

Weekly cleaning overlooked areas – sound like a chore? I know, I know, cleaning isn’t always the most thrilling activity. But trust me, tackling those often-ignored spots in your home can make a HUGE difference in how fresh and inviting your space feels. Think about it: we diligently wipe down counters and vacuum floors, but what about the light switches, the remote controls, or even the inside of your microwave? These are the places where germs and grime love to accumulate, and they can subtly impact your overall sense of cleanliness.
For centuries, cultures around the world have understood the importance of regular cleaning, not just for hygiene, but also for mental well-being. From ancient rituals involving sweeping away negativity to the Victorian obsession with spotless homes, the act of cleaning has always been linked to a sense of order and control. And while we might not be performing elaborate cleansing ceremonies, taking a few extra minutes each week to focus on these weekly cleaning overlooked areas can bring a similar sense of peace and accomplishment.
Why is this DIY trick so essential? Because neglecting these areas can lead to a buildup of bacteria, allergens, and just plain old dirt. This can impact your health, especially if you have allergies or sensitivities. Plus, a cleaner home is simply a more pleasant place to be! So, let’s dive into some simple, effective DIY hacks that will help you conquer those forgotten corners and create a healthier, happier home. I promise, it’s easier than you think!

DIY Deep Clean: Tackling Those Overlooked Weekly Cleaning Spots!
Hey everyone! Let’s be honest, we all have those spots in our homes that we *swear* we’ll get to “next week” during our regular cleaning routine. But next week turns into next month, and before you know it, dust bunnies are throwing parties and grime is staging a hostile takeover. Well, no more! I’m here to guide you through a deep clean of those often-ignored areas, making your home sparkle and feel fresh again. This isn’t about a massive overhaul; it’s about incorporating a few extra tasks into your weekly routine to prevent build-up and maintain a consistently clean space.
Gather Your Supplies
Before we dive in, let’s make sure we have everything we need. Having your supplies ready will make the process much smoother and less daunting.
* Microfiber cloths: These are your best friends for dusting and wiping surfaces. I recommend having a few on hand.
* All-purpose cleaner: Choose your favorite! I prefer a natural, eco-friendly option, but anything that effectively cuts through grease and grime will work.
* Glass cleaner: For streak-free shine on mirrors and windows.
* Vacuum cleaner with attachments: The hose and brush attachments are crucial for reaching tight spaces.
* Small brush (toothbrush or detailing brush): Perfect for scrubbing grout and other hard-to-reach areas.
* Baking soda: A natural and effective cleaner and deodorizer.
* White vinegar: Another cleaning powerhouse! Great for removing hard water stains and disinfecting.
* Dish soap: For washing dishes, obviously, but also useful for cleaning other surfaces.
* Rubber gloves: Protect your hands from harsh chemicals and grime.
* Spray bottles: For diluting cleaners and creating your own solutions.
* Screwdriver (optional): For removing vent covers.
* Ladder or step stool: For reaching high places.
* Cleaning caddy or bucket: To keep all your supplies organized and easily accessible.
Phase 1: Kitchen Deep Clean
The kitchen is often the heart of the home, but it’s also a breeding ground for grime. Let’s tackle those overlooked areas!
1. Clean the Microwave (Inside and Out):
* Inside: Place a microwave-safe bowl filled with 1 cup of water and a few tablespoons of white vinegar inside the microwave. Heat on high for 5 minutes. Let it sit for another 5 minutes (without opening the door) to allow the steam to loosen any stuck-on food. Carefully remove the bowl (it will be hot!) and wipe down the interior with a clean cloth. For stubborn spots, use a sponge with a little baking soda.
* Outside: Wipe down the exterior with a damp cloth and all-purpose cleaner. Don’t forget the handle and buttons!
2. Clean the Dishwasher:
* Empty the dishwasher: Make sure it’s completely empty.
* Clean the filter: Locate the filter (usually at the bottom of the dishwasher) and remove it. Rinse it thoroughly under running water, removing any food particles or debris. Use a small brush to scrub away stubborn grime.
* Run a cleaning cycle: Place a dishwasher-safe cup filled with 1 cup of white vinegar on the top rack. Run the dishwasher on a hot cycle. Alternatively, you can use a dishwasher cleaning tablet.
* Wipe down the door and seals: Use a damp cloth and all-purpose cleaner to wipe down the dishwasher door, paying special attention to the seals.
3. Clean the Oven Hood Filter:
* Remove the filter: Carefully remove the oven hood filter (consult your oven hood manual for specific instructions).
* Soak the filter: Fill a sink or tub with hot, soapy water. Add a few tablespoons of baking soda. Submerge the filter in the water and let it soak for at least 30 minutes.
* Scrub the filter: Use a scrub brush to remove any grease or grime. Rinse thoroughly with hot water.
* Dry the filter: Allow the filter to air dry completely before replacing it.
4. Clean the Small Appliances:
* Coffee Maker: Descale your coffee maker by running a cycle with a mixture of equal parts white vinegar and water. Follow with a cycle of plain water to rinse. Wipe down the exterior with a damp cloth.
* Toaster: Unplug the toaster and remove the crumb tray. Empty the tray and wash it with warm, soapy water. Wipe down the exterior of the toaster with a damp cloth.
* Blender: Fill the blender with warm, soapy water and blend on high for a few seconds. Rinse thoroughly. For stubborn residue, add a tablespoon of baking soda to the water.
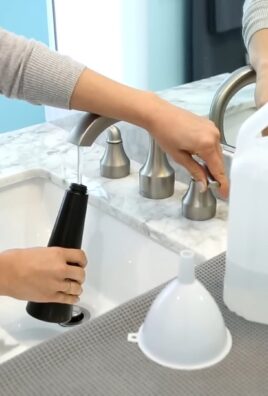
5. Clean the Sink and Faucet:
* Clean the sink basin: Sprinkle baking soda into the sink basin and scrub with a damp sponge. Rinse thoroughly.
* Clean the faucet: Use a damp cloth and all-purpose cleaner to wipe down the faucet. For hard water stains, soak a cloth in white vinegar and wrap it around the faucet for 30 minutes. Rinse thoroughly.
* Clean the drain: Pour a cup of baking soda down the drain, followed by a cup of white vinegar. Let it fizz for 30 minutes, then flush with hot water.
Phase 2: Bathroom Blitz
The bathroom can quickly accumulate soap scum, mildew, and grime. Let’s get it sparkling!
1. Clean the Showerhead:
* Remove the showerhead (optional): If possible, remove the showerhead from the shower arm.
* Soak in vinegar: Fill a plastic bag with white vinegar and secure it around the showerhead with a rubber band or zip tie, ensuring the showerhead is fully submerged. Let it soak for at least 30 minutes, or overnight for heavy build-up. If you can’t remove the showerhead, simply attach the bag directly to the shower arm.
* Rinse and scrub: Remove the bag and rinse the showerhead thoroughly with water. Use a small brush to scrub away any remaining residue.
2. Clean the Grout:
* Apply grout cleaner: Apply a grout cleaner (you can purchase a commercial grout cleaner or make your own by mixing baking soda and water into a paste) to the grout lines.
* Scrub the grout: Use a small brush (an old toothbrush works great) to scrub the grout lines.
* Rinse thoroughly: Rinse the grout with water.
3. Clean the Toilet (Inside and Out):
* Inside: Pour a cup of white vinegar into the toilet bowl and let it sit for at least 30 minutes. Scrub the bowl with a toilet brush and flush. For stubborn stains, use a toilet bowl cleaner.
* Outside: Wipe down the exterior of the toilet with a damp cloth and all-purpose cleaner. Don’t forget the base, the seat, and the handle.
4. Clean the Mirrors and Glass Surfaces:
* Spray with glass cleaner: Spray the mirrors and glass surfaces with glass cleaner.
* Wipe with a microfiber cloth: Wipe the surfaces with a clean, dry microfiber cloth.
5. Clean the Bathroom Fan:
* Turn off the power: Before you begin, turn off the power to the bathroom fan at the circuit breaker.
* Remove the cover: Carefully remove the fan cover.
* Vacuum the fan: Use the brush attachment of your vacuum cleaner to remove dust and debris from the fan blades and the inside of the fan housing.
* Wash the cover: Wash the fan cover with warm, soapy water. Rinse thoroughly and allow it to dry completely before replacing it.
* Reinstall the cover: Reinstall the fan cover and turn the power back on.
Phase 3: Living Areas and Bedrooms
Let’s not forget the areas where we relax and unwind!
1. Dust Light Fixtures and Ceiling Fans:
* Turn off the power: Before you begin, turn off the power to the light fixture or ceiling fan.
* Dust the fixture: Use a duster or a damp cloth to remove dust from the light fixture or ceiling fan blades. For hard-to-reach areas, use a ladder or step stool.
2. Clean Baseboards and Trim:
* Dust the baseboards: Use a duster or a vacuum cleaner with a brush attachment to remove dust from the baseboards and trim.
* Wipe with a damp cloth: Wipe the baseboards and trim with a damp cloth and all-purpose cleaner.
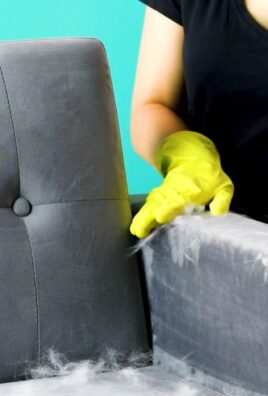
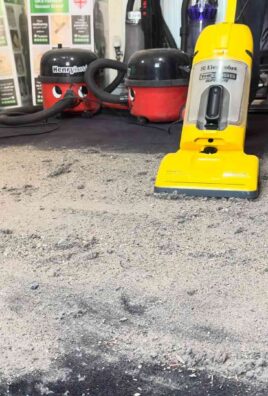
3. Vacuum Under Furniture

Conclusion
So, there you have it! Mastering these often-overlooked areas with our simple, yet effective DIY cleaning tricks can truly transform your home from feeling simply “clean” to feeling genuinely refreshed and revitalized. We’ve shown you how to tackle those hidden grime zones that contribute to dust buildup, lingering odors, and a general sense of unease, even after your regular cleaning routine.
Why is this a must-try? Because it’s about more than just aesthetics. It’s about creating a healthier, more comfortable living environment for you and your family. Think about it: dust mites lurking in your mattress, mold spores thriving in your shower grout, grease accumulating on top of your kitchen cabinets – these are all potential irritants and allergens that can impact your well-being. By incorporating these weekly cleaning overlooked areas into your routine, you’re proactively addressing these issues and promoting a cleaner, healthier home.
But the best part? These DIY solutions are incredibly accessible and affordable. You likely already have most of the ingredients you need in your pantry or cleaning cabinet. We’re talking about simple things like baking soda, vinegar, lemon juice, and dish soap – all powerful cleaning agents that are gentle on your home and your wallet.
Ready to take your cleaning game to the next level?
Here are a few suggestions and variations to get you started:
* **Scent Sensations:** Infuse your cleaning solutions with essential oils for an added aromatherapy boost. Lavender for relaxation, lemon for energy, or eucalyptus for respiratory support – the possibilities are endless! Just be sure to use essential oils safely and dilute them properly.
* **Tool Time:** Invest in a few specialized cleaning tools to make the job even easier. A grout brush, a microfiber duster with an extendable handle, and a steam cleaner can be game-changers for tackling those hard-to-reach areas.
* **Customized Cleaning:** Tailor the cleaning solutions to your specific needs and preferences. If you have sensitive skin, opt for gentler, fragrance-free products. If you’re concerned about the environment, choose eco-friendly alternatives.
* **Deep Cleaning Schedule:** Create a rotating schedule to ensure that you’re consistently addressing these overlooked areas. Focus on one or two areas each week, and you’ll be amazed at how much cleaner your home feels overall.
We’re confident that once you experience the difference these DIY cleaning tricks can make, you’ll never go back to your old routine. So, grab your supplies, roll up your sleeves, and get ready to transform your home into a sparkling sanctuary.
Don’t just take our word for it – try it out for yourself! We encourage you to experiment with these techniques, adapt them to your own needs, and share your experiences with us. What are your favorite DIY cleaning hacks for overlooked areas? What challenges did you encounter, and how did you overcome them? We’d love to hear your stories and learn from your insights. Share your tips, tricks, and before-and-after photos on our social media channels using #DIYCleanHome. Let’s create a community of clean-living enthusiasts and inspire each other to create healthier, happier homes!
Frequently Asked Questions (FAQ)
Q: How often should I be cleaning these “overlooked areas”?
A: Ideally, incorporating these tasks into your weekly cleaning routine is best. However, depending on your lifestyle and the level of traffic in your home, you might adjust the frequency. For example, if you have pets, you might need to clean your baseboards and upholstery more often to remove pet hair and dander. Similarly, if you live in a humid climate, you might need to clean your shower grout more frequently to prevent mold growth. The key is to be proactive and address these areas before they become major problems. A quick wipe-down of the shower walls after each use can significantly reduce the need for deep cleaning later on.
Q: What are some common signs that I’m neglecting these areas?
A: There are several telltale signs that you’re neglecting these overlooked areas. Dust bunnies accumulating under furniture, a musty odor in your bathroom, visible mold or mildew in your shower, greasy residue on top of your kitchen cabinets, and stained or discolored grout are all red flags. You might also notice that your allergies are acting up more frequently, or that your home simply doesn’t feel as fresh and clean as it should. Pay attention to these subtle cues and take action before the problem escalates.
Q: Are these DIY cleaning solutions safe for all surfaces?
A: While most of the DIY cleaning solutions we’ve recommended are generally safe for a variety of surfaces, it’s always a good idea to test them in an inconspicuous area first, especially on delicate or sensitive materials like wood, leather, or natural stone. Avoid using abrasive cleaners or scrub brushes on these surfaces, as they can cause scratches or damage. When in doubt, consult the manufacturer’s instructions or a professional cleaning service. Also, never mix bleach with other cleaning products, as this can create toxic fumes.
Q: I have allergies. Are these DIY cleaning methods allergy-friendly?
A: Yes, many of these DIY cleaning methods are naturally allergy-friendly. Using ingredients like vinegar, baking soda, and lemon juice avoids harsh chemicals and fragrances that can trigger allergic reactions. However, if you have severe allergies, it’s always best to wear gloves and a mask while cleaning to minimize exposure to dust and allergens. You can also opt for fragrance-free versions of these ingredients or add a few drops of essential oils known for their allergy-reducing properties, such as lavender or eucalyptus.
Q: Can I use these DIY cleaning solutions on my electronics?
A: Cleaning electronics requires a different approach than cleaning other surfaces. Never spray cleaning solutions directly onto your electronics. Instead, dampen a microfiber cloth with a small amount of distilled water or a specialized electronics cleaner and gently wipe the surface. Pay particular attention to keyboards, screens, and remote controls, which can harbor a lot of germs and bacteria. Avoid using harsh chemicals or abrasive cleaners, as they can damage the delicate components of your electronics.
Q: What’s the best way to clean my mattress?
A: Cleaning your mattress is essential for removing dust mites, allergens, and odors. Start by vacuuming the entire surface of your mattress with an upholstery attachment. Then, sprinkle baking soda over the mattress and let it sit for several hours to absorb moisture and odors. Vacuum the baking soda thoroughly and spot-clean any stains with a mild detergent and water. Allow the mattress to air dry completely before putting your bedding back on. Consider using a mattress protector to prevent future stains and allergens.
Q: How can I prevent these areas from getting dirty in the first place?
A: Prevention is always better than cure! There are several things you can do to prevent these overlooked areas from getting dirty in the first place. Use doormats to trap dirt and debris before they enter your home. Regularly dust and vacuum to remove dust and allergens. Ventilate your bathroom after showering to prevent mold growth. Wipe up spills immediately to prevent stains. And most importantly, establish a consistent cleaning routine to stay on top of things. By taking these simple steps, you can significantly reduce the amount of time and effort required to keep your home clean and healthy.
Leave a Comment