

Spring cleaning checklist: the ultimate weapon against winter’s lingering mess! Are you tired of that dusty film clinging to every surface? Does the thought of opening your closet fill you with dread? Don’t worry, I’ve been there! For centuries, cultures around the globe have embraced the ritual of spring cleaning, a symbolic act of renewal and a practical way to refresh our living spaces. From ancient Persian Nowruz traditions to the Christian practice of “house cleaning” before Easter, the urge to declutter and revitalize after the long winter months is deeply ingrained in us.
But let’s be honest, tackling a whole house can feel overwhelming. That’s why I’ve created this comprehensive DIY spring cleaning checklist, packed with easy-to-follow tips and tricks to make the process manageable and even enjoyable! We’ll break down each room, identify key areas to focus on, and provide you with simple, effective solutions to banish dirt, grime, and clutter. Get ready to transform your home into a sparkling sanctuary and welcome the vibrant energy of spring!

DIY Spring Cleaning Checklist: Conquer the Clutter and Refresh Your Home!
Okay, friends, spring is officially here (or almost here!), and that means it’s time to tackle that dreaded but oh-so-satisfying task: spring cleaning! I know, I know, the thought alone can be overwhelming. But trust me, breaking it down into manageable steps and having a solid checklist makes all the difference. I’m going to walk you through my tried-and-true method for a deep clean that will leave your home feeling fresh, organized, and ready for the warmer months. Let’s get started!
Phase 1: Preparation is Key!
Before you even think about grabbing a duster, let’s get organized. This phase is all about setting yourself up for success.
* Gather Your Supplies: Nothing is worse than getting halfway through cleaning the bathroom and realizing you’re out of glass cleaner. Here’s a list of essentials:
* Microfiber cloths (lots of them!)
* All-purpose cleaner
* Glass cleaner
* Bathroom cleaner
* Toilet bowl cleaner
* Dusting spray or cleaner
* Wood cleaner (if you have wood furniture)
* Floor cleaner (appropriate for your floor type)
* Vacuum cleaner with attachments
* Mop and bucket
* Sponges
* Rubber gloves
* Trash bags
* Empty boxes or bins for sorting
* Ladder or step stool
* Old toothbrush (for those hard-to-reach spots!)
* Baking soda
* White vinegar
* Lemon juice (optional, but great for natural cleaning!)
* Create a Cleaning Schedule: Don’t try to do everything at once! Break down your cleaning tasks by room or by type of task (e.g., dusting, vacuuming, decluttering). Allocate specific days or times to each task. This will make the whole process feel less daunting. I like to use a simple spreadsheet or even just a handwritten list.
* Declutter First: Before you start cleaning, take some time to declutter each room. Get rid of anything you don’t need, use, or love. This will make the cleaning process much easier and more effective. Think about donating, selling, or simply throwing away unwanted items.
* Open Windows: Fresh air is your friend! Open windows to ventilate your home while you clean. This will help to remove dust and odors.
Phase 2: Room-by-Room Cleaning Guide
Now for the fun part (okay, maybe not *fun*, but definitely rewarding!). I’m going to walk you through each room, highlighting the key areas to focus on.
Kitchen
The kitchen is often the heart of the home, but it can also be a magnet for dirt and grime.
1. Clear the Counters: Remove everything from your countertops. Wipe them down with an all-purpose cleaner.
2. Clean Appliances:
* Refrigerator: Empty the refrigerator completely. Throw away any expired food. Wipe down all shelves and drawers with a solution of warm water and baking soda. Don’t forget to clean the door seals!
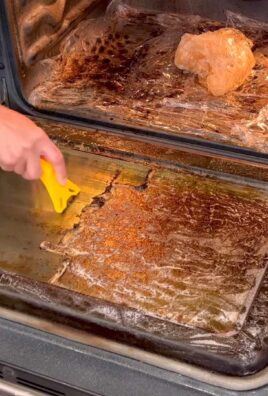
* Oven: Clean your oven according to the manufacturer’s instructions. If you have a self-cleaning oven, run the self-cleaning cycle. Otherwise, use an oven cleaner or a paste of baking soda and water.
* Microwave: Heat a cup of water with a few tablespoons of vinegar in the microwave for a few minutes. This will loosen any stuck-on food. Then, wipe down the interior with a damp cloth.
* Dishwasher: Run an empty dishwasher cycle with a cup of white vinegar in the top rack. This will help to remove any buildup and odors.
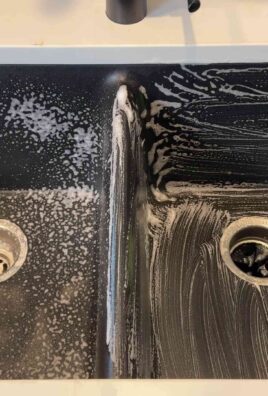
3. Clean the Sink: Scrub the sink with a cleaner and rinse thoroughly. You can also use a paste of baking soda and water to remove stains.
4. Wipe Down Cabinets: Wipe down all cabinet doors and drawers with an all-purpose cleaner. Pay special attention to areas around handles and knobs.
5. Clean the Backsplash: Clean the backsplash with a cleaner appropriate for the material (e.g., tile cleaner for tile backsplash).
6. Sweep and Mop the Floor: Sweep or vacuum the floor to remove any loose dirt and debris. Then, mop the floor with a floor cleaner appropriate for your floor type.
7. Clean the Garbage Disposal: Run cold water and drop in some lemon or lime wedges to freshen up the garbage disposal. You can also use a garbage disposal cleaner.
8. Clean Light Fixtures: Dust or wipe down light fixtures.
Bathrooms
Bathrooms can quickly become breeding grounds for bacteria and mildew.
1. Clean the Toilet: Clean the toilet bowl with a toilet bowl cleaner. Wipe down the exterior of the toilet with an all-purpose cleaner.
2. Clean the Shower/Tub: Clean the shower or tub with a bathroom cleaner. Pay special attention to grout and caulk, which can be prone to mildew. You can use a grout brush or an old toothbrush to scrub these areas.
3. Clean the Sink and Countertop: Clean the sink and countertop with an all-purpose cleaner. Remove any soap scum or toothpaste splatters.
4. Clean the Mirror: Clean the mirror with a glass cleaner.
5. Wipe Down Cabinets and Drawers: Wipe down all cabinet doors and drawers with an all-purpose cleaner.
6. Sweep and Mop the Floor: Sweep or vacuum the floor to remove any loose dirt and debris. Then, mop the floor with a floor cleaner appropriate for your floor type.
7. Clean Light Fixtures: Dust or wipe down light fixtures.
8. Replace Shower Curtain or Liner: If your shower curtain or liner is looking dingy, replace it.
Living Room/Bedrooms
These rooms are all about creating a comfortable and relaxing space.
1. Dust Everything: Dust all surfaces, including furniture, shelves, picture frames, and lamps. Use a microfiber cloth or a dusting spray.
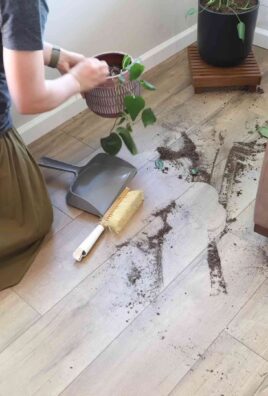
2. Vacuum or Sweep Floors: Vacuum carpets and rugs. Sweep or mop hard floors.
3. Wash Curtains or Blinds: Wash curtains according to the manufacturer’s instructions. Wipe down blinds with a damp cloth.
4. Clean Windows: Clean windows inside and out with a glass cleaner.
5. Clean Upholstery: Vacuum upholstery to remove dust and debris. Spot clean any stains with an upholstery cleaner.
6. Wash Bedding: Wash all bedding, including sheets, pillowcases, blankets, and comforters.
7. Organize Closets: Declutter closets and organize clothing and accessories.
8. Clean Light Fixtures: Dust or wipe down light fixtures.
Phase 3: Don’t Forget the Details!
These often-overlooked areas can make a big difference in the overall cleanliness of your home.
* Baseboards: Wipe down baseboards with a damp cloth or a cleaner.
* Door Frames and Doors: Wipe down door frames and doors with an all-purpose cleaner.
* Light Switches and Outlets: Wipe down light switches and outlets with a damp cloth. Be careful not to get them too wet!
* Doorknobs and Handles: Wipe down doorknobs and handles with an all-purpose cleaner.
* Window Sills: Wipe down window sills with a damp cloth.
* Air Vents: Dust or vacuum air vents.
* Ceiling Fans: Dust ceiling fans with a duster or a damp cloth.
* Electronics: Dust or wipe down electronics, such as TVs, computers, and stereos.
Phase 4: Outdoor Spaces (If Applicable)
If you have a porch, patio, or deck, don’t forget to give it some attention too!
1. Sweep or Power Wash: Sweep or power wash the porch, patio, or deck to remove dirt and debris.
2. Clean Outdoor Furniture: Clean outdoor furniture with a cleaner appropriate for the material.
3. Wash Windows: Clean exterior windows.
4. Tidy Up the Yard: Rake leaves, trim bushes, and pull weeds.
Bonus Tip: Make it a Family Affair!
Get the whole family involved in spring cleaning. Assign tasks to each family member based on their age and abilities. This will make the process go faster and more smoothly. Plus, it’s a great way to teach kids about responsibility and teamwork.
And there you have it! My comprehensive guide to spring cleaning. Remember, the key is to break it down into manageable steps and to stay organized. Don’t try to do everything at once. Take your time, and enjoy the process of creating a clean and fresh home. You’ll be so glad you did!

Conclusion
So, there you have it! Transforming your spring cleaning checklist from a daunting chore list into a manageable, even enjoyable, process is entirely within your reach. This DIY approach isn’t just about ticking off boxes; it’s about reclaiming your space, refreshing your mind, and creating a home environment that truly supports your well-being.
Why is this DIY spring cleaning checklist a must-try? Because it empowers you to tailor the cleaning process to your specific needs and preferences. No more generic lists that leave you feeling overwhelmed and unmotivated. This method allows you to prioritize tasks based on your lifestyle, time constraints, and the areas of your home that need the most attention. It’s about working smarter, not harder.
Furthermore, this DIY approach fosters a deeper connection with your home. As you thoughtfully assess each room and identify areas for improvement, you’ll gain a renewed appreciation for your living space. You’ll be more mindful of the items you own and more intentional about creating a clutter-free and organized environment. This, in turn, can lead to a greater sense of peace and contentment.
Variations and Suggestions:
* Theme Your Cleaning: Consider dedicating each day to a specific theme, such as “Kitchen Day,” “Bedroom Blitz,” or “Decluttering Day.” This can help you stay focused and avoid feeling scattered.
* Involve the Family: Make spring cleaning a family affair! Assign age-appropriate tasks to each member of the household and turn it into a fun and collaborative activity.
* Incorporate Music and Rewards: Put on your favorite playlist to keep your energy levels up and reward yourself with a small treat after completing each task or section of your checklist.
* Go Green: Opt for eco-friendly cleaning products and practices whenever possible. This is a great opportunity to reduce your environmental impact and create a healthier home for your family.
* Don’t Forget the Details: While you’re focusing on the big picture, don’t overlook the small details that can make a big difference. Clean light fixtures, dust baseboards, and wipe down doorknobs to create a truly sparkling home.
* Digital Detox: Consider adding a “digital detox” element to your spring cleaning. Unplug from your devices for a few hours each day and focus on the task at hand. You’ll be surprised at how much more productive you can be.
We wholeheartedly encourage you to give this DIY spring cleaning checklist a try. Take the time to personalize it to your unique needs and preferences, and embrace the process of creating a cleaner, more organized, and more inviting home.
But the most important thing is to share your experience! We’d love to hear how this DIY approach worked for you. What challenges did you encounter? What tips and tricks did you discover along the way? Share your thoughts and insights in the comments below. Your feedback will not only help us improve this guide but also inspire others to embark on their own spring cleaning journeys. Let’s create a community of empowered homeowners who are taking control of their living spaces and creating homes that truly reflect their values and aspirations. So, grab your cleaning supplies, put on some music, and get ready to transform your home with your personalized spring cleaning checklist!
FAQ
What if I don’t have a lot of time for spring cleaning?
That’s perfectly understandable! One of the biggest advantages of creating your own DIY spring cleaning checklist is that you can tailor it to fit your available time. Instead of trying to tackle everything at once, break down the tasks into smaller, more manageable chunks. Focus on the areas that need the most attention and prioritize tasks based on your schedule. Even dedicating just 15-30 minutes each day to spring cleaning can make a significant difference over time. Remember, it’s about progress, not perfection. You can also consider spreading your spring cleaning over several weekends or even a few weeks to avoid feeling overwhelmed.
How do I decide what to include on my spring cleaning checklist?
Start by taking a walk through your home and making a note of all the areas that need attention. Consider both the obvious tasks, such as dusting and vacuuming, as well as the less frequent ones, such as cleaning out closets and organizing drawers. Think about the specific challenges you face in each room and tailor your checklist accordingly. For example, if you struggle with clutter in your living room, you might include tasks such as decluttering bookshelves, organizing media consoles, and donating unwanted items. Don’t be afraid to get specific and break down larger tasks into smaller, more manageable steps.
What if I get overwhelmed by the amount of cleaning that needs to be done?
Feeling overwhelmed is a common experience when it comes to spring cleaning. The key is to break down the process into smaller, more manageable steps. Start by focusing on one room or area at a time. Create a detailed checklist for that specific space and tackle each task one by one. Don’t try to do everything at once. Remember to take breaks and reward yourself for your progress. It can also be helpful to enlist the help of family members or friends to share the workload. And if you’re feeling truly overwhelmed, consider hiring a professional cleaning service to help you get started.
What are some eco-friendly cleaning product alternatives I can use?
There are many eco-friendly cleaning product alternatives that are just as effective as traditional cleaners. For example, you can use vinegar and water to clean windows and mirrors, baking soda to scrub sinks and tubs, and lemon juice to disinfect surfaces. You can also find a wide range of eco-friendly cleaning products at most grocery stores and online retailers. Look for products that are made with natural ingredients, biodegradable, and free of harsh chemicals. Making your own cleaning solutions is also a great way to reduce your environmental impact and save money.
How often should I do a deep spring cleaning?
While the term “spring cleaning” suggests an annual event, the frequency of deep cleaning depends on your lifestyle and personal preferences. For most people, a thorough spring cleaning once or twice a year is sufficient. However, if you have a busy household with children or pets, you may want to consider deep cleaning more frequently. Pay attention to the areas of your home that tend to get the dirtiest and most cluttered, and adjust your cleaning schedule accordingly. Regular maintenance cleaning throughout the year can also help to reduce the need for frequent deep cleaning.
What are some tips for decluttering my home during spring cleaning?
Decluttering is an essential part of spring cleaning. Start by going through each room and identifying items that you no longer need, use, or love. Be honest with yourself and don’t hold onto things out of guilt or obligation. Create three piles: one for items to keep, one for items to donate or sell, and one for items to discard. When deciding what to keep, ask yourself if you’ve used the item in the past year, if it brings you joy, and if it serves a practical purpose. If the answer is no to any of these questions, it’s probably time to let it go. Once you’ve decluttered, organize the remaining items in a way that is both functional and aesthetically pleasing.
How can I make spring cleaning more enjoyable?
Spring cleaning doesn’t have to be a chore! There are many ways to make the process more enjoyable. Start by putting on your favorite music or podcast to keep you entertained. Enlist the help of family members or friends and turn it into a social activity. Reward yourself with small treats or breaks throughout the day. Focus on the positive aspects of spring cleaning, such as creating a cleaner, more organized, and more inviting home. And remember, it’s okay to take your time and enjoy the process.
What if I don’t know where to start with my spring cleaning checklist?
If you’re feeling overwhelmed and don’t know where to start, begin with the easiest and most manageable tasks. This will help you build momentum and feel more motivated to tackle the more challenging projects. Start with a quick decluttering session in one room, or simply wipe down surfaces and vacuum the floors. Once you’ve completed a few small tasks, you’ll feel more confident and ready to tackle the rest of your spring cleaning checklist. Remember, even small steps can make a big difference.
Leave a Comment