

Quick home cleaning hacks are a lifesaver, aren’t they? I mean, who has hours to spend scrubbing and polishing when life is calling? We’re all juggling work, family, hobbies, and trying to squeeze in a little “me time.” The last thing we want is to spend our precious free moments battling dust bunnies and stubborn stains.
Cleaning, in its essence, is an age-old practice. From ancient civilizations using natural remedies to keep their dwellings tidy to the Victorian era’s obsession with spotless homes, the desire for a clean living space is deeply ingrained in our history. But let’s be honest, the methods of our ancestors aren’t always practical (or appealing!) in today’s fast-paced world.
That’s where these quick home cleaning hacks come in! This article is packed with DIY solutions that will transform your cleaning routine from a dreaded chore into a manageable task. We’ll explore clever tips and tricks that use everyday items you probably already have in your pantry. Imagine spending less time cleaning and more time doing the things you love. Sounds good, right? Let’s dive in and discover how to reclaim your weekends and enjoy a sparkling clean home without breaking a sweat!

Quick Home Cleaning Hacks: Making Your Life Easier!
Okay, let’s be honest, cleaning isn’t exactly anyone’s favorite pastime. But a clean home is a happy home, right? So, I’m going to share some of my absolute favorite quick cleaning hacks that will help you keep your place sparkling without spending your entire weekend scrubbing. These are tried and tested, and I promise they’ll save you time and effort!
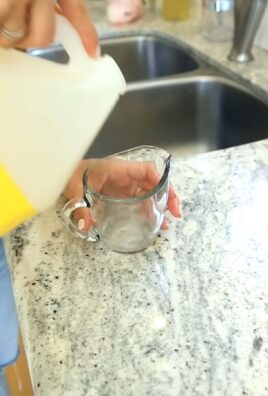
Cleaning the Microwave Like a Pro
Microwaves are notorious for becoming food splatter zones. But fear not! This hack is super easy and uses ingredients you probably already have.
What you’ll need:
* 1 cup of water
* 1 tablespoon of white vinegar or lemon juice
* Microwave-safe bowl
* Clean cloth or sponge
Step-by-step instructions:
1. Mix the solution: In your microwave-safe bowl, combine the water and vinegar (or lemon juice). The vinegar helps loosen grime, and the lemon juice adds a fresh scent.
2. Microwave it: Place the bowl in the microwave and heat it on high for 5-7 minutes. You want the solution to boil and create steam.
3. Let it sit: Don’t open the microwave immediately! Let the steam work its magic for another 3-5 minutes. This will loosen all the stuck-on food.
4. Wipe it clean: Carefully remove the bowl (it will be hot!). Use your clean cloth or sponge to wipe down the inside of the microwave. The grime should come off easily. For stubborn spots, you might need a little extra elbow grease.
5. Dry it off: Use a dry cloth to wipe down the interior and door of the microwave. Voila! A sparkling clean microwave.
De-Grime Your Oven with Baking Soda
Ovens can get incredibly dirty, and those harsh chemical cleaners can be a pain to use. This baking soda method is natural, effective, and much gentler on your lungs!
What you’ll need:
* Baking soda
* Water
* Spray bottle
* Spatula or scraper
* Clean cloths or sponges
* Rubber gloves (optional, but recommended)
Step-by-step instructions:
1. Empty the oven: Remove the oven racks and any loose debris.
2. Make a baking soda paste: In a bowl, mix baking soda with enough water to form a thick paste. You want it to be spreadable but not too runny.
3. Coat the oven: Using your hands (with gloves on!), spread the baking soda paste all over the inside of the oven, avoiding the heating elements. Be generous with the coating, especially on areas with baked-on grease.
4. Let it sit overnight: This is the key! Let the baking soda paste sit for at least 12 hours, or even overnight. This gives it time to break down the grease and grime.
5. Scrape and wipe: The next day, use a spatula or scraper to remove as much of the dried baking soda paste as possible. It should come off fairly easily.
6. Spray with vinegar: Fill a spray bottle with white vinegar and spray it all over the remaining baking soda residue. The vinegar will react with the baking soda, creating a fizzing action that helps loosen any remaining grime.
7. Wipe clean: Use clean cloths or sponges to wipe down the inside of the oven. You may need to rinse and repeat a few times to remove all the baking soda and vinegar residue.
8. Clean the racks: While the oven is drying, clean the oven racks. You can soak them in hot, soapy water or use a baking soda paste to scrub them clean.
9. Dry and replace: Once everything is clean and dry, replace the oven racks. Your oven should now be sparkling clean!
Speed Cleaning Your Shower
Showers can quickly become breeding grounds for soap scum and mildew. This quick cleaning method will help you keep your shower fresh and clean with minimal effort.
What you’ll need:
* Spray bottle
* White vinegar
* Dish soap
* Squeegee
* Scrub brush or sponge
Step-by-step instructions:
1. Mix the cleaning solution: In your spray bottle, combine equal parts white vinegar and dish soap. The vinegar helps dissolve soap scum, and the dish soap cuts through grease and grime.
2. Spray the shower: Spray the cleaning solution all over the shower walls, floor, and door. Be generous, especially on areas with soap scum or mildew.
3. Let it sit: Let the solution sit for 10-15 minutes to allow it to work its magic.
4. Scrub (if needed): If you have stubborn soap scum or mildew, use a scrub brush or sponge to scrub the affected areas.
5. Rinse thoroughly: Rinse the shower with hot water to remove all the cleaning solution and loosened grime.
6. Squeegee the surfaces: Use a squeegee to remove excess water from the shower walls and door. This will help prevent water spots and mildew growth.
7. Ventilate: Leave the shower door or curtain open to allow the shower to air dry completely.
Bonus Tip: Keep a squeegee in your shower and use it after each shower to prevent water spots and mildew buildup. This will significantly reduce the amount of time you need to spend cleaning your shower in the long run.
Dusting Like a Pro: Microfiber Magic
Dusting can feel like a never-ending chore. But with the right tools and techniques, you can make it much faster and more effective.
What you’ll need:
* Microfiber cloths
* Extendable duster (for hard-to-reach areas)
* Furniture polish (optional)
Step-by-step instructions:
1. Start high: Always start dusting from the highest points in the room, such as ceiling fans, light fixtures, and shelves. This way, any dust that falls will land on surfaces you haven’t dusted yet.
2. Use microfiber cloths: Microfiber cloths are excellent for dusting because they trap dust and dirt instead of just spreading it around.
3. Dampen the cloth (optional): For stubborn dust or grime, you can slightly dampen the microfiber cloth with water. Just make sure it’s not too wet, as this can damage some surfaces.
4. Dust in sections: Work your way around the room, dusting each surface thoroughly. Pay attention to corners, crevices, and hard-to-reach areas.
5. Use an extendable duster: For ceiling fans, light fixtures, and other high areas, use an extendable duster to reach them safely and easily.
6. Dust furniture: Dust all furniture surfaces, including tables, chairs, and shelves.
7. Polish furniture (optional): If desired, use furniture polish to protect and shine your wood furniture. Follow the instructions on the polish label.
8. Vacuum or sweep: After you’ve finished dusting, vacuum or sweep the floors to remove any dust that has fallen.
Bonus Tip: Dust regularly to prevent dust buildup. A quick dusting once a week can make a big difference in the overall cleanliness of your home.
Cleaning Your Blender in Seconds
Blenders are amazing for smoothies and soups, but cleaning them can be a hassle. This hack makes it incredibly easy!
What you’ll need:
* Dish soap
* Water
Step-by-step instructions:
1. Rinse the blender: After using your blender, rinse out any remaining food particles with water.
2. Add soap and water: Fill the blender halfway with warm water and add a squirt of dish soap.
3. Blend it: Put the lid on the blender and blend the soapy water on high speed for 20-30 seconds.
4. Rinse thoroughly: Pour out the soapy water and rinse the blender thoroughly with clean water.
5. Dry: Let the blender air dry or dry it with a clean cloth.
That’s it! Your blender is now clean and ready for its next use.
Freshening Up Your Garbage Disposal
Garbage disposals can get stinky over time. Here’s a quick and easy way to freshen them up.
What you’ll need:
* Ice cubes
* Lemon or lime wedges
* Salt
Step-by-step instructions:
1. Fill with ice: Fill the garbage disposal with ice cubes.
2. Add citrus and salt: Add a few lemon or lime wedges and a tablespoon of salt.
3. Run the disposal: Turn on the cold water and run the garbage disposal until the ice is gone. The ice helps scrub the disposal blades, the citrus freshens the scent, and the

Conclusion
So, there you have it! These quick home cleaning hacks aren’t just about saving time; they’re about reclaiming your weekends and enjoying a cleaner, healthier living space without breaking the bank or resorting to harsh chemicals. We’ve explored simple solutions using everyday items you likely already have in your pantry and bathroom. From effortlessly removing stubborn stains to banishing unpleasant odors, these DIY tricks are designed to make your cleaning routine more efficient and, dare we say, even a little bit enjoyable.
The beauty of these hacks lies in their adaptability. Feel free to experiment with different essential oils in your DIY cleaning solutions to create a scent that invigorates you. For instance, try lemon and tea tree oil for a powerful disinfectant with a refreshing aroma, or lavender and chamomile for a calming and relaxing scent. If you find that vinegar is too strong for certain surfaces, dilute it further with water or substitute it with lemon juice. Remember to always test any cleaning solution on an inconspicuous area first to ensure it doesn’t damage the surface.
Consider variations tailored to specific needs. For pet owners, a baking soda and vinegar solution can be particularly effective at neutralizing pet odors. For those with sensitive skin, opt for gentler ingredients like castile soap and water. The key is to find what works best for you and your home.
These quick home cleaning hacks are more than just a trend; they’re a sustainable and cost-effective way to maintain a clean and healthy environment. They empower you to take control of your cleaning routine and create a space that you truly love.
We wholeheartedly encourage you to try these DIY tricks and see the difference they can make in your home. Don’t be afraid to get creative and adapt them to your specific needs and preferences. And most importantly, we want to hear about your experiences! Share your successes, your challenges, and any variations you’ve discovered in the comments below. Let’s build a community of savvy cleaners who are passionate about creating sparkling clean homes without the fuss. Your insights could help others discover even more effective and eco-friendly cleaning solutions. So, grab your supplies, roll up your sleeves, and get ready to transform your cleaning routine with these amazing quick home cleaning hacks!
Frequently Asked Questions (FAQs)
Q: Are these DIY cleaning solutions safe for all surfaces?
A: While most of these solutions are generally safe, it’s always best to test them on an inconspicuous area first, especially on delicate surfaces like marble, granite, or wood. Vinegar, for example, can be too acidic for some natural stone surfaces. When in doubt, dilute the solution further or opt for a gentler alternative like castile soap and water. Always read the labels of any commercial cleaning products you might be combining with DIY ingredients to ensure compatibility and avoid potentially harmful reactions.
Q: How often should I use these DIY cleaning solutions?
A: The frequency of use depends on your cleaning habits and the specific area you’re cleaning. For high-traffic areas like kitchens and bathrooms, you may want to use these solutions more frequently, perhaps once or twice a week. For less frequently used areas, such as guest rooms or storage spaces, a monthly cleaning may suffice. Pay attention to the build-up of dirt and grime and adjust your cleaning schedule accordingly. Regular, light cleaning is often more effective than infrequent, heavy-duty cleaning.
Q: Can I store these DIY cleaning solutions for later use?
A: It’s generally best to use DIY cleaning solutions fresh, as some ingredients may lose their effectiveness over time. However, if you do need to store them, use airtight containers and label them clearly with the ingredients and date. Store them in a cool, dark place away from direct sunlight and heat. Solutions containing essential oils may have a longer shelf life due to the oils’ natural preservative properties. Discard any solutions that show signs of spoilage, such as discoloration, separation, or an unpleasant odor.
Q: Are these DIY cleaning solutions safe for pets and children?
A: While these solutions are generally safer than harsh chemical cleaners, it’s still important to exercise caution when using them around pets and children. Keep cleaning solutions out of reach of children and pets, and ensure that surfaces are thoroughly rinsed after cleaning to remove any residue. Avoid using essential oils that are known to be toxic to pets, such as tea tree oil. If you’re concerned about potential sensitivities, opt for gentler ingredients like castile soap and water. Always supervise children when they are helping with cleaning and teach them about the importance of safety.
Q: What are some alternatives to vinegar for cleaning?
A: If you’re not a fan of the smell of vinegar or are concerned about its acidity, there are several alternatives you can use. Lemon juice is a great natural cleaner and disinfectant with a pleasant citrus scent. Baking soda is an excellent abrasive cleaner and deodorizer. Hydrogen peroxide is a powerful disinfectant and stain remover. Castile soap is a gentle and versatile cleaner that can be used on a variety of surfaces. Experiment with different alternatives to find what works best for you and your home.
Q: How can I make my own all-purpose cleaner?
A: A simple and effective all-purpose cleaner can be made by combining equal parts water and white vinegar in a spray bottle. You can add a few drops of your favorite essential oil for fragrance. For a stronger cleaner, add a tablespoon of baking soda. Shake well before each use. This solution can be used to clean countertops, sinks, appliances, and other surfaces. Remember to test on an inconspicuous area first.
Q: What’s the best way to clean a microwave using DIY methods?
A: A quick and easy way to clean a microwave is to heat a cup of water with a few slices of lemon or a tablespoon of vinegar for a few minutes until the water boils and the microwave is steamy. Let the steam sit for a few minutes to loosen any splatters and grime. Then, carefully remove the cup and wipe down the interior of the microwave with a clean cloth. The steam will have softened the mess, making it easy to remove.
Q: How can I naturally deodorize my home?
A: There are several ways to naturally deodorize your home. Place bowls of baking soda in areas with strong odors, such as the refrigerator or near pet areas. Simmer a pot of water with cinnamon sticks, cloves, and orange peels on the stove for a warm and inviting scent. Use essential oil diffusers to disperse pleasant aromas throughout your home. Open windows and doors to allow fresh air to circulate. Regularly clean and vacuum to remove sources of odors.


Leave a Comment