

Pee Stain Removal Products: Let’s face it, accidents happen! Whether you’re dealing with a mischievous pet, a toddler in training, or even just an unfortunate spill, pee stains are a common household woe. But before you resign yourself to living with lingering odors and unsightly marks, I’m here to tell you that you *can* conquer those stains with the right approach and the best pee stain removal products.
For centuries, people have been devising clever ways to combat the unpleasant effects of urine. From ancient remedies involving vinegar and herbs to modern enzyme-based cleaners, the quest for effective stain removal is a tale as old as time. But with so many products on the market, how do you choose the right one? And more importantly, how do you use it effectively?
That’s where this DIY guide comes in! I’m going to share my tried-and-true tips and tricks for tackling pee stains on various surfaces, from carpets and upholstery to mattresses and clothing. You’ll learn about the different types of pee stain removal products available, how they work, and which ones are best suited for specific situations. Plus, I’ll walk you through step-by-step instructions for achieving stain-free, odor-free results. Say goodbye to embarrassing stains and hello to a fresh, clean home!
“`html
DIY Pee Stain and Odor Removal: A Comprehensive Guide
Hey everyone! Let’s face it, accidents happen, especially if you have kids or furry friends. Pee stains and the lingering odor can be a real pain, but don’t despair! I’m going to walk you through some tried-and-true DIY methods to tackle those pesky stains and smells, using ingredients you probably already have at home.
Understanding the Enemy: Why Pee Stains and Odors Persist
Before we dive into the solutions, let’s understand why pee stains and odors are so stubborn. Urine contains uric acid, which crystallizes and binds to fibers. This is what causes the lingering smell, even after you’ve cleaned the surface. The key is to break down these crystals and neutralize the odor.
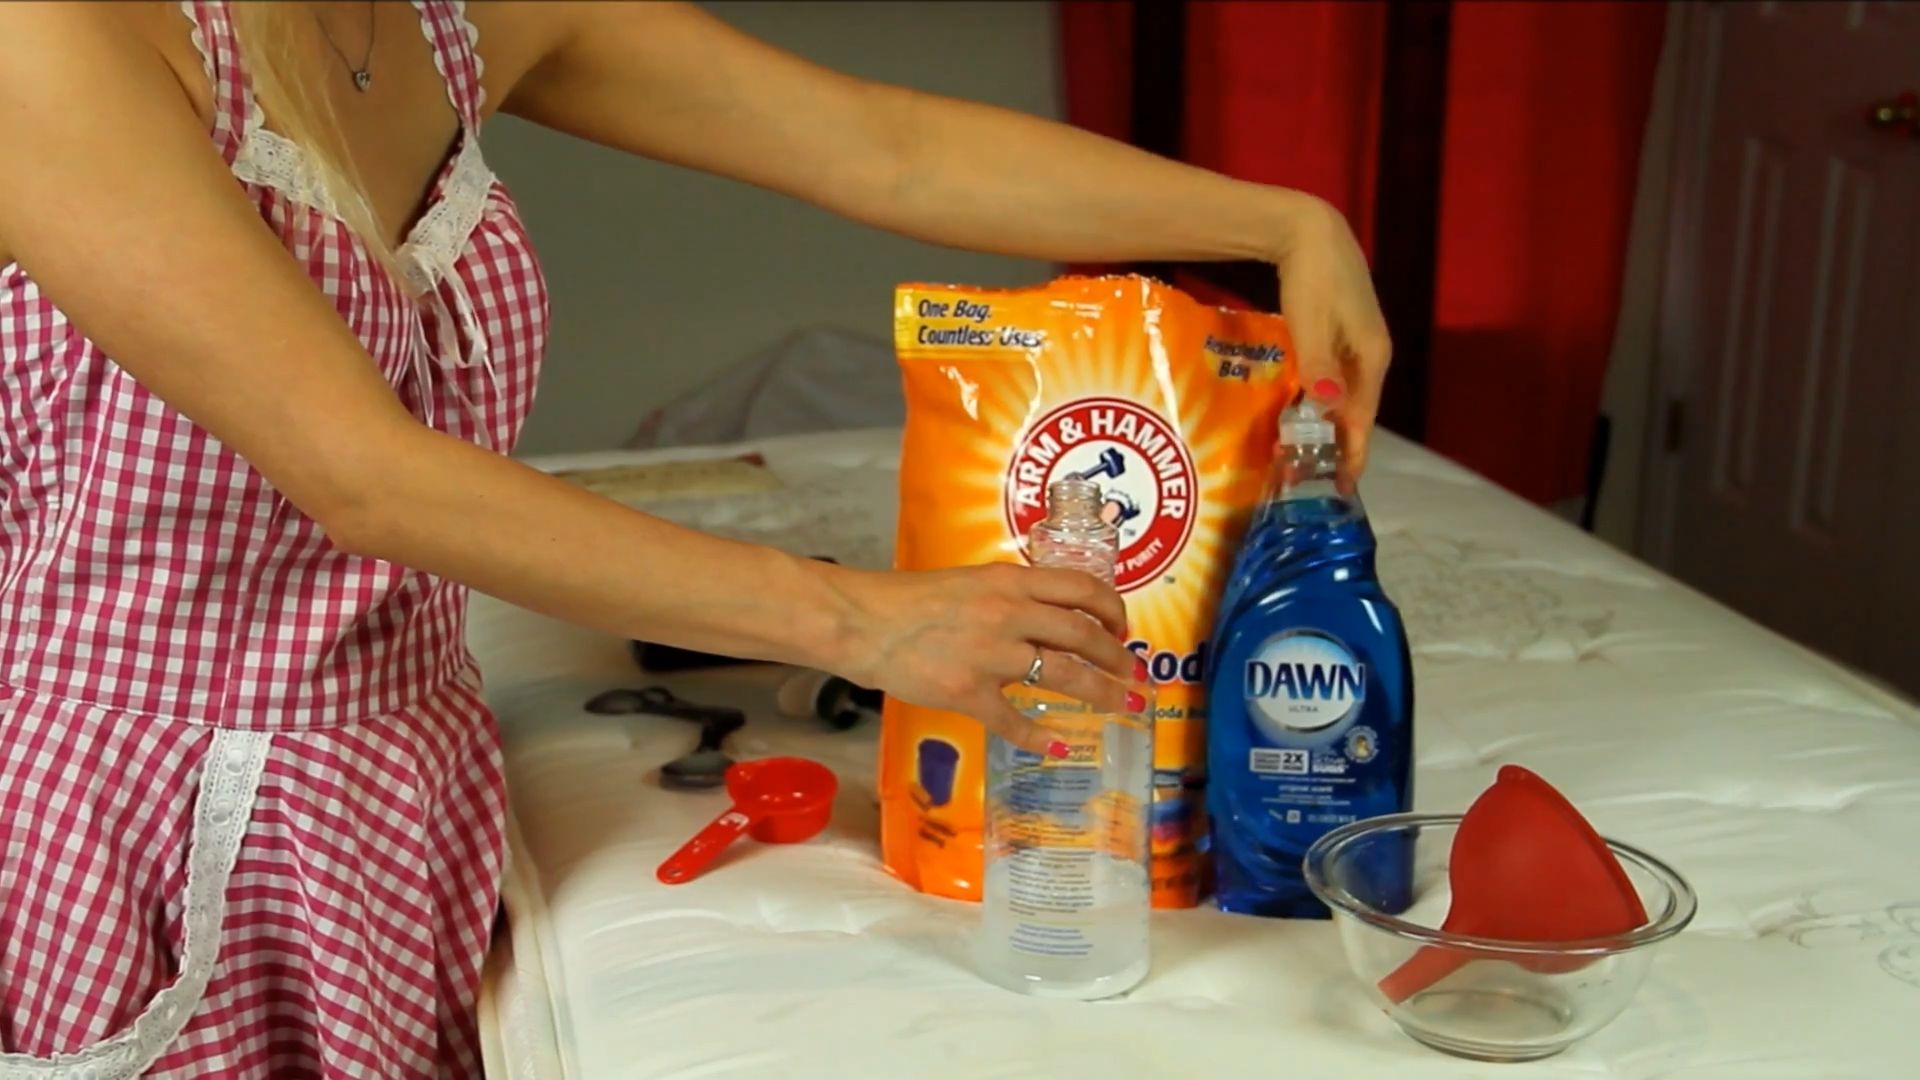
The Arsenal: Gathering Your Supplies
Here’s what you’ll need for most of these methods. It’s always a good idea to have these on hand:
- White Vinegar: A natural disinfectant and odor neutralizer.
- Baking Soda: Absorbs odors and helps lift stains.
- Hydrogen Peroxide (3%): A mild bleaching agent that can help remove stains. Always test on an inconspicuous area first!
- Dish Soap (Mild): Helps break down the stain.
- Enzyme Cleaner: Specifically designed to break down uric acid. You can find these at most pet stores.
- Spray Bottles: For easy application.
- Clean Cloths or Paper Towels: For blotting and wiping.
- Gloves: To protect your hands.
- Vacuum Cleaner: For removing baking soda and dried residue.
- Blacklight Flashlight (Optional): Helps locate old, dried stains.
Method 1: The Vinegar and Baking Soda Power Duo
This is my go-to method for fresh stains and mild odors. It’s simple, effective, and uses ingredients I always have in my pantry.
Step-by-Step Instructions:
- Blot Up Excess Urine: As soon as you notice the accident, grab some paper towels or a clean cloth and blot up as much urine as possible. The more you remove now, the easier it will be to clean later. Don’t rub, just blot!
- Saturate with Vinegar: Pour white vinegar directly onto the stain, making sure to saturate the area thoroughly. Don’t be shy!
- Let it Sit: Allow the vinegar to sit for at least 10-15 minutes. This gives it time to break down the uric acid crystals.
- Blot Again: After the vinegar has soaked, blot up as much of the liquid as possible with a clean cloth or paper towels.
- Apply Baking Soda: Generously sprinkle baking soda over the entire affected area. You want a good, thick layer.
- Let it Dry Completely: This is the most important step! Let the baking soda sit until it’s completely dry. This can take anywhere from a few hours to overnight, depending on the humidity. The baking soda will absorb the remaining moisture and odor.
- Vacuum Thoroughly: Once the baking soda is completely dry, vacuum it up thoroughly. Make sure to get into all the nooks and crannies.
- Inspect and Repeat (If Necessary): If the stain or odor persists, repeat the process. Sometimes, stubborn stains require a second application.
Method 2: The Hydrogen Peroxide Boost (Use with Caution!)
This method is great for tougher stains, but it’s important to use it with caution, especially on colored fabrics. Always test a small, inconspicuous area first to make sure it doesn’t cause discoloration.
Step-by-Step Instructions:
- Blot Up Excess Urine: Just like before, start by blotting up as much urine as possible.
- Vinegar Pre-Treatment (Optional): For older or more stubborn stains, you can pre-treat with vinegar as described in Method 1. This will help break down the stain and odor before using hydrogen peroxide.
- Prepare the Solution: In a spray bottle, mix 1/2 cup of 3% hydrogen peroxide with 1 teaspoon of mild dish soap.
- Spray the Stain: Spray the solution onto the stain, making sure to saturate the area.
- Let it Sit: Allow the solution to sit for 1-2 hours. Keep the area out of direct sunlight, as sunlight can accelerate the bleaching process.
- Blot and Rinse: After the solution has soaked, blot up as much of the liquid as possible with a clean cloth. Then, rinse the area with clean water to remove any soap residue.
- Dry Thoroughly: Allow the area to air dry completely. You can use a fan to speed up the drying process.
- Vacuum (If Necessary): If you used a lot of solution, you may want to vacuum the area once it’s completely dry to remove any remaining residue.
- Inspect and Repeat (If Necessary): If the stain or odor persists, repeat the process.
Method 3: The Enzyme Cleaner Solution (For Serious Odor Problems)
Enzyme cleaners are specifically designed to break down the uric acid crystals that cause pee odor. They’re a great option for persistent odors or for cleaning areas where pets frequently have accidents.
Step-by-Step Instructions:
- Blot Up Excess Urine: As always, start by blotting up as much urine as possible.
- Apply Enzyme Cleaner: Follow the instructions on the enzyme cleaner bottle. Generally, you’ll need to saturate the affected area with the cleaner.
- Let it Sit: Allow the enzyme cleaner to sit for the recommended time, usually several hours or overnight. This is crucial for the enzymes to work effectively.
- Blot Up Excess Cleaner: After the soaking time, blot up any excess cleaner with a clean cloth.
- Air Dry: Allow the area to air dry completely. Do not use heat, as heat can damage the enzymes.
- Inspect and Repeat (If Necessary): If the odor persists, repeat the process.
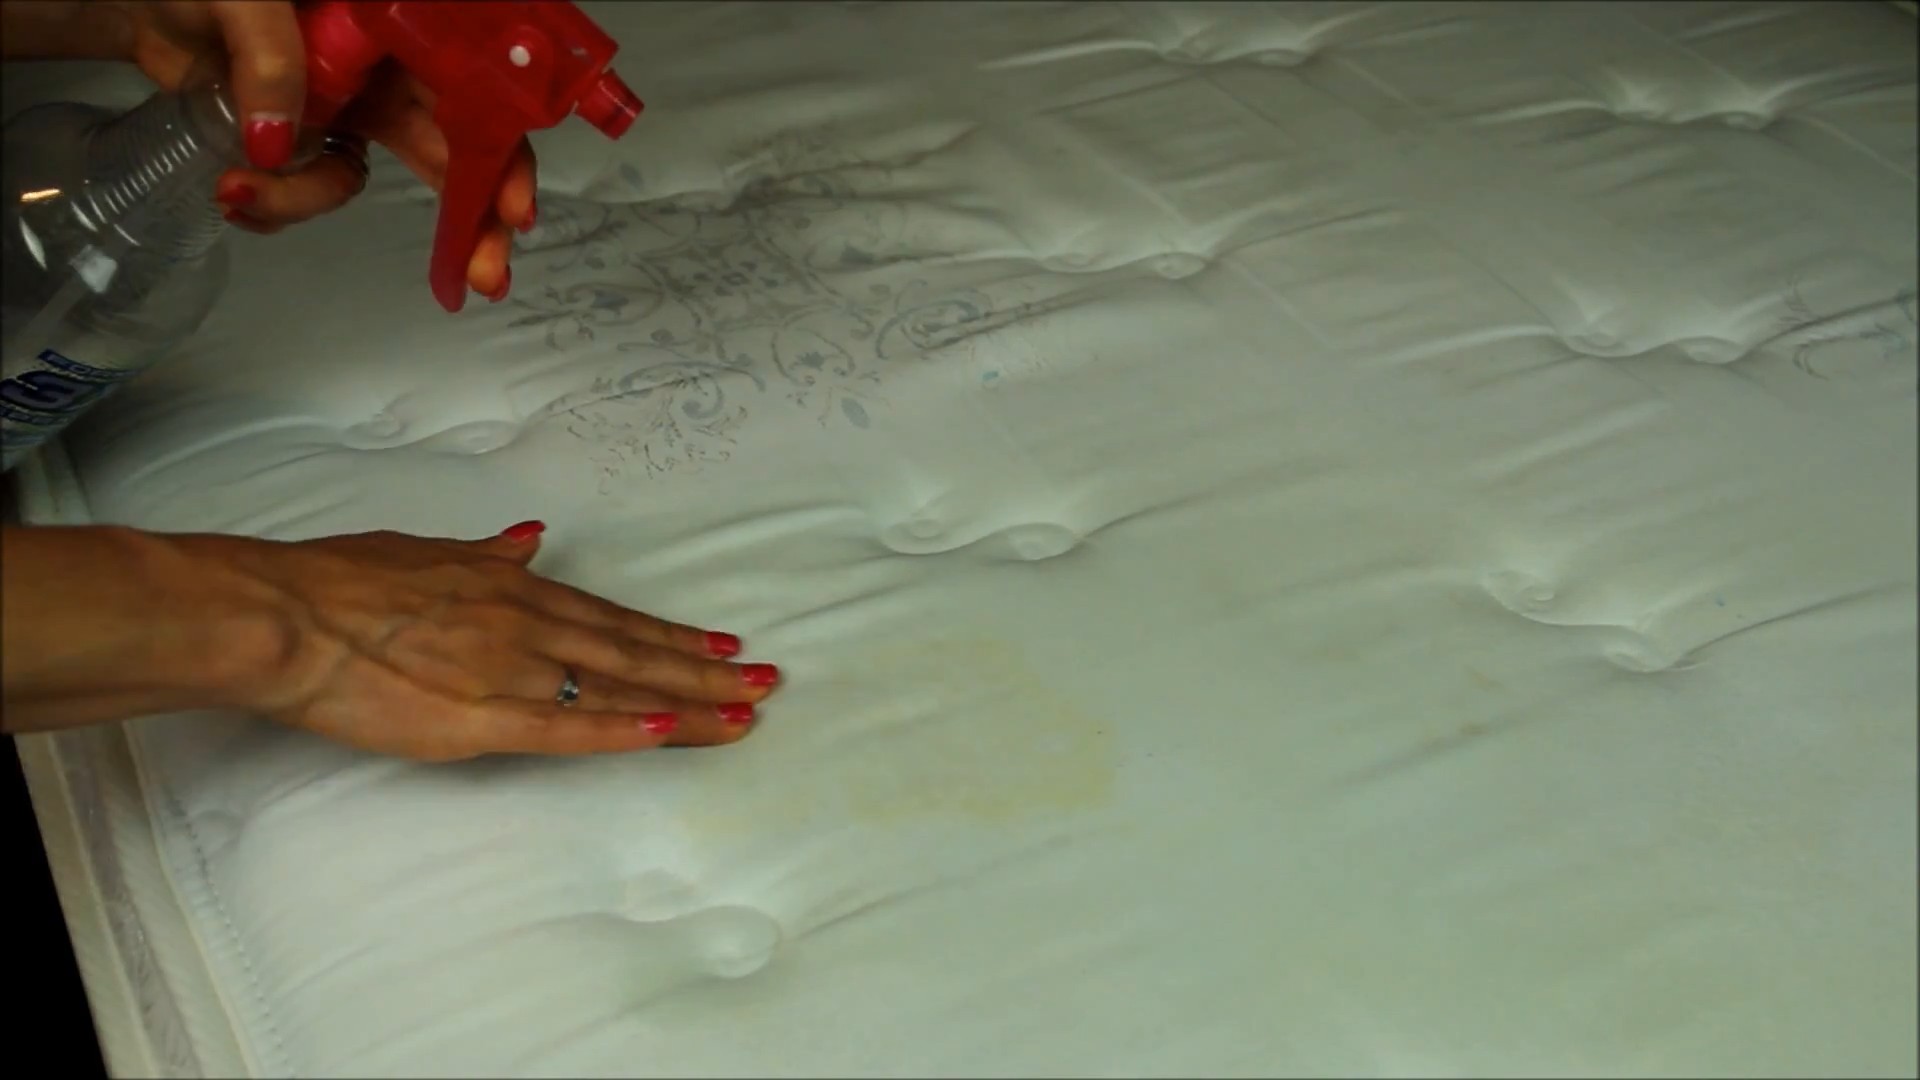
Method 4: For Mattresses: A Deep Cleaning Approach
Mattresses are tricky because they absorb liquids deeply. Here’s how to tackle pee stains on your mattress:
Step-by-Step Instructions:
- Strip the Bed: Remove all bedding and wash it immediately.
- Blot Up Excess Urine: Blot up as much urine as possible with paper towels or a clean cloth. Press firmly to absorb as much liquid as you can.
- Apply Baking Soda: Generously sprinkle baking soda over the entire affected area.
- Let it Sit: Allow the baking soda to sit for at least 8 hours, or preferably overnight. This will help absorb the moisture and odor.
- Vacuum Thoroughly: Vacuum up the baking soda thoroughly. Use the hose attachment to get into all the crevices.
- Spot Treat with Vinegar or Hydrogen Peroxide (Optional): If the stain or odor persists, you can spot treat with vinegar or hydrogen peroxide (remember to test first!). Apply the solution sparingly and blot up any excess liquid.
- Dry Thoroughly: Allow the mattress to air dry completely. This can take several hours or even a day or two. Use a fan to speed up the drying process. You can also place the mattress in direct sunlight (if possible) to help kill bacteria and remove odors.
- Protect Your Mattress: Once the mattress is completely dry, consider using a mattress protector to prevent future accidents from soaking into the mattress.
Preventative Measures: Stopping Accidents Before They Happen
Prevention is always better than cure! Here are a few tips to help prevent pee stains and odors in the first place:
- Potty Training: If you have young children or pets, focus on consistent potty training.
- Regular Walks: Take your dog out for regular walks to prevent accidents indoors.
- Litter Box Maintenance: Keep your cat’s litter box clean and accessible.
- Waterproof Mattress Protectors: Use waterproof mattress protectors on all beds, especially those used by children or pets.
- Prompt Cleanup: Clean up accidents immediately to prevent stains and odors from setting in.
Blacklight Detective: Finding Hidden Stains
A blacklight flashlight can be a lifesaver for finding old, dried pee stains that you might not be able to see with the naked eye. Simply turn off the lights and shine the blacklight around the room. Urine stains will glow under the blacklight. Once you’ve located the stains,
Conclusion
So, there you have it! Ditching those expensive, chemical-laden pee stain removal products and embracing this simple, effective DIY solution is a game-changer for pet owners and parents alike. We’ve walked you through a method that’s not only budget-friendly but also utilizes ingredients you likely already have in your pantry. Think about it: no more frantic trips to the store when accidents happen, no more worrying about harsh chemicals lingering in your home, and a significantly lighter impact on your wallet.
The beauty of this DIY approach lies in its adaptability. While we’ve presented a core recipe, feel free to experiment with variations to suit your specific needs and preferences. For instance, if you’re dealing with a particularly stubborn stain, consider pre-treating the area with a paste of baking soda and water before applying the vinegar solution. Let it sit for a few hours or even overnight to draw out the stain and odor. Alternatively, for delicate fabrics, you might want to dilute the vinegar solution slightly to prevent any potential damage. Remember to always test a small, inconspicuous area first to ensure colorfastness.
Beyond the basic recipe, you can also explore adding a few drops of your favorite essential oil to the solution for a more pleasant scent. Lavender, lemon, and eucalyptus are all excellent choices that not only mask odors but also offer additional cleaning and disinfecting properties. Just be sure to choose pet-safe essential oils if you have furry friends, as some can be harmful to animals.
The environmental benefits of opting for a DIY solution are also undeniable. By reducing your reliance on commercially produced pee stain removal products, you’re minimizing your contribution to plastic waste and the release of harmful chemicals into the environment. It’s a small change that can make a big difference in the long run.
But the real magic of this DIY trick is in its effectiveness. The combination of baking soda, vinegar, and dish soap works synergistically to neutralize odors, break down stains, and leave your carpets and upholstery looking and smelling fresh. It’s a powerful yet gentle solution that’s safe for your family, your pets, and your home.
We wholeheartedly encourage you to give this DIY pee stain removal method a try. We’re confident that you’ll be amazed by the results. And once you’ve experienced the satisfaction of successfully tackling those pesky stains with a simple, homemade solution, we’d love to hear about it! Share your experiences, tips, and variations in the comments below. Let’s create a community of DIY stain-fighting experts and help each other keep our homes clean and fresh, naturally! Don’t hesitate to share before and after photos – we’re eager to see your success stories! This DIY method is a must-try for anyone looking for a safe, effective, and affordable way to tackle pee stains.
Frequently Asked Questions (FAQs)
What makes this DIY pee stain removal method better than store-bought products?
This DIY method offers several advantages over commercial pee stain removal products. First and foremost, it’s significantly more cost-effective. The ingredients – baking soda, vinegar, and dish soap – are readily available and inexpensive. Secondly, it’s a safer alternative, free from harsh chemicals and artificial fragrances that can be harmful to your family and pets. Many commercial products contain volatile organic compounds (VOCs) that can irritate the skin, eyes, and respiratory system. Finally, it’s environmentally friendly, reducing your reliance on plastic packaging and potentially harmful chemicals that can pollute waterways. The effectiveness is comparable, and in many cases, superior, to store-bought options, especially when dealing with fresh stains.
Will this DIY solution work on old, set-in pee stains?
While this DIY solution is most effective on fresh stains, it can also work on older, set-in stains with a little extra effort. For older stains, it’s crucial to pre-treat the area thoroughly. Start by vacuuming the area to remove any loose debris. Then, create a paste of baking soda and water and apply it liberally to the stain. Allow the paste to dry completely, which may take several hours or even overnight. Once dry, vacuum up the baking soda and proceed with the vinegar and dish soap solution as described in the recipe. You may need to repeat the process several times for particularly stubborn stains. Patience is key!
Is vinegar safe to use on all types of carpets and upholstery?
Vinegar is generally safe to use on most carpets and upholstery, but it’s always a good idea to test a small, inconspicuous area first to ensure colorfastness. Some delicate fabrics, such as silk or wool, may be more susceptible to damage from vinegar. If you’re concerned about the potential for damage, you can dilute the vinegar solution with water. For example, instead of using a 50/50 mixture of vinegar and water, try a 25/75 mixture. Always blot the area gently rather than rubbing, as rubbing can damage the fibers of the fabric.
Can I use any type of dish soap for this DIY solution?
While most dish soaps will work, it’s best to use a clear, non-bleach dish soap. Avoid dish soaps that contain dyes or strong fragrances, as these can potentially stain or discolor your carpet or upholstery. A mild, gentle dish soap is the ideal choice.
How do I get rid of the vinegar smell after using this DIY solution?
The vinegar smell will dissipate on its own within a few hours. To speed up the process, you can open windows and doors to ventilate the area. You can also sprinkle baking soda over the treated area after it has dried and vacuum it up after a few hours. The baking soda will help to absorb any lingering odors. Alternatively, you can add a few drops of your favorite essential oil to the vinegar solution to mask the vinegar smell. Lavender, lemon, and eucalyptus are all excellent choices.
What if the stain is gone, but the odor persists?
If the stain is gone but the odor persists, it’s likely that the urine has soaked deep into the carpet padding or subfloor. In this case, you may need to take more drastic measures. Consider using an enzymatic cleaner specifically designed to break down urine odors. These cleaners contain enzymes that digest the bacteria that cause the odor. You may also need to lift the carpet and treat the padding and subfloor directly. In severe cases, you may need to replace the carpet padding.
How often can I use this DIY solution?
You can use this DIY solution as often as needed to clean up pee stains. It’s a gentle and safe alternative to harsh chemicals, so you don’t have to worry about damaging your carpets or upholstery with frequent use. However, it’s always a good idea to test a small, inconspicuous area first to ensure colorfastness, especially if you’re using it on delicate fabrics.
Is this DIY solution safe for pets?
This DIY solution is generally safe for pets, but it’s important to keep them away from the treated area until it has completely dried. Vinegar can be irritating to their skin and eyes, and some essential oils can be toxic to animals. If you’re using essential oils, be sure to choose pet-safe options and use them sparingly. Always consult with your veterinarian if you have any concerns about the safety of this DIY solution for your pets.
Can I use this solution on other types of stains besides pee?
Yes, this DIY solution can be effective on other types of stains as well, such as vomit, feces, and food spills. The combination of baking soda, vinegar, and dish soap works to break down a variety of stains and neutralize odors. However, for certain types of stains, such as grease or ink, you may need to use a different cleaning solution.
Leave a Comment