

Indoor Fern Care can feel like a daunting task, right? I get it! You bring home this lush, vibrant fern, envisioning a mini-jungle oasis in your living room, only to watch it slowly turn brown and crispy. Don’t worry, you’re not alone! Many plant parents struggle with these beautiful, yet sometimes temperamental, green companions.
Ferns have a rich history, dating back millions of years, even predating flowering plants! They’ve been admired and cultivated across cultures, from Victorian parlors to Japanese gardens, symbolizing resilience and tranquility. But let’s face it, recreating their natural, humid environment indoors can be tricky. That’s where these DIY tricks and hacks come in!
Why do you need these Indoor Fern Care secrets? Because a thriving fern not only adds beauty to your home but also purifies the air and boosts your mood. Plus, mastering fern care is incredibly rewarding! I’m going to share some simple, effective, and budget-friendly DIY solutions that will transform your struggling fern into a flourishing focal point. Get ready to unlock the secrets to happy, healthy ferns and finally achieve that indoor jungle you’ve always dreamed of!

Reviving Your Fern: A DIY Guide to Lush Indoor Fronds
Okay, fern fanatics, let’s face it: keeping those delicate indoor ferns happy can feel like a constant battle. They’re dramatic, they’re picky, and they’re not afraid to show their displeasure with crispy brown fronds. But fear not! I’m here to share my tried-and-true DIY secrets to bring your ferns back from the brink and transform them into vibrant, green beauties. This guide is packed with tips and tricks, so get ready to roll up your sleeves and give your fern some TLC!
Understanding Your Fern’s Needs
Before we dive into the DIY magic, let’s quickly cover the basics. Knowing what your fern *really* wants is half the battle.
* Humidity: Ferns are rainforest dwellers at heart. They crave humidity. Think steamy showers and misty mornings.
* Light: Bright, indirect light is key. Direct sunlight will scorch those delicate fronds faster than you can say “sunburn.”
* Watering: Consistent moisture is crucial, but soggy soil is a no-no. Think damp sponge, not swamp.
* Soil: Well-draining, slightly acidic soil is their happy place.
* Temperature: They prefer moderate temperatures, generally between 65-75°F (18-24°C). Avoid drafts and sudden temperature changes.
DIY Humidity Boosters
Ferns and humidity are like peanut butter and jelly – they just belong together. Here are a few DIY ways to crank up the moisture levels around your fern:
1. The Pebble Tray Method
This is a super simple and effective way to create a humid microclimate around your fern.
Materials:
* A shallow tray (larger than the base of your pot)
* Pebbles or gravel
* Water
Instructions:
1. Fill the tray with pebbles: Spread a layer of pebbles evenly across the bottom of the tray.
2. Add water: Pour water into the tray, making sure the water level is *below* the top of the pebbles. You don’t want your pot sitting directly in water, as this can lead to root rot.
3. Place your fern on top: Set your fern pot on top of the pebble-filled tray. As the water evaporates, it will increase the humidity around the plant.
4. Refill as needed: Keep an eye on the water level and refill the tray as the water evaporates.
2. DIY Misting Station
Misting is another great way to boost humidity, but it needs to be done correctly.
Materials:
* A spray bottle (preferably one that produces a fine mist)
* Distilled water or rainwater (tap water can leave mineral deposits on the leaves)
Instructions:
1. Fill the spray bottle: Fill your spray bottle with distilled water or rainwater.
2. Mist regularly: Mist your fern lightly every day, or even twice a day, especially during dry periods. Focus on misting *around* the plant, rather than directly on the fronds, to avoid water spots.
3. Avoid over-misting: Don’t saturate the leaves. You want a light, even mist.
3. Grouping Plants Together
Plants naturally release moisture through transpiration. Grouping your ferns with other humidity-loving plants can create a mini-ecosystem that benefits everyone.
Instructions:
1. Choose compatible plants: Select other plants that enjoy similar light and humidity conditions as your fern. Good companions include peace lilies, orchids, and calatheas.
2. Arrange them closely: Place the plants close together, but make sure they still have enough space for air circulation.
3. Monitor humidity levels: Keep an eye on the humidity levels around the plants and adjust your watering and misting accordingly.
DIY Soil Mix for Happy Ferns
The right soil mix is crucial for providing your fern with the nutrients and drainage it needs to thrive. Here’s my go-to DIY recipe:
Ingredients:
* 1 part peat moss (or coconut coir for a more sustainable option)
* 1 part perlite
* 1 part potting soil
Instructions:
1. Combine the ingredients: In a large container, thoroughly mix together the peat moss (or coconut coir), perlite, and potting soil.
2. Moisten the mix: Lightly moisten the soil mix with water. It should be damp, but not soggy.
3. Repot your fern: When repotting your fern, use this DIY soil mix to provide it with the perfect growing medium.
DIY Fertilizer for Lush Growth
Ferns are light feeders, so you don’t need to fertilize them heavily. However, a little boost of nutrients can help them stay healthy and vibrant.
Materials:
* Liquid fertilizer (specifically formulated for ferns or diluted all-purpose fertilizer)
* Water
Instructions:
1. Dilute the fertilizer: Dilute the liquid fertilizer to half the recommended strength. Ferns are sensitive to over-fertilization, so it’s better to err on the side of caution.
2. Water your fern: Water your fern as usual.
3. Apply the diluted fertilizer: After watering, apply the diluted fertilizer to the soil. Avoid getting fertilizer on the fronds.
4. Fertilize sparingly: Fertilize your fern every 4-6 weeks during the growing season (spring and summer). Reduce or stop fertilizing during the dormant season (fall and winter).
Dealing with Brown Fronds: A DIY Rescue Mission
Brown fronds are a common problem with indoor ferns, but don’t despair! Here’s how to tackle them:
1. Identify the Cause
First, try to figure out what’s causing the browning. Is it lack of humidity? Overwatering? Underwatering? Too much sun? Once you identify the culprit, you can take steps to correct it.
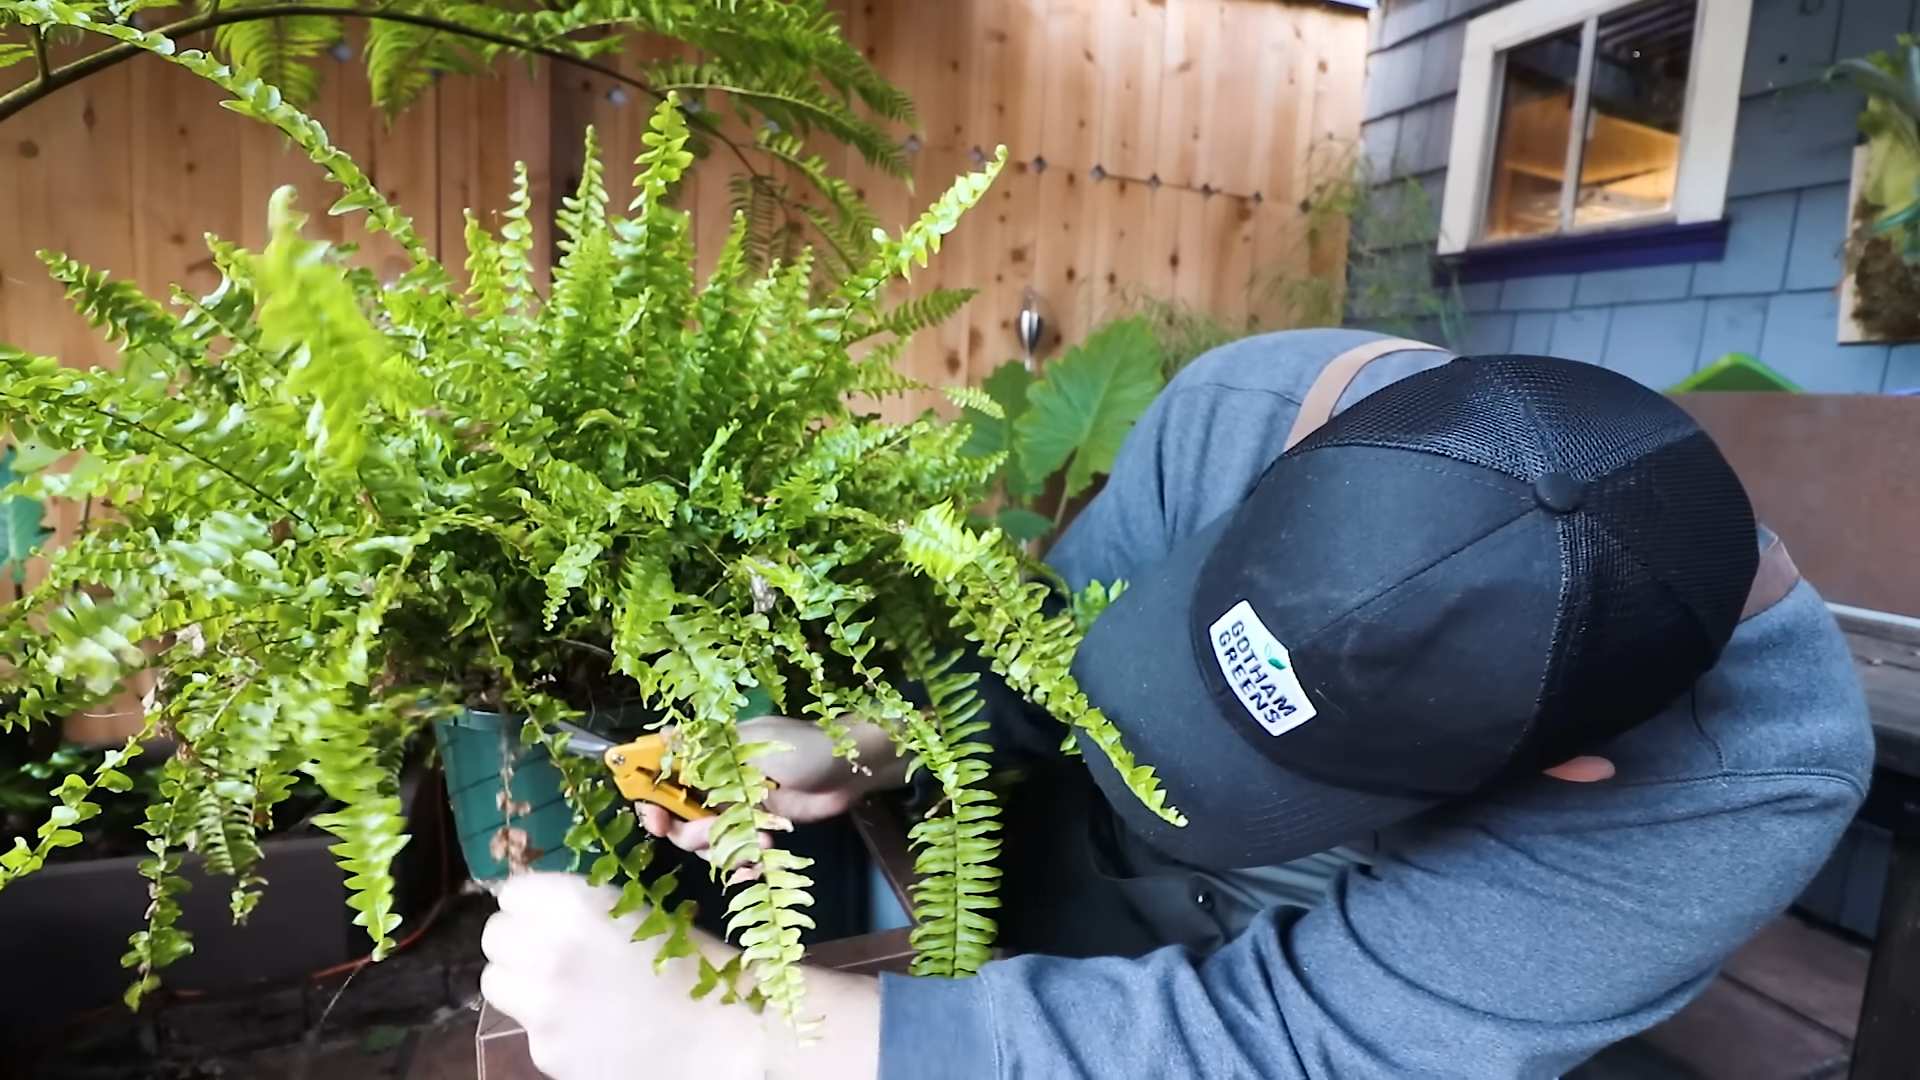
2. Prune the Brown Fronds
Using clean, sharp scissors or pruning shears, carefully trim away the brown fronds. Cut them off at the base of the plant. This will not only improve the appearance of your fern, but it will also encourage new growth.
3. Adjust Your Care Routine
Based on the cause of the browning, adjust your care routine accordingly. Increase humidity, adjust your watering schedule, move the plant to a different location, or fertilize if necessary.
4. The “Haircut” Method (For Severely Damaged Ferns)
If your fern is severely damaged with a lot of brown fronds, you might consider giving it a “haircut.” This involves cutting back all the fronds to just a few inches above the soil line. This may seem drastic, but it can often stimulate new growth and revive the plant.
Instructions:
1. Cut back the fronds: Using clean, sharp scissors or pruning shears, cut back all the fronds to just a few inches above the soil line.
2. Provide optimal care: After giving your fern a haircut, provide it with optimal care, including high humidity, bright, indirect light, and consistent moisture.
3. Be patient: It may take several weeks or even months for new growth to appear. Be patient and continue to provide the plant with the care it needs.
DIY Pest Control for Ferns
Ferns can sometimes be susceptible to pests like spider mites, mealybugs, and scale. Here’s a DIY pest control solution:
Materials:
* 1 teaspoon mild dish soap (avoid detergents with bleach or degreasers)
* 1 liter of water
* Spray bottle
Instructions:
1. Mix the solution: In a spray bottle, mix together the dish soap and water.
2. Test on a small area: Before spraying the entire plant, test the solution on a small, inconspicuous area to make sure it doesn’t damage the fronds.
3. Spray the plant: Spray the entire plant, including the undersides of the leaves, with the soap solution.
4. Rinse the plant: After a few hours, rinse the plant with clean water to remove the soap residue.
5. Repeat as needed: Repeat the treatment every few days until the pests are gone.
DIY Propagation: Making More Ferns!
Once your fern is thriving, you can even propagate it to create new plants! The easiest way to propagate ferns is through division.
Materials:
* A healthy, mature fern
* A sharp knife or pruning shears
* New pots
* Potting soil
Instructions:
1. Remove the fern from its pot: Gently remove the fern from its pot.
2. Divide the root ball: Using a sharp knife or pruning shears, carefully divide the root ball into two or more sections. Make sure each section has healthy roots and fronds.
3.
Conclusion
So, there you have it! This simple DIY trick for boosting your indoor fern care is a game-changer. No more wilting fronds, no more brown tips, just lush, vibrant greenery bringing life and freshness into your home. We’ve shown you how to create a humidity haven for your ferns without breaking the bank or resorting to complicated setups. The beauty of this method lies in its simplicity and effectiveness. It’s a testament to the fact that sometimes, the best solutions are the most straightforward.
Why is this a must-try? Because healthy ferns are happy ferns, and happy ferns make for a happier home. They purify the air, add a touch of elegance to any room, and provide a calming, natural aesthetic. But beyond the aesthetic benefits, nurturing a plant is a rewarding experience in itself. It connects you to nature, teaches patience, and provides a sense of accomplishment as you watch your green friend thrive.
Variations and Suggestions:
While the basic setup is incredibly effective, feel free to experiment and adapt it to your specific needs and preferences.
* Pebble Tray Power-Up: For an extra humidity boost, combine this DIY trick with a pebble tray. Place a layer of pebbles in a shallow dish, add water to just below the top of the pebbles, and set your fern (in its pot) on top. The evaporating water will create a microclimate of humidity around the plant.
* Terrarium Transformation: If you’re feeling ambitious, consider creating a mini-terrarium for your fern. This is especially beneficial for ferns that require very high humidity levels. Just ensure proper drainage to prevent root rot.
* Grouping is Good: Grouping your ferns together with other humidity-loving plants can also help create a more humid environment. Plants naturally transpire, releasing moisture into the air, which benefits their neighbors.
* Misting Matters (Sometimes): While our DIY trick significantly reduces the need for frequent misting, a light misting every few days can still be beneficial, especially during particularly dry periods. Use distilled or filtered water to avoid mineral buildup on the leaves.
* Light Adjustment: Remember that humidity is only one piece of the puzzle. Ensure your fern is receiving the right amount of indirect sunlight. Too much direct sun can scorch the leaves, even in a humid environment.
We are confident that this DIY trick will revolutionize your indoor fern care routine. It’s easy, affordable, and incredibly effective. But don’t just take our word for it! We encourage you to try it out for yourself and witness the transformation firsthand.
Share Your Success!
We’d love to hear about your experience with this DIY humidity trick. Share your photos and stories on social media using #IndoorFernCareDIY and tag us! Let’s create a community of thriving fern enthusiasts and spread the joy of healthy, happy plants. Your tips and experiences can inspire others to embrace the beauty of indoor ferns and overcome the challenges of keeping them healthy. We believe that by sharing our knowledge and experiences, we can all become better plant parents. So, go ahead, give it a try, and let us know how it works for you! We can’t wait to see your ferns flourishing!
Frequently Asked Questions (FAQ)
What type of ferns will benefit most from this DIY trick?
This trick is particularly beneficial for ferns that thrive in high humidity environments, such as Maidenhair ferns, Boston ferns, and Bird’s Nest ferns. However, most indoor ferns will appreciate the added humidity boost, especially during dry seasons or in homes with central heating or air conditioning. Even ferns that are considered more tolerant of lower humidity levels will generally exhibit healthier growth and more vibrant foliage when provided with adequate moisture. The key is to observe your fern and adjust the humidity levels accordingly. If you notice brown tips or wilting fronds, it’s a sign that the air is too dry.
How often should I change the water in the plastic bag?
The frequency of water changes depends on the humidity levels in your home and the size of the bag. Generally, you should check the bag every few days and change the water when it becomes cloudy or discolored. This will prevent the growth of algae or bacteria that could harm your fern. It’s also a good idea to wipe down the inside of the bag occasionally to remove any condensation buildup. Using distilled or filtered water can also help prevent mineral buildup and keep the water cleaner for longer.
Will this DIY trick cause root rot?
Root rot is a common concern when increasing humidity levels, but it’s easily preventable. The key is to ensure proper drainage. Make sure your fern is planted in a well-draining potting mix and that the pot has drainage holes. Avoid overwatering, and allow the soil to dry slightly between waterings. The plastic bag should not be airtight; it should allow for some air circulation to prevent excessive moisture buildup around the base of the plant. Regularly check the soil moisture and adjust your watering schedule as needed.
Can I use a different type of container instead of a plastic bag?
Yes, you can use other clear containers, such as a glass cloche or a plastic storage bin. The important thing is that the container is large enough to enclose the fern without touching the leaves and that it allows for some air circulation. Glass cloches can be aesthetically pleasing, but they can also trap heat, so be sure to monitor the temperature inside the cloche and provide ventilation if necessary. Plastic storage bins are a more affordable option, but they may not be as visually appealing. Choose a container that suits your needs and preferences.
My fern is already in a humid room (like a bathroom). Do I still need this trick?
Even if your fern is in a humid room, this DIY trick can still provide an extra boost of humidity, especially during periods of low humidity or if the room is not consistently humid. Bathrooms, for example, may only be humid during and after showers. The plastic bag will create a more consistent and localized humid environment for your fern. However, if your fern is thriving in its current location, you may not need to use this trick. Observe your fern and adjust your care routine as needed.
How long should I keep the plastic bag on my fern each day?
The duration depends on the humidity levels in your home and the needs of your fern. You can start by keeping the bag on for a few hours each day and gradually increase the duration as needed. Some people leave the bag on overnight and remove it during the day, while others leave it on continuously. Experiment to see what works best for your fern. If you notice any signs of excessive moisture, such as mold growth or soggy soil, reduce the duration or increase ventilation.
Is there a specific type of water I should use for this DIY trick?
Using distilled or filtered water is recommended to prevent mineral buildup on the leaves and in the soil. Tap water can contain minerals and chemicals that can be harmful to ferns over time. If you don’t have access to distilled or filtered water, you can let tap water sit out for 24 hours to allow some of the chlorine to evaporate. Rainwater is also a good option, as it is naturally soft and free of minerals.
What if I see condensation forming inside the bag?
Condensation is a normal occurrence when using this DIY trick, as it indicates that the humidity levels are elevated. However, excessive condensation can lead to fungal growth or other problems. If you see a lot of condensation, you can try reducing the duration that the bag is on the fern or increasing ventilation. You can also wipe down the inside of the bag with a clean cloth to remove excess moisture.
Can I use this trick for other plants besides ferns?
While this trick is particularly beneficial for ferns, it can also be used for other humidity-loving plants, such as orchids, African violets, and calatheas. However, it’s important to research the specific needs of each plant before using this trick, as some plants may be more sensitive to high humidity levels than others. Always monitor your plants closely and adjust the humidity levels accordingly.

Leave a Comment