

Growing Raspberries at Home can seem daunting, but trust me, with a few clever tricks and a little DIY spirit, you can be picking juicy, sun-ripened berries right from your own backyard! Imagine stepping outside on a warm summer morning, basket in hand, and harvesting a bounty of raspberries – fresher and tastier than anything you’ll find in the store. Sounds dreamy, right?
Raspberries have a rich history, dating back to ancient times, with evidence of their cultivation found in Roman settlements. They weren’t just a delicious treat; they were valued for their medicinal properties too! Today, while we might not rely on them for healing as much, the joy of growing your own food, connecting with nature, and enjoying the fruits (literally!) of your labor is more relevant than ever.
But why bother with DIY raspberry growing? Well, for starters, store-bought raspberries can be expensive and often lack the intense flavor of homegrown varieties. Plus, you have complete control over what goes into your garden, ensuring your berries are free from harmful pesticides and chemicals. In this article, I’m going to share some of my favorite home gardening tricks and DIY hacks that will make growing raspberries at home easier and more rewarding than you ever thought possible. So, grab your gardening gloves, and let’s get started!

Growing Raspberries: A Beginner’s Guide to a Bountiful Harvest
Hey there, fellow gardening enthusiasts! I’m so excited to share my experience and knowledge on growing raspberries right in your own backyard. There’s nothing quite like the taste of fresh, homegrown raspberries, and trust me, it’s easier than you might think! This guide will walk you through everything you need to know, from choosing the right variety to harvesting your delicious berries.
Choosing the Right Raspberry Variety
Before you even think about digging a hole, you need to decide which type of raspberry is best suited for your climate and gardening style. Raspberries are generally categorized into two main types:
* Everbearing (or Fall-Bearing) Raspberries: These guys are super convenient because they produce two crops a year! The first, smaller crop appears in the late summer or early fall on the tips of the current year’s canes. Then, the following summer, they produce a larger crop on the lower portion of those same canes. I personally love everbearing varieties because I get a longer harvest season.
* Summer-Bearing Raspberries: As the name suggests, these raspberries produce one large crop in the summer, usually in June or July. They bear fruit on the previous year’s canes. Summer-bearing varieties often produce a larger single harvest compared to everbearing types.
Within these two categories, there are tons of different cultivars, each with its own unique characteristics. Consider these factors when making your choice:
* Climate: Some varieties are more cold-hardy than others. Check the plant’s hardiness zone to make sure it’s suitable for your region.
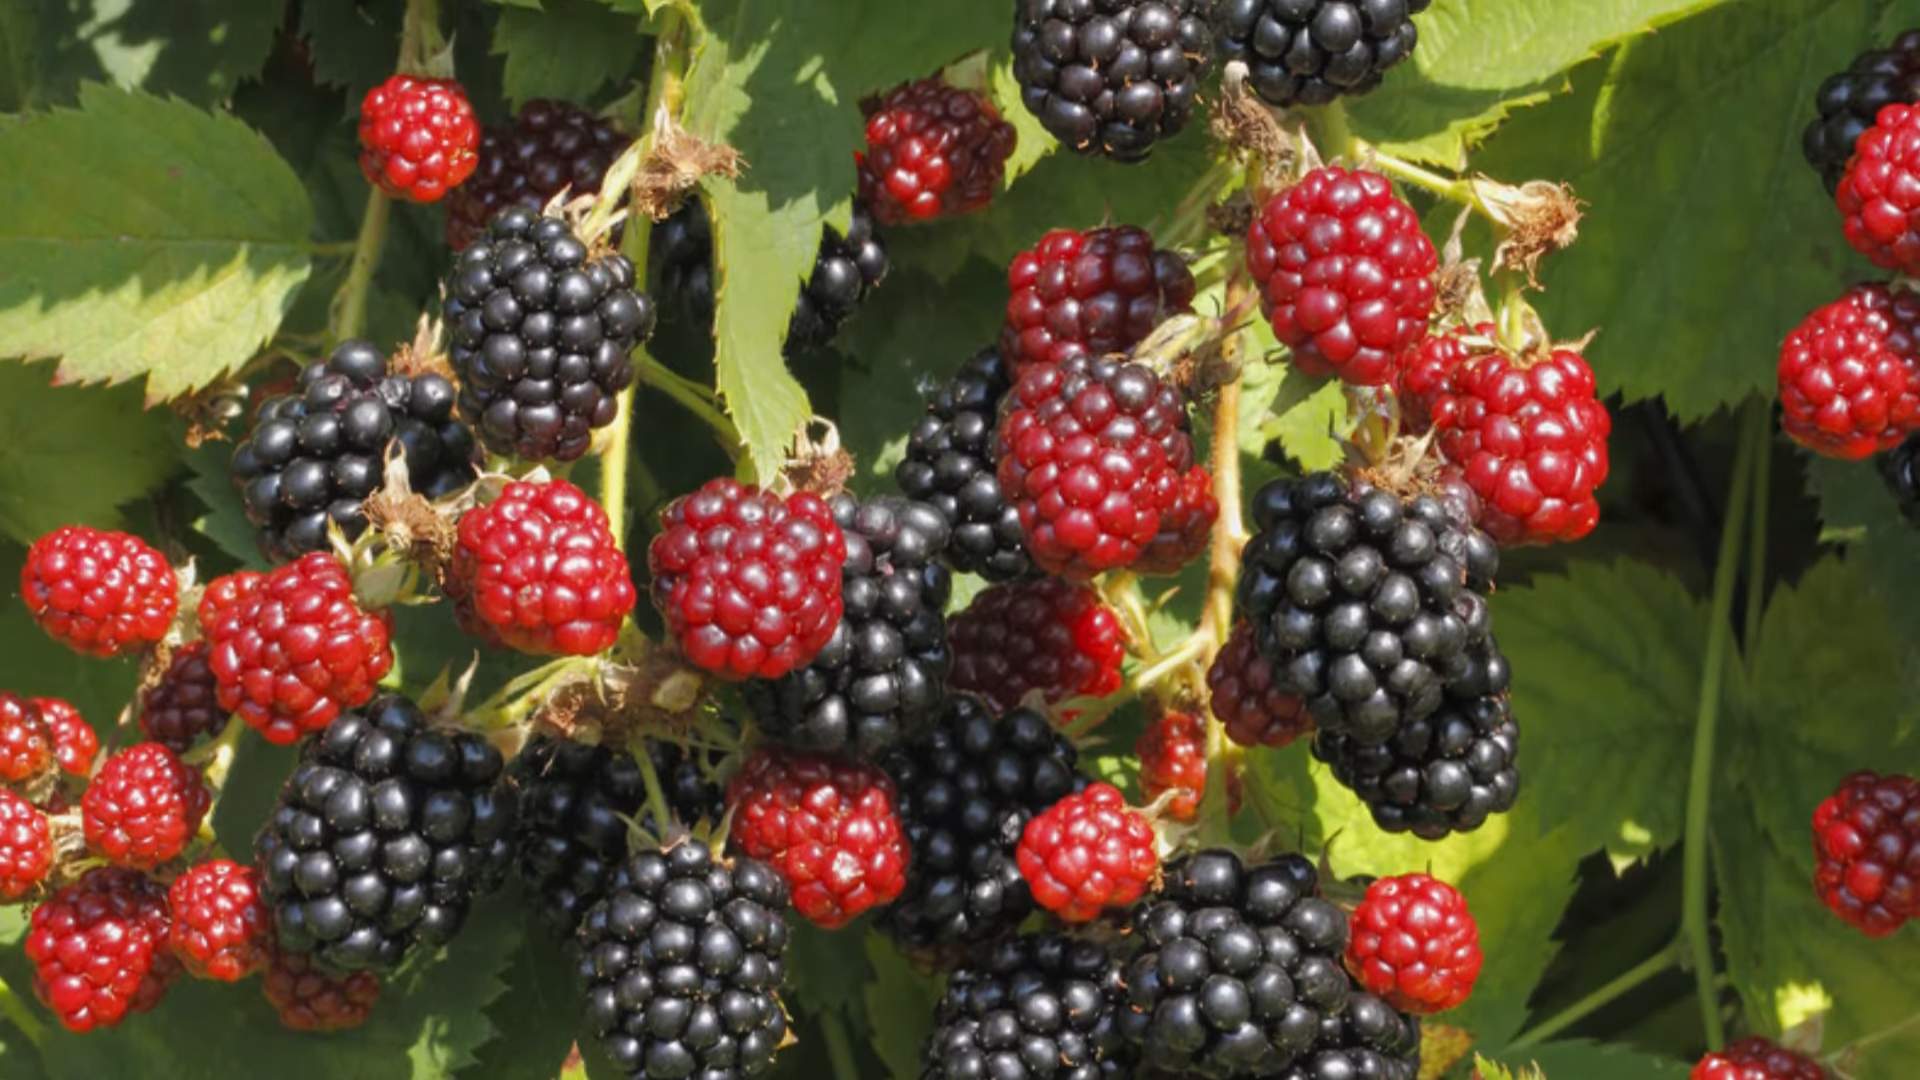
* Berry Color: Raspberries come in red, black, purple, and even yellow! Choose the color you prefer.
* Berry Size and Flavor: Some varieties produce larger, sweeter berries than others. Read reviews and descriptions to get an idea of the taste and size.
* Disease Resistance: Look for varieties that are resistant to common raspberry diseases like root rot and cane blight.
Some popular and reliable varieties include:
* ‘Heritage’ (Everbearing): A classic, reliable everbearing variety with excellent flavor.
* ‘Caroline’ (Everbearing): Known for its large, flavorful berries and disease resistance.
* ‘Boyne’ (Summer-Bearing): A very cold-hardy variety, perfect for northern climates.
* ‘Nova’ (Summer-Bearing): Produces large, firm berries with good flavor.
Preparing the Planting Site
Raspberries thrive in well-drained, slightly acidic soil (pH 6.0-6.8). They also need plenty of sunlight – at least 6-8 hours per day. Here’s how to prepare your planting site:
1. Choose a Sunny Location: As I mentioned, raspberries need lots of sun. Avoid planting them in shady areas.
2. Test Your Soil: A soil test will tell you the pH and nutrient levels of your soil. You can purchase a soil testing kit at most garden centers or send a sample to your local extension office.
3. Amend the Soil: Based on your soil test results, amend the soil as needed. If your soil is too alkaline, you can lower the pH by adding sulfur or peat moss. If it’s too acidic, add lime.
4. Improve Drainage: Raspberries hate wet feet! If your soil is heavy clay, amend it with plenty of organic matter, such as compost or well-rotted manure, to improve drainage.
5. Clear the Area: Remove any weeds, grass, rocks, and other debris from the planting area.
6. Create Raised Beds (Optional): If you have heavy clay soil or poor drainage, consider planting your raspberries in raised beds. This will help to improve drainage and prevent root rot.
Planting Your Raspberry Canes
The best time to plant raspberries is in early spring or late fall, when the plants are dormant. Here’s how to plant them:
1. Soak the Roots: Before planting, soak the roots of your raspberry canes in water for about an hour. This will help to rehydrate them.
2. Dig the Holes: Dig holes that are wide enough to accommodate the roots of the plants and deep enough so that the top of the root ball is level with the ground. Space the holes about 2-3 feet apart for summer-bearing varieties and 1.5-2 feet apart for everbearing varieties. If you are planting in rows, space the rows about 8-10 feet apart.
3. Plant the Canes: Gently remove the raspberry canes from their containers and loosen the roots. Place the canes in the holes and spread out the roots.
4. Backfill the Holes: Backfill the holes with soil, gently firming it around the roots.
5. Water Thoroughly: Water the newly planted canes thoroughly to settle the soil.
6. Mulch: Apply a layer of mulch around the plants to help retain moisture, suppress weeds, and regulate soil temperature. I like to use wood chips, straw, or shredded leaves.
Caring for Your Raspberry Plants
Once your raspberry plants are in the ground, they need regular care to thrive. Here’s what you need to do:
* Watering: Raspberries need consistent moisture, especially during the growing season. Water them deeply whenever the top inch of soil feels dry. Avoid overwatering, as this can lead to root rot.
* Fertilizing: Fertilize your raspberry plants in the spring with a balanced fertilizer, such as 10-10-10. Follow the instructions on the fertilizer package. You can also amend the soil with compost or well-rotted manure.
* Weeding: Keep the area around your raspberry plants free of weeds. Weeds compete with the raspberries for water and nutrients.
* Pruning: Pruning is essential for maintaining healthy and productive raspberry plants. The pruning techniques differ depending on whether you have everbearing or summer-bearing varieties.
Pruning Raspberries: The Key to a Great Harvest
Pruning might seem intimidating, but it’s crucial for maximizing your raspberry harvest. Don’t worry, I’ll break it down for you:
Pruning Everbearing Raspberries
This is where it gets a little different from summer-bearing types. Remember, they fruit twice!
1. Late Fall/Early Spring (First Year): After planting, cut back the canes to about 12 inches. This encourages strong root development.
2. Late Fall/Early Spring (Second Year and Beyond):
* Remove the top portion of the canes that fruited in the fall. Cut them back to just above a healthy bud. These sections will not produce again.
* Thin out the remaining canes. Remove any weak, damaged, or crowded canes. Aim to leave about 4-5 of the strongest canes per linear foot of row.
* You can also choose to prune all the canes down to the ground in late fall or early spring. This will result in one larger crop in the fall, but you’ll sacrifice the summer crop. I personally prefer the two-crop method, but the single-crop method can be easier for some gardeners.
Pruning Summer-Bearing Raspberries
Summer-bearing raspberries are pruned differently because they only fruit once a year on the previous year’s canes.
1. After Harvest: Immediately after the harvest is complete, cut all the canes that fruited down to the ground. These canes will not produce again.
2. Thin Out New Canes: During the growing season, new canes will emerge from the ground. These are the canes that will produce fruit next year. Thin out these new canes to about 4-5 of the strongest canes per linear foot of row. Remove any weak, damaged, or crowded canes.
3. Tip Pruning (Optional): In late winter or early spring, you can tip prune the remaining canes by cutting off the top few inches. This will encourage lateral branching and increase fruit production.
Supporting Your Raspberry Plants
Raspberry canes can get quite tall and heavy with fruit, so it’s important to provide them with support. This will prevent the canes from bending over and breaking, and it will also make it easier to harvest the berries. Here are a few options for supporting your raspberry plants:
* Trellis System: A trellis system is a great way to support your raspberry plants. You can build a simple trellis using posts and wires, or you can purchase a pre-made trellis from a garden center.
* Stakes: You can also support individual canes with stakes. Simply drive a stake into the ground next to each cane and tie the cane to the stake with twine.
* Wire Support: Run wires along the rows of raspberry plants and tie the canes to the wires.
Dealing with Pests and Diseases
Raspberries are generally pretty easy to grow, but they can be susceptible to certain pests and diseases. Here are some common problems and how to deal with them
Conclusion
So, there you have it! Growing raspberries at home isn’t just a gardening project; it’s an investment in fresh, flavorful rewards that you can enjoy for years to come. We’ve covered everything from selecting the right raspberry variety for your climate and space to preparing the soil, planting, and providing ongoing care. The satisfaction of harvesting your own sun-ripened berries, bursting with sweetness and far superior to anything you’ll find in the grocery store, is truly unparalleled.
But why is this DIY raspberry growing trick a must-try? Because it empowers you to control the entire process, ensuring that your raspberries are grown organically, free from harmful pesticides and herbicides. You know exactly what’s going into your food, and that peace of mind is priceless. Plus, it’s a fantastic way to connect with nature, get some exercise, and learn new skills.
Beyond the basic techniques we’ve discussed, there’s plenty of room for experimentation and personalization. Consider these variations to tailor your raspberry growing experience:
* Vertical Growing: If you’re short on space, explore vertical growing methods using trellises or containers. This not only maximizes your yield but also adds a beautiful architectural element to your garden.
* Companion Planting: Enhance your raspberry patch by planting companion plants like garlic, chives, or marigolds. These can help deter pests and attract beneficial insects, creating a healthier ecosystem.
* Different Varieties: Don’t limit yourself to just one type of raspberry! Experiment with different varieties to discover your favorites. Consider everbearing raspberries for a longer harvest season or black raspberries for a unique flavor profile.
* Raspberry Propagation: Once your raspberry plants are established, you can easily propagate them to create new plants. This is a cost-effective way to expand your raspberry patch or share your bounty with friends and family.
Growing raspberries at home is a journey, not a destination. There will be challenges along the way, but the rewards are well worth the effort. Imagine the delicious pies, jams, smoothies, and desserts you can create with your homegrown raspberries. Think of the joy of sharing your harvest with loved ones. And picture yourself strolling through your garden, plucking ripe berries straight from the cane and savoring their exquisite flavor.
We wholeheartedly encourage you to give this DIY trick a try. Start small, be patient, and don’t be afraid to experiment. The more you learn, the more successful you’ll become. And most importantly, don’t forget to share your experience with us! We’d love to hear about your successes, challenges, and favorite raspberry recipes. Share your photos and stories on our social media channels using #HomegrownRaspberries. Let’s build a community of passionate raspberry growers and inspire others to discover the joys of growing their own food. Happy gardening!
Frequently Asked Questions (FAQ)
Q: What is the best time of year to plant raspberries?
A: The best time to plant raspberries depends on your climate and the type of raspberry you’re planting. In general, fall or early spring are the ideal times. Fall planting allows the plants to establish their roots before winter, giving them a head start in the spring. Spring planting should be done as soon as the ground is workable. For bare-root raspberries, early spring is usually the best option. Container-grown raspberries can be planted throughout the growing season, but avoid planting during the hottest part of summer.
Q: What kind of soil do raspberries need?
A: Raspberries thrive in well-drained, slightly acidic soil with a pH between 6.0 and 6.8. The soil should be rich in organic matter, such as compost or well-rotted manure. Avoid planting raspberries in heavy clay soil, as this can lead to root rot. If your soil is poor, amend it with plenty of organic matter before planting. Good drainage is crucial for raspberry health, so ensure the planting site doesn’t retain water after rain.
Q: How much sun do raspberries need?
A: Raspberries need at least 6-8 hours of direct sunlight per day to produce a good crop of berries. Choose a planting location that receives full sun, especially during the morning hours. Afternoon shade can be beneficial in hot climates to prevent the berries from scorching. Insufficient sunlight can result in reduced yields and smaller, less flavorful berries.
Q: How often should I water my raspberry plants?
A: Raspberries need consistent moisture, especially during the growing season and when the berries are developing. Water deeply and regularly, aiming to keep the soil consistently moist but not waterlogged. The frequency of watering will depend on your climate, soil type, and rainfall. Check the soil moisture regularly and water when the top inch feels dry to the touch. Mulching around the plants can help retain moisture and reduce the need for frequent watering.
Q: How do I prune my raspberry plants?
A: Pruning is essential for maintaining the health and productivity of your raspberry plants. The pruning method depends on the type of raspberry you’re growing (everbearing or summer-bearing). Summer-bearing raspberries produce fruit on the previous year’s canes. After harvesting, cut these canes down to the ground. Everbearing raspberries produce fruit on the top portion of the current year’s canes in the fall. You can either prune these canes down to the ground after harvesting the fall crop or prune only the top portion that fruited, leaving the lower portion to produce a second crop the following summer. Remove any weak, damaged, or diseased canes at any time of year.
Q: What are some common pests and diseases that affect raspberries?
A: Raspberries can be susceptible to various pests and diseases, including aphids, spider mites, raspberry cane borers, raspberry fruitworms, and fungal diseases like anthracnose and cane blight. Regularly inspect your plants for signs of pests or diseases. Use organic pest control methods, such as insecticidal soap or neem oil, to control pests. Ensure good air circulation around the plants to prevent fungal diseases. Remove and destroy any infected canes or leaves to prevent the spread of disease.
Q: Can I grow raspberries in containers?
A: Yes, you can successfully grow raspberries in containers, especially if you have limited space. Choose a large container (at least 15-20 gallons) with good drainage. Use a high-quality potting mix that is well-draining and rich in organic matter. Select a compact or dwarf raspberry variety that is well-suited for container growing. Water regularly and fertilize as needed. Container-grown raspberries may need more frequent watering and fertilization than those grown in the ground.
Q: How do I fertilize my raspberry plants?
A: Raspberries benefit from regular fertilization to promote healthy growth and abundant fruit production. Apply a balanced fertilizer (e.g., 10-10-10) in early spring, before new growth begins. You can also use organic fertilizers, such as compost or well-rotted manure. Avoid over-fertilizing, as this can lead to excessive vegetative growth and reduced fruit production. Follow the fertilizer manufacturer’s instructions for application rates.
Q: How long does it take for raspberry plants to produce fruit?
A: The time it takes for raspberry plants to produce fruit depends on the type of raspberry and the planting method. Bare-root raspberries typically take 1-2 years to produce a significant crop. Container-grown raspberries may produce fruit sooner, sometimes in the first year. Everbearing raspberries will produce a fall crop in their first year and a summer crop in subsequent years. Summer-bearing raspberries will produce fruit in their second year.
Q: How do I protect my raspberries from birds?
A: Birds love to feast on ripe raspberries, so it’s important to protect your crop. The most effective way to protect your raspberries from birds is to cover the plants with netting. Use bird netting with small holes to prevent birds from getting trapped. Secure the netting around the plants, ensuring that there are no gaps for birds to enter. You can also use bird-scaring devices, such as reflective tape or scarecrows, but these may not be as effective as netting.
Leave a Comment