

Growing Potatoes at Home might seem daunting, conjuring images of sprawling farms and heavy machinery. But guess what? You don’t need acres of land to enjoy the satisfaction of harvesting your own spuds! This DIY guide is your passport to a bountiful potato harvest, right in your backyard, balcony, or even on your windowsill.
For centuries, potatoes have been a staple food, fueling civilizations and providing essential nutrients. Originating in the Andes Mountains of South America, they’ve traveled the globe, becoming a cornerstone of countless cuisines. Think about it – from crispy fries to creamy mashed potatoes, this humble vegetable has a rich and delicious history.
But why bother growing your own? Well, beyond the sheer joy of nurturing life from seed (or in this case, a potato!), growing potatoes at home allows you to control exactly what goes into your food. No more worrying about pesticides or questionable farming practices. Plus, freshly harvested potatoes taste unbelievably better than anything you’ll find at the grocery store. Imagine the pride you’ll feel serving up a meal featuring potatoes you grew yourself! This DIY project is not only rewarding but also a step towards a more sustainable and healthier lifestyle. So, grab your gardening gloves, and let’s get started on this exciting adventure!
Growing Potatoes in Buckets: A Beginner’s Guide
Hey there, fellow gardening enthusiasts! I’m so excited to share my favorite way to grow potatoes – in buckets! It’s perfect for small spaces, balconies, or even just to keep your potato patch contained. Trust me, once you taste homegrown potatoes, you’ll never go back to store-bought! This guide will walk you through every step, from choosing the right potatoes to harvesting your delicious bounty.
Choosing Your Seed Potatoes
First things first, you need seed potatoes. These aren’t just any potatoes you find at the grocery store. Those are often treated to prevent sprouting. Seed potatoes are specifically grown for planting and are certified disease-free. You can find them at your local garden center or online.
* Variety is the Spice of Life: Consider what kind of potatoes you like to eat. Do you prefer Yukon Golds for their creamy texture? Or maybe Russets for fluffy baked potatoes? There are tons of varieties to choose from, so do a little research and pick what sounds best to you.
* Size Matters (Sort Of): You can plant whole small seed potatoes, or cut larger ones into pieces. Each piece should have at least one or two “eyes” (those little buds that sprout).
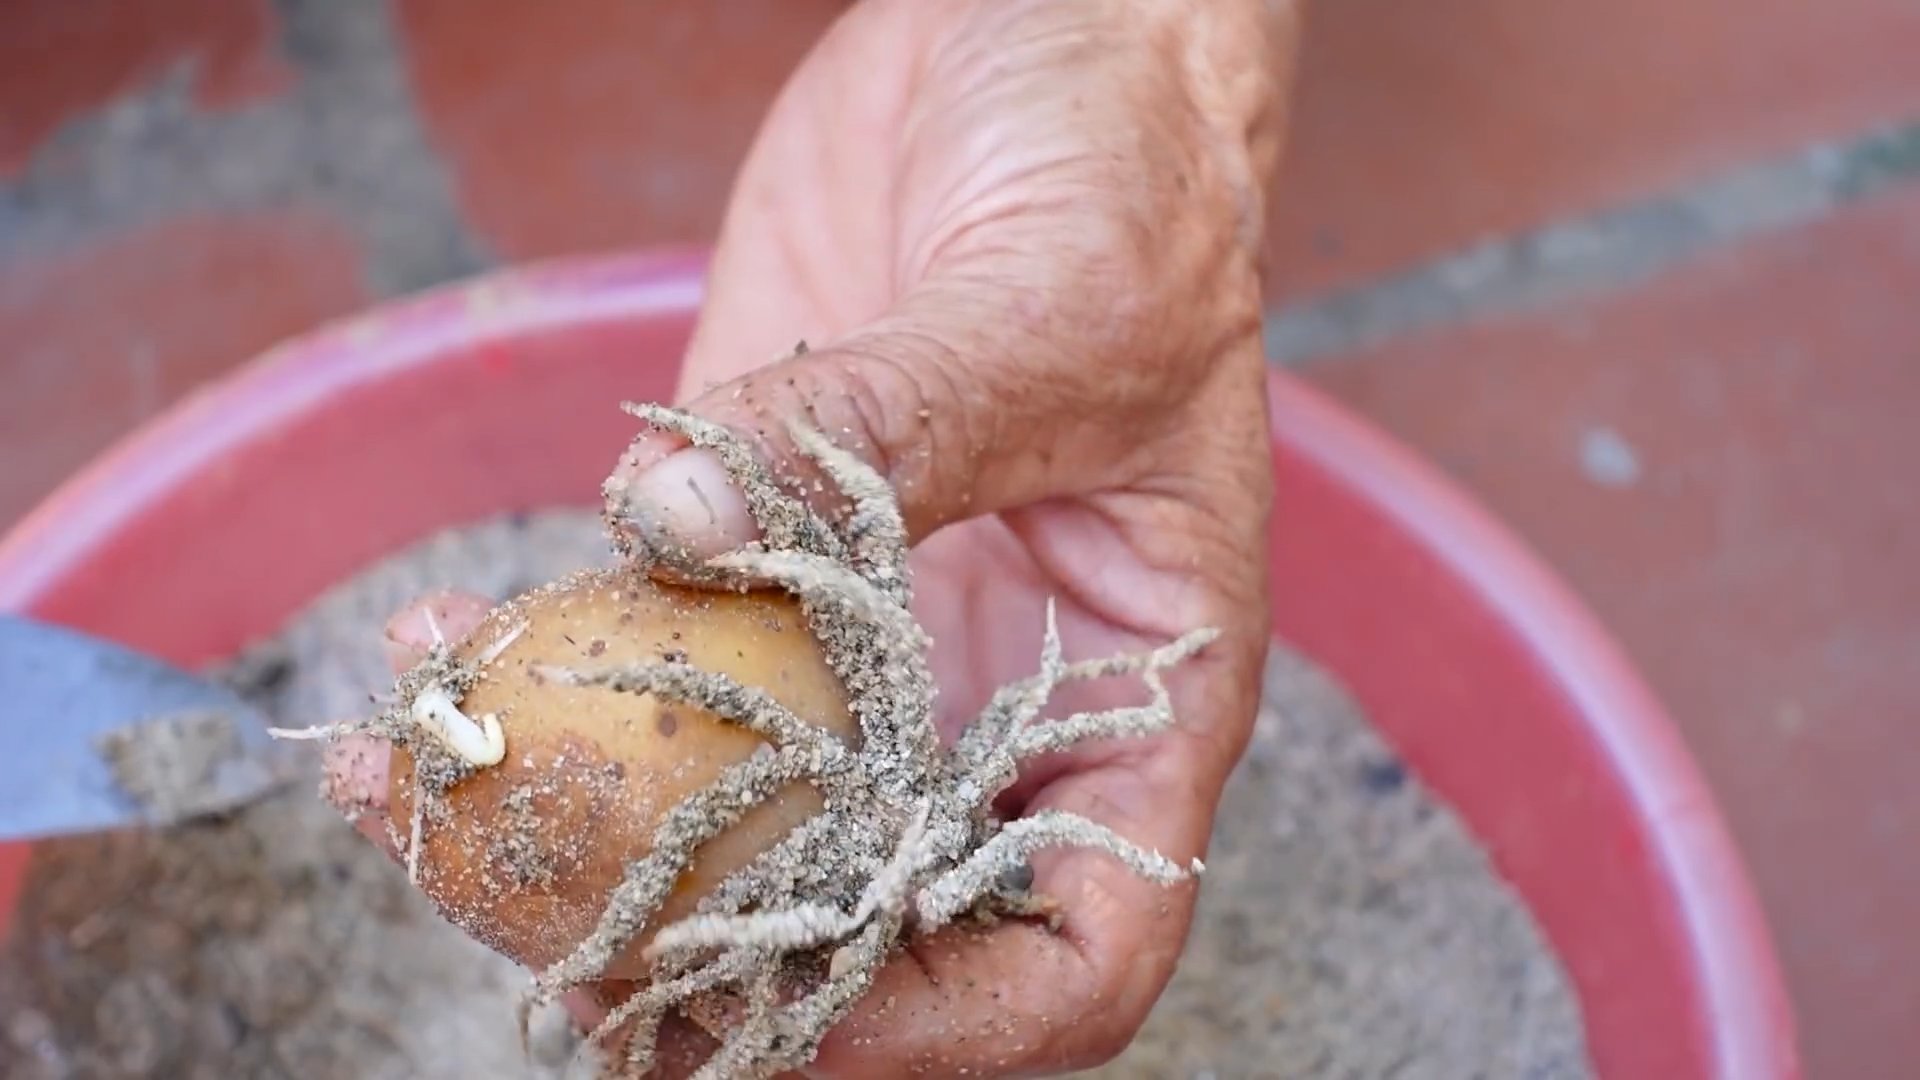
* Chitting (Optional, But Recommended): Chitting is the process of encouraging your seed potatoes to sprout before planting. This gives them a head start and can result in an earlier harvest.
Preparing Your Seed Potatoes
Okay, let’s get those potatoes ready for planting!
1. Chitting (If You Choose To): A few weeks before your expected planting date, place your seed potatoes in a cool, bright location. An egg carton or a tray works great. Make sure the eyes are facing upwards. You’ll see little green sprouts start to emerge.
2. Cutting (If Necessary): If your seed potatoes are large, cut them into pieces, ensuring each piece has at least two eyes. Let the cut pieces sit for a day or two to allow the cut surfaces to callous over. This helps prevent rot. I usually cut mine a day before planting.
Setting Up Your Potato Buckets
Now for the fun part – creating the perfect potato home!
* Bucket Selection: I recommend using 5-gallon buckets. They’re readily available and provide enough space for a decent potato crop. Make sure they’re clean!
* Drainage is Key: Drill several drainage holes in the bottom of each bucket. Potatoes hate sitting in soggy soil.
* Location, Location, Location: Potatoes need at least 6-8 hours of sunlight per day. Choose a sunny spot for your buckets.
Planting Your Seed Potatoes
Alright, let’s get those potatoes in the ground (or, well, in the bucket)!
1. Layering the Soil: Start by adding about 4-6 inches of well-draining potting mix to the bottom of each bucket. I like to use a mix of compost, peat moss, and perlite.
2. Planting the Seed Potatoes: Place your seed potato pieces (or whole small potatoes) on top of the soil, with the eyes facing upwards. Space them evenly if you’re planting more than one piece per bucket. I usually plant 2-3 pieces in a 5-gallon bucket.
3. Covering the Potatoes: Cover the seed potatoes with another 4-6 inches of potting mix.
4. Watering: Water thoroughly, but gently, until the soil is moist but not soggy.
The “Hilling” Process: Encouraging More Potatoes
This is where the magic happens! “Hilling” is the process of adding more soil to the bucket as the potato plants grow. This encourages the plants to produce more potatoes along the buried stem.
1. Waiting for Growth: Wait until the potato plants have emerged and are about 6-8 inches tall.
2. Adding More Soil: Add another 4-6 inches of potting mix to the bucket, burying the lower part of the stems. Leave the top few inches of the plant exposed.
3. Repeating the Process: Continue this process every few weeks as the plants grow, until the bucket is almost full. Always leave a few inches of space at the top for watering.
Caring for Your Potato Plants
Now that your potatoes are planted, it’s time to give them some TLC.
* Watering: Potatoes need consistent moisture, especially during flowering and tuber formation. Water deeply whenever the top inch of soil feels dry. Avoid overwatering, as this can lead to rot.
* Fertilizing: Feed your potato plants with a balanced fertilizer every few weeks. Look for a fertilizer that’s specifically formulated for vegetables. Follow the instructions on the fertilizer package.
* Pest Control: Keep an eye out for pests like aphids, potato beetles, and flea beetles. Hand-picking them off the plants is often effective. You can also use organic pest control methods like insecticidal soap or neem oil.
* Sunlight: Remember, potatoes need at least 6-8 hours of sunlight per day. If your plants aren’t getting enough sun, they may become leggy and produce fewer potatoes.
Harvesting Your Potato Crop
The moment you’ve been waiting for!
1. Knowing When to Harvest: The timing of your harvest depends on the variety of potato you’re growing and when you planted them. Generally, you can start harvesting “new potatoes” (small, tender potatoes) a few weeks after the plants have flowered. For larger, mature potatoes, wait until the foliage starts to die back.
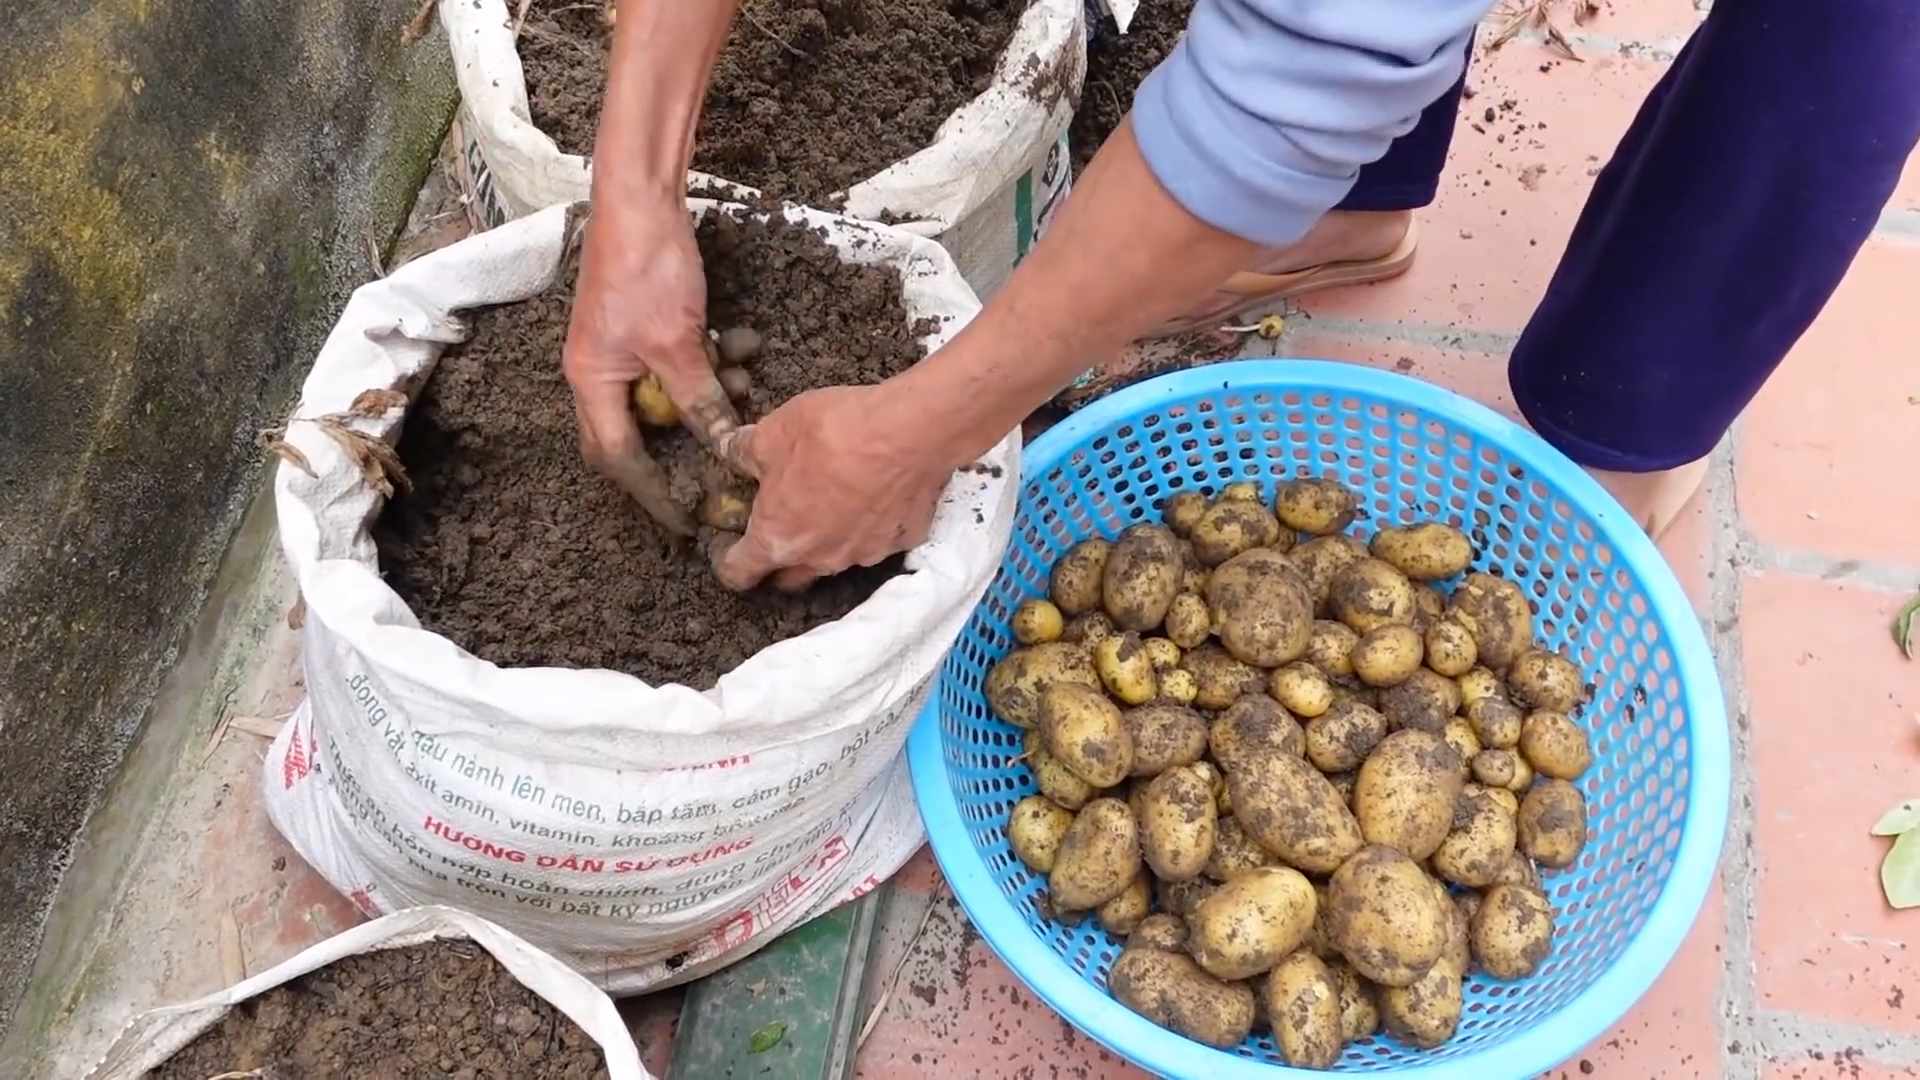
2. Checking for Readiness: Gently dig around the base of the plant to check the size of the potatoes. If they’re the size you want, it’s time to harvest!
3. Harvesting the Potatoes: The easiest way to harvest potatoes from a bucket is to simply dump the bucket out onto a tarp or other surface. Gently sift through the soil to find your buried treasure!
4. Curing (Optional): If you plan to store your potatoes for a longer period, you can cure them. To cure potatoes, spread them out in a cool, dark, and well-ventilated place for a week or two. This helps to toughen the skins and prevent rot.
Troubleshooting Common Potato Problems
Even with the best care, you might encounter some problems along the way. Here are a few common issues and how to deal with them:
* Potato Scab: This is a common fungal disease that causes rough, scabby patches on the potato skins. It’s usually not a serious problem, but it can make the potatoes look less appealing. To prevent potato scab, avoid overwatering and make sure your soil is well-draining.
* Early Blight: This is another fungal disease that causes dark spots on the leaves. It can weaken the plants and reduce yields. To prevent early blight, water at the base of the plants and avoid overhead watering. You can also use a fungicide if necessary.
* Potato Beetles: These pesky beetles can quickly defoliate your potato plants. Hand-picking them off the plants is often effective. You can also use organic insecticides like neem oil or spinosad.
* Rotting Potatoes: This can be caused by overwatering or poor drainage. Make sure your soil is well-draining and avoid overwatering. If you see any rotting potatoes, remove them immediately to prevent the rot from spreading.
Enjoying Your Homegrown Potatoes
Congratulations! You’ve successfully grown potatoes in buckets! Now it’s time to enjoy the fruits (or rather, the tubers) of your labor.
* Cooking: Homegrown potatoes taste amazing in just about any dish. Try them roasted, mashed, fried, or in potato salad.
* Storing: Store your potatoes in a cool, dark, and well-ventilated place. They should last for several months if stored properly.
Tips and Tricks for Potato Growing Success
Here are a few extra tips to help you get the most out of your potato-growing experience:
* Rotate Your Crops: Don’t plant potatoes in the same spot year after year. Rotating your crops helps to prevent soilborne diseases and pests.
* Use Organic Soil Amendments: Adding organic matter like compost or aged manure to your soil can improve its drainage, fertility, and water-holding capacity.
* Mulch Your Plants: Mulching around your potato plants can help to retain moisture, suppress weeds, and regulate soil temperature.
* Experiment with Different Varieties: Try growing different varieties of potatoes to see which ones you like best and which ones grow best in your area.
* Have Fun!: Gardening should be enjoyable! Don’t be afraid to experiment and learn from your mistakes.
Growing potatoes in buckets is a rewarding and fun experience. With a little bit of effort, you can enjoy a delicious harvest of homegrown potatoes. Happy gardening!
Conclusion
So, there you have it! Growing potatoes at home, while it might seem daunting at first, is an incredibly rewarding and surprisingly simple process. We’ve walked you through the steps, from selecting the right seed potatoes to harvesting your own homegrown bounty. But why should you bother?
The answer is multifaceted. First and foremost, the taste of freshly dug, homegrown potatoes is simply unparalleled. Forget the bland, mass-produced spuds you find in the supermarket. These potatoes burst with flavor, a testament to the care and attention you’ve given them. The difference is truly remarkable.
Beyond the superior taste, growing your own potatoes offers a level of control and transparency you just can’t get with store-bought produce. You know exactly what went into growing them – no harsh chemicals, no mystery ingredients, just good old-fashioned soil, water, and sunshine. This is especially important for those concerned about organic practices and sustainable living.
Furthermore, it’s a fantastic way to connect with nature and get your hands dirty (literally!). Gardening is a therapeutic activity, proven to reduce stress and boost your mood. Watching your potato plants grow from tiny sprouts to flourishing bushes, and then unearthing the hidden treasure beneath the soil, is an incredibly satisfying experience.
And let’s not forget the cost savings! While there’s an initial investment in seed potatoes and perhaps some soil amendments, the yield you’ll get from even a small plot can significantly reduce your grocery bill. Plus, you can save some of your harvest to use as seed potatoes for the following year, creating a sustainable cycle of homegrown goodness.
Ready to take your potato growing to the next level? Consider experimenting with different varieties. From the creamy Yukon Gold to the vibrant purple potatoes, each offers a unique flavor and texture profile. You can also try different growing methods, such as container gardening or straw bale gardening, to suit your space and preferences. Don’t be afraid to get creative and adapt the techniques to your specific needs.
Growing potatoes at home is more than just a gardening project; it’s an investment in your health, your well-being, and your connection to the natural world. It’s a chance to experience the joy of growing your own food and savor the unparalleled taste of homegrown goodness.
So, what are you waiting for? Grab some seed potatoes, prepare your soil, and get ready to embark on this exciting gardening adventure. We encourage you to try this DIY trick and share your experiences with us in the comments below. Let us know what varieties you’re growing, what challenges you’ve faced, and what successes you’ve celebrated. Together, we can create a community of passionate potato growers and inspire others to discover the joys of homegrown produce. Happy growing!
Frequently Asked Questions (FAQ)
What are the best potato varieties to grow at home?
The “best” potato variety really depends on your personal preferences and growing conditions. However, some popular and reliable choices for home gardens include:
* **Yukon Gold:** Known for its creamy texture and buttery flavor, Yukon Gold is a versatile potato that’s great for boiling, roasting, and mashing.
* **Red Pontiac:** A classic red-skinned potato with a firm texture and slightly sweet flavor. It’s excellent for boiling, salads, and roasting.
* **Russet Burbank:** The quintessential baking potato, Russet Burbank has a fluffy texture and mild flavor. It’s also good for frying.
* **Fingerling Potatoes (e.g., Russian Banana, French Fingerling):** These small, elongated potatoes have a unique shape and a waxy texture. They’re delicious roasted, boiled, or used in salads.
* **Purple Potatoes (e.g., All Blue, Purple Majesty):** These vibrant potatoes add a pop of color to your plate and have a slightly nutty flavor. They’re good for roasting, boiling, and mashing.
Consider your local climate and soil conditions when selecting your potato varieties. Some varieties are better suited to certain regions than others. Also, think about how you plan to use your potatoes. If you primarily want baking potatoes, Russet Burbank is a good choice. If you prefer potatoes for salads, Red Pontiac or fingerling potatoes might be a better option.
How much space do I need to grow potatoes?
Potatoes need adequate space to grow and develop properly. As a general rule, you should allow at least 12 inches between potato plants in a row and 30-36 inches between rows. This spacing allows the plants to receive enough sunlight and air circulation, which helps prevent disease.
If you’re growing potatoes in containers, choose pots that are at least 15-20 gallons in size. This will provide enough room for the potato tubers to develop. You can grow one or two potato plants per container, depending on the size of the container and the variety of potato.
Even with limited space, you can still enjoy growing potatoes at home. Consider using vertical gardening techniques, such as potato towers or grow bags, to maximize your growing space.
How often should I water my potato plants?
Potato plants need consistent moisture, especially during tuber formation. Water your potato plants deeply whenever the top inch of soil feels dry to the touch. Avoid overwatering, as this can lead to root rot.
The frequency of watering will depend on your climate, soil type, and the stage of growth of your potato plants. In hot, dry weather, you may need to water your plants daily. In cooler, wetter weather, you may only need to water them every few days.
A good way to check if your potato plants need water is to stick your finger into the soil near the base of the plant. If the soil feels dry, it’s time to water.
What are common potato pests and diseases, and how can I prevent them?
Potatoes are susceptible to a variety of pests and diseases, including:
* **Colorado Potato Beetle:** This beetle can defoliate potato plants, reducing yields. Handpick beetles and larvae, or use an organic insecticide like neem oil.
* **Potato Leafhopper:** These small insects suck sap from potato leaves, causing them to curl and turn yellow. Use row covers to protect your plants, or spray with insecticidal soap.
* **Early Blight:** This fungal disease causes dark, circular spots on potato leaves. Improve air circulation around your plants, and avoid overhead watering. Use a copper fungicide if necessary.
* **Late Blight:** This devastating fungal disease can quickly destroy potato plants. Choose disease-resistant varieties, and monitor your plants closely. Use a fungicide if necessary.
* **Scab:** This bacterial disease causes rough, scabby lesions on potato tubers. Plant disease-free seed potatoes, and avoid overwatering.
To prevent potato pests and diseases, practice good garden hygiene. Remove any diseased or infested plants promptly, and rotate your crops each year. Also, choose disease-resistant potato varieties whenever possible.
When and how do I harvest my potatoes?
The timing of your potato harvest will depend on the variety of potato you’re growing and whether you want “new potatoes” or mature potatoes.
* **New Potatoes:** These are small, immature potatoes that are harvested early in the season. They have thin skins and a delicate flavor. You can start harvesting new potatoes about 2-3 weeks after the potato plants have finished flowering. Gently dig around the base of the plant to harvest the potatoes, being careful not to damage the remaining tubers.
* **Mature Potatoes:** These are fully grown potatoes that are harvested later in the season. They have thicker skins and a longer storage life. Wait until the potato plants have died back completely before harvesting mature potatoes. Dig up the potatoes carefully, using a garden fork or shovel.
After harvesting your potatoes, cure them in a cool, dark, and well-ventilated place for about 1-2 weeks. This will help to toughen the skins and improve their storage life. Store your cured potatoes in a cool, dark, and dry place, such as a root cellar or basement.
Can I grow potatoes in containers?
Yes, you can absolutely grow potatoes in containers! This is a great option for gardeners with limited space or poor soil. Choose a large container (at least 15-20 gallons) with drainage holes. Fill the container with a well-draining potting mix. Plant seed potatoes about 4-6 inches deep, and water thoroughly. As the potato plants grow, add more soil to the container, burying the stems. This encourages the plants to produce more tubers. Keep the soil moist but not soggy, and fertilize regularly.
How do I store my homegrown potatoes?
Proper storage is crucial for extending the shelf life of your homegrown potatoes. After harvesting and curing your potatoes, store them in a cool, dark, and dry place. The ideal storage temperature is between 40-50°F (4-10°C). A root cellar or basement is ideal, but a cool pantry or garage can also work.
Avoid storing potatoes near apples or bananas, as these fruits release ethylene gas, which can cause potatoes to sprout prematurely. Also, avoid storing potatoes in direct sunlight, as this can cause them to turn green and develop a bitter taste.
With proper storage, your homegrown potatoes can last for several months. Check your potatoes regularly for signs of spoilage, such as soft spots or sprouts. Remove any spoiled potatoes to prevent them from affecting the rest of your harvest.

Leave a Comment