

Growing Peppers at Home can seem daunting, but trust me, it’s more achievable (and rewarding!) than you might think. Have you ever dreamt of plucking a perfectly ripe, fiery habanero straight from your backyard to spice up your tacos? Or maybe you envision a vibrant display of colorful bell peppers adding a touch of beauty to your garden and your dinner plate? Well, stop dreaming and start doing! This DIY guide is packed with simple tricks and hacks that will transform even the most novice gardener into a pepper-growing pro.
Peppers have a rich history, dating back thousands of years to South America, where they were not only a staple food but also held cultural and medicinal significance. From the ancient Aztecs using chili peppers in rituals to the global spice trade that spread them across continents, peppers have always held a special place in human history. Today, they remain a beloved ingredient worldwide, adding flavor and heat to countless dishes.
But why should you bother growing peppers at home when you can just buy them at the store? Simple: freshness, flavor, and control! Store-bought peppers often lack the vibrant taste and crisp texture of homegrown varieties. Plus, when you grow your own, you know exactly what’s going into them – no harmful pesticides or chemicals. This DIY guide will empower you to cultivate a thriving pepper patch, regardless of your experience level or garden size. We’ll cover everything from seed starting to pest control, ensuring you have a bountiful harvest of delicious peppers all season long. Let’s get started!
Growing Peppers at Home: A Beginner’s Guide to Spicy Success
Hey there, fellow gardening enthusiasts! I’m so excited to share my tried-and-true method for growing peppers at home. Whether you’re dreaming of fiery habaneros or sweet bell peppers, this guide will walk you through every step, from seed to salsa. Let’s get our hands dirty!
Choosing Your Pepper Varieties
Before we even think about soil, let’s talk peppers! The world of peppers is vast and exciting. Consider these factors when choosing your varieties:
* Heat Level: This is the most obvious! Do you want a mild bell pepper, a medium jalapeño, or a scorching ghost pepper? The Scoville scale measures pepper heat, so do some research.
* Growing Conditions: Some peppers thrive in hot, sunny climates, while others prefer cooler temperatures. Check the seed packet or plant label for specific requirements.
* Space: Some pepper plants grow quite large, so consider the space you have available. Container gardening is a great option for smaller spaces.
* Purpose: Are you planning to make hot sauce, stuff peppers, or just add them to your salads? Different peppers are better suited for different uses.
Some of my personal favorites include:
* Jalapeños: Versatile and easy to grow.
* Bell Peppers: Classic and sweet.
* Serranos: A good medium heat option.
* Habaneros: For those who like it hot!
Starting Your Pepper Seeds Indoors
Starting your pepper seeds indoors is crucial, especially if you live in a region with a shorter growing season. This gives your plants a head start and ensures a bountiful harvest.
What You’ll Need:
* Pepper seeds
* Seed starting trays or small pots
* Seed starting mix (a light, well-draining mix)
* Watering can or spray bottle
* Heat mat (optional, but recommended)
* Grow lights (essential)
* Humidity dome (optional, but helpful)
Step-by-Step Instructions:
1. Prepare Your Seed Starting Trays: Fill your seed starting trays or pots with seed starting mix. Gently tap the trays to settle the soil.
2. Sow Your Seeds: Make a small indentation (about ¼ inch deep) in the soil. Place 1-2 seeds in each indentation. Cover the seeds with a thin layer of soil.
3. Water Gently: Use a watering can or spray bottle to gently moisten the soil. Avoid overwatering, as this can lead to damping off (a fungal disease that kills seedlings).
4. Provide Heat: Place your seed starting trays on a heat mat. Peppers germinate best in warm temperatures (around 80-85°F).
5. Provide Light: Place your seed starting trays under grow lights. Keep the lights on for 14-16 hours per day. Adjust the height of the lights as your seedlings grow, keeping them a few inches above the plants.
6. Maintain Humidity: Cover your seed starting trays with a humidity dome. This will help to keep the soil moist and create a humid environment that is ideal for germination.
7. Monitor and Water: Check the soil moisture daily. Water when the top inch of soil feels dry to the touch. Remove the humidity dome once the seedlings emerge.
8. Thin Seedlings: Once your seedlings have developed their first true leaves (the second set of leaves), thin them to one seedling per cell or pot. Choose the strongest, healthiest seedling and snip off the others at the soil line.
Transplanting Your Pepper Seedlings
Once your pepper seedlings have grown large enough and the weather has warmed up, it’s time to transplant them outdoors.
What You’ll Need:
* Your pepper seedlings
* Gardening gloves
* Trowel or shovel
* Well-draining soil
* Compost or other organic matter
* Watering can or hose
* Mulch (optional)
* Stakes or cages (optional, but recommended for taller varieties)
Hardening Off Your Seedlings:
Before transplanting your seedlings outdoors, you need to “harden them off.” This process gradually acclimates them to the outdoor environment and prevents them from being shocked by the change in temperature and sunlight.
1. Start Slowly: Begin by placing your seedlings outdoors in a sheltered location (e.g., a porch or patio) for 1-2 hours per day.
2. Increase Exposure: Gradually increase the amount of time your seedlings spend outdoors each day, adding an hour or two each time.
3. Protect from Harsh Conditions: Protect your seedlings from strong winds, direct sunlight, and frost.
4. Monitor and Water: Check the soil moisture regularly and water as needed.
5. After a Week or Two: After a week or two of hardening off, your seedlings should be ready to be transplanted into the garden.
Transplanting Instructions:
1. Choose a Sunny Location: Peppers need at least 6-8 hours of sunlight per day. Choose a location in your garden that receives plenty of sun.
2. Prepare the Soil: Dig a hole that is slightly larger than the root ball of your seedling. Amend the soil with compost or other organic matter to improve drainage and fertility.
3. Remove the Seedling: Gently remove the seedling from its pot or cell. Be careful not to damage the roots.
4. Plant the Seedling: Place the seedling in the hole and backfill with soil. Gently firm the soil around the base of the plant.
5. Water Thoroughly: Water the seedling thoroughly after planting.
6. Mulch (Optional): Apply a layer of mulch around the base of the plant to help retain moisture and suppress weeds.
7. Stake or Cage (Optional): If you are growing taller varieties of peppers, consider staking or caging them to provide support.
Caring for Your Pepper Plants
Once your pepper plants are in the ground, it’s important to provide them with the care they need to thrive.
Watering:
* Water your pepper plants regularly, especially during hot, dry weather.
* Water deeply, allowing the water to soak into the soil.
* Avoid overwatering, as this can lead to root rot.
* Water in the morning to allow the foliage to dry before nightfall.
Fertilizing:
* Fertilize your pepper plants every 2-3 weeks with a balanced fertilizer.
* Follow the instructions on the fertilizer label.
* Avoid over-fertilizing, as this can lead to excessive foliage growth and reduced fruit production.
* Consider using a fertilizer that is specifically formulated for peppers.
Pruning:
* Pruning pepper plants is not always necessary, but it can help to improve air circulation and promote fruit production.
* Remove any suckers (small shoots that grow from the base of the plant).
* Remove any yellowing or diseased leaves.
* Pinch off the tips of the branches to encourage branching.
Pest and Disease Control:
* Monitor your pepper plants regularly for pests and diseases.
* Common pepper pests include aphids, spider mites, and whiteflies.
* Common pepper diseases include blossom end rot, fungal leaf spot, and viral diseases.
* Use organic pest and disease control methods whenever possible.
* Neem oil, insecticidal soap, and copper fungicide are effective organic options.
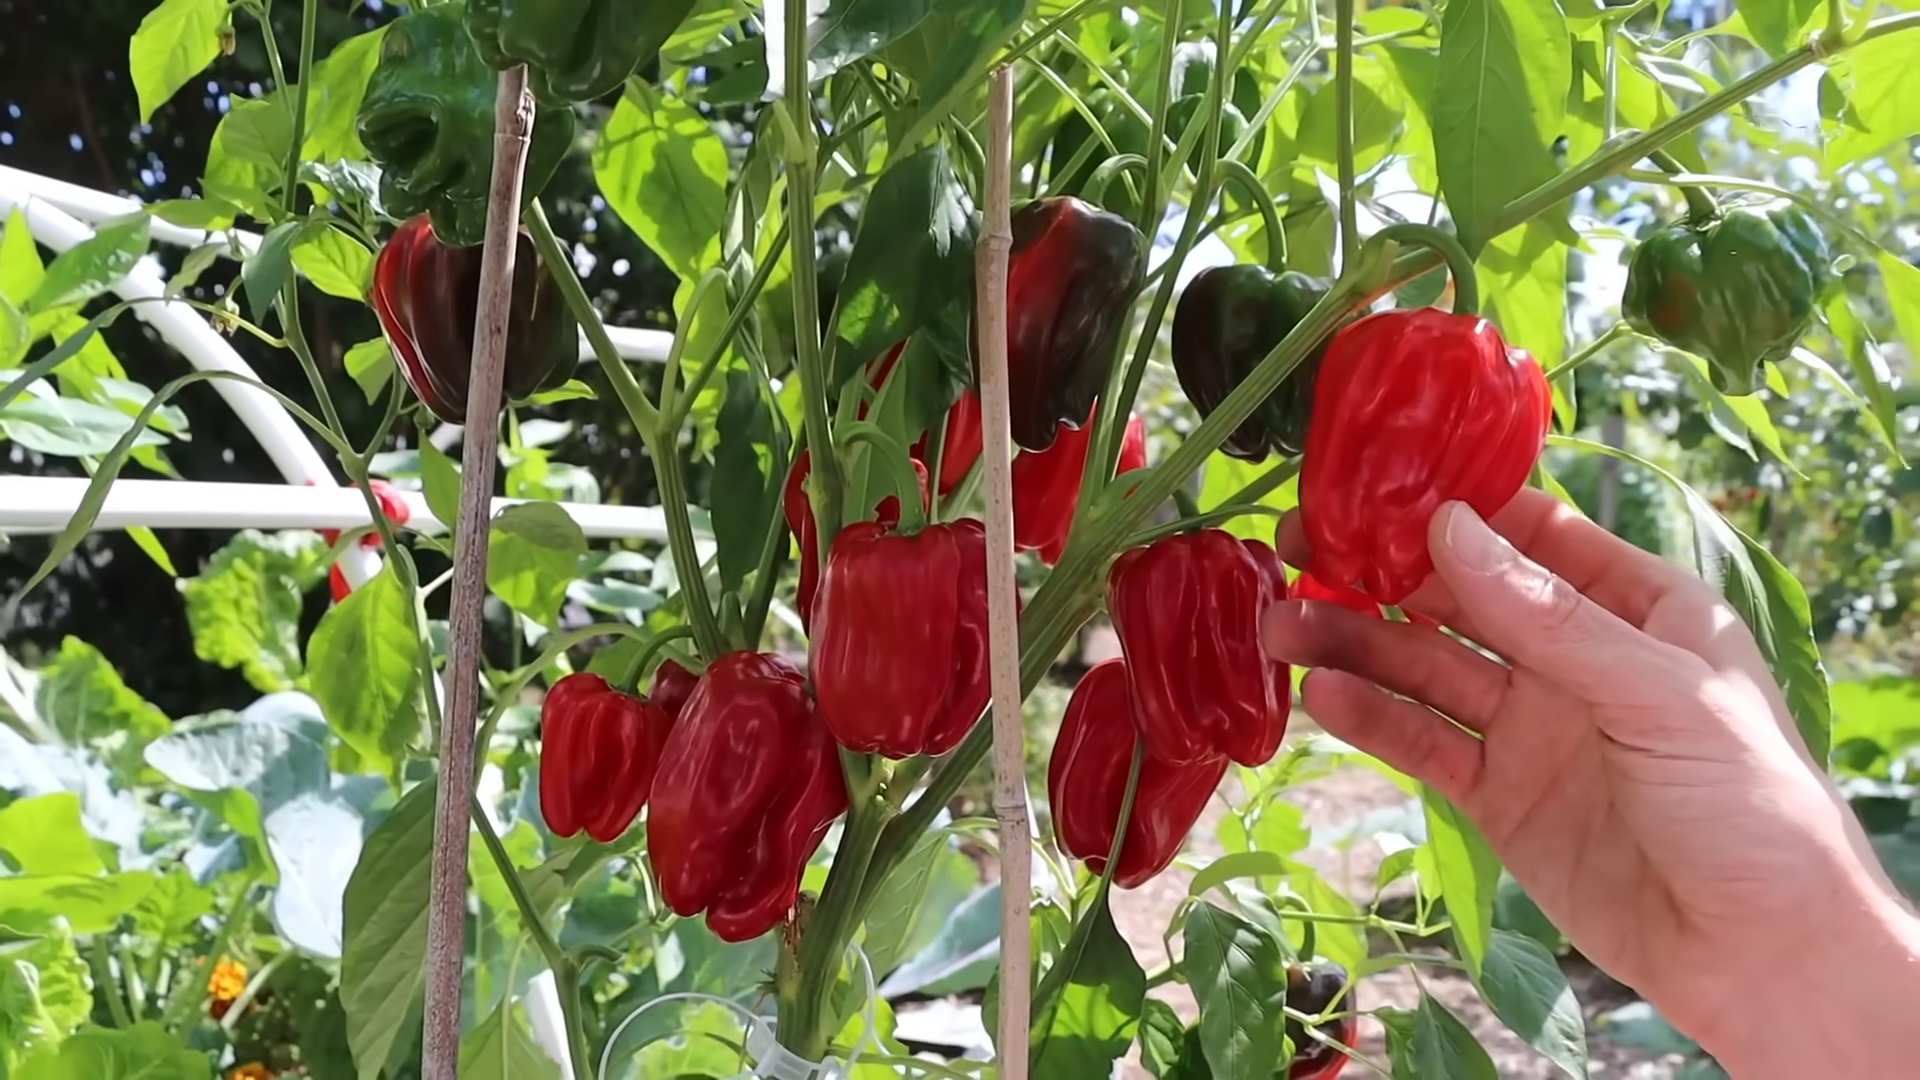
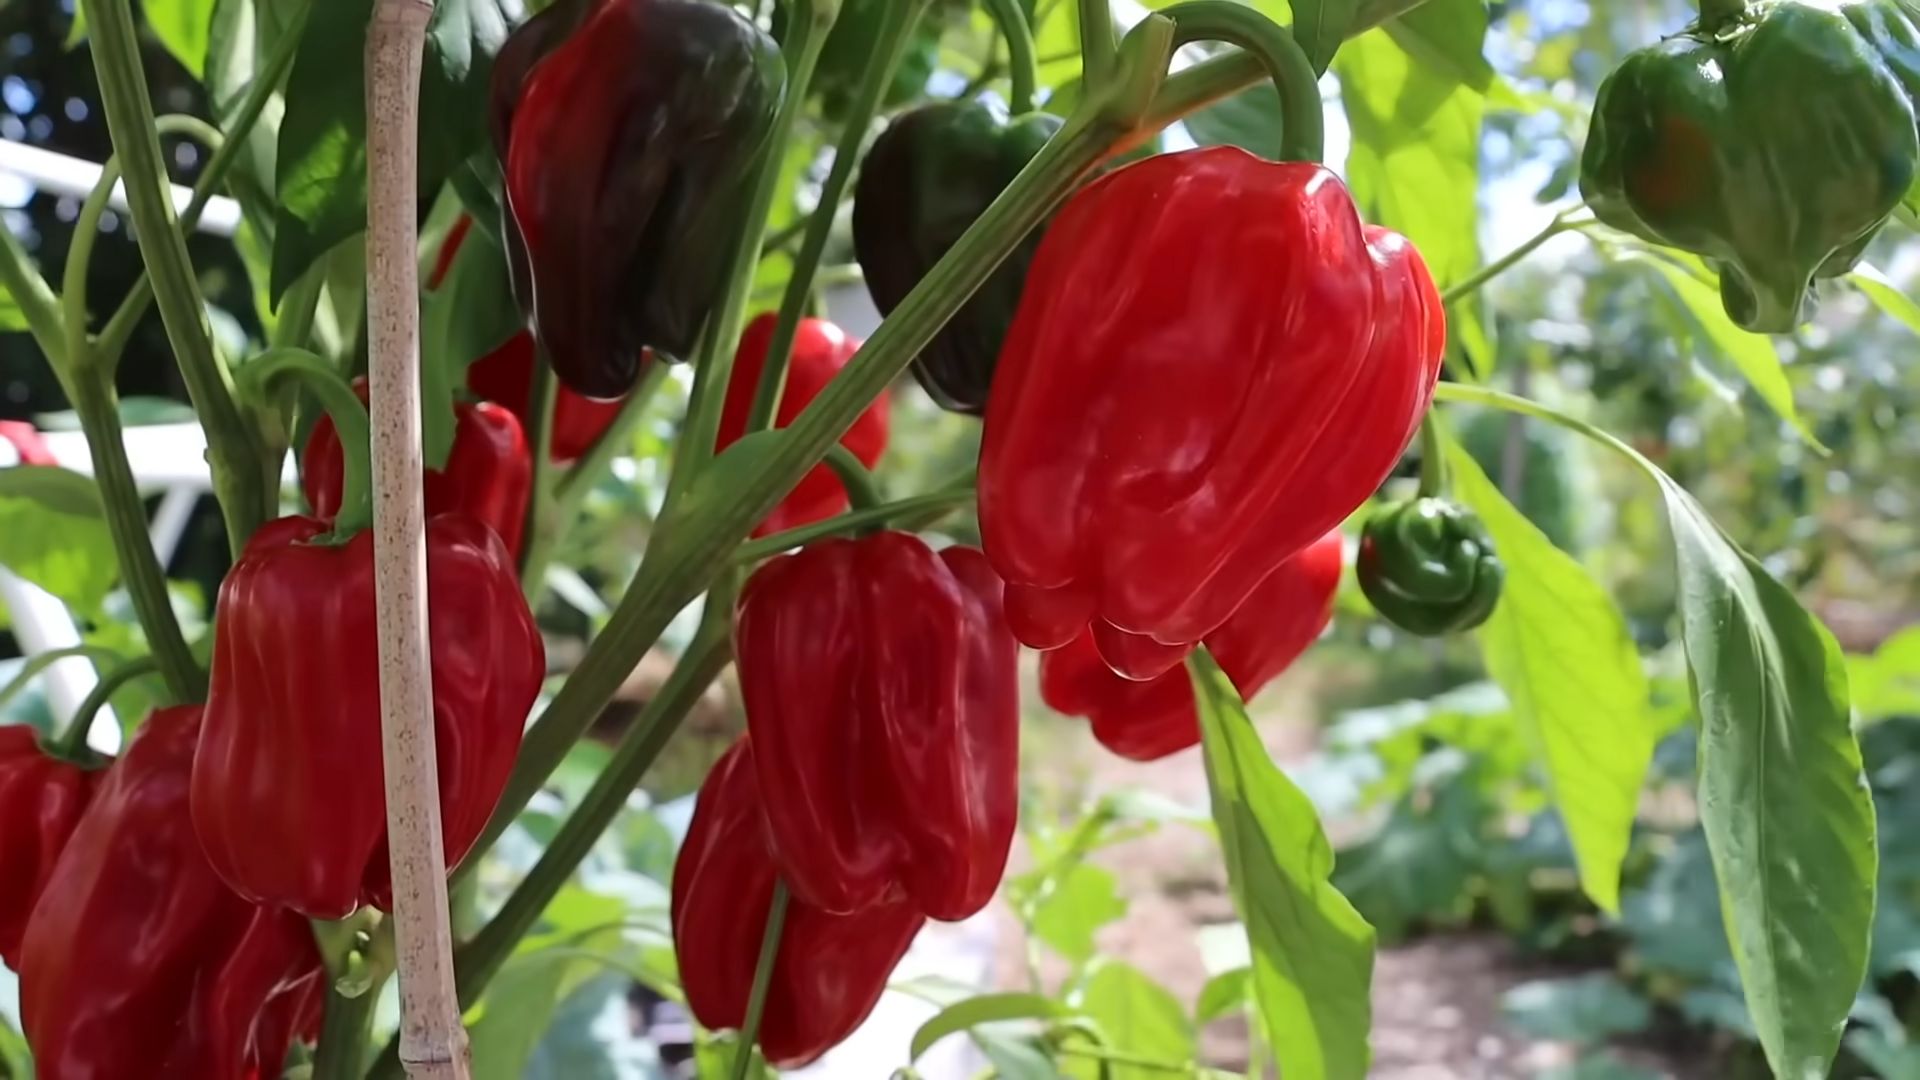
Harvesting Your Peppers
The moment we’ve all been waiting for! Knowing when to harvest your peppers is key to enjoying their full flavor and heat.
* Color: Most peppers change color as they ripen. Bell peppers, for example, start green and turn red, yellow, or orange.
* Size: Peppers will reach their mature size before they fully ripen.
* Firmness: Ripe peppers should be firm to the touch.
* Taste: The best way to know if a pepper is ripe is to taste it! (Be careful with hot peppers!)
Use pruning shears or a sharp knife to cut the peppers from the plant. Leave a small piece of stem attached to the pepper.
Troubleshooting Common Pepper Problems
Even with the best care, you might encounter some problems along the way. Here are a few common issues and how to address them:
* Blossom End Rot: This is caused by a calcium deficiency. Ensure consistent watering and consider adding calcium to the soil.
* Aphids: These tiny pests can suck the sap from your plants. Spray them with insecticidal soap or neem oil.
* Sunscald: This occurs when peppers are exposed to too much direct sunlight. Provide some shade during the hottest part of the day.
* Lack of Fruit: This can be caused by a variety of factors, including poor pollination, nutrient deficiencies, and extreme temperatures. Ensure proper pollination
Conclusion
So, there you have it! Growing peppers at home, especially using our simple DIY trick, is not just a gardening endeavor; it’s an investment in flavor, freshness, and a rewarding connection to the food you eat. We’ve walked you through the process, highlighting how easy it is to bypass common pitfalls and cultivate a thriving pepper patch, even if you’re a complete beginner.
Why is this DIY method a must-try? Because it streamlines the process, maximizes your yield, and minimizes the headaches often associated with pepper cultivation. By focusing on soil preparation, strategic watering, and providing adequate sunlight, you’re setting your plants up for success from the very beginning. This isn’t about complicated techniques or expensive equipment; it’s about understanding the fundamental needs of your pepper plants and meeting them in a simple, effective way.
But don’t stop there! The beauty of growing peppers is the endless possibilities for experimentation. Feel free to explore different varieties, from the mildest bell peppers to the fiery habaneros. Try companion planting with herbs like basil or rosemary to deter pests and enhance flavor. Consider using different types of containers, from traditional pots to raised beds, to find what works best for your space and preferences.
For those looking to take their pepper game to the next level, consider experimenting with different fertilizers. A balanced fertilizer during the early stages of growth will promote strong root development, while a fertilizer higher in phosphorus and potassium during flowering and fruiting will encourage abundant pepper production. Remember to always follow the instructions on the fertilizer label and avoid over-fertilizing, which can damage your plants.
Another variation to consider is the use of grow lights, especially if you live in an area with limited sunlight. Grow lights can provide your pepper plants with the supplemental light they need to thrive, even during the darker months of the year.
Ultimately, the best way to learn is by doing. Don’t be afraid to get your hands dirty, make mistakes, and learn from them. Each season will bring new challenges and opportunities for growth, both for your plants and for you as a gardener.
We are confident that with a little effort and our DIY trick, you’ll be harvesting a bountiful crop of delicious peppers in no time. Imagine the satisfaction of using your own homegrown peppers in your favorite recipes, from spicy salsas to flavorful stir-fries. The possibilities are endless!
So, what are you waiting for? Grab your seeds, prepare your soil, and get ready to embark on a pepper-growing adventure. We encourage you to try our DIY trick for growing peppers at home and share your experiences with us. Let us know what varieties you’re growing, what challenges you’ve faced, and what successes you’ve achieved. Share your photos and stories on our social media channels using #HomeGrownPeppers. We can’t wait to see what you create!
Frequently Asked Questions (FAQ)
Q: What is the most important factor in successfully growing peppers at home?
A: While several factors contribute to success, providing adequate sunlight is arguably the most crucial. Peppers thrive in warm, sunny conditions and require at least 6-8 hours of direct sunlight per day. Without sufficient sunlight, your plants may become leggy, produce fewer flowers, and ultimately yield fewer peppers. If you don’t have access to enough natural sunlight, consider using grow lights to supplement their needs.
Q: What kind of soil is best for growing peppers?
A: Peppers prefer well-draining soil that is rich in organic matter. A slightly acidic to neutral pH (around 6.0 to 7.0) is ideal. You can improve your soil by amending it with compost, aged manure, or other organic materials. Avoid heavy clay soils, as they can retain too much water and lead to root rot. If you have clay soil, consider growing your peppers in raised beds or containers with a well-draining potting mix.
Q: How often should I water my pepper plants?
A: Water your pepper plants deeply and regularly, especially during hot, dry weather. The frequency of watering will depend on factors such as the weather, soil type, and size of your plants. As a general rule, aim to keep the soil consistently moist but not waterlogged. Check the soil moisture by sticking your finger about an inch deep into the soil. If it feels dry, it’s time to water. Avoid overhead watering, as this can promote fungal diseases. Instead, water at the base of the plant.
Q: When should I start my pepper seeds indoors?
A: Start your pepper seeds indoors 6-8 weeks before the last expected frost in your area. This will give your seedlings a head start and allow them to develop strong root systems before being transplanted outdoors. Use a seed-starting mix and sow the seeds about ¼ inch deep. Keep the soil moist and warm (around 80-85°F) until germination. Once the seedlings emerge, provide them with plenty of light and gradually harden them off before transplanting them outdoors.
Q: How do I harden off my pepper seedlings?
A: Hardening off is the process of gradually acclimating your seedlings to outdoor conditions. This is essential to prevent transplant shock and ensure that your plants thrive once they are planted in the garden. Start by placing your seedlings outdoors in a sheltered location for a few hours each day, gradually increasing the amount of time they spend outside. Protect them from direct sunlight and strong winds. After about a week, they should be ready to be transplanted into the garden.
Q: What are some common pests and diseases that affect pepper plants?
A: Common pests that affect pepper plants include aphids, spider mites, whiteflies, and pepper weevils. Diseases include blossom-end rot, fungal leaf spot, and verticillium wilt. Regularly inspect your plants for signs of pests or diseases and take action promptly. Use organic pest control methods such as insecticidal soap or neem oil to control pests. Prevent diseases by providing good air circulation, avoiding overhead watering, and using disease-resistant varieties.
Q: What is blossom-end rot, and how can I prevent it?
A: Blossom-end rot is a common problem in peppers (and tomatoes) caused by a calcium deficiency. It appears as a dark, sunken spot on the blossom end of the fruit. To prevent blossom-end rot, ensure that your soil has adequate calcium levels. You can amend your soil with lime or bone meal before planting. Also, maintain consistent soil moisture, as fluctuations in watering can interfere with calcium uptake.
Q: How do I know when my peppers are ripe?
A: The ripeness of a pepper depends on the variety. Bell peppers are typically harvested when they are fully colored (green, red, yellow, or orange) and firm to the touch. Hot peppers are usually harvested when they have reached their mature color and size. You can also test the ripeness by tasting a small piece of the pepper. If it has the desired flavor and heat level, it’s ready to harvest.
Q: Can I grow peppers in containers?
A: Yes, peppers grow very well in containers. Choose a container that is at least 12 inches in diameter and has good drainage. Use a high-quality potting mix and provide your plants with plenty of sunlight and water. Container-grown peppers may need to be fertilized more frequently than those grown in the ground.
Q: What are some good companion plants for peppers?
A: Good companion plants for peppers include basil, rosemary, marigolds, and onions. Basil repels pests such as aphids and whiteflies, while rosemary deters cabbage moths and bean beetles. Marigolds attract beneficial insects that prey on pests, and onions repel aphids and other pests. Avoid planting peppers near fennel, as it can inhibit their growth.

Leave a Comment