

Growing Cauliflower at Home might seem daunting, but trust me, it’s more achievable (and rewarding!) than you think. Imagine harvesting your own crisp, white cauliflower head, knowing you nurtured it from a tiny seed to a culinary masterpiece. Forget those bland, overpriced heads at the grocery store – we’re talking about fresh, flavorful cauliflower bursting with nutrients, straight from your backyard!
Cauliflower’s journey from the Mediterranean to our plates is a fascinating one. Believed to have originated in Asia Minor, it was refined in Europe, particularly in Italy, hence the name “cauliflower” from the Italian “cavolfiore,” meaning “cabbage flower.” For centuries, it’s been a staple in various cuisines, prized for its versatility and health benefits. But why rely on commercial farms when you can easily embark on your own growing cauliflower at home adventure?
In today’s world, where we’re increasingly conscious of where our food comes from and the impact of industrial agriculture, growing your own vegetables is more relevant than ever. Plus, let’s be honest, who doesn’t love a good DIY project? This guide will equip you with simple, effective tricks and hacks to successfully cultivate cauliflower in your own garden, regardless of your experience level. We’ll cover everything from seed starting to pest control, ensuring you enjoy a bountiful harvest. So, grab your gardening gloves, and let’s get started!

Growing Cauliflower at Home: A Beginner’s Guide
Okay, so you want to grow cauliflower? Awesome! It might seem a little intimidating at first, but trust me, with a little patience and the right know-how, you can absolutely harvest your own delicious, homegrown cauliflower. I’m going to walk you through everything you need to know, from starting seeds to dealing with pests. Let’s get started!
Choosing Your Cauliflower Variety
First things first, you need to pick the right cauliflower variety for your climate and growing season. There are tons of options out there, and it can be a little overwhelming. Here are a few popular choices:
* Snowball Y Improved: This is a classic, reliable variety that produces medium-sized, pure white heads. It’s a good choice for beginners.
* Early White Hybrid: As the name suggests, this variety matures relatively quickly, making it a good option for shorter growing seasons.
* Graffiti: Want something a little different? Graffiti cauliflower produces vibrant purple heads that are just as tasty as the white varieties.
* Cheddar: This variety produces orange heads and is packed with extra Vitamin A.
* Romanesco: This one is a showstopper! Romanesco cauliflower has a unique, fractal-like appearance and a slightly nutty flavor.
Consider your local climate and the length of your growing season when making your choice. Seed packets will usually provide information about days to maturity, which is a helpful indicator.
Starting Your Cauliflower Seeds
You can either start your cauliflower seeds indoors or direct sow them in your garden. I personally prefer starting them indoors because it gives them a head start and protects them from early-season pests.
Here’s how to start your cauliflower seeds indoors:
1. Gather your supplies: You’ll need seed starting trays or small pots, seed starting mix (not regular potting soil!), cauliflower seeds, a spray bottle, and a warm, sunny location or a grow light.
2. Fill your trays or pots with seed starting mix: Gently fill each cell or pot with the mix, leaving about half an inch of space at the top.
3. Sow your seeds: Place 2-3 seeds in each cell or pot, about ¼ inch deep.
4. Water gently: Use a spray bottle to moisten the soil. You don’t want to soak it, just dampen it.
5. Provide warmth and light: Cauliflower seeds need warmth to germinate. Aim for a soil temperature of around 70-75°F (21-24°C). Place your trays or pots in a warm, sunny location or under a grow light. If using a grow light, keep it a few inches above the soil surface.
6. Keep the soil moist: Check the soil daily and water as needed to keep it consistently moist, but not soggy.
7. Thin your seedlings: Once your seedlings have emerged and have a couple of true leaves (the second set of leaves that appear), thin them to one seedling per cell or pot. Choose the strongest, healthiest-looking seedling and snip off the others at the soil line. Don’t pull them out, as this can disturb the roots of the seedling you’re keeping.
Transplanting Your Cauliflower Seedlings
Once your seedlings have developed several sets of true leaves and the weather outside has warmed up (usually 2-3 weeks after starting them indoors), it’s time to transplant them into your garden.
1. Harden off your seedlings: This is a crucial step! Hardening off gradually acclimates your seedlings to the outdoor environment. About a week before you plan to transplant them, start taking them outside for a few hours each day, gradually increasing the amount of time they spend outdoors. Protect them from direct sunlight and strong winds at first.
2. Prepare your garden bed: Cauliflower needs well-drained, fertile soil with a pH of 6.0-7.0. Amend your soil with compost or other organic matter to improve its fertility and drainage.
3. Space your plants properly: Space your cauliflower plants 18-24 inches apart in rows that are 24-36 inches apart. This gives them enough room to grow and allows for good air circulation.
4. Dig your holes: Dig holes that are slightly larger than the root balls of your seedlings.
5. Transplant your seedlings: Gently remove the seedlings from their trays or pots and place them in the holes. Make sure the top of the root ball is level with the surrounding soil.
6. Fill in the holes and water thoroughly: Fill in the holes with soil and gently firm the soil around the base of the plants. Water thoroughly to help settle the soil and reduce transplant shock.
Caring for Your Cauliflower Plants
Now that your cauliflower plants are in the ground, it’s important to provide them with the care they need to thrive.
* Watering: Cauliflower needs consistent moisture, especially during head formation. Water deeply and regularly, especially during dry spells. Aim for about 1-1.5 inches of water per week.
* Fertilizing: Cauliflower is a heavy feeder, so it needs plenty of nutrients. Fertilize your plants every 2-3 weeks with a balanced fertilizer or a fertilizer specifically formulated for vegetables. Follow the instructions on the fertilizer label.
* Weeding: Keep your garden bed free of weeds, as they can compete with your cauliflower plants for nutrients and water. Hand-pull weeds or use a hoe to remove them.
* Mulching: Apply a layer of mulch around your cauliflower plants to help retain moisture, suppress weeds, and regulate soil temperature. Straw, wood chips, or shredded leaves are all good options.
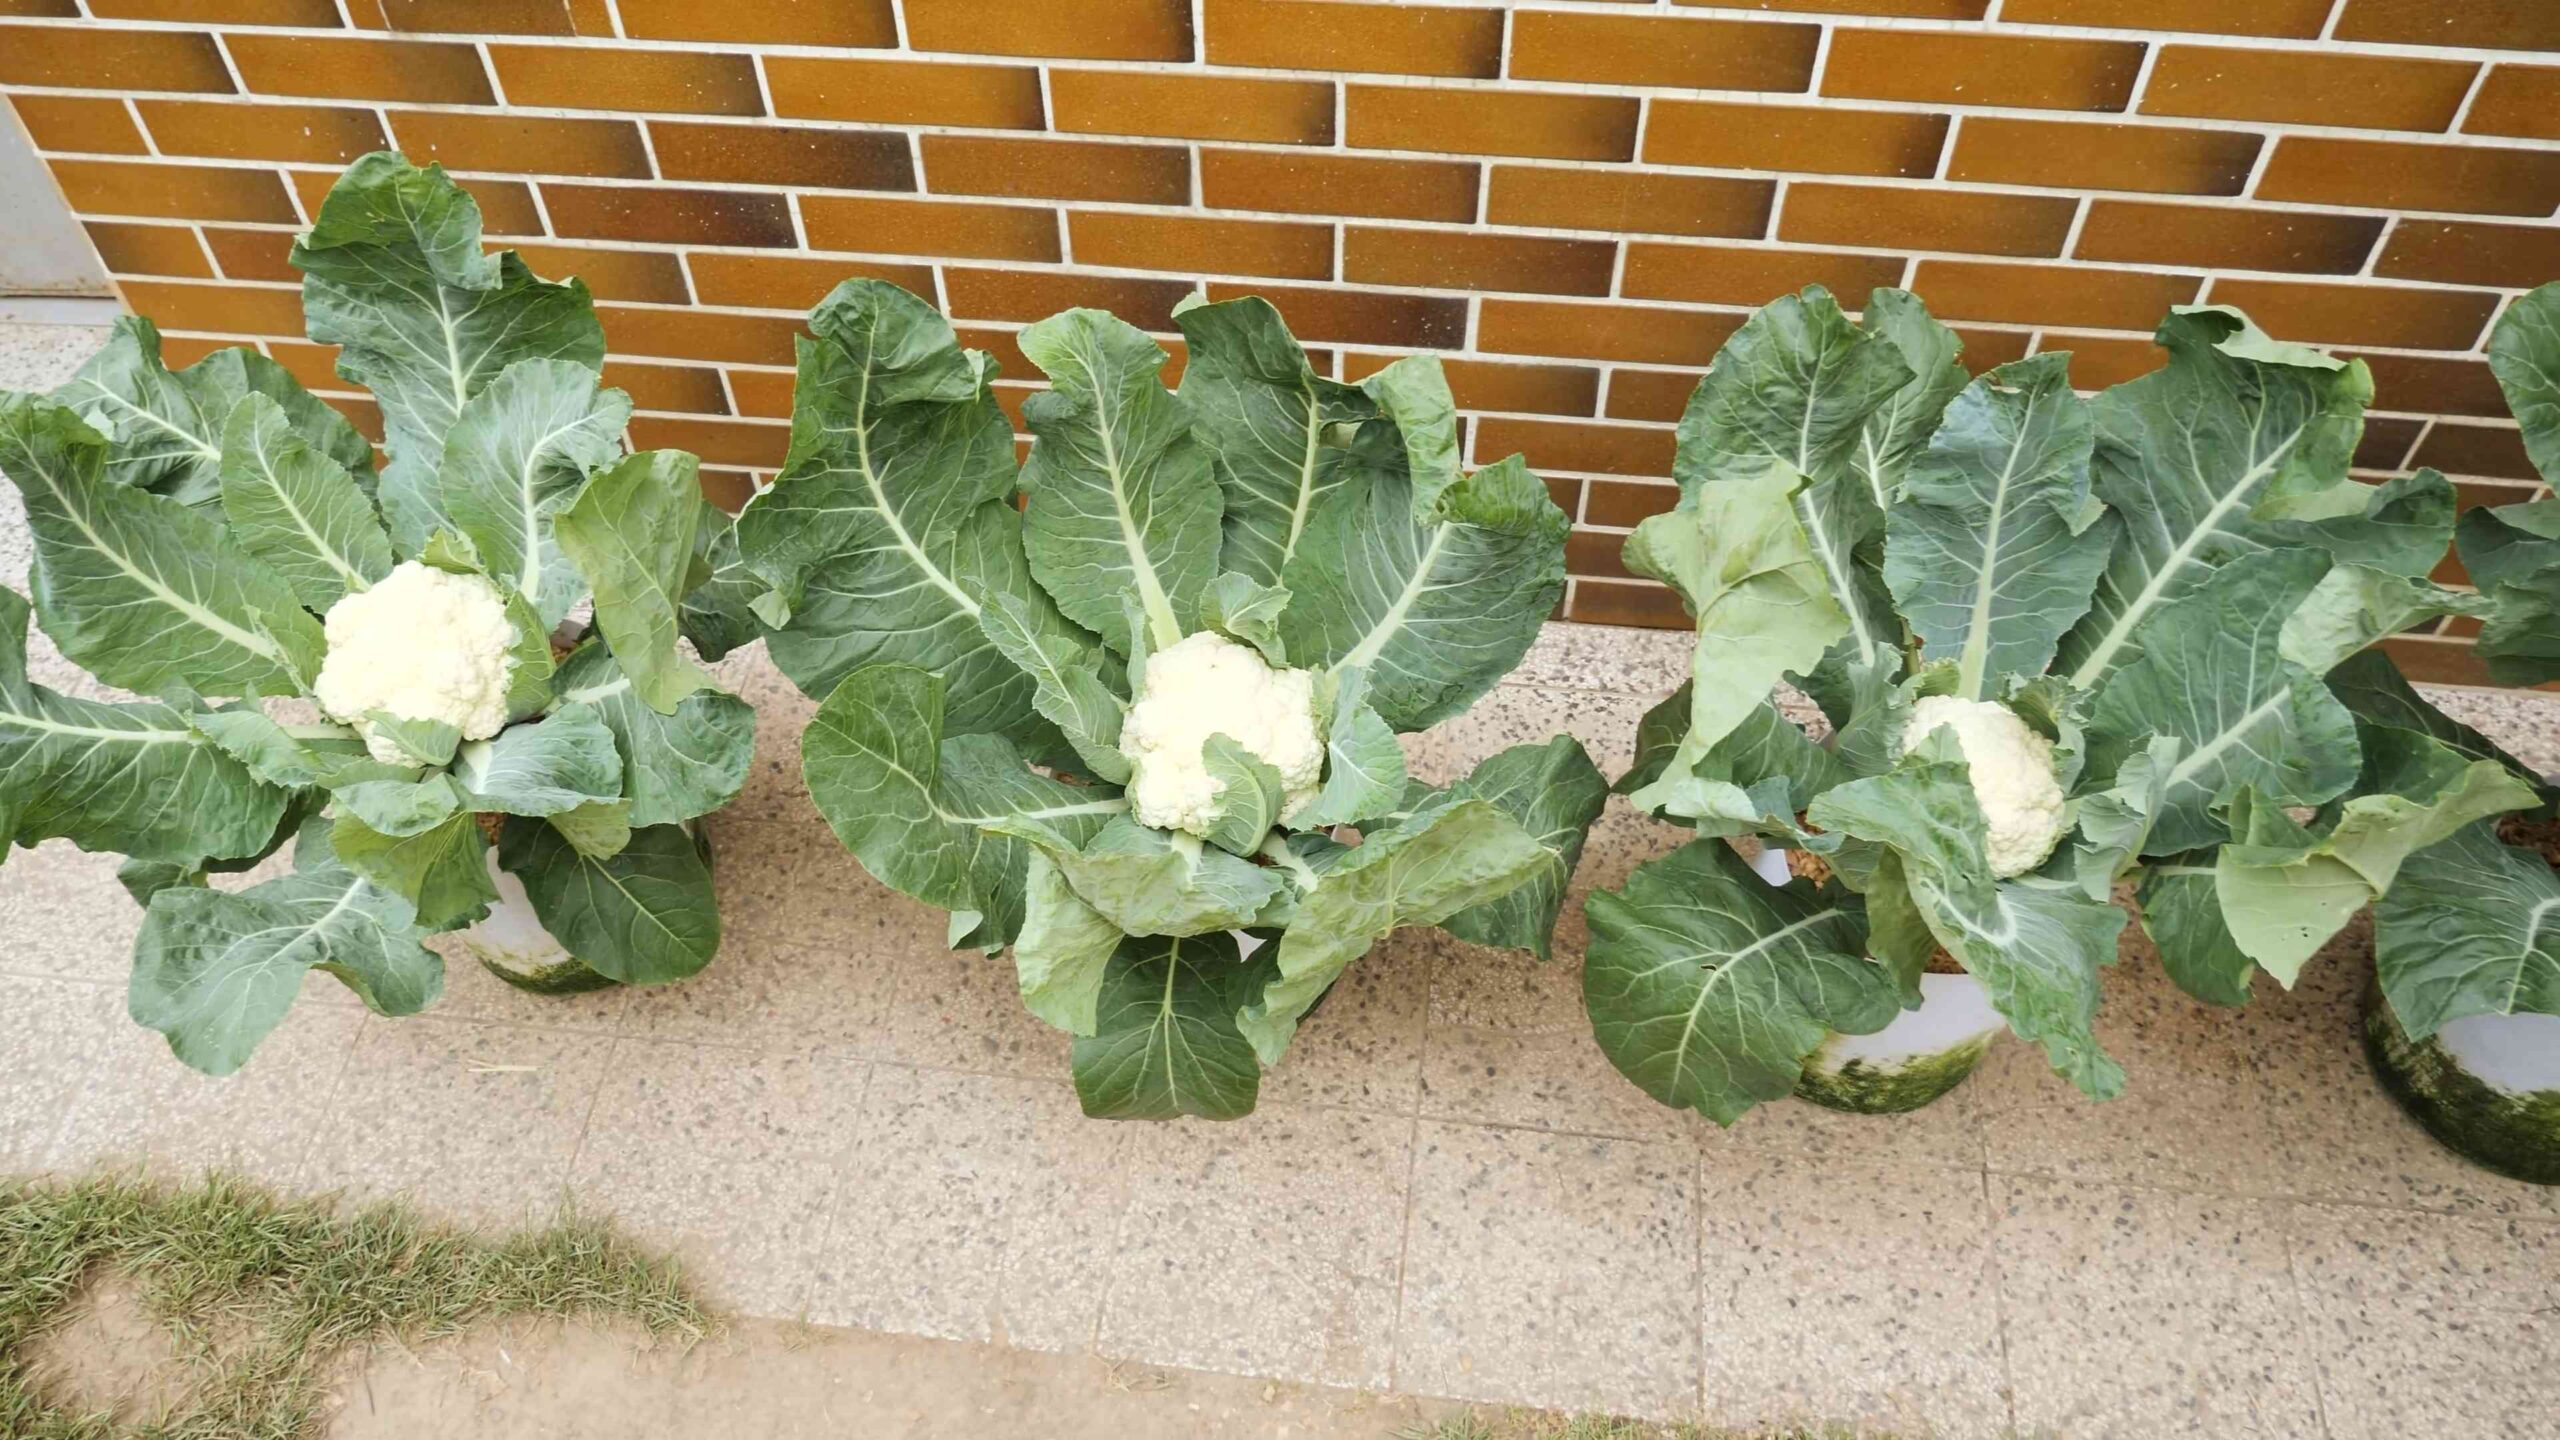
Blanching Your Cauliflower Heads
Blanching is the process of covering the developing cauliflower head to protect it from sunlight. This helps to keep the head white and prevents it from developing a bitter flavor. While some modern varieties are self-blanching, most still benefit from this process.
1. When to blanch: Start blanching your cauliflower heads when they are about 2-3 inches in diameter.
2. How to blanch: Gently pull the large outer leaves of the plant over the developing head and secure them with twine, rubber bands, or clothespins. Make sure the head is completely covered.
3. Check regularly: Check the heads regularly to make sure they are still covered and to monitor their growth.
Dealing with Pests and Diseases
Cauliflower is susceptible to a few common pests and diseases. Here’s what to watch out for and how to deal with them:
* Cabbage worms: These green caterpillars can quickly devour your cauliflower leaves. Handpick them off the plants or use an organic insecticide like Bacillus thuringiensis (Bt).
* Cabbage loopers: Similar to cabbage worms, cabbage loopers are also green caterpillars that feed on cauliflower leaves. Use the same control methods as for cabbage worms.
* Aphids: These tiny insects suck the sap from plants, causing them to weaken and become distorted. Spray aphids with a strong stream of water or use an insecticidal soap.
* Clubroot: This fungal disease causes the roots of cauliflower plants to become swollen and distorted. Prevent clubroot by planting resistant varieties, rotating your crops, and maintaining a soil pH of 7.0 or higher.
* Downy mildew: This fungal disease causes yellow spots on the upper surface of leaves and a white, downy growth on the underside. Improve air circulation around your plants and avoid overhead watering to prevent downy mildew. You can also use a fungicide if necessary.
Harvesting Your Cauliflower
The moment you’ve been waiting for! It’s time to harvest your cauliflower.
1. When to harvest: Harvest your cauliflower when the head is firm, compact, and has reached the desired size. The size will vary depending on the variety, but most heads are ready to harvest when they are 6-8 inches in diameter.
2. How to harvest: Use a sharp knife to cut the head from the plant, leaving a few leaves attached to protect the head.
3. Store your cauliflower: Store your harvested cauliflower in the refrigerator for up to a week.
Troubleshooting Common Problems
Even with the best care, you might encounter a few problems along the way. Here are some common issues and how to fix them:
* Small heads: Small heads can be caused by a lack of nutrients, water, or sunlight. Make sure your plants are getting enough of all three.
* Loose heads: Loose heads can be caused by hot weather or inconsistent watering. Try to provide consistent moisture and shade your plants during the hottest part of the day.
* Discolored heads: Discolored heads can be caused by sunlight exposure. Make sure you’re blanching your heads properly.
Extra Tips for Success
* Succession planting: Plant cauliflower seeds every few weeks to ensure a continuous harvest throughout the season.
* Companion planting: Plant cauliflower with
Conclusion
So, there you have it! Growing cauliflower at home isn’t just a gardening project; it’s an investment in fresh, flavorful, and healthy eating. From selecting the right variety to nurturing your seedlings and protecting them from pests, every step of the process is a rewarding experience. The satisfaction of harvesting your own perfectly formed cauliflower head, knowing exactly where it came from and what went into its growth, is unparalleled.
Why is this DIY trick a must-try? Because it empowers you to take control of your food source, reduce your reliance on store-bought produce (often laden with pesticides and transported long distances), and enjoy cauliflower at its peak freshness. Imagine the vibrant flavors and textures of a cauliflower freshly picked from your garden, compared to one that’s been sitting on a supermarket shelf for days. The difference is truly remarkable.
But the benefits extend beyond just taste. Growing your own cauliflower allows you to experiment with unique and heirloom varieties that you might never find in a grocery store. Think vibrant purple cauliflower, Romanesco with its fractal patterns, or even orange cauliflower packed with extra beta-carotene. The possibilities are endless!
Variations and Suggestions:
* Succession Planting: To ensure a continuous harvest, consider succession planting. Plant new seedlings every few weeks to stagger your cauliflower production throughout the growing season.
* Companion Planting: Enhance your cauliflower’s growth by planting it alongside beneficial companions like marigolds (to deter pests), rosemary (to repel cabbage moths), or beans (to fix nitrogen in the soil).
* Container Gardening: If you’re short on space, don’t despair! Cauliflower can also be successfully grown in large containers. Just make sure to choose a pot that’s at least 18 inches in diameter and provides adequate drainage.
* Blanching: For a whiter cauliflower head, blanch it by tying the outer leaves together over the developing head when it reaches about 2-3 inches in diameter. This protects it from direct sunlight and prevents discoloration. However, colored varieties don’t need blanching.
* Soil Testing: Before planting, conduct a soil test to determine its pH and nutrient levels. Cauliflower thrives in slightly acidic soil (pH 6.0-7.0) and requires plenty of nitrogen, phosphorus, and potassium. Amend your soil accordingly based on the test results.
We strongly encourage you to give growing cauliflower at home a try. It’s a fulfilling and educational experience that will connect you with nature and provide you with delicious, nutritious food. Don’t be intimidated by the perceived challenges; with a little planning and care, you can successfully cultivate your own cauliflower crop.
Once you’ve harvested your first head of homegrown cauliflower, we’d love to hear about your experience! Share your tips, tricks, and photos with us in the comments below. Let’s build a community of passionate home gardeners and celebrate the joys of growing our own food. Embrace the journey of growing cauliflower at home and savor the rewards of your labor!
Frequently Asked Questions (FAQ)
Q: How long does it take to grow cauliflower from seed?
A: Growing cauliflower from seed to harvest typically takes between 75 and 85 days, depending on the variety and growing conditions. Starting seeds indoors 6-8 weeks before the last expected frost can give you a head start and shorten the overall growing time. Keep in mind that some varieties are faster maturing than others, so check the seed packet for specific information.
Q: What are the most common pests and diseases that affect cauliflower?
A: Cauliflower is susceptible to several pests and diseases, including cabbage worms, cabbage loopers, aphids, flea beetles, clubroot, and black rot. Regularly inspect your plants for signs of infestation or disease. Use organic pest control methods like handpicking pests, applying insecticidal soap, or using row covers to protect your plants. For diseases, ensure good air circulation, avoid overhead watering, and practice crop rotation.
Q: How much sunlight does cauliflower need?
A: Cauliflower requires at least 6 hours of direct sunlight per day to thrive. Choose a sunny location in your garden where your plants will receive ample sunlight throughout the day. If you’re growing cauliflower indoors, use grow lights to supplement natural sunlight.
Q: What kind of soil is best for growing cauliflower?
A: Cauliflower prefers well-drained, fertile soil that is rich in organic matter. Amend your soil with compost or well-rotted manure before planting to improve its fertility and drainage. The ideal soil pH for cauliflower is between 6.0 and 7.0. Conduct a soil test to determine your soil’s pH and nutrient levels and adjust accordingly.
Q: How often should I water cauliflower?
A: Cauliflower needs consistent moisture to grow properly. Water your plants deeply and regularly, especially during dry periods. Aim to keep the soil consistently moist but not waterlogged. Mulching around your plants can help retain moisture and suppress weeds. Check the soil moisture regularly by sticking your finger about an inch deep into the soil. If it feels dry, it’s time to water.
Q: When is the best time to harvest cauliflower?
A: Cauliflower is ready to harvest when the head is firm, compact, and reaches the desired size (usually 6-8 inches in diameter). The florets should be tightly closed and not starting to separate or turn yellow. Use a sharp knife to cut the head from the plant, leaving a few leaves attached to protect the head.
Q: Can I grow cauliflower in containers?
A: Yes, cauliflower can be successfully grown in containers, but you’ll need to choose a large container that’s at least 18 inches in diameter and provides adequate drainage. Use a high-quality potting mix and fertilize regularly. Container-grown cauliflower may require more frequent watering than plants grown in the ground.
Q: What are some good companion plants for cauliflower?
A: Good companion plants for cauliflower include marigolds (to deter pests), rosemary (to repel cabbage moths), beans (to fix nitrogen in the soil), thyme, dill, and chamomile. Avoid planting cauliflower near strawberries, tomatoes, or peppers, as they can compete for nutrients or attract pests.
Q: How do I prevent cauliflower from bolting (going to seed prematurely)?
A: Bolting can occur when cauliflower plants are exposed to stress, such as extreme temperatures or inconsistent watering. To prevent bolting, choose heat-tolerant varieties, provide consistent moisture, and protect your plants from extreme temperatures. Mulching can help regulate soil temperature and retain moisture.
Q: My cauliflower head is turning yellow. What should I do?
A: Yellowing of the cauliflower head can be caused by several factors, including overexposure to sunlight, nutrient deficiencies, or disease. If the head is exposed to direct sunlight, blanch it by tying the outer leaves together over the developing head. Ensure your plants are receiving adequate nutrients by fertilizing regularly. If you suspect disease, consult a gardening expert or your local extension office for diagnosis and treatment options.
Leave a Comment