

Growing cabbage in plastic bottles might sound like something out of a science fiction movie, but trust me, it’s a surprisingly effective and incredibly rewarding way to cultivate this leafy green! Have you ever dreamed of harvesting your own fresh, crisp cabbage right from your balcony or windowsill, even if you don’t have a sprawling garden? Well, this DIY trick is your ticket to making that dream a reality.
For centuries, cabbage has been a staple in diets around the world, from the hearty stews of Eastern Europe to the vibrant slaws of North America. Its resilience and nutritional value have made it a beloved crop. But what if you live in an apartment or have limited space? That’s where the magic of upcycling and creative gardening comes in!
This DIY guide will show you how to transform ordinary plastic bottles into mini-cabbage patches. Not only is it a fantastic way to recycle and reduce waste, but it also allows you to control the growing environment, protect your precious plants from pests, and enjoy a bountiful harvest, regardless of your living situation. Growing cabbage in plastic bottles is a game-changer for urban gardeners and anyone looking for a sustainable and space-saving way to enjoy fresh, homegrown vegetables. Let’s get started and turn those plastic bottles into a thriving cabbage garden!
DIY Cabbage Patch: Growing Cabbage in Recycled Plastic Bottles
Hey there, fellow gardening enthusiasts! Are you short on space but still dreaming of fresh, homegrown cabbage? Well, I’ve got a fantastic solution for you: growing cabbage in recycled plastic bottles! It’s a fun, eco-friendly, and surprisingly effective way to cultivate these leafy greens, even if you only have a balcony or a small patio. Let’s dive into how you can create your own mini cabbage patch using those discarded plastic bottles.
What You’ll Need
Before we get started, let’s gather all the necessary materials. This will make the whole process smoother and more enjoyable.
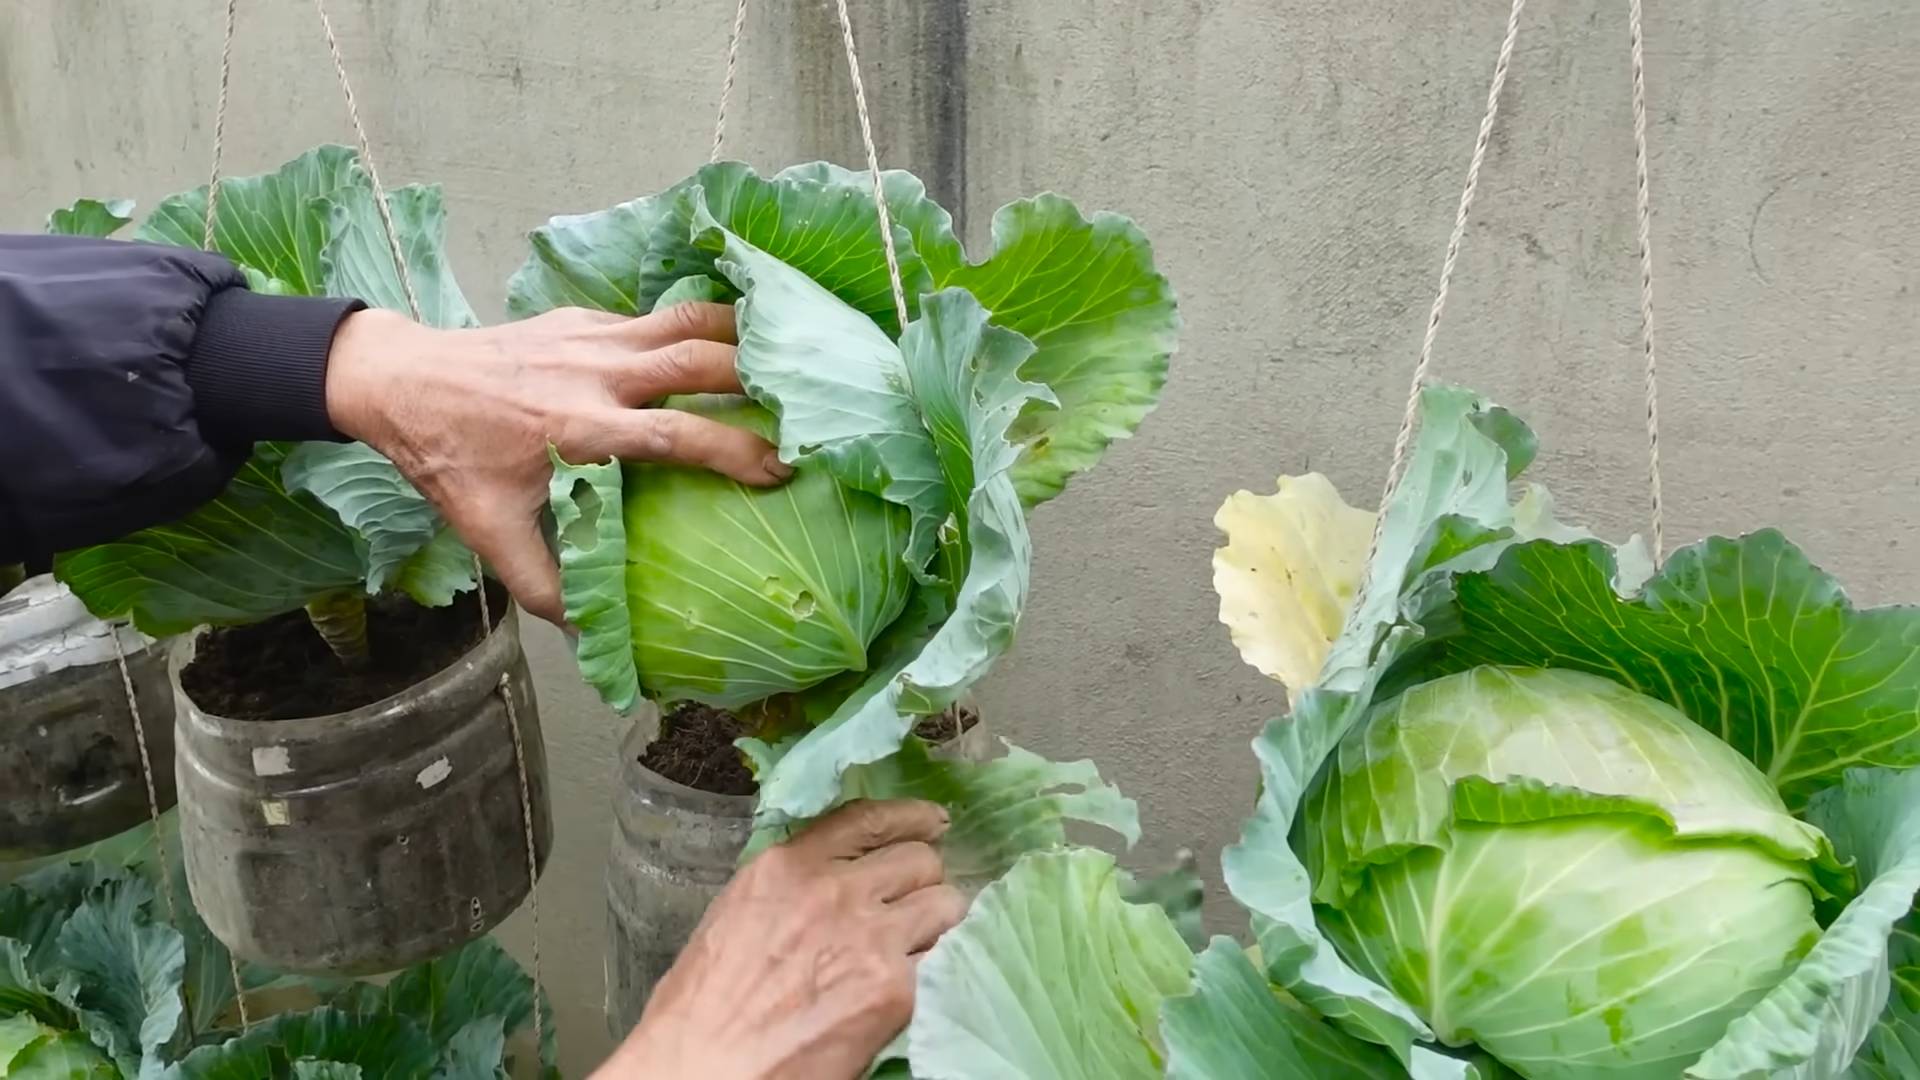
* Plastic Bottles: The star of the show! I recommend using bottles that are at least 2 liters in size. Larger bottles (like those from water coolers) are even better, as they provide more room for the cabbage roots to grow. Make sure they are clean and free of any residue.
* Potting Soil: A good quality potting mix is crucial for healthy cabbage growth. Look for a mix that’s well-draining and rich in organic matter. You can also amend regular potting soil with compost or aged manure.
* Cabbage Seeds or Seedlings: You can start from seeds or purchase seedlings from your local nursery. Starting from seeds gives you more control over the variety, but seedlings will give you a head start. I personally prefer starting from seeds, it’s so rewarding to watch them sprout!
* Scissors or a Utility Knife: For cutting the plastic bottles. Be careful!
* Drill or Nail: To create drainage holes in the bottom of the bottles.
* Watering Can or Hose: For watering your cabbage plants.
* Fertilizer (Optional): A balanced fertilizer can help boost growth, especially if your potting soil is not particularly rich. I like to use a slow-release organic fertilizer.
* Gloves (Optional): To keep your hands clean.
* Measuring Cup or Scoop: For measuring potting soil and fertilizer.
* Small Trowel or Spoon: For transplanting seedlings.
* Labels and Marker (Optional): To label your cabbage varieties.
Preparing the Plastic Bottles
This is a crucial step, as it sets the stage for healthy cabbage growth. Proper drainage and sufficient space are key.
1. Clean the Bottles: Thoroughly wash the plastic bottles with soap and water to remove any dirt, grime, or residue. Rinse them well and let them dry completely. This prevents any unwanted contaminants from affecting your plants.
2. Cut the Bottles: There are a couple of ways you can cut the bottles, depending on the size and your preference.
* Method 1 (Horizontal Cut): For larger bottles, you can cut them horizontally, about two-thirds of the way up from the bottom. This creates a deeper container for the cabbage roots.
* Method 2 (Vertical Cut): For smaller bottles, you can cut them vertically, creating two halves. This is a good option if you want to grow multiple smaller cabbage plants in each bottle.
I usually go with the horizontal cut for larger cabbages.
3. Create Drainage Holes: This is super important! Use a drill or a nail to create several drainage holes in the bottom of each bottle. These holes will allow excess water to drain out, preventing root rot. I usually make about 5-6 holes, evenly spaced.
4. Smooth the Edges (Optional): If the cut edges of the plastic bottles are sharp, you can smooth them down with sandpaper or cover them with duct tape to prevent any accidental cuts.
Planting the Cabbage
Now comes the fun part – planting your cabbage! Whether you’re starting from seeds or seedlings, follow these steps for success.
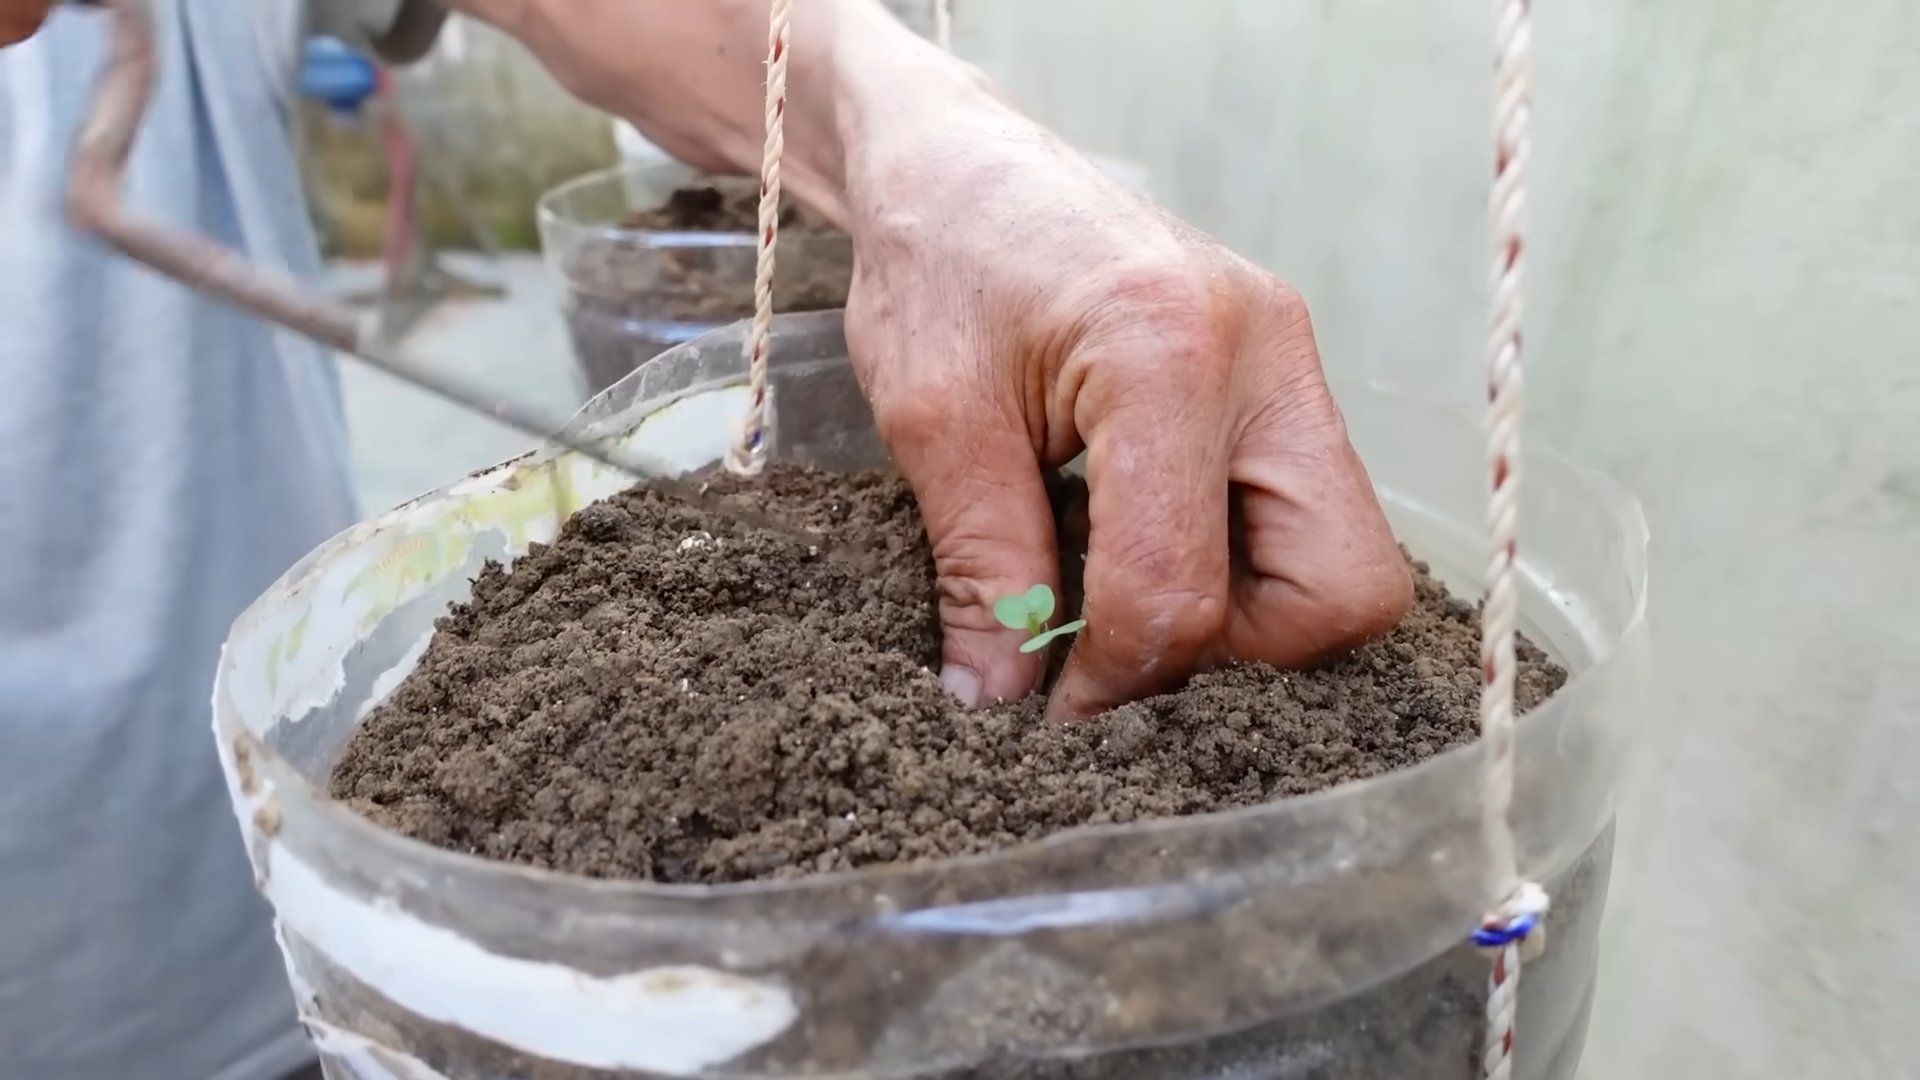
1. Fill the Bottles with Potting Soil: Fill the prepared plastic bottles with potting soil, leaving about an inch of space at the top. Gently pat down the soil to remove any air pockets.
2. Sowing Seeds (If Starting from Seeds):
* Make small indentations in the soil, about half an inch deep.
* Place 2-3 cabbage seeds in each indentation.
* Cover the seeds with a thin layer of potting soil.
* Gently water the soil to moisten it.
* Cover the bottles with plastic wrap or a clear plastic bag to create a mini-greenhouse effect. This will help retain moisture and promote germination.
* Place the bottles in a warm, sunny location.
* Once the seeds germinate (usually within 7-14 days), remove the plastic wrap and thin out the seedlings, leaving only the strongest one in each bottle.
3. Transplanting Seedlings (If Starting from Seedlings):
* Gently remove the cabbage seedlings from their nursery pots.
* Make a hole in the potting soil in each bottle, large enough to accommodate the seedling’s root ball.
* Place the seedling in the hole and gently backfill with potting soil.
* Water the seedlings thoroughly.
4. Label Your Plants (Optional): If you’re growing different varieties of cabbage, label each bottle with the variety name and the date of planting. This will help you keep track of your plants and their progress.
Caring for Your Cabbage Plants
Proper care is essential for healthy cabbage growth. Here’s what you need to do to keep your plants thriving.
1. Watering: Water your cabbage plants regularly, especially during hot and dry weather. Keep the soil consistently moist, but not waterlogged. I usually water them deeply every 2-3 days, depending on the weather. Check the soil moisture by sticking your finger into the soil – if it feels dry an inch below the surface, it’s time to water.
2. Sunlight: Cabbage plants need at least 6 hours of sunlight per day. Place your plastic bottle containers in a sunny location where they will receive plenty of light. If you live in a particularly hot climate, you may need to provide some afternoon shade to prevent the plants from getting scorched.
3. Fertilizing: Cabbage plants are heavy feeders, so they benefit from regular fertilization. Use a balanced fertilizer, following the instructions on the package. I like to use a slow-release organic fertilizer, which provides a steady supply of nutrients over time. You can also supplement with liquid fertilizer every 2-3 weeks.
4. Pest Control: Cabbage plants are susceptible to various pests, such as cabbage worms, aphids, and slugs. Regularly inspect your plants for signs of infestation.
* Cabbage Worms: These green caterpillars can quickly devour your cabbage leaves. Handpick them off the plants or use a biological insecticide like Bacillus thuringiensis (Bt).
* Aphids: These tiny insects suck the sap from the leaves, causing them to curl and distort. Spray the plants with a strong stream of water or use insecticidal soap.
* Slugs: These slimy creatures can damage the leaves, especially at night. Use slug bait or handpick them off the plants.
I’ve found that companion planting with herbs like rosemary and thyme can help deter pests naturally.
5. Weed Control: Keep the area around your cabbage plants free of weeds. Weeds can compete with the cabbage for nutrients and water. Hand-pull any weeds that appear.
6. Rotating the Bottles: Every few days, rotate the plastic bottles to ensure that all sides of the plants receive equal sunlight. This will help prevent the plants from leaning towards the light.
Harvesting Your Cabbage
After all your hard work, it’s time to reap the rewards! Cabbage is typically ready to harvest in 60-100 days, depending on the variety.
1. Check for Maturity: The cabbage head should be firm and compact. Gently squeeze the head – if it feels solid, it’s ready to harvest.
2. Harvesting: Use a sharp knife to cut the cabbage head from the stem, leaving a few outer leaves attached.
3. Storage: Store your harvested cabbage in the refrigerator. It will keep for several weeks.
Troubleshooting
Even with the best care, you may encounter some problems along the way. Here are some common issues and how to address them.
* Yellowing Leaves: This can be caused by overwatering, underwatering, or nutrient deficiencies. Check the soil moisture and adjust your watering accordingly. Fertilize the plants with a balanced fertilizer.
* Stunted Growth: This can be caused by poor soil, lack of sunlight, or pest infestations. Make sure your potting soil is well-draining and rich in nutrients. Provide the plants with at least 6 hours of sunlight per day. Inspect the plants for pests and take appropriate action.
* Root Rot: This is caused by overwatering and poor drainage. Make sure the plastic bottles have adequate drainage holes. Avoid overwatering the plants.
* Bolting: This occurs when the cabbage plant prematurely
Conclusion
So, there you have it! Growing cabbage in plastic bottles isn’t just a quirky gardening experiment; it’s a practical, space-saving, and surprisingly effective way to cultivate this nutritious vegetable. We’ve explored the numerous benefits, from maximizing yields in limited spaces like balconies and patios to providing a protective barrier against common cabbage pests and diseases. This method truly democratizes gardening, making fresh, homegrown cabbage accessible to everyone, regardless of their property size or gardening experience.
But why is this DIY trick a must-try? Beyond the space-saving aspect, consider the improved drainage and aeration that plastic bottles offer. Unlike traditional garden beds, where soil compaction can hinder root growth, the controlled environment within a bottle allows for optimal root development. This translates to healthier, more robust cabbage heads. Furthermore, the portability of these bottle gardens means you can easily move them to chase the sun or shelter them from harsh weather conditions.
Don’t be afraid to experiment with variations! Try using different sizes of plastic bottles to accommodate varying cabbage varieties. For smaller, faster-growing cabbages, a 2-liter bottle might suffice, while larger varieties will thrive in larger containers. Consider painting the bottles white or covering them with reflective material to further protect the roots from overheating in direct sunlight. You can also incorporate companion planting by adding herbs like rosemary or thyme to the bottle, which can help deter pests and enhance the flavor of your cabbage.
Another exciting variation is to explore hydroponic cabbage growing in plastic bottles. By using a nutrient-rich water solution instead of soil, you can further accelerate growth and potentially increase yields. This method requires a bit more attention to detail, but the results can be truly impressive.
The possibilities are endless! The key is to embrace the spirit of experimentation and adapt the technique to suit your specific needs and environment.
We wholeheartedly encourage you to give this DIY cabbage-growing method a try. It’s a rewarding experience that connects you to the food you eat and empowers you to create a sustainable food source, even in the most urban settings. Imagine the satisfaction of harvesting your own fresh, crisp cabbage, knowing that you nurtured it from seed to table using recycled materials.
More than just a gardening technique, growing cabbage in plastic bottles is a statement about resourcefulness and environmental consciousness. It’s a way to reduce waste, promote sustainability, and enjoy the bounty of nature, all within the confines of your own home.
We’re eager to hear about your experiences! Share your photos, tips, and challenges in the comments section below. Let’s build a community of bottle-gardeners and inspire others to embrace this innovative and rewarding approach to growing fresh, healthy food. What kind of cabbage did you grow? What challenges did you face? What tips do you have for other aspiring bottle-gardeners? Your insights are invaluable and can help others succeed in their own cabbage-growing endeavors. Let’s cultivate a thriving community of resourceful gardeners, one plastic bottle at a time!
FAQ
What type of plastic bottles are best for growing cabbage?
Ideally, you should use food-grade plastic bottles, such as those used for water, juice, or soda. These are generally considered safe for growing edible plants. Avoid using bottles that have contained harsh chemicals or cleaning products, as these could contaminate the soil and potentially harm your plants. PET (polyethylene terephthalate) bottles are a common and suitable choice. Ensure the bottles are thoroughly cleaned before use to remove any residue.
How do I prepare the plastic bottles for planting?
First, thoroughly clean the bottles with soap and water to remove any residue. Then, cut the bottle in half horizontally. The top half, inverted and placed inside the bottom half, will act as a self-watering system. Drill drainage holes in the bottom of the bottle to prevent waterlogging. You can also add a layer of gravel or small stones at the bottom for improved drainage.
What type of soil should I use for growing cabbage in plastic bottles?
A well-draining potting mix is essential. You can use a commercially available potting mix or create your own by combining equal parts of garden soil, compost, and perlite or vermiculite. The compost provides nutrients, while the perlite or vermiculite improves drainage and aeration. Avoid using heavy clay soil, as it can become compacted and hinder root growth.
How often should I water my cabbage plants in plastic bottles?
The watering frequency will depend on the weather conditions and the type of soil you’re using. Generally, you should water your cabbage plants when the top inch of soil feels dry to the touch. Avoid overwatering, as this can lead to root rot. The self-watering system created by inverting the top half of the bottle helps maintain consistent moisture levels. Check the water level in the bottom half of the bottle regularly and refill as needed.
How much sunlight do cabbage plants need?
Cabbage plants need at least 6 hours of direct sunlight per day to thrive. Choose a sunny location for your bottle garden. If you live in a particularly hot climate, you may need to provide some afternoon shade to prevent the plants from overheating. The portability of the bottle gardens makes it easy to move them to optimize sunlight exposure.
What are some common pests and diseases that affect cabbage plants, and how can I prevent them?
Common pests include cabbage worms, aphids, and flea beetles. Diseases include clubroot and black rot. To prevent pests, you can use insect netting or row covers to protect your plants. Companion planting with herbs like rosemary or thyme can also help deter pests. To prevent diseases, ensure good air circulation and avoid overwatering. If you notice any signs of pests or diseases, treat them promptly with appropriate organic pesticides or fungicides.
How long does it take to grow cabbage in plastic bottles?
The time it takes to grow cabbage will depend on the variety you’re growing and the growing conditions. Generally, it takes about 60-90 days from transplanting seedlings to harvest. You can start seeds indoors 6-8 weeks before the last expected frost and then transplant them into the plastic bottles once the weather warms up.
Can I grow different varieties of cabbage in plastic bottles?
Yes, you can grow different varieties of cabbage in plastic bottles. Consider the size of the cabbage head when choosing a variety. Smaller varieties, such as bok choy or napa cabbage, may be better suited for smaller bottles, while larger varieties, such as green cabbage or red cabbage, will require larger bottles.
How do I harvest my cabbage?
Harvest your cabbage when the head is firm and compact. Use a sharp knife to cut the head from the stem, leaving a few outer leaves intact. You can store harvested cabbage in the refrigerator for several weeks.
Can I reuse the plastic bottles for multiple growing seasons?
Yes, you can reuse the plastic bottles for multiple growing seasons. However, it’s important to thoroughly clean and disinfect them before each use to prevent the spread of diseases. You can wash them with a solution of bleach and water (1 part bleach to 9 parts water) and then rinse them thoroughly.
What are the benefits of growing cabbage in plastic bottles compared to traditional gardening?
Growing cabbage in plastic bottles offers several benefits, including:
* Space-saving: Ideal for small spaces like balconies and patios.
* Improved drainage and aeration: The controlled environment allows for optimal root development.
* Pest and disease control: The bottles provide a protective barrier against common pests and diseases.
* Portability: Easy to move the plants to optimize sunlight exposure or shelter them from harsh weather.
* Sustainability: Reuses plastic bottles, reducing waste.
Can I use this method for other vegetables besides cabbage?
Yes, this method can be adapted for growing other vegetables, such as lettuce, spinach, kale, and herbs. The key is to choose vegetables that have relatively shallow root systems and don’t require a lot of space.
How do I fertilize my cabbage plants in plastic bottles?
You can fertilize your cabbage plants with a balanced liquid fertilizer every 2-3 weeks. Follow the instructions on the fertilizer label. You can also add compost tea to the soil to provide additional nutrients. Avoid over-fertilizing, as this can lead to excessive foliage growth and reduced head formation.
What if my cabbage plants are not forming heads?
There are several reasons why your cabbage plants may not be forming heads, including:
* Insufficient sunlight: Ensure your plants are getting at least 6 hours of direct sunlight per day.
* Lack of nutrients: Fertilize your plants regularly with a balanced fertilizer.
* Overcrowding: Thin out the plants if they are too close together.
* High temperatures: Cabbage plants prefer cooler temperatures. Provide some afternoon shade if you live in a hot climate.
* Pest or disease infestation: Inspect your plants regularly for pests and diseases and treat them promptly.
Is growing cabbage in plastic bottles environmentally friendly?
Yes, growing cabbage in plastic bottles can be considered environmentally friendly because it promotes the reuse of plastic bottles, reducing waste and the need for new plastic production. It also allows people to grow their own food locally, reducing the carbon footprint associated with transporting food from distant farms.

Leave a Comment