

Growing Aloe Vera from Leaf might seem like a magic trick, but trust me, it’s totally achievable and incredibly rewarding! Have you ever wondered how to propagate your own Aloe Vera plant from just a single leaf? I know I have! For centuries, Aloe Vera has been revered for its medicinal properties, dating back to ancient Egypt where it was known as the “plant of immortality.” Its soothing gel has been used to treat burns, heal wounds, and even as a beauty aid.
But beyond its practical uses, there’s something deeply satisfying about nurturing a plant from scratch. Let’s be honest, buying new Aloe Vera plants can get expensive, and sometimes you just want to expand your collection without breaking the bank. That’s where this DIY guide comes in! I’m going to walk you through the simple steps to successfully growing Aloe Vera from leaf cuttings, saving you money and giving you the joy of watching new life sprout from your own efforts. Plus, imagine the bragging rights when you tell your friends you grew your own Aloe Vera from just a leaf! So, grab your gardening gloves, and let’s get started on this exciting botanical adventure!
Growing Aloe Vera from Leaf: A DIY Guide
Hey there, plant enthusiasts! Ever wondered if you could magically grow a whole new aloe vera plant from just a single leaf? Well, the truth is, it’s a bit more involved than waving a magic wand, but it’s totally doable with a little patience and the right technique. While aloe vera is most reliably propagated from pups (those little baby plants that sprout around the base of the mother plant), attempting to grow it from a leaf cutting can be a fun experiment. Let’s dive in!
Understanding the Challenge
Before we get started, let’s be realistic. Aloe vera, unlike some other succulents, doesn’t readily root from leaf cuttings in the same way. The success rate is lower, and it requires creating the right conditions. What we’re essentially trying to do is encourage the leaf to form a callus and eventually, hopefully, sprout roots. Think of it as a bit of a gamble, but a rewarding one if it pays off!
What You’ll Need
* A healthy aloe vera leaf (more on this below)
* A sharp, clean knife or scissors
* Rooting hormone powder (optional, but highly recommended)
* Well-draining potting mix (cactus or succulent mix is ideal)
* A small pot with drainage holes
* A spray bottle with water
* A warm, bright location (but not direct sunlight)
Choosing the Right Leaf
The key to success starts with selecting the right leaf. Here’s what to look for:
* Maturity: Choose a leaf that’s mature and healthy. This means it should be plump, firm, and at least 6-8 inches long. Avoid leaves that are thin, damaged, or discolored.
* Location: Select a leaf from the lower part of the plant. These are generally older and more likely to have the energy reserves needed for rooting.
* Health: Make sure the leaf is free from any signs of disease or pests.
Step-by-Step Instructions
Okay, let’s get our hands dirty! Here’s the process, broken down into easy-to-follow steps:
1. Prepare Your Cutting Tool: Sanitize your knife or scissors with rubbing alcohol to prevent any bacterial or fungal infections. This is a crucial step!
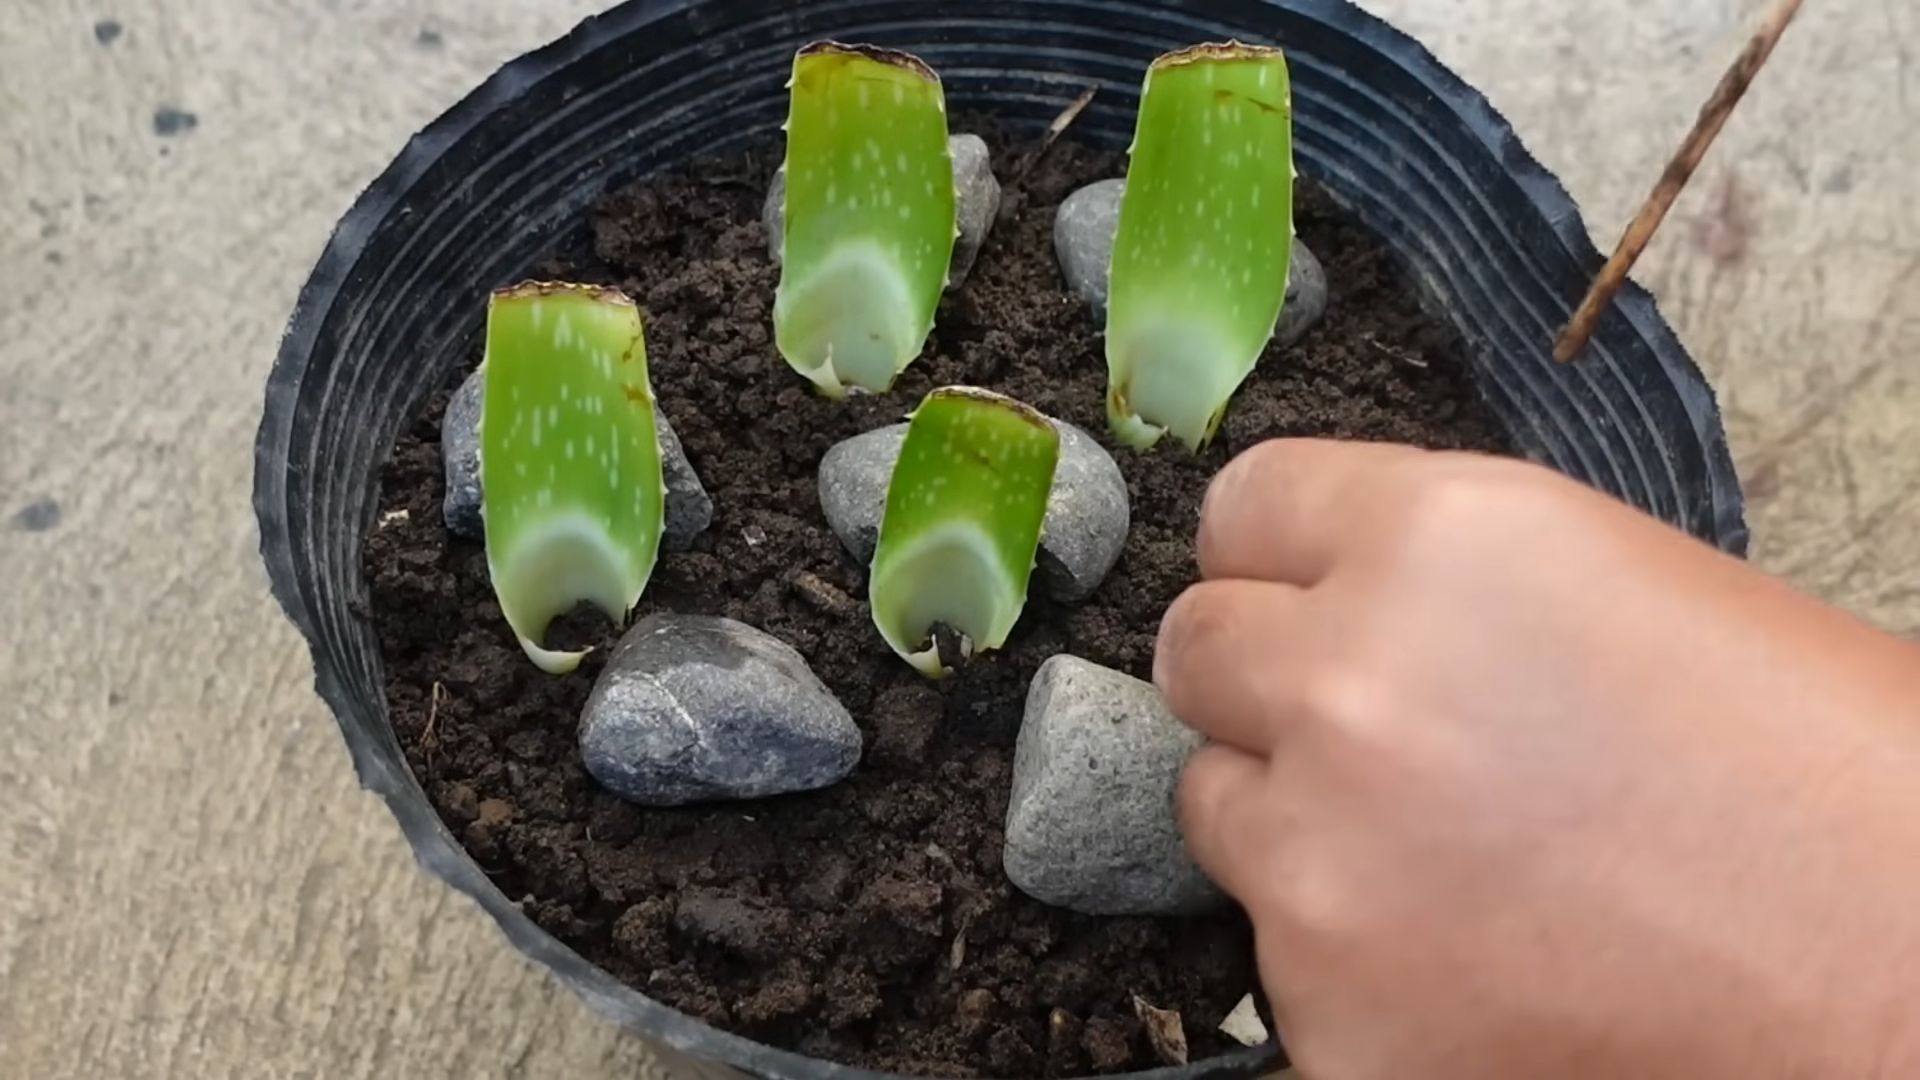
2. Take the Cutting: Carefully cut the leaf from the aloe vera plant as close to the base as possible. Make a clean, straight cut.
3. Callus Formation: This is the most important step! Place the cut end of the leaf on a paper towel in a dry, well-ventilated area. You need to let the cut end callus over. This usually takes 1-3 weeks. The cut surface should become dry and slightly hardened. This prevents rot when you plant it.
4. Prepare Your Potting Mix: While the leaf is callusing, prepare your pot. Fill it with well-draining potting mix. Cactus or succulent mix is perfect because it doesn’t retain too much moisture.
5. Apply Rooting Hormone (Optional): Once the cut end has callused, you can dip it in rooting hormone powder. This can help stimulate root growth, but it’s not essential. Just tap off any excess powder.
6. Planting the Cutting: Make a small hole in the potting mix with your finger or a pencil. Gently insert the callused end of the leaf into the hole, burying it about 1-2 inches deep.
7. Watering: Lightly mist the soil with water. Don’t soak it! Aloe vera is susceptible to rot, so less is more.
8. Location: Place the pot in a warm, bright location, but avoid direct sunlight. Direct sunlight can scorch the leaf. An east-facing window is usually ideal.
9. Patience is Key: Now comes the hard part: waiting. It can take several weeks or even months for roots to develop. During this time, keep the soil lightly moist, but avoid overwatering.
10. Checking for Roots: After a few weeks, you can gently tug on the leaf to see if it has rooted. If it resists, it means roots have started to form. If it comes out easily, it hasn’t rooted yet, and you’ll need to be patient and give it more time.
11. Transplanting (Maybe!): If your leaf successfully roots and starts to grow, you can eventually transplant it into a larger pot.
Troubleshooting
Even with the best intentions, things can sometimes go wrong. Here are some common problems and how to address them:
* Rotting: If the leaf starts to rot, it’s usually due to overwatering. Remove the leaf from the pot, let it dry out completely, and try again with fresh potting mix and less water.
* No Root Growth: If the leaf doesn’t root after several months, it may simply not be viable. Don’t be discouraged! Try again with a different leaf.
* Leaf Shriveling: If the leaf starts to shrivel, it may be due to underwatering or too much sunlight. Adjust your watering schedule and move the pot to a less sunny location.
Optimizing Your Success
While growing aloe vera from a leaf cutting can be tricky, there are a few things you can do to increase your chances of success:
* Use a Humidity Dome: Creating a humid environment can help encourage root growth. You can do this by placing a clear plastic bag or container over the pot, creating a mini-greenhouse. Just make sure to vent it regularly to prevent mold growth.
* Bottom Watering: Instead of watering from the top, try bottom watering. Place the pot in a shallow dish of water and let the soil absorb the water from the bottom. This can help prevent overwatering and rot.
* Warmth: Aloe vera prefers warm temperatures. Keep the pot in a warm location, especially during the rooting process. A heat mat can also be helpful.
* Be Patient: I can’t stress this enough! Growing aloe vera from a leaf cutting takes time and patience. Don’t give up if you don’t see results immediately.
Alternative Propagation Methods
As I mentioned earlier, the most reliable way to propagate aloe vera is from pups. Here’s a quick overview of how to do that:
1. Identify Pups: Look for small baby plants growing around the base of the mother plant.
2. Separate the Pups: Gently dig up the pups, making sure to get as many roots as possible.
3. Plant the Pups: Plant the pups in their own pots with well-draining potting mix.
4. Water and Care: Water the pups lightly and care for them as you would a mature aloe vera plant.
Why Bother with Leaf Cuttings?
Okay, so if it’s so much easier to propagate from pups, why even bother with leaf cuttings? Well, for a few reasons:
* Experimentation: It’s a fun experiment! It’s a great way to learn more about plant propagation and challenge yourself.
* Limited Resources: Maybe you only have access to a single leaf and not a whole plant with pups.
* Bragging Rights: Let’s be honest, it’s pretty cool to say you grew an aloe vera plant from just a leaf!
Final Thoughts
Growing aloe vera from a leaf cutting is definitely a challenge, but it’s not impossible. With the right technique, a little patience, and a bit of luck, you might just be able to create a whole new plant from a single leaf. Even if it doesn’t work out, you’ll still learn something in the process. So, give it a try and see what happens! Happy growing!

Conclusion
So, there you have it! Growing aloe vera from a leaf might seem like a botanical magic trick, but it’s a surprisingly accessible and rewarding project for any plant enthusiast, regardless of experience level. We’ve walked you through the process, highlighting the key steps to ensure your success, from selecting the right leaf to providing the optimal growing environment.
Why is this DIY trick a must-try? Because it offers a unique and cost-effective way to expand your aloe vera collection. Instead of purchasing multiple plants, you can propagate new ones from a single, healthy leaf. This is not only budget-friendly but also incredibly satisfying, allowing you to witness the miracle of plant regeneration firsthand. Imagine the pride you’ll feel watching a tiny root emerge and a new aloe vera plant begin its journey, all thanks to your care and attention.
Beyond the economic and emotional benefits, propagating aloe vera from a leaf allows you to control the quality and health of your plants. You know exactly where your plant came from and how it was cared for, minimizing the risk of introducing pests or diseases into your home. Plus, it’s a fantastic way to share the gift of aloe vera with friends and family. Imagine gifting a beautifully potted aloe vera plant, grown from a leaf you nurtured yourself!
But the possibilities don’t stop there! Feel free to experiment with different potting mixes. While we recommended a well-draining cactus or succulent mix, you can also try creating your own blend using perlite, vermiculite, and potting soil. Observe how your aloe vera responds to different conditions and adjust your care accordingly. You can also experiment with different sizes of containers. Starting with a small pot is generally recommended, but as your aloe vera grows, you can gradually transplant it into larger pots to accommodate its expanding root system.
Consider also the aesthetic aspect. Aloe vera plants come in various shapes and sizes. While propagating from a leaf will generally result in a plant similar to the parent, slight variations can occur, adding to the uniqueness of your collection. You can also explore different decorative pots to complement your home décor and showcase your thriving aloe vera plants.
Don’t be discouraged if your first attempt isn’t immediately successful. Plant propagation can be a bit of a learning curve, and not every leaf will root. The key is to be patient, persistent, and observant. Pay attention to the signs of success (root development) and the signs of trouble (rot or decay), and adjust your approach accordingly.
We wholeheartedly encourage you to try this DIY trick and experience the joy of growing aloe vera from a leaf. It’s a simple, rewarding, and sustainable way to expand your plant collection and connect with the natural world. And most importantly, we want to hear about your experiences! Share your successes, your challenges, and your tips in the comments below. Let’s create a community of aloe vera enthusiasts and learn from each other’s journeys. Your insights could be invaluable to someone just starting out, and together, we can all become better plant parents. So go ahead, grab a leaf, and let the aloe vera adventure begin! This method of aloe vera propagation is sure to bring you joy.
Frequently Asked Questions (FAQ)
1. What is the best type of aloe vera leaf to use for propagation?
The ideal leaf for propagation is a mature, healthy leaf from a well-established aloe vera plant. Look for leaves that are plump, firm, and free from any signs of damage, disease, or discoloration. Avoid using leaves that are too young or too old, as they may not have the energy reserves necessary to develop roots. The leaf should be at least 4-6 inches long for best results. Also, ensure the parent plant is healthy and not stressed, as this will increase the chances of successful propagation.
2. How long does it take for an aloe vera leaf to root?
The time it takes for an aloe vera leaf to root can vary depending on several factors, including the temperature, humidity, and the overall health of the leaf. Generally, you can expect to see roots emerge within 4-8 weeks. However, it’s important to be patient and avoid disturbing the leaf too frequently. Check for root development every week or two by gently tugging on the leaf. If you feel resistance, it’s a good sign that roots have formed. If you don’t see any roots after 8 weeks, it’s possible that the leaf has rotted or is not viable.
3. What type of soil is best for rooting aloe vera leaves?
Aloe vera plants thrive in well-draining soil, so it’s crucial to use a potting mix that allows excess water to escape. A cactus or succulent mix is an excellent choice, as it typically contains ingredients like perlite, vermiculite, and sand, which promote drainage. You can also create your own mix by combining equal parts of potting soil, perlite, and coarse sand. Avoid using heavy, clay-based soils, as they can retain too much moisture and lead to root rot.
4. How often should I water the aloe vera leaf while it’s rooting?
Watering is a critical aspect of aloe vera propagation, and it’s important to strike the right balance. Overwatering can lead to rot, while underwatering can prevent root development. Initially, after planting the calloused leaf end in the soil, water sparingly. Allow the soil to dry out completely between waterings. Once roots have formed, you can gradually increase the frequency of watering, but always ensure that the soil is dry to the touch before adding more water. During the dormant winter months, reduce watering even further.
5. What are the signs of root rot in an aloe vera leaf?
Root rot is a common problem in aloe vera plants, and it’s essential to identify it early to prevent further damage. Signs of root rot include:
* The leaf turning mushy or brown.
* A foul odor coming from the soil.
* The leaf easily detaching from the base.
* The plant wilting or drooping, even when the soil is moist.
If you suspect root rot, immediately remove the affected leaf from the soil and inspect the roots. If the roots are brown and mushy, carefully trim them away with a clean knife or scissors. Repot the leaf in fresh, well-draining soil and avoid overwatering.
6. Can I propagate aloe vera from a broken leaf?
Yes, you can propagate aloe vera from a broken leaf, as long as the leaf is healthy and mature. Follow the same steps as you would for a whole leaf: allow the cut end to callous over for several days before planting it in well-draining soil. Be extra careful not to overwater the broken leaf, as it may be more susceptible to rot.
7. What is the best location for rooting aloe vera leaves?
Aloe vera leaves need bright, indirect sunlight to root properly. Avoid placing them in direct sunlight, as this can scorch the leaves. A location near an east- or west-facing window is ideal. You can also use a grow light to supplement natural light, especially during the winter months. Maintain a consistent temperature between 65-80°F (18-27°C) for optimal root development.
8. My aloe vera leaf is turning yellow. What does this mean?
A yellowing aloe vera leaf can indicate several issues, including:
* Overwatering: Too much water can lead to root rot and cause the leaves to turn yellow.
* Underwatering: Insufficient water can also stress the plant and cause the leaves to yellow.
* Sunburn: Direct sunlight can scorch the leaves and cause them to turn yellow or brown.
* Nutrient deficiency: A lack of essential nutrients can also lead to yellowing leaves.
Assess your watering habits, light exposure, and soil quality to determine the cause of the yellowing and adjust your care accordingly.
9. Can I use rooting hormone to propagate aloe vera leaves?
While not strictly necessary, using rooting hormone can help to speed up the rooting process and increase the chances of success. Dip the calloused end of the leaf in rooting hormone powder before planting it in the soil. Be sure to follow the instructions on the rooting hormone packaging.
10. How do I know when my new aloe vera plant is ready to be transplanted?
Once your aloe vera leaf has developed a healthy root system and new growth is visible, it’s ready to be transplanted into a larger pot. Gently remove the plant from its current container and inspect the roots. If the roots are circling the bottom of the pot, it’s definitely time to transplant. Choose a pot that is slightly larger than the current one and fill it with fresh, well-draining soil. Carefully place the aloe vera plant in the new pot and water thoroughly.
Leave a Comment