

Grow Yellow Watermelon at Home: Imagine biting into a juicy, vibrant watermelon, but instead of the familiar red, it’s a sunshine yellow! Sounds intriguing, right? For centuries, watermelons have been a symbol of summer, abundance, and refreshing sweetness, enjoyed across cultures from ancient Egypt to modern-day picnics. But did you know that the yellow variety offers a unique twist on this classic fruit?
This isn’t just about novelty; growing your own yellow watermelon is surprisingly achievable, even if you’re a beginner gardener. I’m here to tell you that you don’t need acres of land or a green thumb of legend to enjoy this delicious treat. In fact, with a few simple tricks and DIY hacks, you can cultivate these beauties right in your own backyard or even in containers on your patio!
Why should you try this? Well, besides the bragging rights of growing something truly unique, yellow watermelons often boast a sweeter, honey-like flavor compared to their red counterparts. Plus, knowing exactly where your food comes from and the care it received is incredibly rewarding. This DIY guide will walk you through every step, from selecting the right seeds to harvesting your very own grow yellow watermelon at home, ensuring a successful and delicious experience. Let’s get started!
Grow Your Own Sweet & Sunny Yellow Watermelon!
Okay, watermelon lovers, listen up! I’m about to share my secrets for growing those gorgeous, sunshine-yellow watermelons right in your own backyard. Forget the grocery store – imagine biting into a juicy, homegrown yellow watermelon, bursting with flavor. It’s easier than you think, and I’m here to guide you every step of the way.
Choosing the Right Variety
First things first, you need the right seeds! Not all watermelons are created equal, and you definitely need to choose a yellow-fleshed variety. Here are a few of my favorites:
* ‘Yellow Doll’: This is a popular choice for a reason! It’s a smaller, personal-sized melon with a super sweet flavor. Perfect for a single serving (or maybe sharing, if you’re feeling generous!).
* ‘Golden Midget’: As the name suggests, this is a compact variety that’s great for smaller gardens. The rind turns golden yellow when it’s ripe, which is a handy visual cue!
* ‘Buttercup Yellow’: This one boasts a vibrant yellow flesh and a crisp, refreshing taste. It’s also known for its good disease resistance.
* ‘Mountain Sweet Yellow’: If you’re looking for a larger melon, this is a good option. It’s known for its sweetness and juicy texture.
Once you’ve picked your variety, make sure you’re getting your seeds from a reputable source. Look for seeds that are specifically labeled as “yellow watermelon.”
Getting Started: Planting Your Seeds
Watermelons need a long growing season, so starting your seeds indoors is often the best way to go, especially if you live in a cooler climate.
Here’s what you’ll need:
* Watermelon seeds (of course!)
* Seed starting trays or small pots (biodegradable pots are great!)
* Seed starting mix (this is different from regular potting soil)
* A warm, sunny spot or a grow light
* Water
Step-by-Step Planting Instructions:
1. Prepare your seed starting trays or pots: Fill each cell or pot with seed starting mix. Gently tap the container to settle the mix.
2. Sow the seeds: Plant 2-3 seeds per cell or pot, about 1 inch deep. I always plant a few extra in case some don’t germinate.
3. Water gently: Moisten the soil thoroughly, but be careful not to overwater. You want the soil to be damp, not soggy. A spray bottle works well for this.
4. Provide warmth and light: Watermelon seeds need warmth to germinate. Aim for a soil temperature of 70-85°F (21-29°C). Place the trays in a warm, sunny spot, or use a grow light. If using a grow light, keep it a few inches above the soil surface.
5. Keep the soil moist: Check the soil daily and water as needed to keep it consistently moist.
6. Wait for germination: Watermelon seeds typically germinate in 5-10 days. Once the seedlings emerge, remove the weaker ones, leaving only the strongest seedling in each cell or pot.
Transplanting Your Seedlings
Once your seedlings have developed a few sets of true leaves (the leaves that look like miniature watermelon leaves), and the weather has warmed up, it’s time to transplant them outdoors.
Important Considerations Before Transplanting:
* Timing is crucial: Watermelons are very sensitive to frost. Make sure all danger of frost has passed before transplanting. The soil temperature should be at least 60°F (15°C).
* Choose a sunny location: Watermelons need at least 6-8 hours of direct sunlight per day.
* Prepare the soil: Watermelons need well-drained soil that is rich in organic matter. Amend the soil with compost or well-rotted manure before planting.
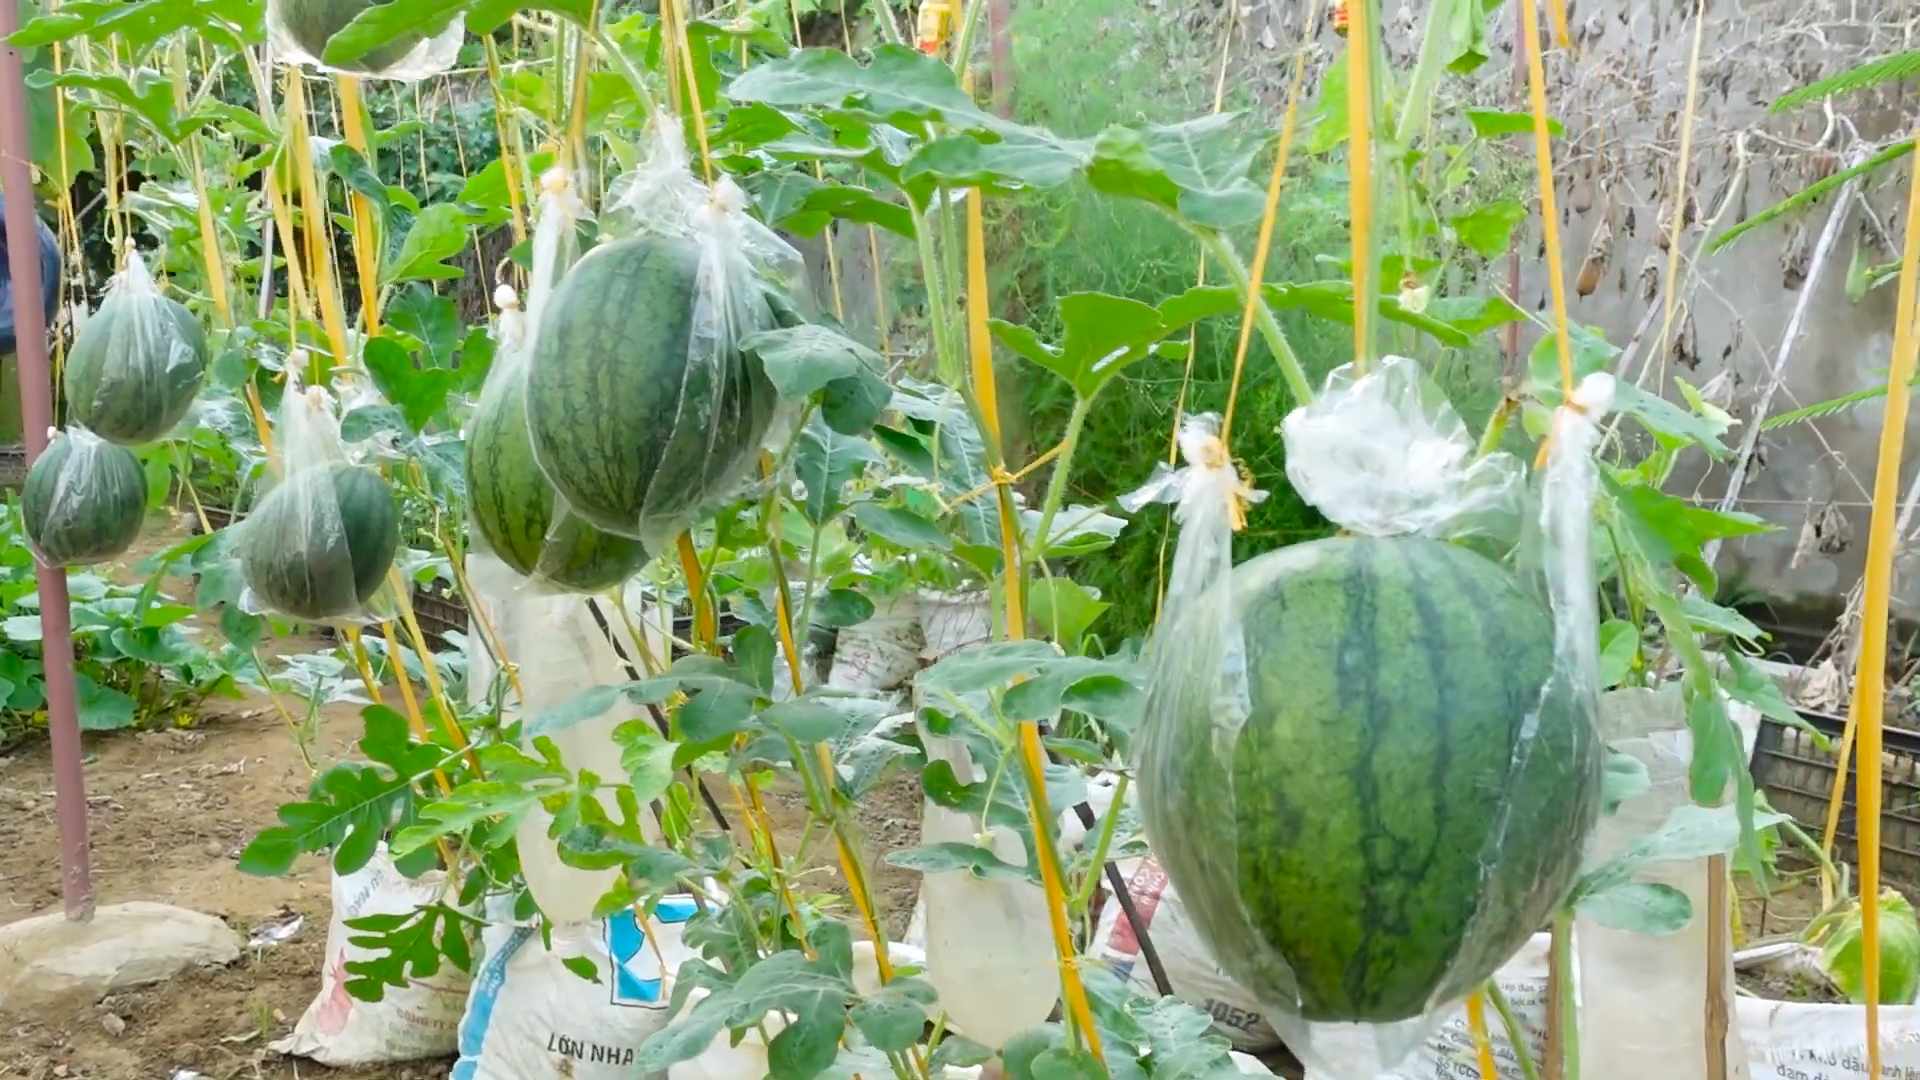
* Space them properly: Give your watermelon plants plenty of room to grow. Space them at least 3-4 feet apart in rows that are 6-8 feet apart. This allows for good air circulation and prevents overcrowding.
Transplanting Steps:
1. Harden off the seedlings: Before transplanting, you need to “harden off” the seedlings. This means gradually exposing them to outdoor conditions over a period of 7-10 days. Start by placing them outdoors in a sheltered location for a few hours each day, gradually increasing the amount of time they spend outside.
2. Dig the planting holes: Dig holes that are slightly larger than the root balls of the seedlings.
3. Gently remove the seedlings from their containers: Be careful not to damage the roots. If you’re using biodegradable pots, you can plant the entire pot directly into the ground.
4. Plant the seedlings: Place the seedlings in the holes and backfill with soil. Gently firm the soil around the base of the plants.
5. Water thoroughly: Water the newly transplanted seedlings well.
6. Mulch around the plants: Apply a layer of mulch around the plants to help retain moisture, suppress weeds, and regulate soil temperature. Straw, wood chips, or black plastic mulch are all good options.
Caring for Your Watermelon Plants
Now that your watermelon plants are in the ground, it’s time to give them the care they need to thrive.
Watering:
Watermelons need consistent moisture, especially during hot, dry weather. Water deeply and regularly, aiming to keep the soil consistently moist but not waterlogged. Avoid overhead watering, as this can promote fungal diseases. Drip irrigation is an excellent option for watering watermelons.
Fertilizing:
Watermelons are heavy feeders, so they need regular fertilization.
* At planting time: Mix a balanced fertilizer (e.g., 10-10-10) into the soil before planting.
* After the vines start to run: Side-dress the plants with a nitrogen-rich fertilizer to promote vine growth.
* When the fruits start to develop: Switch to a fertilizer that is higher in phosphorus and potassium to promote fruit development.
Follow the instructions on the fertilizer package for application rates.
Weeding:
Keep the area around your watermelon plants free of weeds. Weeds compete with the plants for water and nutrients. Hand-pull weeds regularly or use a hoe to cultivate the soil. Be careful not to damage the watermelon roots when weeding.
Pollination:
Watermelons need to be pollinated in order to produce fruit. Bees are the primary pollinators of watermelons. To attract bees to your garden, plant flowers that are attractive to bees, such as sunflowers, zinnias, and lavender. If you’re not seeing many bees in your garden, you may need to hand-pollinate the flowers.
To hand-pollinate:
1. Identify the male and female flowers. Male flowers have a long, slender stem, while female flowers have a small, immature fruit at the base of the flower.
2. Use a small paintbrush or cotton swab to collect pollen from the male flower.
3. Gently transfer the pollen to the stigma of the female flower.
4. Repeat this process for several female flowers.
Pest and Disease Control:
Watermelons can be susceptible to a variety of pests and diseases.
* Common pests: Aphids, squash bugs, cucumber beetles, and vine borers.
* Common diseases: Powdery mildew, fusarium wilt, and anthracnose.
Inspect your plants regularly for signs of pests or diseases. If you find any problems, take action immediately. Use organic pest control methods whenever possible. For example, you can spray aphids with insecticidal soap or use row covers to protect your plants from pests. For diseases, make sure your plants have good air circulation and avoid overhead watering. You can also use a fungicide if necessary.
Harvesting Your Yellow Watermelon
This is the moment we’ve all been waiting for! Knowing when to harvest your yellow watermelon is key to getting that perfect sweetness and flavor.
Signs of Ripeness:
* The tendril closest to the fruit turns brown and dry: This is one of the most reliable indicators of ripeness.
* The underside of the melon (where it rests on the ground) turns from white to yellow: This is called the “ground spot.”
* The melon sounds hollow when you thump it: This takes some practice, but with experience, you’ll be able to tell the difference between a ripe and unripe melon.
* The rind becomes dull and loses its shine: A ripe watermelon will have a slightly dull appearance.
Harvesting Instructions:
1. Use a sharp knife or pruning shears to cut the watermelon from the vine. Leave a few inches of stem attached to the melon.
2. Handle the watermelon carefully to avoid bruising it.
3. Store the watermelon in

Conclusion
So, there you have it! Growing your own yellow watermelon at home is not only achievable but also a deeply rewarding experience. Forget the grocery store roulette and the disappointment of bland, tasteless watermelons. With a little patience, some basic gardening knowledge, and our simple DIY trick, you can cultivate juicy, vibrant yellow watermelons right in your backyard.
Why is this a must-try? Because it puts you in control. You control the quality of the soil, the amount of sunlight, and the watering schedule, ensuring your watermelon receives the optimal conditions for growth. You also avoid the pesticides and chemicals often used in commercial farming. The result? A healthier, tastier, and more satisfying fruit.
Beyond the pure joy of harvesting your own homegrown produce, growing yellow watermelon offers a unique culinary adventure. Imagine the vibrant salads, refreshing smoothies, and stunning desserts you can create with this unique fruit. Think beyond the traditional watermelon recipes. Try grilling slices for a smoky sweetness, pickling the rind for a tangy treat, or even fermenting the juice for a refreshing summer beverage.
Consider these variations to personalize your yellow watermelon growing experience:
* Experiment with different yellow watermelon varieties: There are several cultivars available, each with its own unique flavor profile and size. Research and choose the one that best suits your taste and growing conditions. Some popular choices include ‘Yellow Doll’, ‘Buttercup Yellow’, and ‘Honey Heart’.
* Companion planting: Enhance your watermelon’s growth by planting beneficial companion plants nearby. Marigolds deter pests, while basil improves flavor. Consider planting flowers to attract pollinators like bees, which are crucial for fruit production.
* Vertical gardening: If you have limited space, consider training your watermelon vines to grow vertically on a trellis. This not only saves space but also improves air circulation and reduces the risk of fungal diseases.
* Seed saving: Once you’ve successfully grown your own yellow watermelons, save the seeds for future planting. This allows you to continue enjoying your homegrown fruit year after year and adapt the seeds to your specific growing environment.
Growing yellow watermelon at home is more than just a gardening project; it’s a connection to nature, a celebration of flavor, and a testament to the power of DIY. Don’t be intimidated by the process. Start small, learn as you go, and most importantly, have fun!
We encourage you to embrace this DIY trick and embark on your own yellow watermelon growing journey. Once you’ve harvested your first homegrown watermelon, we’d love to hear about your experience. Share your photos, tips, and recipes with us and the community. Let’s inspire each other to grow our own food and enjoy the fruits (and vegetables!) of our labor.
Now, let’s address some frequently asked questions to help you get started:
Frequently Asked Questions (FAQ)
What is the best time to plant yellow watermelon seeds?
The ideal time to plant yellow watermelon seeds is after the last frost, when the soil temperature has reached at least 70°F (21°C). Watermelons are warm-season crops and require plenty of sunshine and warmth to thrive. In most regions, this typically falls between late spring and early summer. You can start seeds indoors 3-4 weeks before the last expected frost to get a head start, but be sure to harden them off gradually before transplanting them outdoors.
How much space do yellow watermelon plants need?
Yellow watermelon plants are sprawling vines that require a significant amount of space. Each plant needs at least 6-8 feet of space in all directions. If you’re planting in rows, space the rows 8-10 feet apart. Consider using a trellis for vertical growing if you have limited space. Proper spacing allows for adequate air circulation, sunlight penetration, and room for the vines to spread.
What kind of soil is best for growing yellow watermelons?
Yellow watermelons thrive in well-drained, sandy loam soil that is rich in organic matter. The soil pH should be between 6.0 and 6.8. Before planting, amend the soil with compost or well-rotted manure to improve drainage and fertility. Avoid heavy clay soils, as they can retain too much moisture and lead to root rot.
How often should I water my yellow watermelon plants?
Yellow watermelon plants need consistent watering, especially during fruit development. Water deeply and regularly, aiming for about 1-2 inches of water per week. Avoid overhead watering, as it can promote fungal diseases. Use a soaker hose or drip irrigation to deliver water directly to the roots. Reduce watering as the fruits ripen to prevent them from cracking.
How do I know when my yellow watermelon is ripe?
Determining when a yellow watermelon is ripe requires a combination of visual and tactile cues. Look for the following signs:
* The tendril closest to the fruit turns brown and dries out.
* The underside of the watermelon (where it rests on the ground) turns from white to yellow.
* The watermelon sounds hollow when you thump it.
* The rind becomes dull and slightly waxy.
With practice, you’ll develop a feel for when your yellow watermelons are perfectly ripe.
What are some common pests and diseases that affect yellow watermelons?
Yellow watermelons are susceptible to several pests and diseases, including:
* Aphids: Small, sap-sucking insects that can weaken plants.
* Squash bugs: Large, brown insects that feed on leaves and stems.
* Cucumber beetles: Yellow and black beetles that can transmit diseases.
* Powdery mildew: A fungal disease that causes white, powdery spots on leaves.
* Fusarium wilt: A soilborne fungal disease that can cause plants to wilt and die.
To prevent pest and disease problems, practice good garden hygiene, such as removing weeds and debris. Use organic pest control methods, such as insecticidal soap or neem oil. Choose disease-resistant varieties whenever possible.
Can I grow yellow watermelons in containers?
Yes, you can grow yellow watermelons in containers, but you’ll need a large container (at least 20 gallons) with good drainage. Choose a dwarf or bush variety of yellow watermelon that is better suited for container growing. Provide plenty of sunlight, water, and fertilizer. You may also need to provide support for the vines as they grow.
What kind of fertilizer should I use for yellow watermelons?
Yellow watermelons benefit from regular fertilization. Use a balanced fertilizer (e.g., 10-10-10) at planting time. Once the vines start to grow, switch to a fertilizer that is higher in phosphorus and potassium to promote fruit development. Avoid over-fertilizing with nitrogen, as this can lead to excessive vine growth and reduced fruit production.
How can I improve pollination for my yellow watermelons?
Watermelons require pollination to set fruit. If you’re not seeing many bees in your garden, you can hand-pollinate the flowers. Use a small paintbrush to transfer pollen from the male flowers (which have a long, thin stem) to the female flowers (which have a small, immature watermelon at the base). Pollinate in the morning, when the flowers are open. Planting flowers that attract pollinators, such as sunflowers and zinnias, can also help improve pollination.
Is growing yellow watermelon at home really worth the effort?
Absolutely! While it requires some effort and attention, the reward of harvesting your own juicy, flavorful yellow watermelon is well worth it. Not only will you enjoy a delicious and healthy treat, but you’ll also gain a sense of accomplishment and connection to nature. Plus, you’ll have the satisfaction of knowing exactly where your food came from and how it was grown. So, grab some seeds, get your hands dirty, and experience the joy of growing your own yellow watermelon!

Leave a Comment