

Grow Table Olives Beginners, and transform your garden into a Mediterranean oasis! Have you ever dreamed of plucking your own plump, juicy olives straight from the tree, ready to be cured and enjoyed? It sounds idyllic, doesn’t it? Well, it’s more achievable than you might think, even if you’re a complete beginner.
Olives have a rich history, dating back thousands of years to ancient civilizations. They were prized by the Greeks and Romans, not just for their delicious fruit and oil, but also for their medicinal properties. Imagine connecting with that ancient tradition by cultivating your own olive tree!
I know what you might be thinking: “Growing olives seems complicated!” But trust me, with the right guidance, it’s a rewarding experience. This DIY guide is designed specifically for beginners like you, providing simple, step-by-step instructions to successfully grow table olives beginners. We’ll cover everything from choosing the right variety for your climate to planting, pruning, and even curing your first batch of homegrown olives. Why buy them from the store when you can have the satisfaction of growing your own? Let’s get started and unlock the secrets to a bountiful olive harvest!
Growing Table Olives at Home: A Beginner’s Guide
Okay, so you want to grow your own table olives? Awesome! It’s a rewarding process, and while it takes some patience, the satisfaction of brining and enjoying your own homegrown olives is totally worth it. This guide will walk you through everything you need to know to get started, from choosing the right variety to harvesting and curing your delicious olives.
Choosing the Right Olive Variety
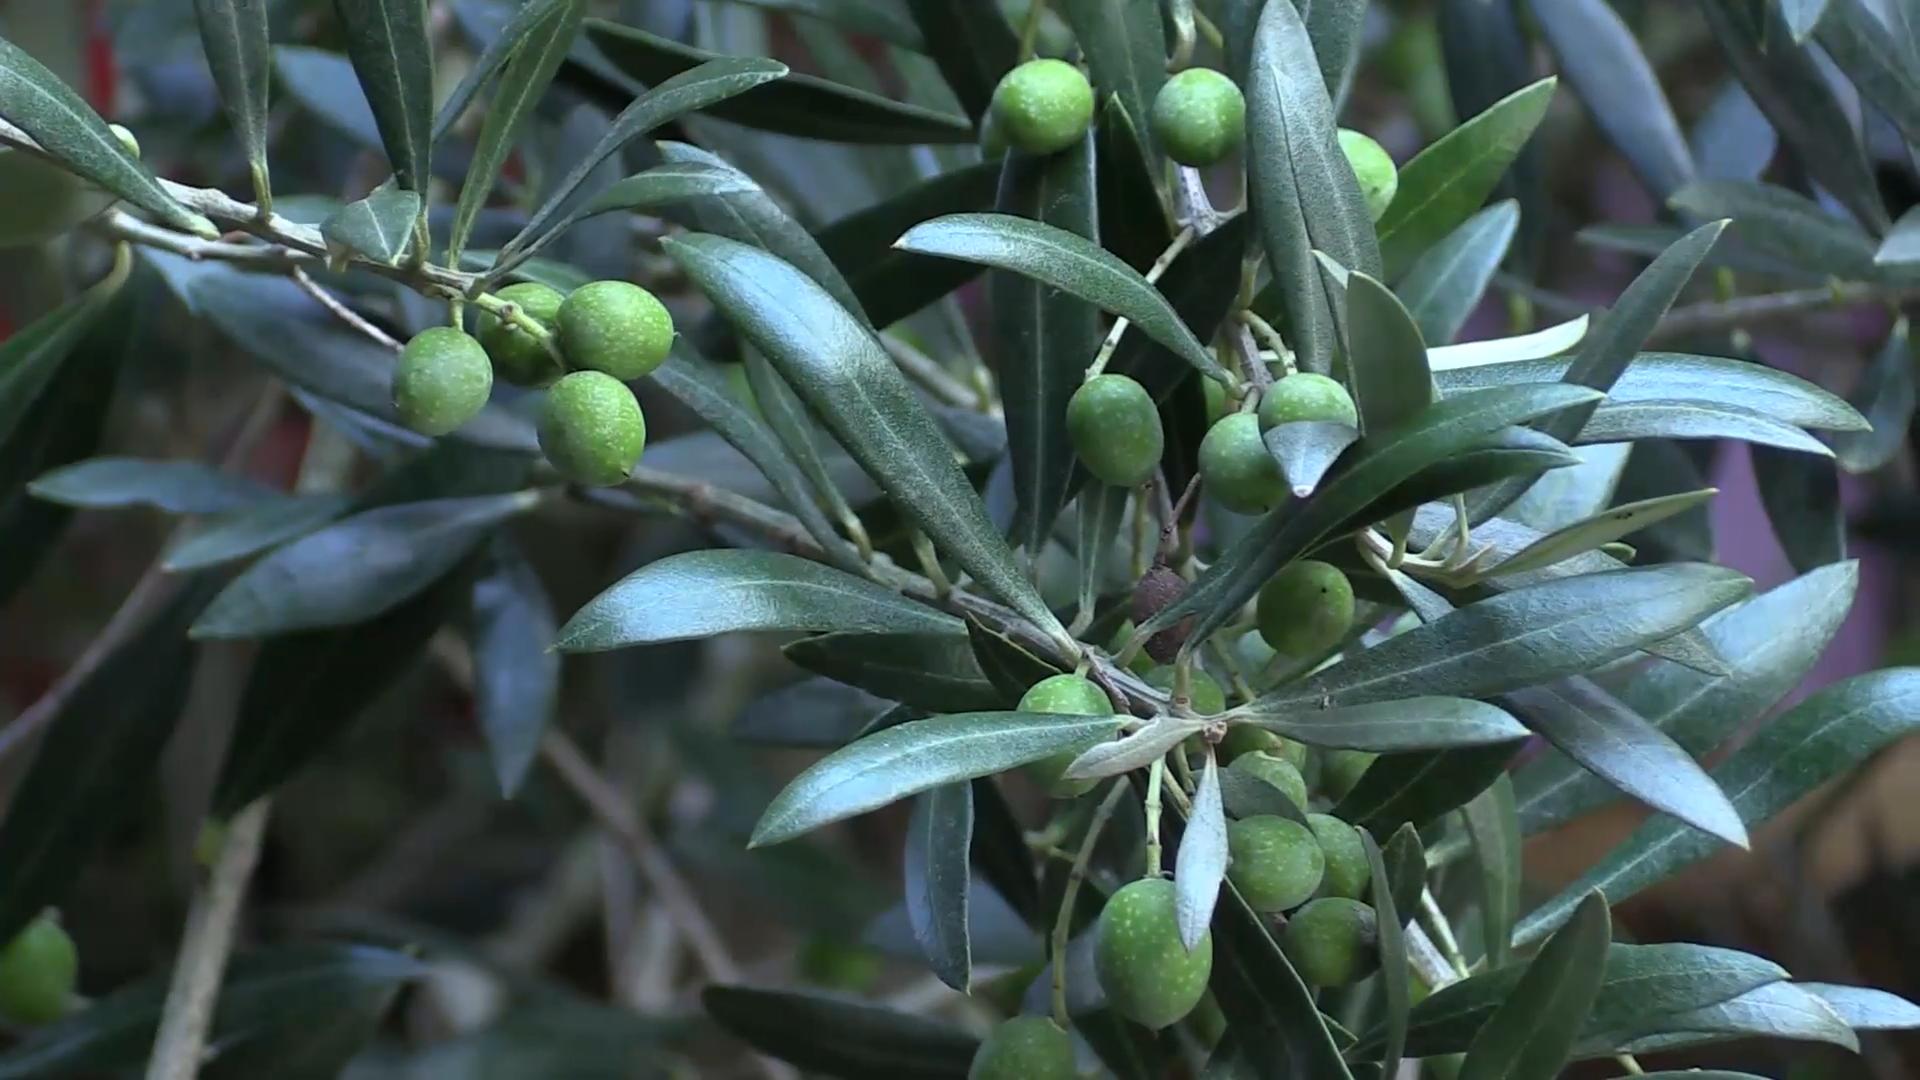
First things first, you need to pick the right olive tree. Not all olive varieties are created equal, especially when it comes to table olives. Some are better suited for oil production, while others are specifically bred for eating. Here’s what to consider:
- Size: Think about how much space you have. Olive trees can get pretty big! If you’re limited on space, look for dwarf varieties or consider growing in a large container.
- Climate: Olives thrive in warm, Mediterranean-like climates. Check your local climate zone to make sure the variety you choose is suitable for your area. They need a certain number of “chill hours” (hours below a certain temperature) to produce fruit, but too much cold can damage them.
- Table Olive Qualities: Look for varieties known for their good flavor and texture when cured. Some popular choices for table olives include:
- Manzanilla: A classic Spanish variety, known for its large size and mild flavor. It’s a great all-around choice.
- Sevillano: Another Spanish variety, producing large, flavorful olives. They are often used for green olives.
- Mission: A popular American variety, producing medium-sized olives with a good flavor. It’s relatively cold-hardy.
- Ascolano: An Italian variety, known for its very large size and mild flavor. They are often stuffed.
- Self-Fertility: Some olive varieties are self-fertile, meaning they can produce fruit on their own. Others require cross-pollination from another olive variety. If you only have space for one tree, choose a self-fertile variety. If you have room for two, consider planting two different varieties that can pollinate each other.
Planting Your Olive Tree
Alright, you’ve chosen your variety! Now it’s time to get your hands dirty. Here’s how to plant your olive tree:
- Choose the Right Location: Olives need plenty of sunshine – at least 6-8 hours per day. They also prefer well-drained soil. Avoid planting in areas where water tends to pool.
- Prepare the Soil: Dig a hole that’s twice as wide as the root ball and just as deep. Amend the soil with compost or other organic matter to improve drainage and fertility.
- Plant the Tree: Gently remove the tree from its container and loosen any circling roots. Place the tree in the hole, making sure the top of the root ball is level with the surrounding soil.
- Backfill the Hole: Fill the hole with the amended soil, gently tamping it down to remove air pockets.
- Water Thoroughly: Water the tree deeply after planting. This will help settle the soil and encourage root growth.
- Mulch: Apply a layer of mulch around the base of the tree to help retain moisture and suppress weeds. Keep the mulch a few inches away from the trunk to prevent rot.
Caring for Your Olive Tree
Once your olive tree is planted, it’s important to provide it with the proper care to ensure it thrives and produces a bountiful harvest.
Watering
* Newly Planted Trees: Water deeply and regularly, especially during the first few months. Check the soil moisture regularly and water when the top inch or two feels dry.
* Established Trees: Once the tree is established, it’s relatively drought-tolerant. Water deeply during dry spells, especially during fruit development. Avoid overwatering, as this can lead to root rot.
Fertilizing
* Young Trees: Fertilize young trees in the spring with a balanced fertilizer. Follow the instructions on the fertilizer label.
* Mature Trees: Mature trees generally don’t need a lot of fertilizer. You can fertilize them in the spring with a fertilizer specifically formulated for fruit trees. Avoid over-fertilizing, as this can reduce fruit production.
Pruning
* Young Trees: Prune young trees to establish a strong central leader and good branch structure. Remove any dead, damaged, or crossing branches.
* Mature Trees: Prune mature trees annually to remove dead, damaged, or crossing branches. Also, prune to improve air circulation and sunlight penetration. Olives produce fruit on the previous year’s growth, so avoid pruning too heavily, as this can reduce fruit production. The best time to prune is in late winter or early spring, before new growth begins.
Pest and Disease Control
* Olive Fruit Fly: This is a common pest that can damage olive fruit. Monitor your trees regularly for signs of infestation and take appropriate action, such as using traps or applying insecticides.
* Olive Knot: This is a bacterial disease that causes galls to form on the branches. Prune out infected branches and disinfect your pruning tools.
* Verticillium Wilt: This is a soilborne fungal disease that can cause wilting and death. Plant olive trees in well-drained soil and avoid overwatering.
Harvesting Your Olives
Harvest time! This is where all your hard work pays off. Here’s what you need to know:
- Timing: The timing of the harvest depends on the variety and your personal preference. Green olives are typically harvested in the fall, before they fully ripen. Black olives are harvested in the late fall or early winter, when they are fully ripe.
- Method: You can harvest olives by hand or with a mechanical shaker. Hand-picking is the most gentle method and is best for table olives. Mechanical shakers can damage the fruit, so they are more commonly used for oil olives.
- Care: Handle the olives gently to avoid bruising. Bruised olives will spoil more quickly.
Curing Your Olives
Okay, you’ve got your olives! Now comes the curing process. Raw olives are incredibly bitter and inedible. Curing removes this bitterness and makes them delicious. There are several different curing methods, but here are two popular options:
Brine Curing
This is a traditional method that uses a saltwater solution to draw out the bitterness.
- Sort and Wash: Sort the olives, discarding any that are bruised or damaged. Wash the olives thoroughly.
- Score or Crack: Score each olive with a knife or crack it gently with a mallet. This helps the brine penetrate the olive. Be careful not to crush the olive completely.
- Soak in Water: Place the olives in a large container and cover them with fresh water. Change the water daily for 7-10 days to remove some of the bitterness.
- Prepare the Brine: Make a brine solution by dissolving 1/2 cup of sea salt per gallon of water.
- Brine the Olives: Drain the olives and place them in a clean container. Cover them with the brine solution. Make sure the olives are completely submerged. You can use a plate or a weight to keep them submerged.
- Ferment: Allow the olives to ferment in the brine for several weeks or months, tasting them periodically. The length of time will depend on the variety and your personal preference. They are ready when they have lost their bitterness and have a pleasant flavor.
- Store: Once the olives are cured, store them in the brine in the refrigerator. They will keep for several months.
Lye Curing
This method uses lye (sodium hydroxide) to quickly remove the bitterness. It’s faster than brine curing, but it requires more caution. Lye is caustic and can cause burns, so wear gloves and eye protection when working with it.
- Sort and Wash: Sort the olives, discarding any that are bruised or damaged. Wash the olives thoroughly.
- Prepare the Lye Solution: Dissolve lye in cold water according to the instructions on the lye container. Always add lye to water, never water to lye. The solution will heat up as the lye dissolves.
- Soak in Lye Solution: Place the olives in a plastic container (do not use metal) and cover them with the lye solution. Make sure the olives are completely submerged.
- Monitor: Check the olives frequently. The lye will penetrate the olives, turning them a dark color. The length of time will depend on the variety and the strength of the lye solution. It

Conclusion
So, there you have it! Transforming bitter, inedible olives into delectable, ready-to-eat table olives is not only achievable for beginners, but also incredibly rewarding. This DIY method for preparing your own grow table olives beginners style unlocks a world of flavor and allows you to control every aspect of the process, from the brine to the seasonings. Forget the bland, mass-produced olives from the supermarket; with a little patience and this simple guide, you can enjoy olives bursting with homemade goodness.
Why is this a must-try? Because it’s about more than just olives. It’s about connecting with your food, understanding the process, and experiencing the satisfaction of creating something delicious from scratch. It’s about taking control of the ingredients and avoiding unwanted additives or preservatives. And, let’s be honest, it’s about impressing your friends and family with your newfound culinary skills!
But the beauty of this DIY project lies in its adaptability. Feel free to experiment with different brines. Try adding herbs like rosemary, thyme, or oregano to the brine for an aromatic twist. Infuse your olives with garlic cloves, chili flakes, or lemon zest for an extra kick. Consider using different types of vinegar, such as red wine vinegar or apple cider vinegar, to alter the flavor profile. You can even try different curing methods, such as dry-salting, although brining is generally the easiest and most reliable method for beginners.
Don’t be afraid to adjust the salt concentration in the brine to suit your taste preferences. Some people prefer a saltier olive, while others prefer a milder flavor. The key is to taste the olives periodically throughout the curing process and adjust accordingly. Remember, you can always add more salt, but you can’t take it away!
Another variation to consider is the type of olive you use. While this guide focuses on general principles, different olive varieties may require slightly different curing times. Research the specific variety of olive you’re working with to ensure optimal results.
Ultimately, the best way to learn is by doing. So, gather your olives, prepare your brine, and embark on this exciting culinary adventure. We’re confident that you’ll be amazed by the results.
We encourage you to try this DIY trick and share your experience with us! Let us know what variations you tried, what challenges you faced, and what delicious creations you came up with. Share your photos and stories on social media using [Your Hashtag Here] so we can all learn from each other. Happy olive curing!
Frequently Asked Questions (FAQ)
What type of olives are best for curing?
The best type of olives for curing depends on your personal preference and what’s available in your area. Some popular varieties include Kalamata, Manzanilla, and Sevillano. Green olives are generally firmer and have a more bitter flavor, while black olives are softer and have a milder flavor. Experiment with different varieties to find your favorite. For beginners, starting with a readily available and relatively large olive like Manzanilla can be a good choice. Make sure the olives are fresh and undamaged for the best results.
How long does it take to cure olives?
The curing time for olives can vary depending on the size and type of olive, as well as the method used. Generally, it takes several weeks to several months to fully cure olives. The lye method is the fastest, but it requires careful handling of a corrosive substance. The water-curing method is the slowest, but it’s also the safest and easiest for beginners. The brine-curing method, which we recommend, typically takes 4-6 weeks. Taste the olives periodically throughout the curing process to check for bitterness. They are ready when they have lost their bitterness and have a pleasant, salty flavor.
How do I know when the olives are ready?
The best way to determine if the olives are ready is to taste them. Remove an olive from the brine, rinse it thoroughly, and taste it. If it’s still bitter, continue curing it for another week or two and then taste it again. Repeat this process until the olives have lost their bitterness and have a pleasant, salty flavor. The texture should also be firm but not hard.
What if my olives are still bitter after several weeks?
If your olives are still bitter after several weeks, it means they need more time to cure. Continue changing the brine regularly and tasting the olives periodically. You can also try increasing the salt concentration in the brine, as salt helps to draw out the bitterness. In extreme cases, you might consider scoring the olives with a knife to help the brine penetrate more easily.
Can I use tap water to cure olives?
It’s generally recommended to use filtered or bottled water to cure olives, as tap water can contain chlorine and other chemicals that can affect the flavor of the olives. If you must use tap water, let it sit uncovered for 24 hours to allow the chlorine to evaporate.
How should I store cured olives?
Cured olives should be stored in an airtight container in the refrigerator. They can be stored in the brine they were cured in, or you can pack them in olive oil. If storing in brine, make sure the olives are completely submerged to prevent spoilage. Properly stored cured olives can last for several months in the refrigerator.
Can I add other ingredients to the brine?
Yes, you can definitely add other ingredients to the brine to enhance the flavor of your olives. Some popular additions include garlic cloves, chili flakes, lemon zest, rosemary, thyme, oregano, and bay leaves. Experiment with different combinations to find your favorite flavor profile.
What is the white film that sometimes forms on the surface of the brine?
The white film that sometimes forms on the surface of the brine is Kahm yeast, a harmless type of yeast that can grow in brines. It’s not harmful to eat, but it can affect the flavor of the olives. To prevent Kahm yeast from forming, make sure the olives are completely submerged in the brine and that the container is tightly sealed. If Kahm yeast does form, simply skim it off the surface of the brine.
Can I use sea salt instead of table salt?
Yes, you can use sea salt instead of table salt to cure olives. However, make sure to use a coarse sea salt that doesn’t contain any additives. Table salt often contains iodine, which can affect the flavor of the olives.
What do I do if my olives become moldy?
If your olives become moldy, it’s best to discard them. Mold indicates that the olives have not been properly cured or stored and are no longer safe to eat. To prevent mold from forming, make sure the olives are completely submerged in the brine and that the container is tightly sealed.
Is it safe to eat olives straight from the tree?
No, it is not safe to eat olives straight from the tree. Raw olives contain a bitter compound called oleuropein, which makes them inedible. Curing the olives removes this compound and makes them palatable.
Can I use this method for all types of olives?
While this method is generally applicable to most types of olives, some varieties may require slight adjustments to the curing time or brine concentration. Research the specific variety of olive you’re working with to ensure optimal results. Smaller, more delicate olives may require less curing time than larger, more robust olives.
What if I don’t have a grow table? Can I still cure olives?
Absolutely! The term “grow table olives beginners” refers to the fact that you are starting with fresh olives, regardless of where they were grown. You don’t need a grow table to cure olives. You can purchase fresh olives from a local farmer’s market, specialty grocery store, or even online. The key is to start with fresh, undamaged olives.


Leave a Comment