

Grow Pea Shoots Indoors: Craving fresh, vibrant greens in the dead of winter? Or perhaps you’re simply looking for a fun, rewarding gardening project that even the smallest apartment can accommodate? Then you’ve come to the right place! I’m here to show you how incredibly easy it is to grow pea shoots indoors, bringing a taste of spring to your kitchen all year round.
Pea shoots, the tender young tendrils and leaves of pea plants, have been a culinary delight in Asian cuisine for centuries. Their delicate, slightly sweet flavor adds a wonderful crunch and freshness to salads, stir-fries, and even sandwiches. But you don’t need a sprawling garden or a trip to a specialty grocery store to enjoy them.
In today’s fast-paced world, many of us are disconnected from the source of our food. Growing your own pea shoots indoors is a fantastic way to reconnect with nature, even in a small way. Plus, it’s incredibly satisfying to harvest something you’ve nurtured from seed to table. This DIY project is not only budget-friendly but also ensures you have access to fresh, organic greens whenever you desire. Ready to get your hands dirty? Let’s dive into the simple steps to grow pea shoots indoors and transform your windowsill into a mini-garden!
Grow Your Own Delicious Pea Shoots Indoors: A Beginner’s Guide
Hey there, fellow plant enthusiasts! Ever wanted a taste of spring in the middle of winter? Or maybe you just love the fresh, slightly sweet flavor of pea shoots? Well, I’m here to tell you that growing your own pea shoots indoors is surprisingly easy and incredibly rewarding. Forget those expensive grocery store prices – you can have a constant supply of these nutritious greens right on your windowsill!
This guide will walk you through every step of the process, from choosing the right peas to harvesting your first batch of delicious shoots. Trust me, once you start, you’ll be hooked!
What You’ll Need
Before we dive in, let’s gather our supplies. The beauty of this project is that it doesn’t require a lot of fancy equipment. Here’s what you’ll need:
* Pea Seeds: This is the most important part! You’ll want to use dried peas specifically sold for sprouting or growing pea shoots. Avoid using treated seeds (those with a colored coating) as they are not safe for consumption. I personally love using ‘Dwarf Grey Sugar’ or ‘Lincoln’ peas, but any variety suitable for shelling or snow peas will work. You can find these at most garden centers or online.
* Growing Trays or Containers: You can use almost anything that’s shallow and has drainage holes. Recycled plastic containers, seed starting trays, or even old takeout containers (cleaned thoroughly, of course!) work great. I often use a 10×20 inch tray.
* Growing Medium: You have a few options here. You can use potting soil, seed starting mix, or even coconut coir. I prefer using a seed starting mix because it’s lightweight and provides good drainage.
* Watering Can or Spray Bottle: For gentle watering.
* Scissors or Kitchen Shears: For harvesting your pea shoots.
* Optional: A weight (like a book or brick) to help with germination.
* Optional: A grow light if you don’t have a sunny windowsill.
Step-by-Step Instructions: Planting Your Pea Shoots
Okay, let’s get our hands dirty! Here’s how to plant your pea shoots:
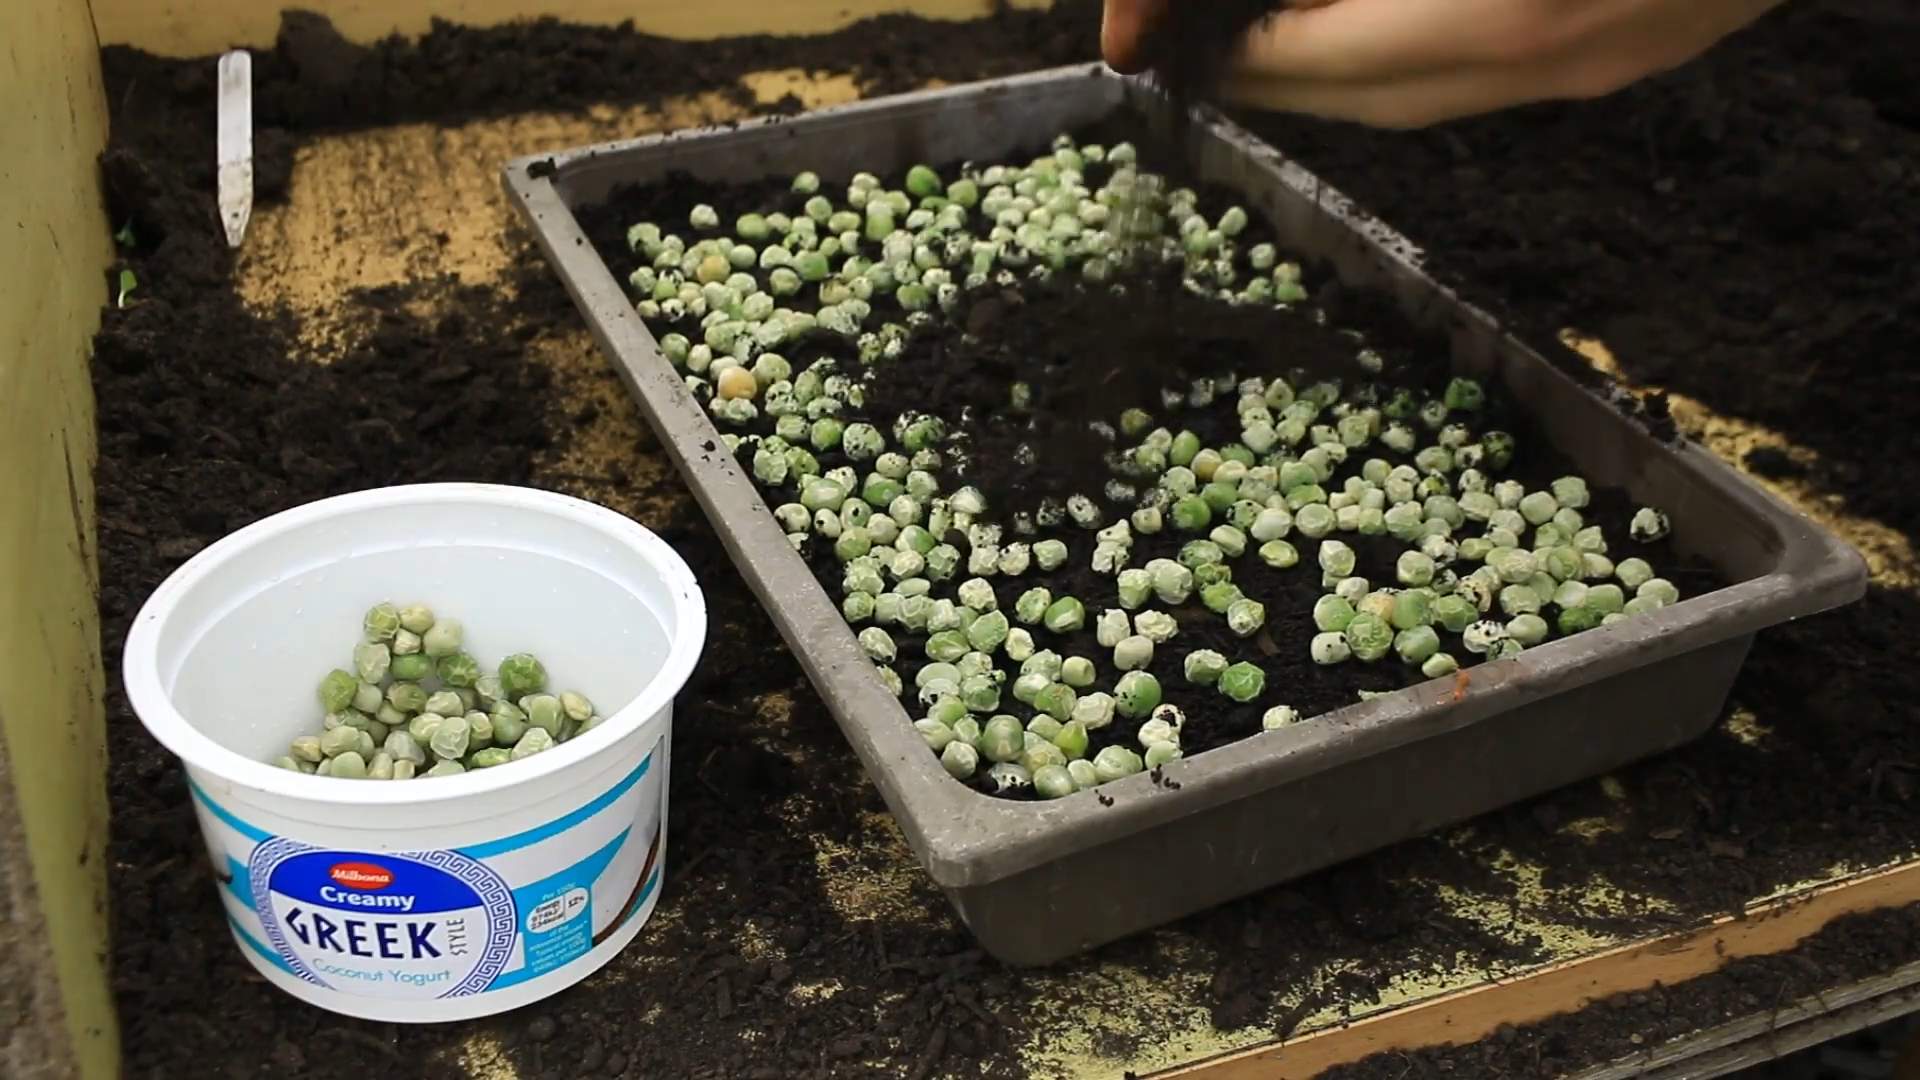
1. Soak the Pea Seeds: This is a crucial step to kickstart the germination process. Place your pea seeds in a bowl and cover them with cool water. Let them soak for 8-12 hours, or even overnight. You’ll notice they plump up as they absorb the water. This helps soften the seed coat and makes it easier for the sprouts to emerge.
2. Prepare Your Growing Container: Fill your chosen container with your growing medium, leaving about an inch of space at the top. Gently pat down the soil to create a level surface. You don’t want to compact it too much, just enough to provide a stable base for the seeds.
3. Sow the Pea Seeds: Now comes the fun part! Drain the soaked pea seeds and spread them evenly over the surface of the soil. You can pack them in pretty densely – they don’t need a lot of space to grow into shoots. I usually aim for about 1/4 inch between seeds.
4. Cover the Seeds: Lightly cover the pea seeds with a thin layer of the growing medium. About 1/4 inch is perfect. This helps keep the seeds moist and provides a dark environment for germination.
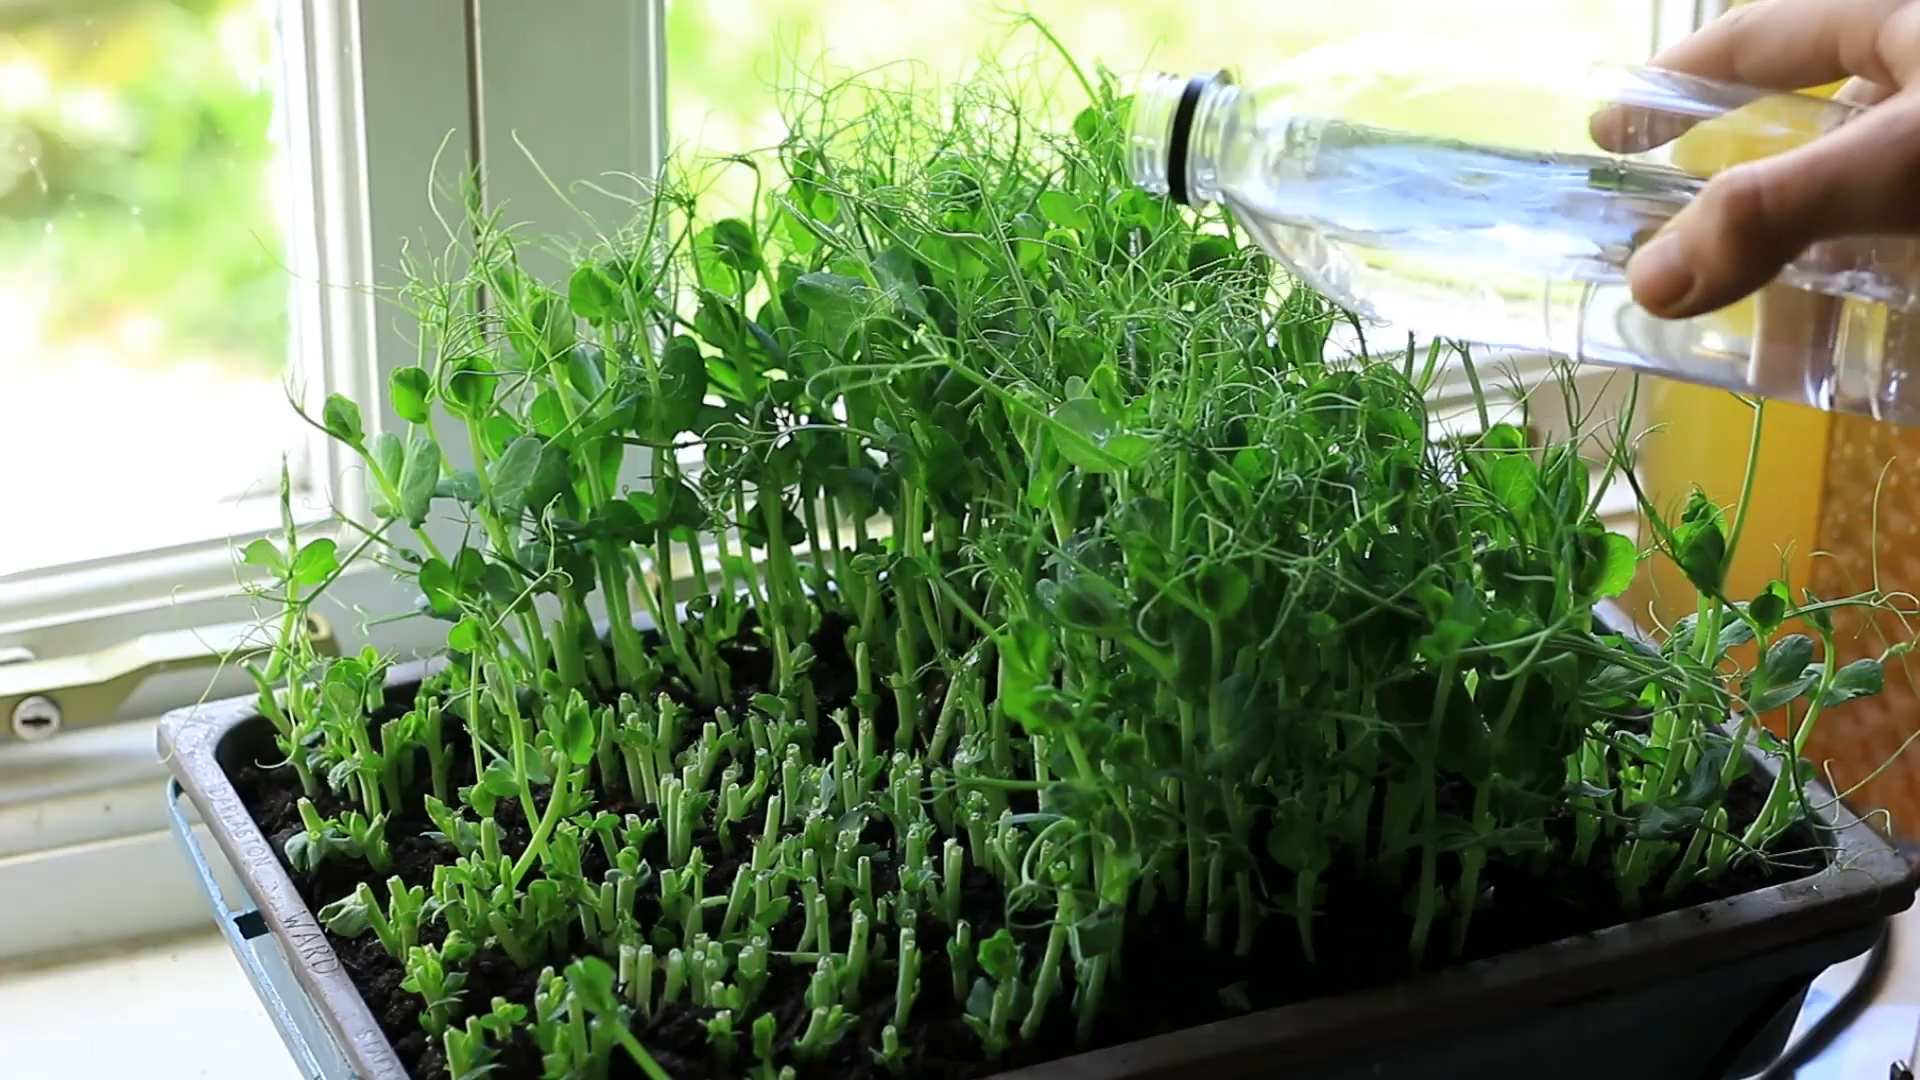
5. Water Thoroughly: Gently water the soil until it’s evenly moist. You don’t want it to be soggy, just damp. Use a watering can with a gentle rose or a spray bottle to avoid disturbing the seeds.
6. Weighting (Optional but Recommended): This step can significantly improve germination rates. Place a light weight (like a book wrapped in plastic or a brick) on top of the soil. This helps the seeds make good contact with the soil and encourages even sprouting. Leave the weight on for 2-3 days, or until you see the first sprouts emerging.
7. Find a Good Location: Place your container in a warm, well-lit location. A sunny windowsill is ideal, but if you don’t have one, you can use a grow light. Pea shoots need at least 4-6 hours of light per day.
Caring for Your Pea Shoots: From Sprout to Harvest
Now that your pea shoots are planted, it’s time to nurture them and watch them grow!
1. Watering: Keep the soil consistently moist, but not waterlogged. Check the soil moisture daily and water when the top inch feels dry to the touch. I usually water every other day, but this will depend on the temperature and humidity in your home.
2. Light: As mentioned earlier, pea shoots need plenty of light. If you’re using a windowsill, rotate the container regularly to ensure even growth. If you’re using a grow light, position it about 6-12 inches above the plants.
3. Ventilation: Good air circulation is important to prevent fungal diseases. Make sure your growing area is well-ventilated. You can open a window for a few hours each day or use a small fan to circulate the air.
4. Fertilizing (Optional): Pea shoots don’t typically need fertilizer, especially if you’re using a good quality growing medium. However, if you notice the leaves are looking pale or yellow, you can give them a light feeding with a diluted liquid fertilizer. I rarely fertilize mine.
5. Monitoring: Keep an eye out for any signs of pests or diseases. Aphids can sometimes be a problem, but they can usually be controlled with a strong spray of water.
Harvesting Your Pea Shoots: Time to Enjoy the Fruits (or Shoots!) of Your Labor
This is the moment you’ve been waiting for! After about 2-3 weeks, your pea shoots should be ready to harvest.
1. When to Harvest: The best time to harvest pea shoots is when they are about 4-6 inches tall and have several leaves.
2. How to Harvest: Using sharp scissors or kitchen shears, cut the pea shoots just above the lowest set of leaves. This will allow the plant to regrow and produce another harvest.
3. Multiple Harvests: You can usually get 2-3 harvests from each planting. After each harvest, continue to water and care for the plants as usual.
4. Washing and Storing: Gently wash the harvested pea shoots in cool water to remove any dirt or debris. Pat them dry with a paper towel or spin them in a salad spinner. Store them in a sealed container in the refrigerator for up to a week.
Troubleshooting: Common Issues and Solutions
Even with the best intentions, sometimes things don’t go exactly as planned. Here are some common issues you might encounter and how to fix them:
* Poor Germination: If your pea seeds aren’t sprouting, make sure they are fresh and have been properly soaked. Also, ensure the soil is moist and the temperature is warm enough. Using the weighting method can also improve germination rates.
* Mold or Fungus: If you see mold or fungus growing on the soil surface, it’s usually a sign of overwatering or poor ventilation. Reduce watering and improve air circulation. You can also sprinkle a little cinnamon on the soil surface, as it has antifungal properties.
* Leggy Growth: If your pea shoots are tall and spindly, it’s usually a sign that they’re not getting enough light. Move them to a brighter location or use a grow light.
* Yellowing Leaves: Yellowing leaves can be caused by a variety of factors, including nutrient deficiencies, overwatering, or underwatering. Check the soil moisture and consider giving them a light feeding with a diluted liquid fertilizer.
* Pests: Aphids are the most common pest on pea shoots. They can be controlled with a strong spray of water or by introducing beneficial insects like ladybugs.
Using Your Pea Shoots: Culinary Delights
Now that you have a bounty of fresh pea shoots, it’s time to get creative in the kitchen! Pea shoots are incredibly versatile and can be used in a variety of dishes.
* Salads: Add them to your favorite salads for a fresh, slightly sweet flavor and a boost of nutrients.
* Sandwiches and Wraps: Use them as a healthy and flavorful topping for sandwiches and wraps.
* Stir-fries: Toss them into stir-fries for a quick and easy way to add some greens.
* Soups: Garnish soups with fresh pea shoots for a pop of color and flavor.
* Smoothies: Blend them into smoothies for a nutritious and delicious boost.
* Pesto: Make a delicious pea shoot pesto by blending them with garlic, Parmesan cheese, pine nuts, and olive oil.
* Juicing: Add them to your favorite juice recipes.
I personally love adding them to my morning omelets or using them as a garnish for
Conclusion
So, there you have it! Growing your own pea shoots indoors is not just a fun project; it’s a gateway to fresh, flavorful greens right at your fingertips. Forget those wilted, overpriced bags at the grocery store. With minimal effort and readily available supplies, you can cultivate a continuous supply of these nutritional powerhouses.
Why is this DIY trick a must-try? Because it’s incredibly rewarding. Imagine the satisfaction of snipping off your own homegrown pea shoots and adding them to salads, stir-fries, or even just enjoying them as a healthy snack. The vibrant green color and delicate, sweet flavor will elevate any dish. Plus, you’ll know exactly where your food comes from and what went into growing it – no pesticides, no long-distance transportation, just pure, homegrown goodness.
But the benefits extend beyond taste and convenience. Growing pea shoots indoors is also a fantastic way to introduce children to the wonders of gardening and healthy eating. It’s a quick and visually appealing project that can spark their curiosity and encourage them to try new foods.
Looking for variations? Experiment with different types of peas! While snow peas and sugar snap peas are popular choices, you can also try using field peas or even dried peas from the grocery store (just make sure they haven’t been treated with any chemicals). You can also play around with the growing medium. While soil is a reliable option, you can also use coconut coir, vermiculite, or even just a damp paper towel. Each medium will offer slightly different results, so it’s fun to experiment and see what works best for you.
Another variation to consider is the container you use. While a standard tray works perfectly well, you can also repurpose plastic containers, yogurt tubs, or even old takeout containers. Just make sure they have drainage holes to prevent waterlogging.
Don’t be afraid to get creative and personalize your pea shoot growing experience!
We wholeheartedly encourage you to give this DIY trick a try. It’s a simple, affordable, and incredibly satisfying way to add fresh, healthy greens to your diet. And once you’ve experienced the joy of harvesting your own pea shoots, we’re confident you’ll be hooked.
So, grab your supplies, follow our simple instructions, and get ready to enjoy a bounty of delicious, homegrown pea shoots. And most importantly, don’t forget to share your experience with us! We’d love to see your photos, hear your tips, and learn about your favorite ways to enjoy your homegrown pea shoots. Share your success stories and any challenges you encounter in the comments below. Let’s build a community of indoor gardeners and spread the love of fresh, homegrown food! This method of growing pea shoots indoors is a game changer.
Frequently Asked Questions (FAQ)
What kind of peas should I use for growing pea shoots?
The best types of peas for growing pea shoots are snow peas, sugar snap peas, and field peas. You can also use dried peas from the grocery store, but make sure they are not treated with any chemicals or pesticides. Look for organic options whenever possible. Avoid using split peas, as they won’t germinate properly. Experimenting with different varieties can lead to unique flavors and textures in your pea shoots.
How long does it take for pea shoots to grow?
Pea shoots typically take about 1-3 weeks to grow, depending on the variety of pea, the growing conditions (temperature, light, and humidity), and the growing medium. You’ll usually see sprouts within a few days of planting, and they’ll be ready to harvest when they’re about 2-4 inches tall. Consistent moisture and adequate light are crucial for optimal growth.
How often should I water my pea shoots?
You should water your pea shoots regularly to keep the growing medium consistently moist but not waterlogged. Check the moisture level daily by sticking your finger into the soil or growing medium. If it feels dry to the touch, it’s time to water. Water gently to avoid disturbing the seedlings. Overwatering can lead to mold or fungal growth, so ensure proper drainage.
What kind of light do pea shoots need?
Pea shoots need plenty of light to grow properly. A sunny windowsill that receives at least 4-6 hours of direct sunlight per day is ideal. If you don’t have a sunny windowsill, you can use a grow light. Position the grow light a few inches above the pea shoots and keep it on for 12-16 hours per day. Adequate light is essential for healthy, vibrant green growth.
Can I grow pea shoots without soil?
Yes, you can grow pea shoots without soil using alternative growing mediums like coconut coir, vermiculite, or even just damp paper towels. When using paper towels, ensure they remain consistently moist and change them regularly to prevent mold growth. These soilless methods can be cleaner and easier to manage, but may require more frequent watering.
How do I harvest pea shoots?
To harvest pea shoots, simply snip them off with scissors or sharp shears just above the lowest set of leaves. This will encourage the plant to produce more shoots. Harvest when the shoots are about 2-4 inches tall. You can harvest multiple times from the same planting, extending your harvest period.
How many times can I harvest from one planting?
You can typically harvest pea shoots 2-3 times from one planting. After each harvest, the plant will regrow new shoots. However, the yield will decrease with each subsequent harvest. After the third harvest, it’s best to start a new planting for optimal results.
How do I store pea shoots after harvesting?
After harvesting, rinse the pea shoots gently and pat them dry with a paper towel. Store them in a sealed container or plastic bag in the refrigerator. They will stay fresh for about 3-5 days. Avoid storing them in a humid environment, as this can cause them to wilt or become slimy.
What are some ways to use pea shoots in cooking?
Pea shoots are incredibly versatile and can be used in a variety of dishes. They can be added to salads, stir-fries, soups, and sandwiches. They can also be used as a garnish or eaten as a healthy snack. Their delicate, sweet flavor pairs well with many different ingredients. Try them in pesto, smoothies, or even as a pizza topping!
Are pea shoots nutritious?
Yes, pea shoots are highly nutritious. They are a good source of vitamins A, C, and K, as well as folate, fiber, and antioxidants. They are also low in calories and fat. Adding pea shoots to your diet is a great way to boost your nutrient intake and improve your overall health.
What if my pea shoots are not growing well?
If your pea shoots are not growing well, consider the following factors:
* **Light:** Ensure they are receiving enough light, either from a sunny windowsill or a grow light.
* **Water:** Make sure the growing medium is consistently moist but not waterlogged.
* **Temperature:** Pea shoots prefer cooler temperatures (around 60-70°F).
* **Seed Quality:** Use high-quality seeds from a reputable source.
* **Drainage:** Ensure the container has adequate drainage to prevent root rot.
Adjusting these factors can often improve the growth of your pea shoots.
Can I grow pea shoots in a small space?
Absolutely! One of the great things about growing pea shoots is that they don’t require a lot of space. They can be easily grown in a small tray or container on a windowsill, countertop, or balcony. This makes them a perfect option for apartment dwellers or anyone with limited gardening space.
Are there any pests or diseases that affect pea shoots?
Pea shoots are generally resistant to pests and diseases, especially when grown indoors. However, they can sometimes be affected by aphids, spider mites, or fungal diseases like powdery mildew. To prevent these problems, ensure good air circulation, avoid overwatering, and inspect your plants regularly. If you notice any pests or diseases, treat them promptly with an appropriate organic solution.
Can I reuse the soil after harvesting pea shoots?
While you can technically reuse the soil after harvesting pea shoots, it’s generally recommended to use fresh soil for each planting. This is because the soil may have become depleted of nutrients or contaminated with pathogens. Using fresh soil will ensure optimal growth and prevent potential problems. If you do choose to reuse the soil, amend it with compost or other organic matter to replenish nutrients.
Leave a Comment