

Grow Ginger at Home? Absolutely! Imagine stepping into your kitchen and harvesting fresh, zesty ginger straight from your own little garden. No more trips to the grocery store or settling for less-than-fresh roots. This isn’t just a dream; it’s a deliciously achievable reality with a few simple DIY tricks!
Ginger, with its fiery flavor and incredible health benefits, has been cherished for centuries. Originating in South Asia, it’s been used in traditional medicine and culinary practices across cultures. From soothing teas to flavorful stir-fries, ginger has earned its place as a staple in kitchens worldwide.
But why rely on store-bought ginger when you can cultivate your own supply? I’ve found that growing your own ginger at home is not only incredibly rewarding, but it also guarantees you’re getting the freshest, most flavorful ginger possible. Plus, it’s a fantastic way to connect with nature and add a touch of green to your living space. This DIY guide will walk you through everything you need to know to successfully grow ginger at home, even if you don’t have a green thumb. Get ready to unlock the secrets to a thriving ginger patch right in your own home!
Grow Your Own Ginger: A Beginner’s Guide
Okay, so you want to grow your own ginger? Awesome! It’s surprisingly easy and incredibly rewarding. Imagine adding freshly harvested ginger to your stir-fries, teas, and smoothies. The taste is so much brighter and more vibrant than anything you can buy at the store. Plus, you get the satisfaction of knowing you grew it yourself. Let’s dive in!
Choosing Your Ginger Rhizome
Before we get our hands dirty, we need to select the right ginger rhizome (that knobby thing you buy at the grocery store). Here’s what to look for:
* Look for plumpness: Choose a rhizome that’s firm and plump, not shriveled or dried out.
* Eyes are key: Make sure it has visible “eyes” or buds. These are the little bumps that will sprout into new shoots. The more eyes, the better!
* Organic is best: Opt for organic ginger if possible. Non-organic ginger may have been treated with growth inhibitors to prevent sprouting.
* Avoid blemishes: Steer clear of rhizomes with soft spots, mold, or any signs of damage.
Preparing Your Ginger Rhizome
Now that you’ve got your ginger, it’s time to get it ready for planting. This step is crucial for successful sprouting.
1. Soaking (Optional but Recommended): I like to soak my ginger rhizome in lukewarm water for 12-24 hours before planting. This helps to rehydrate it and encourage sprouting. It’s not absolutely necessary, but I’ve found it makes a difference.
2. Cutting (If Necessary): If your rhizome is large, you can cut it into smaller pieces, ensuring each piece has at least one or two “eyes.” Let the cut ends callous over for a day or two before planting to prevent rot. This is important! Just leave them out in a dry place.
3. Choosing Your Container: Ginger needs room to spread, so select a wide, shallow container rather than a deep one. A container that’s at least 12 inches wide and 6-8 inches deep is a good starting point. Make sure it has drainage holes! This is non-negotiable.
Planting Your Ginger
Alright, the fun part! Let’s get that ginger in the ground (or, well, in the pot).
1. Choosing Your Soil: Ginger thrives in well-draining, nutrient-rich soil. A good potting mix is essential. I like to use a mix of potting soil, compost, and perlite for optimal drainage and fertility. You can also add a bit of coco coir to help retain moisture.
2. Filling the Container: Fill your container with the potting mix, leaving about an inch or two of space at the top.
3. Planting the Rhizome: Place the ginger rhizome on top of the soil, with the “eyes” facing upwards. Cover it with about 1-2 inches of soil.
4. Watering: Water the soil thoroughly after planting. Make sure the water drains freely from the drainage holes.
Caring for Your Ginger Plant
Now that your ginger is planted, it’s time to provide it with the right conditions to thrive.
1. Location, Location, Location: Ginger loves warmth and humidity. Place your container in a warm spot that receives bright, indirect sunlight. Direct sunlight can scorch the leaves, so avoid placing it in a south-facing window during the hottest part of the day. An east-facing window is ideal.
2. Watering Schedule: Keep the soil consistently moist, but not soggy. Water when the top inch of soil feels dry to the touch. Overwatering can lead to root rot, so be careful!
3. Humidity: Ginger loves humidity. If you live in a dry climate, you can increase humidity by misting the plant regularly, placing a tray of water near the plant, or using a humidifier.
4. Fertilizing: Feed your ginger plant every 2-3 weeks with a balanced liquid fertilizer during the growing season (spring and summer). Follow the instructions on the fertilizer label.
5. Pest Control: Keep an eye out for pests like aphids and spider mites. If you notice any pests, treat them with insecticidal soap or neem oil.
6. Patience is Key: Don’t be discouraged if you don’t see sprouts right away. Ginger can take several weeks to sprout, especially in cooler temperatures. Just be patient and keep the soil moist.
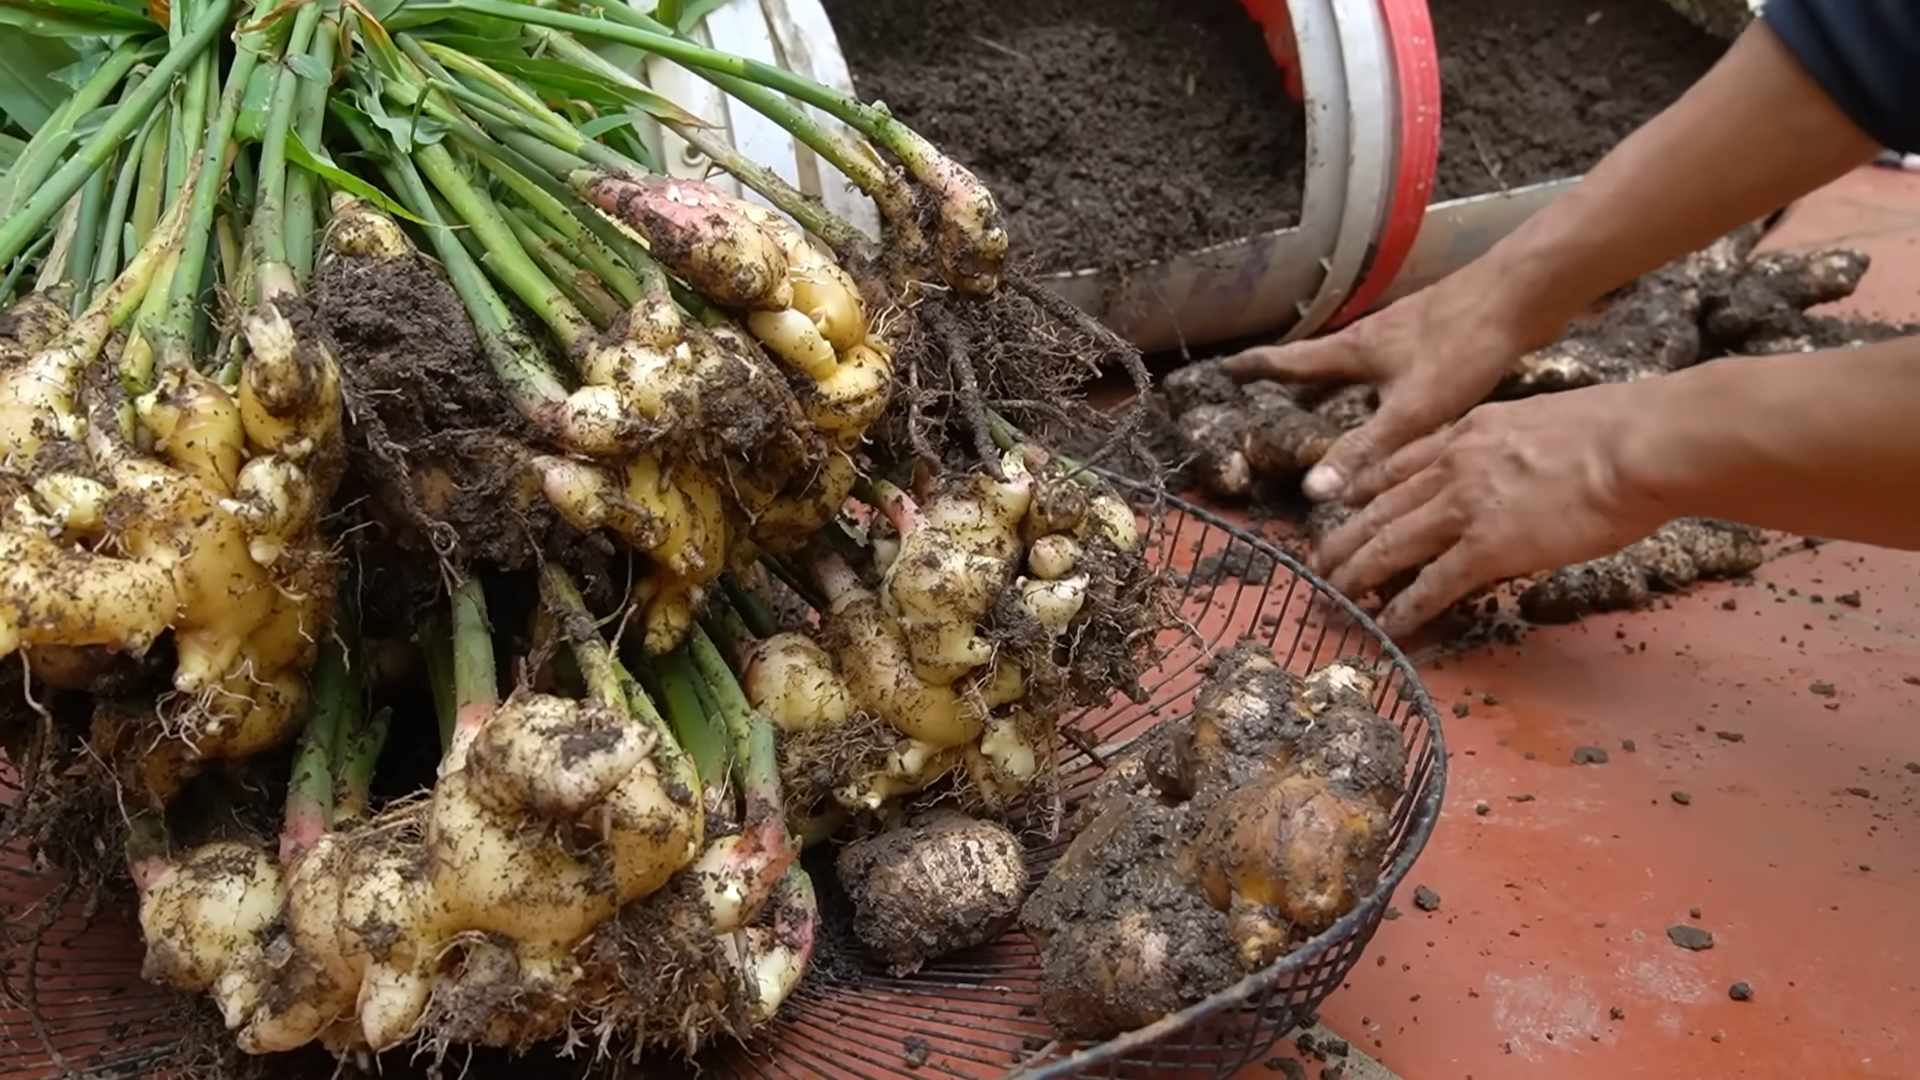
Harvesting Your Ginger
The moment you’ve been waiting for! Harvesting your own ginger is so satisfying.
1. When to Harvest: You can start harvesting ginger about 8-10 months after planting. The leaves will start to turn yellow and die back when the ginger is ready to harvest.
2. Harvesting Process: Gently dig around the plant and lift the rhizomes from the soil. You can harvest the entire plant or just a portion of the rhizomes, leaving the rest to continue growing.
3. Storing Your Ginger: Freshly harvested ginger can be stored in the refrigerator for several weeks. You can also freeze it for longer storage. To freeze, peel and chop the ginger, then place it in a freezer bag or container.
Troubleshooting
Even with the best care, you might encounter some challenges along the way. Here are a few common problems and how to fix them:
* No Sprouting: If your ginger isn’t sprouting, make sure it’s getting enough warmth and moisture. Check the rhizome for signs of rot. If it’s rotting, discard it and try again with a fresh rhizome.
* Yellowing Leaves: Yellowing leaves can be a sign of overwatering, underwatering, or nutrient deficiency. Adjust your watering schedule and fertilize the plant if necessary.
* Root Rot: Root rot is caused by overwatering. Make sure your container has good drainage and allow the soil to dry out slightly between waterings.
* Pests: Inspect your plant regularly for pests. Treat any infestations promptly with insecticidal soap or neem oil.
Propagating Ginger
Want more ginger plants? You can easily propagate ginger by dividing the rhizomes.
1. Dividing the Rhizomes: When you harvest your ginger, you can divide the rhizomes into smaller pieces, ensuring each piece has at least one or two “eyes.”
2. Planting the Divisions: Plant the divisions in separate containers, following the same planting instructions as above.
Enjoying Your Homegrown Ginger
Now that you’ve successfully grown your own ginger, it’s time to enjoy the fruits (or, well, rhizomes) of your labor!
* Cooking: Add freshly grated ginger to stir-fries, soups, curries, and other dishes.
* Tea: Make a soothing ginger tea by steeping sliced ginger in hot water.
* Smoothies: Add a small piece of ginger to your smoothies for a spicy kick.
* Baking: Use grated ginger in cookies, cakes, and other baked goods.
* Candied Ginger: Make your own candied ginger for a sweet and spicy treat.
Growing ginger at home is a fun and rewarding experience. With a little patience and care, you can enjoy a steady supply of fresh, flavorful ginger right from your own home. Happy growing!

Conclusion
So, there you have it! Growing ginger at home is not only surprisingly simple, but it’s also incredibly rewarding. Imagine the satisfaction of harvesting your own fresh, vibrant ginger root, knowing exactly where it came from and how it was grown. Forget those bland, store-bought rhizomes – with this DIY trick, you’ll have access to ginger bursting with flavor and aroma, ready to elevate your culinary creations and soothe your senses.
This isn’t just about saving a few dollars; it’s about connecting with nature, understanding the growing process, and enjoying the unparalleled taste of homegrown produce. Plus, it’s a fantastic conversation starter! Think of the stories you can share with friends and family as you proudly present dishes seasoned with your very own ginger.
But the benefits don’t stop there. Growing your own ginger allows you to control the entire process, from the soil composition to the watering schedule. This means you can ensure your ginger is grown organically, free from harmful pesticides and chemicals. You’ll be contributing to a healthier lifestyle for yourself and your loved ones.
Why is this a must-try? Because it’s easy, cost-effective, and yields a superior product compared to what you can find in most grocery stores. It’s a sustainable practice that reduces your carbon footprint and connects you to the earth. And let’s be honest, there’s something incredibly satisfying about nurturing a plant from a humble rhizome to a thriving source of flavor.
Ready to take your ginger game to the next level? Consider experimenting with different varieties of ginger. Explore the nuances of pink ginger, with its delicate flavor, or the fiery intensity of galangal, a close relative. You can also try growing your ginger in different types of containers, from traditional pots to raised beds, to see what works best for your space and climate.
Another fun variation is to infuse your water with ginger leaves for a refreshing and healthy drink. The leaves have a milder ginger flavor and are packed with antioxidants. You can also dry the leaves and use them to make a soothing tea.
Don’t be afraid to get creative with your ginger harvest! Use it in stir-fries, soups, smoothies, baked goods, and even cocktails. The possibilities are endless.
We wholeheartedly encourage you to try this DIY trick for growing ginger at home. It’s a simple yet profound way to enhance your culinary experience and connect with the natural world.
And most importantly, we want to hear about your experience! Share your photos, tips, and stories with us in the comments below. Let’s create a community of ginger-growing enthusiasts and inspire others to embark on this rewarding journey. What challenges did you face? What successes did you celebrate? What unique ways did you incorporate your homegrown ginger into your cooking? Your insights will be invaluable to other aspiring ginger growers. So, go ahead, get your hands dirty, and discover the joy of growing your own ginger!
Frequently Asked Questions (FAQ)
1. What kind of ginger should I use to start growing?
The best ginger to use for planting is fresh, plump ginger root from a grocery store or nursery. Look for pieces that are firm, with well-developed “eyes” or buds. Organic ginger is often recommended, as it’s less likely to have been treated with growth inhibitors. Avoid ginger that is shriveled, soft, or moldy. The healthier the ginger root you start with, the better your chances of success.
2. How long does it take to grow ginger at home?
Growing ginger at home typically takes around 8-10 months from planting to harvest. However, you can start harvesting small pieces of ginger after about 4 months, as needed. The plant will continue to grow and produce more ginger over time. The exact time frame can vary depending on your climate, growing conditions, and the variety of ginger you’re growing. Be patient, and you’ll be rewarded with a bountiful harvest.
3. What are the ideal growing conditions for ginger?
Ginger thrives in warm, humid environments with partial shade. It prefers well-draining soil that is rich in organic matter. The ideal temperature range for growing ginger is between 65°F and 90°F (18°C and 32°C). Avoid exposing your ginger plant to direct sunlight, as this can scorch the leaves. Consistent moisture is essential, but be careful not to overwater, as this can lead to root rot.
4. How often should I water my ginger plant?
Water your ginger plant regularly, keeping the soil consistently moist but not waterlogged. The frequency of watering will depend on your climate, the type of soil you’re using, and the size of your container. In general, water deeply when the top inch of soil feels dry to the touch. During hot, dry weather, you may need to water more frequently. Reduce watering during the cooler months.
5. What kind of soil is best for growing ginger?
Ginger prefers well-draining soil that is rich in organic matter. A good soil mix for growing ginger at home is a combination of potting soil, compost, and perlite or vermiculite. This will provide the necessary nutrients and drainage for healthy growth. Avoid using heavy clay soil, as it can retain too much moisture and lead to root rot.
6. Can I grow ginger indoors?
Yes, you can definitely grow ginger indoors! In fact, growing ginger indoors is a great option for those who live in colder climates. Choose a pot that is at least 12 inches deep and wide, and fill it with a well-draining potting mix. Place the pot in a warm, sunny location, such as a windowsill or under a grow light. Water regularly, and mist the leaves occasionally to increase humidity.
7. What are some common problems when growing ginger, and how can I prevent them?
Some common problems when growing ginger include root rot, fungal diseases, and pests. Root rot can be prevented by using well-draining soil and avoiding overwatering. Fungal diseases can be prevented by providing good air circulation and avoiding overhead watering. Pests, such as aphids and spider mites, can be controlled with insecticidal soap or neem oil. Regularly inspect your ginger plant for any signs of problems, and take action promptly to prevent them from spreading.
8. How do I harvest ginger?
You can start harvesting ginger after about 4 months, when the plant is mature enough. To harvest, gently dig around the plant and lift the rhizome out of the soil. You can harvest the entire rhizome or just a portion of it, leaving the rest of the plant to continue growing. Wash the harvested ginger root thoroughly and store it in a cool, dry place.
9. Can I grow ginger from store-bought ginger?
Yes, you can grow ginger from store-bought ginger, but it’s important to choose a healthy rhizome. Look for ginger that is firm, plump, and has well-developed “eyes” or buds. Organic ginger is often recommended, as it’s less likely to have been treated with growth inhibitors. Soak the ginger in water overnight before planting to encourage sprouting.
10. How do I store my harvested ginger?
Freshly harvested ginger can be stored in the refrigerator for several weeks. Wrap the ginger in a paper towel and place it in a plastic bag or container. You can also freeze ginger for longer storage. Peel the ginger and chop it into small pieces, then freeze it in a single layer on a baking sheet. Once frozen, transfer the ginger to a freezer bag or container. Frozen ginger can be used directly from the freezer in your cooking. Another option is to pickle the ginger.
11. Can I grow ginger in containers?
Yes, growing ginger in containers is a great option, especially if you have limited space or live in a colder climate. Choose a container that is at least 12 inches deep and wide to allow the ginger root to spread. Make sure the container has drainage holes to prevent waterlogging. Use a well-draining potting mix and place the container in a warm, partially shaded location.
12. What are the benefits of growing my own ginger?
There are many benefits to growing your own ginger. Homegrown ginger is fresher, more flavorful, and often more potent than store-bought ginger. You can also control the growing process and ensure that your ginger is grown organically, free from harmful pesticides and chemicals. Growing your own ginger is a sustainable practice that reduces your carbon footprint and connects you to the earth. Plus, it’s a rewarding and enjoyable experience!

Leave a Comment