

Grow Bitter Melon at Home and unlock a world of culinary possibilities right in your backyard! Have you ever dreamt of harvesting your own exotic vegetables, impressing your friends with unique dishes, and knowing exactly where your food comes from? Well, dream no more! This DIY guide is your passport to cultivating this intriguing and nutritious gourd, even if you’re a complete beginner.
Bitter melon, also known as bitter gourd or karela, boasts a rich history deeply intertwined with traditional medicine and culinary practices across Asia, Africa, and the Caribbean. For centuries, it has been revered for its potential health benefits and distinctive, albeit acquired, taste. But beyond its medicinal properties, bitter melon adds a unique dimension to stir-fries, curries, and even juices.
Why should you embark on this home gardening adventure? Because growing your own bitter melon allows you to control the entire process, ensuring you have access to fresh, organic produce free from harmful pesticides. Plus, it’s incredibly rewarding to nurture a plant from seed to harvest! Many find the unique flavor of homegrown bitter melon to be less intense than store-bought varieties, making it more palatable. I’m excited to share my tried-and-true tips and tricks for successfully grow bitter melon at home, transforming your garden into a thriving source of this fascinating vegetable. Let’s get started!
Grow Your Own Bitter Melon: A Comprehensive DIY Guide
Hey there, fellow gardening enthusiasts! I’m so excited to share my experience growing bitter melon (also known as bitter gourd or karela) right in my own backyard. It’s a rewarding process, and the fresh, homegrown taste is unbeatable. While it might seem intimidating at first, trust me, with a little patience and this guide, you’ll be harvesting your own bitter melons in no time!
Choosing the Right Variety and Starting Seeds
First things first, let’s talk about choosing the right variety and getting those seeds started.
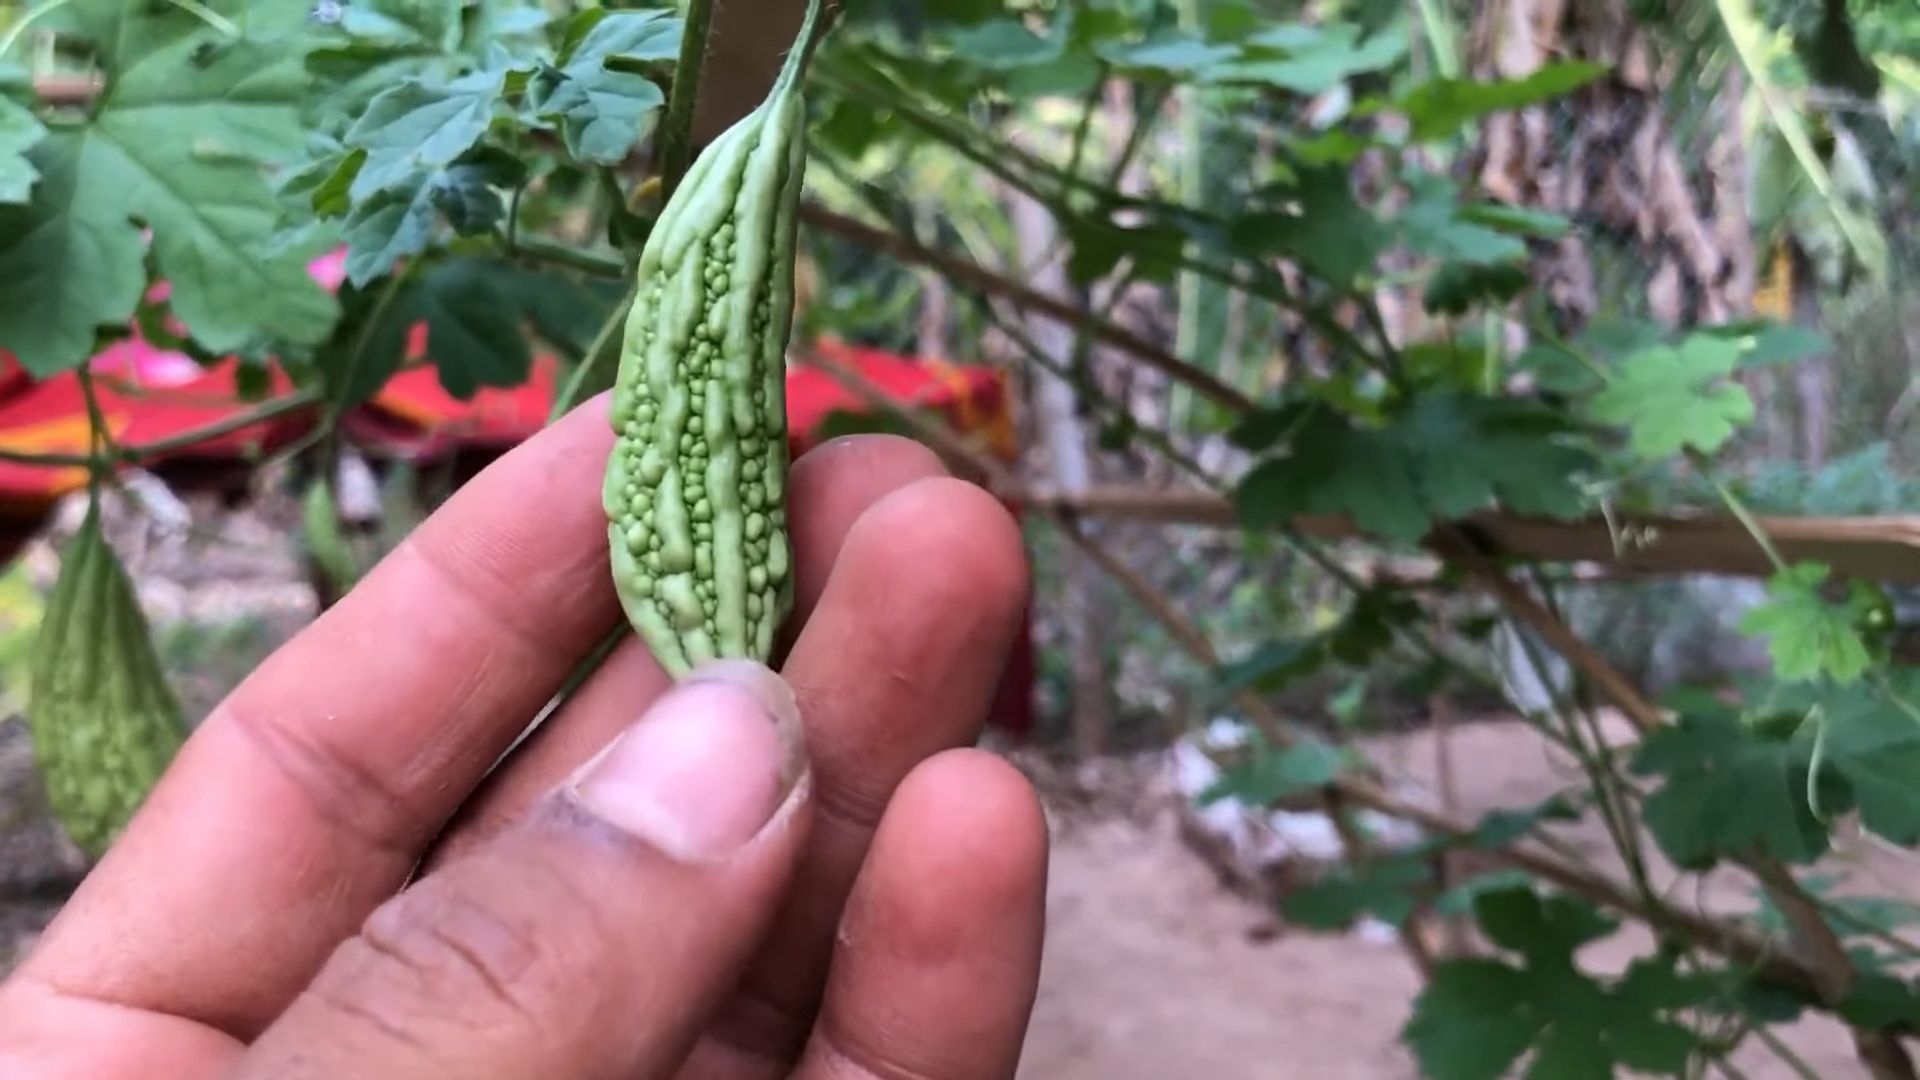
* Variety Selection: There are several varieties of bitter melon, each with slightly different shapes, sizes, and levels of bitterness. Some popular choices include ‘Chinese Bitter Melon’ (longer and lighter green), ‘Indian Bitter Melon’ (smaller and darker green with pointed ends), and ‘Japanese Bitter Melon’ (smaller and rounder). I personally prefer the ‘Chinese Bitter Melon’ for its milder flavor.
* Seed Starting vs. Direct Sowing: Bitter melon thrives in warm weather, so if you live in a cooler climate with a shorter growing season, starting seeds indoors is highly recommended. This gives your plants a head start. If you live in a warmer climate with a long growing season, you can directly sow the seeds into the ground.
* Seed Preparation: Bitter melon seeds have a tough outer coating, so scarifying them can improve germination rates. Gently rub the seeds with sandpaper or nick them with a knife. Be careful not to damage the inner seed! Soaking the seeds in warm water for 24 hours before planting also helps.
Now, let’s get those seeds going!
1. Prepare Your Seed Starting Tray: Fill a seed starting tray or small pots with a well-draining seed starting mix. I like to use a mix of peat moss, perlite, and vermiculite.
2. Sow the Seeds: Plant the scarified and soaked seeds about ½ inch deep in the soil.
3. Water Gently: Water the soil gently to moisten it, but avoid overwatering. You want the soil to be damp, not soggy.
4. Provide Warmth and Light: Place the seed starting tray in a warm location (around 75-85°F or 24-29°C). A heat mat can be helpful. Provide plenty of light, either natural sunlight or a grow light.
5. Keep the Soil Moist: Keep the soil consistently moist, but not waterlogged. Check the soil moisture daily and water as needed.
6. Transplant Seedlings: Once the seedlings have developed a few sets of true leaves (usually after 2-3 weeks), they are ready to be transplanted into larger pots or directly into the garden.
Preparing the Garden Bed and Transplanting
Okay, your seedlings are thriving! Now it’s time to get the garden bed ready for their new home.
* Sunlight: Bitter melon needs at least 6-8 hours of direct sunlight per day. Choose a location in your garden that receives plenty of sunshine.
* Soil: Bitter melon prefers well-draining soil that is rich in organic matter. Amend the soil with compost or well-rotted manure before planting.
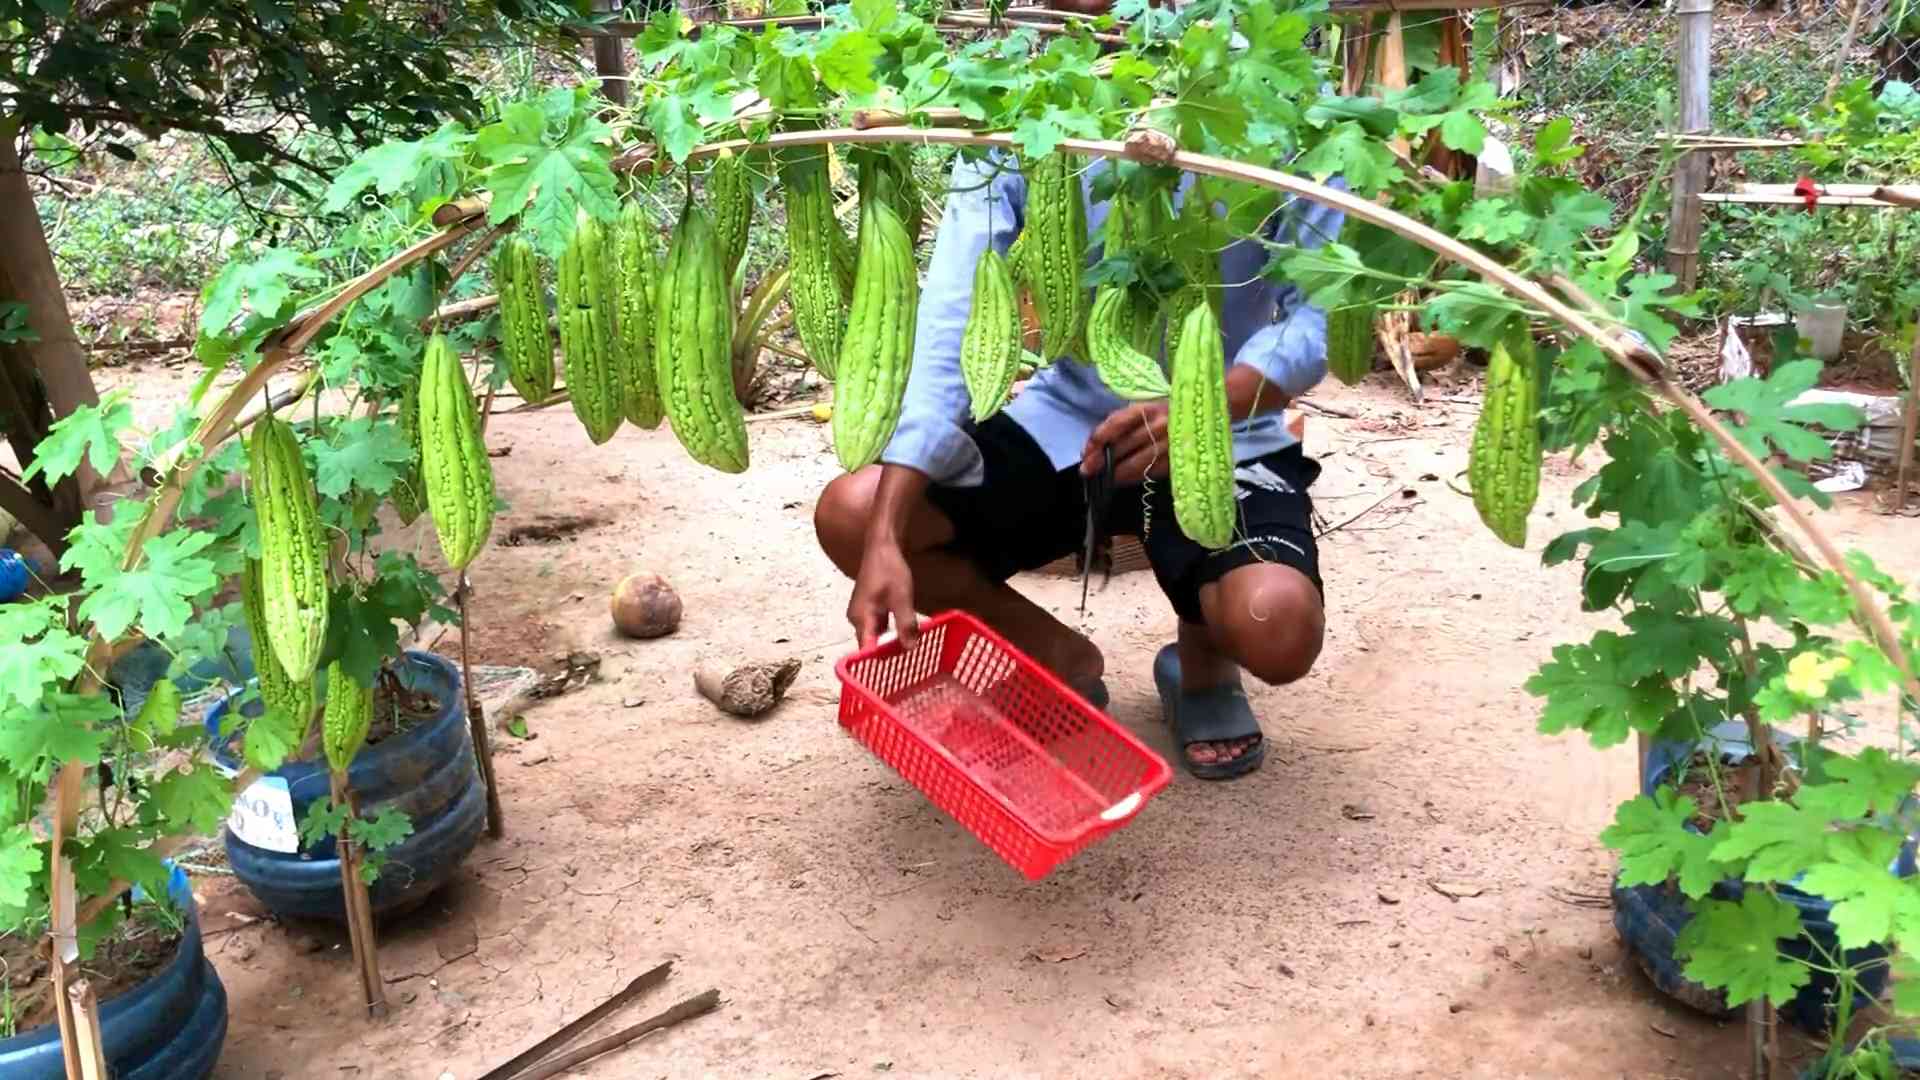
* Support Structure: Bitter melon is a vine, so it needs a trellis, fence, or other support structure to climb on. I use a sturdy trellis made of wood and wire mesh. You can also use a chain-link fence or even a strong tomato cage.
* Spacing: Space the plants about 18-24 inches apart. This allows them plenty of room to grow and prevents overcrowding.
Now, let’s get those seedlings into the ground!
1. Harden Off Seedlings: Before transplanting, harden off the seedlings by gradually exposing them to outdoor conditions for a week or so. Start by placing them outside for a few hours each day, gradually increasing the amount of time they spend outdoors. This helps them acclimate to the sun, wind, and temperature changes.
2. Dig Holes: Dig holes that are slightly larger than the root balls of the seedlings.
3. Carefully Remove Seedlings: Gently remove the seedlings from their pots, being careful not to damage the roots.
4. Plant Seedlings: Place the seedlings in the holes and backfill with soil. Gently firm the soil around the base of the plants.
5. Water Thoroughly: Water the plants thoroughly after transplanting.
6. Mulch: Apply a layer of mulch around the base of the plants to help retain moisture, suppress weeds, and regulate soil temperature. I like to use straw or wood chips.
Caring for Your Bitter Melon Plants
Now that your bitter melon plants are in the ground, it’s time to provide them with the care they need to thrive.
* Watering: Water the plants regularly, especially during hot, dry weather. Bitter melon needs consistent moisture to produce healthy fruits. Aim for about 1 inch of water per week.
* Fertilizing: Fertilize the plants every 2-3 weeks with a balanced fertilizer. I like to use a liquid fertilizer diluted to half strength. You can also use a slow-release granular fertilizer.
* Pruning: Pruning can help improve air circulation and encourage fruit production. Remove any yellowing or dead leaves. You can also prune the vines to control their growth.
* Pest and Disease Control: Keep an eye out for pests and diseases. Common pests include aphids, spider mites, and squash bugs. Common diseases include powdery mildew and downy mildew. Treat any infestations or infections promptly with appropriate organic pesticides or fungicides. Neem oil is a great organic option for many pests.
* Training the Vines: As the vines grow, train them to climb the trellis or support structure. Gently guide the vines and tie them to the support with twine or plant ties.
Pollination and Fruit Development
Bitter melon produces separate male and female flowers on the same plant. Pollination is necessary for fruit development.
* Pollination: Bees and other insects are the primary pollinators of bitter melon. If you don’t see many bees in your garden, you may need to hand-pollinate the flowers.
* Hand-Pollination: To hand-pollinate, use a small paintbrush to transfer pollen from the male flowers to the female flowers. The male flowers have a long, thin stem, while the female flowers have a small, immature fruit behind the flower.
* Fruit Development: After pollination, the female flowers will begin to develop into fruits. The fruits will grow rapidly and change color as they mature.
Harvesting and Storing Bitter Melon
Finally, the moment you’ve been waiting for – harvesting your own bitter melons!
* Harvesting Time: Bitter melon fruits are typically ready to harvest about 2-3 months after planting. The fruits should be firm and green, but not too hard. The skin should be smooth and unblemished.
* Harvesting Technique: Use a sharp knife or pruning shears to cut the fruits from the vine. Leave a small piece of stem attached to the fruit.
* Storage: Bitter melon can be stored in the refrigerator for up to a week. Wrap the fruits in plastic wrap or place them in a plastic bag to prevent them from drying out.
* Reducing Bitterness: If you find the bitter melon too bitter, you can soak the sliced fruit in salted water for about 30 minutes before cooking. This helps to draw out some of the bitterness.
Enjoying Your Homegrown Bitter Melon
Now that you’ve harvested your own bitter melon, it’s time to enjoy the fruits of your labor! Bitter melon can be used in a variety of dishes, from stir-fries and curries to soups and salads. It’s a versatile vegetable that adds a unique flavor and nutritional boost to any meal.
Here are a few of my favorite ways to enjoy homegrown bitter melon:
* Stir-fried with Eggs: This is a classic dish that’s quick, easy, and delicious. Simply stir-fry sliced bitter melon with scrambled eggs, garlic, and soy sauce.
* Bitter Melon Curry: Bitter melon adds a unique flavor to curries. Try adding it to your favorite curry recipe for a healthy and flavorful meal.
* Bitter Melon Juice: Bitter melon juice is a popular health drink. Blend sliced bitter melon with water and a little bit of lemon juice for a refreshing and nutritious beverage.
Growing bitter melon at home is a rewarding experience that allows you to enjoy fresh, healthy produce right from your own backyard. With a little patience and care, you can successfully grow your own bitter melons and enjoy their unique flavor and nutritional benefits. Happy gardening!
Conclusion
So, there you have it! Growing bitter melon at home is not only achievable but also incredibly rewarding. Forget those bland, mass-produced vegetables from the supermarket. Imagine stepping into your garden and harvesting fresh, vibrant bitter melon, bursting with flavor and packed with nutrients. This DIY trick transforms your backyard into a personal farm-to-table experience, offering a taste of freshness you simply can’t replicate.
Why is this a must-try? Because it empowers you to control the quality of your food. You know exactly what goes into your bitter melon – no harmful pesticides, no artificial fertilizers, just pure, natural goodness. Plus, the satisfaction of nurturing a plant from seed to harvest is an unparalleled feeling. It’s a connection to nature, a lesson in patience, and a delicious reward all rolled into one.
But the journey doesn’t end with the basic method. Feel free to experiment! Try different varieties of bitter melon to discover your favorite flavor profile. Some prefer the smaller, more intensely bitter types, while others lean towards the larger, milder varieties. Consider companion planting to enhance growth and deter pests naturally. Marigolds, for example, are known to repel nematodes, while basil can help keep away aphids.
And don’t limit yourself to just the traditional trellis system. Get creative with your support structures! Use repurposed materials like old ladders or bamboo poles to create unique and visually appealing climbing frames for your bitter melon vines. You can even train them to grow along a fence or pergola, adding a touch of greenery to your outdoor space.
Furthermore, think about the soil composition. While bitter melon is relatively adaptable, it thrives in well-draining soil rich in organic matter. Amend your soil with compost or aged manure to provide the necessary nutrients for healthy growth and abundant fruit production. Regular watering is crucial, especially during hot and dry periods, but avoid overwatering, which can lead to root rot.
Beyond the practical benefits, growing bitter melon at home is also a sustainable choice. It reduces your carbon footprint by minimizing transportation and packaging waste. It also encourages biodiversity in your garden, attracting beneficial insects and pollinators.
We wholeheartedly encourage you to give this DIY trick a try. It’s easier than you might think, and the rewards are well worth the effort. Don’t be afraid to get your hands dirty, experiment with different techniques, and learn from your experiences.
Once you’ve harvested your first crop of homegrown bitter melon, we’d love to hear about your journey! Share your photos, tips, and recipes with us and the rest of the community. Let’s inspire each other to embrace the joys of gardening and the deliciousness of fresh, homegrown produce. What are you waiting for? Start growing your own bitter melon today!
Frequently Asked Questions (FAQ)
What is the best time of year to plant bitter melon?
Bitter melon thrives in warm weather, so the best time to plant it is in late spring or early summer, after the last frost has passed. The soil temperature should be at least 65°F (18°C) for optimal germination. If you live in a region with a short growing season, you can start the seeds indoors 4-6 weeks before the last expected frost and transplant them outdoors once the weather warms up.
How much sunlight does bitter melon need?
Bitter melon requires at least 6-8 hours of direct sunlight per day to produce a good yield. Choose a sunny location in your garden where the plants will receive ample sunlight throughout the day. If you’re growing bitter melon in containers, make sure to place them in a sunny spot on your patio or balcony.
What kind of soil is best for growing bitter melon?
Bitter melon prefers well-draining soil that is rich in organic matter. Amend your soil with compost, aged manure, or other organic materials to improve its fertility and drainage. The ideal soil pH for bitter melon is between 6.0 and 7.0. You can test your soil pH using a soil testing kit and adjust it accordingly.
How often should I water bitter melon plants?
Water bitter melon plants regularly, especially during hot and dry periods. The soil should be kept consistently moist, but not waterlogged. Water deeply at the base of the plants, avoiding wetting the foliage, which can increase the risk of fungal diseases. Mulching around the plants can help retain moisture in the soil and suppress weeds.
What type of fertilizer should I use for bitter melon?
Bitter melon benefits from regular fertilization. Use a balanced fertilizer with equal amounts of nitrogen, phosphorus, and potassium (e.g., 10-10-10) or a fertilizer specifically formulated for vegetables. Apply the fertilizer according to the package instructions, typically every 2-3 weeks during the growing season. You can also supplement with organic fertilizers like compost tea or fish emulsion.
How do I control pests and diseases on bitter melon plants?
Bitter melon can be susceptible to various pests and diseases, including aphids, spider mites, squash bugs, and fungal diseases like powdery mildew. Inspect your plants regularly for signs of infestation or disease. Use organic pest control methods like insecticidal soap, neem oil, or horticultural oil to control pests. Ensure good air circulation around the plants to prevent fungal diseases. Remove any infected leaves or fruits promptly to prevent the spread of disease.
When is bitter melon ready to harvest?
Bitter melon is typically ready to harvest 8-12 weeks after planting. The fruits should be firm and green, with a slightly waxy coating. The size of the fruit will vary depending on the variety. Harvest the fruits before they turn yellow or orange, as they will become more bitter as they ripen. Use a sharp knife or pruning shears to cut the fruits from the vine, leaving a short stem attached.
How do I store bitter melon after harvesting?
Store harvested bitter melon in the refrigerator for up to a week. Wrap the fruits in plastic wrap or place them in a plastic bag to prevent them from drying out. Bitter melon can also be frozen for longer storage. Blanch the sliced or cubed bitter melon in boiling water for 2-3 minutes, then transfer it to an ice bath to stop the cooking process. Drain well and freeze in airtight containers or freezer bags.
Can I eat the seeds of bitter melon?
The seeds of bitter melon are edible, but they are also quite bitter. Some people enjoy the taste of the seeds, while others find them too bitter. If you want to eat the seeds, remove them from the fruit and wash them thoroughly. You can roast them, add them to stir-fries, or use them as a garnish. However, it’s important to note that bitter melon seeds contain a compound called vicine, which can cause favism in people with a genetic deficiency of the enzyme glucose-6-phosphate dehydrogenase (G6PD). If you have G6PD deficiency, you should avoid eating bitter melon seeds.
Is growing bitter melon at home worth the effort?
Absolutely! Growing bitter melon at home allows you to enjoy fresh, flavorful, and nutritious produce that is free from harmful pesticides and chemicals. It’s a rewarding experience that connects you to nature and provides you with a sustainable source of food. Plus, the unique flavor and health benefits of bitter melon make it a valuable addition to your diet. So, grab some seeds, get your hands dirty, and start growing your own bitter melon today!
Leave a Comment