

Grow Artichokes Backyard – sounds like a dream, right? Imagine stepping outside your back door and harvesting your own spiky, delicious globes of artichoke goodness. It’s not as far-fetched as you might think! For centuries, artichokes have been prized for their unique flavor and nutritional benefits, gracing tables from ancient Rome to modern-day California. They were even considered a delicacy reserved for the elite!
But here’s the thing: you don’t need to be a culinary master or have acres of land to grow artichokes backyard. I’m here to tell you that with a few clever DIY tricks and hacks, you can cultivate these architectural beauties right in your own garden.
Why bother? Well, store-bought artichokes can be pricey, and nothing beats the taste of freshly harvested produce. Plus, growing your own is incredibly rewarding! This article is packed with easy-to-follow instructions and insider tips to help you succeed, even if you’re a beginner gardener. We’ll cover everything from choosing the right variety to protecting your plants from pests. So, grab your gardening gloves, and let’s get started on this exciting journey to homegrown artichokes!
Growing Artichokes in Your Backyard: A Comprehensive DIY Guide
Hey there, fellow gardening enthusiasts! I’m so excited to share my experience with growing artichokes right in my own backyard. These architectural beauties are not only stunning to look at but also incredibly delicious. While they might seem intimidating, with a little patience and the right know-how, you can absolutely cultivate these thistles at home. Let’s dive in!
Choosing Your Artichoke Variety
Before we get our hands dirty, it’s important to choose the right artichoke variety for your climate. Some varieties are better suited for warmer regions, while others can tolerate cooler temperatures. Here are a few popular choices:
* ‘Green Globe’: This is a classic and widely available variety, known for its large, round, green globes. It’s a reliable producer and generally does well in most climates.
* ‘Violetta’: If you’re looking for something a little different, ‘Violetta’ artichokes have a beautiful purple hue. They’re also known for their tender hearts.
* ‘Imperial Star’: This variety is a good choice for cooler climates as it matures relatively quickly.
* ‘Big Heart’: As the name suggests, this variety produces large artichokes with meaty hearts.
I personally started with ‘Green Globe’ because it’s readily available and a proven performer. Do some research to see which variety is best suited for your specific location and growing conditions.
Preparing Your Artichoke Bed
Artichokes are heavy feeders, meaning they need nutrient-rich soil to thrive. Proper soil preparation is crucial for a successful harvest.
* Sunlight: Artichokes need at least 6-8 hours of direct sunlight per day. Choose a location in your yard that receives plenty of sunshine.
* Soil: They prefer well-draining soil that is rich in organic matter. Amend your soil with compost, aged manure, or other organic materials to improve its fertility and drainage.
* pH: Artichokes prefer a slightly acidic to neutral soil pH, ideally between 6.0 and 7.0. You can test your soil pH with a simple soil testing kit.
* Space: Artichoke plants can grow quite large, reaching up to 3-4 feet in height and width. Give them plenty of space to spread out. I recommend spacing them at least 4 feet apart.
Step-by-Step Planting Guide
Now for the fun part – planting! You can start artichokes from seeds, but I recommend starting with transplants (small plants) from a nursery. This will give you a head start and increase your chances of success.
1. Timing is Key: The best time to plant artichoke transplants is in the spring, after the last frost. In warmer climates, you can also plant them in the fall.
2. Dig the Hole: Dig a hole that is slightly larger than the root ball of your transplant.
3. Amend the Soil (Again!): Mix some compost or other organic matter into the soil at the bottom of the hole. This will provide extra nutrients for the plant’s roots.
4. Gently Remove the Transplant: Carefully remove the transplant from its container, being careful not to damage the roots.
5. Place the Transplant: Place the transplant in the hole, making sure that the top of the root ball is level with the surrounding soil.
6. Backfill the Hole: Fill the hole with soil, gently firming it around the base of the plant.
7. Water Thoroughly: Water the transplant thoroughly after planting. This will help settle the soil and encourage root growth.
8. Mulch: Apply a layer of mulch around the base of the plant. Mulch helps to retain moisture, suppress weeds, and regulate soil temperature. I like to use straw or wood chips.
Caring for Your Artichoke Plants
Once your artichoke plants are in the ground, it’s important to provide them with proper care to ensure a healthy and productive harvest.
* Watering: Artichokes need consistent moisture, especially during hot, dry weather. Water deeply and regularly, especially when the plants are young and establishing themselves. Aim for about 1-2 inches of water per week.
* Fertilizing: As heavy feeders, artichokes benefit from regular fertilization. Apply a balanced fertilizer every few weeks during the growing season. You can also side-dress with compost or aged manure.
* Weeding: Keep the area around your artichoke plants free of weeds. Weeds compete with the artichokes for water and nutrients.
* Pest Control: Artichokes can be susceptible to certain pests, such as aphids, snails, and slugs. Inspect your plants regularly and take action if you notice any signs of infestation. I prefer to use organic pest control methods, such as insecticidal soap or diatomaceous earth.
* Pruning: After the harvest, you can prune your artichoke plants to encourage new growth. Cut back the spent flower stalks to the ground. In colder climates, you may need to protect your artichoke plants from frost. You can do this by covering them with a thick layer of mulch or wrapping them in burlap.
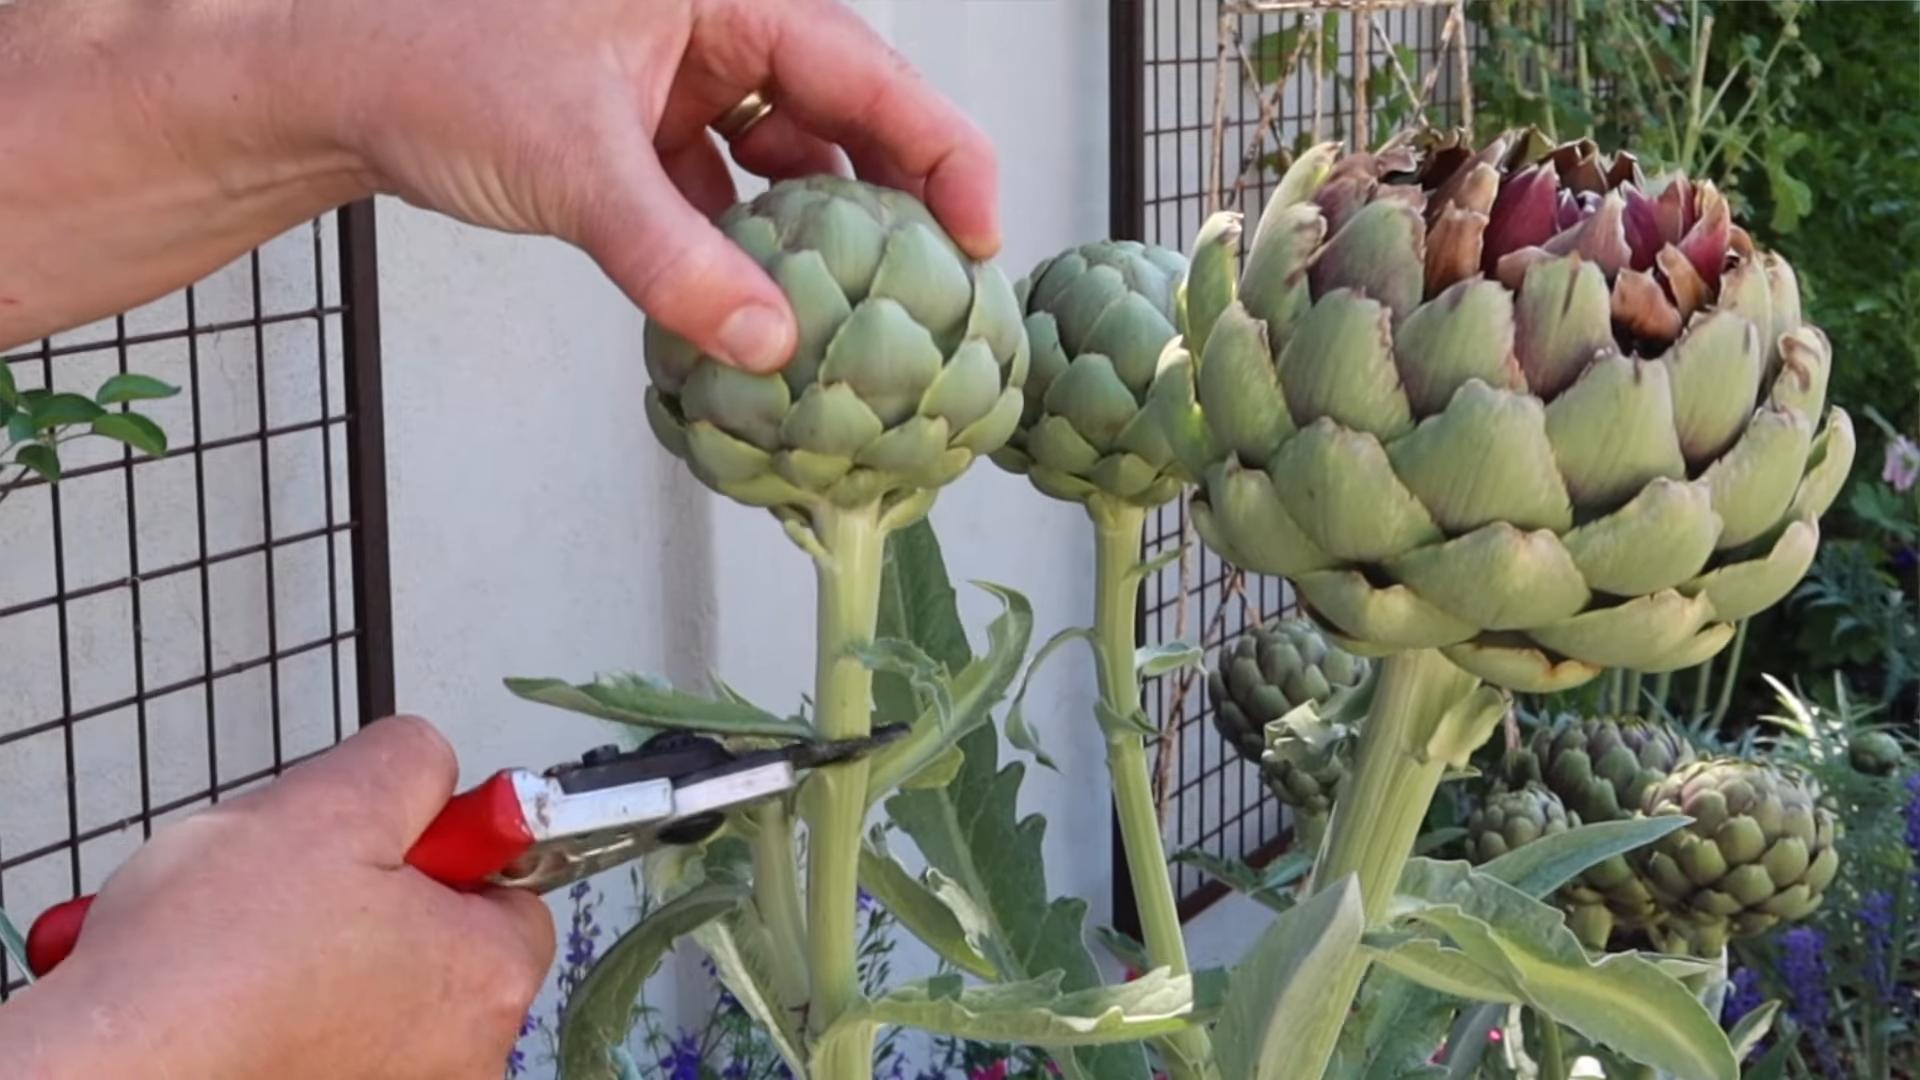
Harvesting Your Artichokes
The moment you’ve been waiting for! Harvesting artichokes is a rewarding experience.
* Timing: Artichokes are typically ready to harvest in the spring or early summer. The exact timing will depend on your climate and the variety you are growing.
* Look for Tight Buds: Harvest the artichokes when the buds are still tight and firm, before the bracts (the outer leaves) start to open.
* Size Matters: The size of the artichoke will also depend on the variety, but generally, you want to harvest them when they are a good size for eating.
* Cut the Stem: Use a sharp knife to cut the artichoke stem about 2-3 inches below the base of the bud.
* Enjoy! Once you’ve harvested your artichokes, you can enjoy them in a variety of ways. They can be steamed, grilled, baked, or added to soups and stews.
Overwintering Artichokes (For Colder Climates)
If you live in a colder climate where temperatures drop below freezing, you’ll need to take steps to protect your artichoke plants over the winter. Artichokes are perennials, meaning they can live for several years, but they are not very cold-hardy.
1. Cut Back the Foliage: In the late fall, after the first frost, cut back the foliage of your artichoke plants to about 6-8 inches above the ground.
2. Mulch Heavily: Apply a thick layer of mulch around the base of the plants. This will help to insulate the roots and protect them from freezing temperatures. I recommend using straw, leaves, or wood chips.
3. Cover with Burlap or Fabric: For extra protection, you can cover the plants with burlap or a frost blanket. This will help to trap heat and prevent the plants from being damaged by the cold.
4. Remove Protection in Spring: In the spring, after the last frost, remove the mulch and burlap or fabric covering. The plants should start to regrow from the roots.
Troubleshooting Common Artichoke Problems
Even with the best care, you may encounter some problems when growing artichokes. Here are a few common issues and how to address them:
* Aphids: These small, sap-sucking insects can infest artichoke plants, causing the leaves to become distorted and yellowed. Control aphids with insecticidal soap or neem oil.
* Snails and Slugs: These pests can damage artichoke leaves and buds. Handpick them off the plants or use snail and slug bait.
* Artichoke Plume Moth: The larvae of this moth can bore into the artichoke buds, causing them to rot. Remove and destroy any infested buds.
* Root Rot: This fungal disease can occur in poorly drained soil. Improve drainage by amending the soil with compost or other organic matter.
* Lack of Buds: If your artichoke plants are not producing buds, it could be due to a lack of sunlight, water, or nutrients. Make sure the plants are getting enough of each.
Propagating Artichokes
Once you have established artichoke plants, you can propagate them to create new plants. There are a few different ways to propagate artichokes:
* Division: This is the easiest way to propagate artichokes. In the spring, after the plants have started to regrow, carefully dig up the plants and divide them into smaller clumps. Each clump should have at least one healthy shoot and some roots. Replant the clumps in a new location.
* Root Cuttings: You can also propagate artichokes from root cuttings. In the fall, after the plants have gone dormant, dig up the plants and cut off some of the roots. The roots should be about 4-6 inches long. Plant the root cuttings in pots filled with potting

Conclusion
So, there you have it! Growing your own artichokes in your backyard is not only achievable, but it’s also a deeply rewarding experience. Forget those expensive, often less-than-fresh artichokes at the grocery store. Imagine stepping out into your garden and harvesting these architectural beauties, knowing exactly where they came from and how they were grown. The difference in flavor and texture between a homegrown artichoke and a store-bought one is truly remarkable – a testament to the power of fresh, local produce.
This DIY approach to growing artichokes offers a multitude of benefits. You control the growing environment, ensuring your plants receive the best possible care, free from harmful pesticides and chemicals. You also gain a deeper connection to your food, fostering a sense of self-sufficiency and appreciation for the natural world. Plus, let’s be honest, there’s a certain satisfaction in showing off your impressive artichoke plants to friends and neighbors!
But the benefits don’t stop there. Growing artichokes can be a surprisingly versatile endeavor. While the classic steamed artichoke with drawn butter is always a winner, don’t be afraid to experiment! Try grilling them for a smoky char, braising them in white wine and herbs, or even pickling the hearts for a tangy treat. The possibilities are endless.
Consider these variations to tailor your artichoke-growing experience to your specific needs and preferences:
* For smaller gardens: Choose a compact variety like ‘Little Violet’ or ‘Tavor’. These varieties are specifically bred to produce smaller plants that are well-suited for container gardening or limited garden spaces.
* For warmer climates: Opt for varieties like ‘Green Globe’ or ‘Imperial Star’, which are known for their heat tolerance and ability to thrive in warmer regions.
* For colder climates: Select varieties like ‘Colorado Star’ or ‘Violet de Provence’, which are more cold-hardy and can withstand cooler temperatures.
* For a unique flavor profile: Explore heirloom varieties like ‘Romanesco’, which boasts a distinctive nutty flavor and beautiful purple-tinged bracts.
Remember, successful artichoke growing requires patience and attention to detail. But with a little planning and effort, you can enjoy a bountiful harvest of these delicious and nutritious vegetables. Don’t be discouraged if your first attempt isn’t perfect. Gardening is a learning process, and every season brings new opportunities to improve your skills.
We wholeheartedly encourage you to give this DIY trick a try. Start small, experiment with different varieties, and most importantly, have fun! We’re confident that you’ll be amazed by the results. And once you’ve harvested your first crop of homegrown artichokes, we’d love to hear about your experience. Share your photos, tips, and recipes with us in the comments below. Let’s create a community of artichoke enthusiasts and inspire others to discover the joys of growing their own food. So, get out there, get your hands dirty, and start growing your own delicious, homegrown artichokes today! You’ll be amazed at how easy it is to grow artichokes in your backyard.
Frequently Asked Questions (FAQ)
What is the best time of year to plant artichokes?
The ideal time to plant artichokes depends largely on your climate. In regions with mild winters (zones 7-10), you can plant artichokes in the fall for a spring harvest. In colder climates (zones 6 and below), it’s best to start artichokes indoors in late winter or early spring and transplant them outdoors after the last frost. Starting them indoors gives them a head start and allows them to establish themselves before the colder weather arrives.
How much space do artichoke plants need?
Artichoke plants can grow quite large, reaching up to 3-4 feet in height and width. Therefore, it’s essential to provide them with ample space to thrive. A good rule of thumb is to space artichoke plants at least 4 feet apart in rows that are 4-6 feet apart. This spacing allows for adequate air circulation and sunlight penetration, which are crucial for healthy growth and abundant yields. If you’re growing artichokes in containers, choose a large pot that is at least 18-24 inches in diameter.
What kind of soil do artichokes prefer?
Artichokes thrive in well-drained, fertile soil that is rich in organic matter. They prefer a slightly acidic to neutral soil pH, ideally between 6.0 and 7.0. Before planting, amend your soil with compost, aged manure, or other organic materials to improve its drainage, fertility, and water-holding capacity. If your soil is heavy clay, consider adding sand or perlite to improve drainage.
How often should I water artichoke plants?
Artichokes require consistent moisture, especially during hot, dry weather. Water deeply and regularly, aiming to keep the soil consistently moist but not waterlogged. Avoid overhead watering, as this can increase the risk of fungal diseases. Instead, water at the base of the plant, using a soaker hose or drip irrigation system. During periods of heavy rainfall, reduce watering accordingly.
Do artichoke plants need fertilizer?
Yes, artichokes are heavy feeders and benefit from regular fertilization. Apply a balanced fertilizer (e.g., 10-10-10) in early spring, just as new growth begins to emerge. You can also side-dress your plants with compost or aged manure throughout the growing season to provide them with a steady supply of nutrients. Avoid over-fertilizing, as this can lead to excessive vegetative growth at the expense of flower production.
How do I protect artichoke plants from pests and diseases?
Artichokes can be susceptible to various pests and diseases, including aphids, slugs, snails, and powdery mildew. To prevent pest and disease problems, practice good garden hygiene, such as removing weeds and debris from around your plants. Inspect your plants regularly for signs of pests or diseases and take action promptly. You can control aphids with insecticidal soap or neem oil. Slugs and snails can be handpicked or trapped. To prevent powdery mildew, ensure good air circulation around your plants and avoid overhead watering.
When are artichokes ready to harvest?
Artichokes are typically ready to harvest in the spring or early summer, depending on your climate and the variety you’re growing. The buds are ready to harvest when they are plump, firm, and have tightly closed bracts. The size of the bud will vary depending on the variety, but a good rule of thumb is to harvest when the bud is about 3-4 inches in diameter. To harvest, cut the stem about 2-3 inches below the base of the bud, using a sharp knife or pruning shears.
Can I grow artichokes in containers?
Yes, artichokes can be successfully grown in containers, provided you choose a large enough pot and provide them with adequate care. Select a container that is at least 18-24 inches in diameter and has good drainage holes. Use a high-quality potting mix that is well-draining and rich in organic matter. Water and fertilize your container-grown artichokes regularly, and protect them from extreme temperatures.
Are artichokes perennial plants?
In mild climates (zones 7-10), artichokes are typically grown as perennials, meaning they will live for several years. In colder climates (zones 6 and below), artichokes are often grown as annuals, as they may not survive the winter. However, you can overwinter your artichoke plants by cutting them back to the ground in the fall and covering them with a thick layer of mulch or straw. In the spring, remove the mulch and fertilize your plants to encourage new growth.
How do I overwinter artichoke plants in cold climates?
To overwinter artichoke plants in cold climates, cut back the foliage to about 6 inches above the ground after the first frost. Cover the plants with a thick layer of mulch, straw, or leaves to protect them from freezing temperatures. You can also wrap the plants with burlap or horticultural fleece for added insulation. In the spring, remove the protective covering gradually as the weather warms up.
Leave a Comment