

Grapevine Cuttings Water Propagation: Unlock the secrets to multiplying your grapevines with this simple, yet incredibly effective DIY method! Have you ever admired a lush grapevine, laden with juicy grapes, and wished you could have one just like it in your own backyard? Well, now you can, and you don’t need to be a seasoned horticulturalist to do it. This guide will walk you through the entire process of propagating grapevines from cuttings using just water – a technique that’s both budget-friendly and surprisingly rewarding.
The practice of propagating plants through cuttings has ancient roots, dating back to civilizations who understood the power of vegetative reproduction. For centuries, gardeners have relied on this method to clone their favorite plants, ensuring the continuation of desirable traits. Today, we’re bringing this time-honored tradition into the modern home garden, making it accessible to everyone.
Why should you learn grapevine cuttings water propagation? Because it’s an easy and inexpensive way to expand your vineyard without spending a fortune on new plants. Plus, it’s incredibly satisfying to watch those tiny roots emerge and know that you’ve created a brand-new grapevine from a simple cutting. Imagine the joy of harvesting your own grapes, knowing that you nurtured them from the very beginning! This DIY trick is perfect for beginners and experienced gardeners alike, offering a fun and fulfilling way to connect with nature and grow your own delicious fruit.

Propagating Grapevines from Cuttings: A Water Propagation Guide
Hey there, fellow gardening enthusiasts! Ever dreamt of having your own vineyard, even if it’s just a few vines climbing your fence? Well, I’m here to tell you it’s totally achievable, and one of the easiest ways to get started is by propagating grapevines from cuttings using water propagation. It’s a surprisingly simple method, and I’ve had great success with it. Let me walk you through the process step-by-step.
What You’ll Need
Before we dive in, let’s gather our supplies. Here’s what you’ll need to successfully propagate grapevines from cuttings in water:
* Grapevine Cuttings: These should be dormant, hardwood cuttings taken in late winter or early spring. Look for healthy, one-year-old growth, about pencil-thick.
* Sharp Pruning Shears or Knife: Clean and sharp tools are essential for making clean cuts and preventing disease.
* Rooting Hormone (Optional): While not strictly necessary, rooting hormone can significantly increase your success rate.
* Clean Water: Tap water is fine, but letting it sit out for 24 hours to dissipate chlorine is even better.
* Clear Glass or Plastic Containers: Jars, vases, or even plastic bottles work great. Just make sure they’re clean and allow you to see the roots develop.
* Well-Draining Potting Mix: Once the roots are established, you’ll need potting mix to plant your new grapevines.
* Small Pots: Individual pots for each cutting are ideal.
* Spray Bottle: For misting the cuttings after planting.
* Patience: Rooting takes time, so don’t get discouraged if you don’t see results immediately!
Taking the Cuttings
This is a crucial step, so pay close attention! The quality of your cuttings directly impacts your success.
1. Timing is Key: The best time to take grapevine cuttings is in late winter or early spring, before the buds begin to swell. This is when the vines are dormant and have stored up energy for new growth.
2. Selecting the Right Wood: Choose healthy, one-year-old hardwood growth. This means the wood that grew last season. It should be about the thickness of a pencil and have several nodes (the points where leaves or buds emerge). Avoid thin, weak, or diseased-looking wood.
3. Making the Cuts: Use your sharp pruning shears or knife to make clean cuts.
* Bottom Cut: Make a cut just below a node at the bottom of the cutting. A slanted cut is often recommended, as it increases the surface area for root development.
* Top Cut: Make a cut about an inch or two above a node at the top of the cutting. A straight cut is fine for the top.
4. Cutting Length: Aim for cuttings that are 6-12 inches long. I usually go for around 8-10 inches.
5. Removing Buds (Optional but Recommended): Remove all but the top 2-3 buds. This encourages the plant to focus its energy on root development rather than leaf growth. You can gently rub off the buds with your fingers.
6. Labeling: If you’re taking cuttings from different grape varieties, be sure to label them clearly! You can use masking tape and a permanent marker.
Water Propagation: The Rooting Process
Now for the fun part – watching those roots grow!
1. Preparing the Cuttings: If you’re using rooting hormone, dip the bottom inch of the cutting into the hormone powder or solution. Follow the instructions on the product label.
2. Placing the Cuttings in Water: Fill your clean glass or plastic container with water. Make sure the water level is high enough to cover at least one node at the bottom of the cutting, but don’t submerge the entire cutting.
3. Arranging the Cuttings: Place the cuttings in the water, making sure they don’t touch each other too much. You can put several cuttings in one container, but give them enough space to breathe.
4. Choosing the Right Location: Place the container in a warm, bright location, but avoid direct sunlight. A windowsill that receives indirect sunlight is ideal.
5. Changing the Water: Change the water every 2-3 days to keep it fresh and prevent the growth of algae or bacteria. This is really important for success!
6. Monitoring Root Development: Be patient! It can take several weeks for roots to develop. You should start to see small roots emerging from the nodes that are submerged in water.
7. Adding Nutrients (Optional): Once the roots are about an inch long, you can add a very diluted liquid fertilizer to the water. This will provide the cuttings with some extra nutrients to help them grow. I use a balanced fertilizer diluted to about 1/4 strength.
Planting the Rooted Cuttings
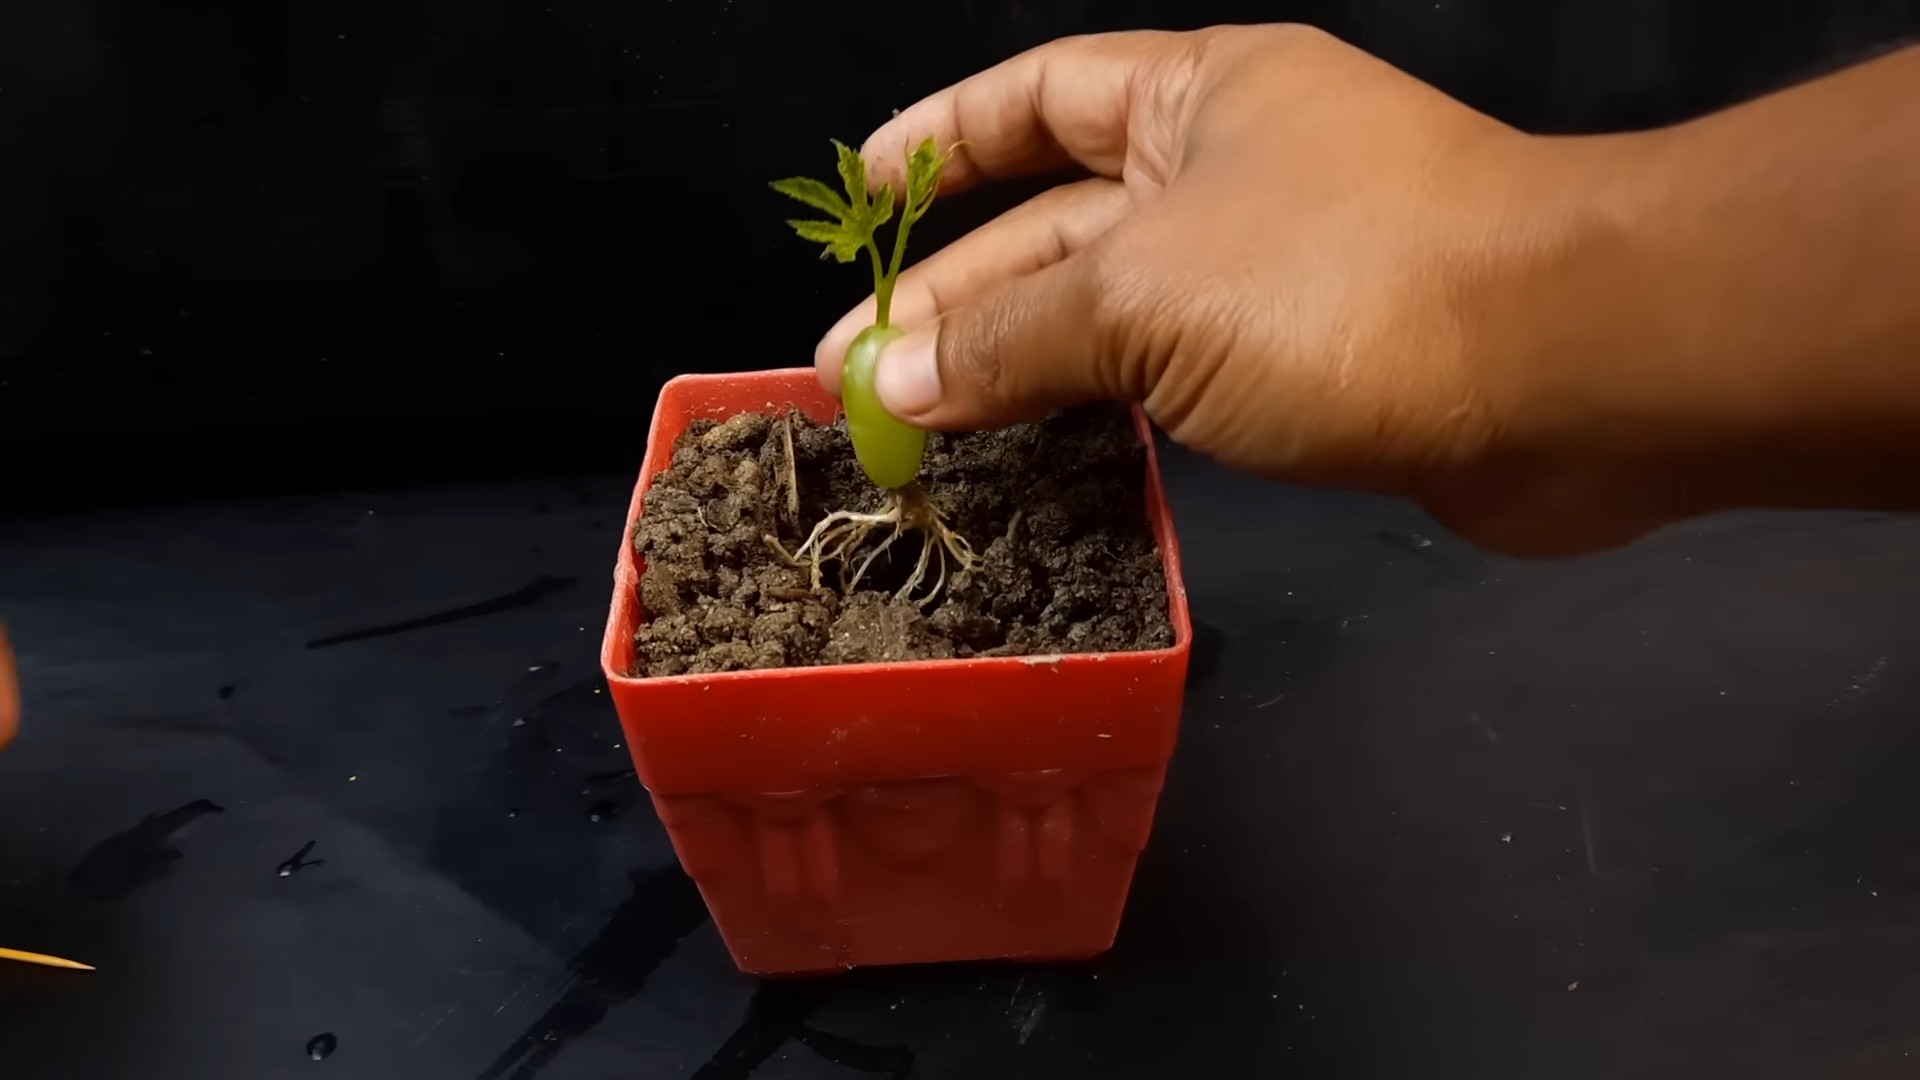
Once the roots are well-developed (at least a few inches long), it’s time to plant your new grapevines in soil.
1. Preparing the Pots: Fill your small pots with well-draining potting mix.
2. Carefully Removing the Cuttings: Gently remove the cuttings from the water, being careful not to damage the delicate roots.
3. Planting the Cuttings: Make a small hole in the potting mix and carefully place the cutting in the hole. Gently backfill with potting mix, making sure the roots are covered.
4. Watering: Water the newly planted cuttings thoroughly, but don’t overwater. The soil should be moist, but not soggy.
5. Misting: Mist the cuttings with a spray bottle to increase humidity. This will help them adjust to their new environment.
6. Providing Support (Optional): If the cuttings are tall and spindly, you can provide them with some support, such as a small stake.
7. Choosing the Right Location: Place the pots in a warm, bright location, but avoid direct sunlight for the first few days. Gradually acclimate them to more sunlight over the next week or two.
8. Ongoing Care: Water the cuttings regularly, allowing the soil to dry out slightly between waterings. Fertilize them every few weeks with a diluted liquid fertilizer.
Hardening Off and Transplanting
Before planting your new grapevines in their permanent location, you’ll need to harden them off. This process gradually acclimates them to outdoor conditions.
1. Gradual Acclimation: Start by placing the pots outdoors in a sheltered location for a few hours each day. Gradually increase the amount of time they spend outdoors over the course of a week or two.
2. Protecting from the Elements: Protect the cuttings from strong winds, direct sunlight, and extreme temperatures.
3. Checking the Weather: Avoid hardening off your cuttings during periods of frost or extreme heat.
4. Transplanting: Once the cuttings are hardened off, you can transplant them to their permanent location in your garden or vineyard. Choose a sunny location with well-draining soil.
5. Planting Depth: Dig a hole that is large enough to accommodate the root ball. Plant the grapevine at the same depth it was growing in the pot.
6. Watering: Water the newly transplanted grapevine thoroughly.
7. Providing Support: Provide the grapevine with support, such as a trellis or fence.
8. Ongoing Care: Water and fertilize the grapevine regularly. Prune it annually to encourage healthy growth and fruit production.
Troubleshooting
Sometimes, things don’t go as planned. Here are a few common problems you might encounter and how to address them:
* Cuttings Rotting: This is usually caused by overwatering or poor drainage. Make sure the soil is well-draining and avoid overwatering. Also, ensure the water you are using for propagation is clean and changed regularly.
* No Root Development: This could be due to several factors, such as poor-quality cuttings, improper timing, or lack of rooting hormone. Try taking cuttings from different parts of the vine or using rooting hormone.
* Slow Growth: This could be due to lack of sunlight, nutrients, or water. Make sure the cuttings are getting enough sunlight and water, and fertilize them regularly.
* Pests and Diseases: Keep an eye out for pests and diseases, such as aphids, spider mites, and powdery mildew. Treat them promptly with appropriate insecticides or fungicides.
Final Thoughts
Propagating grapevines from cuttings is a rewarding experience. It allows you to create new grapevines from your favorite varieties and expand your vineyard without spending a fortune. With a little patience and care, you can successfully propagate grapevines from cuttings using water propagation and enjoy the fruits (literally!) of your labor for years to come. Good
Conclusion
So, there you have it! Mastering the art of grapevine cuttings water propagation is not just a fun experiment; it’s a gateway to expanding your vineyard, saving money, and experiencing the sheer joy of nurturing new life from a simple cutting. Forget expensive nursery plants and embrace the satisfaction of creating your own grapevine empire, one glass of water at a time.
This method, while seemingly simple, offers a remarkable success rate when done correctly. The visual aspect of watching roots emerge is incredibly rewarding, providing a tangible connection to the growth process. It’s a fantastic project for gardeners of all skill levels, from seasoned pros to curious beginners.
But the benefits don’t stop there. Propagating your own grapevines allows you to select specific varieties that thrive in your local climate and soil conditions. You can experiment with different cultivars, creating a diverse and resilient vineyard tailored to your unique needs. Imagine the satisfaction of harvesting grapes from vines you personally nurtured from a single cutting!
Don’t be afraid to experiment with variations on this method. Some gardeners prefer to add a rooting hormone to the water to further stimulate root growth. Others have found success by gently scraping the bottom of the cutting to encourage callus formation. You could also try using different types of water, such as rainwater or distilled water, to see if it affects the rooting process. Remember to keep the water clean and change it regularly to prevent the growth of algae or bacteria.
Consider the container you use as well. While a simple glass jar works perfectly well, you might experiment with opaque containers to see if they promote root growth by shielding the roots from direct light. You can also try using a propagation station with multiple compartments to propagate several cuttings simultaneously.
The possibilities are endless, and the learning never stops. The key is to be patient, observant, and willing to adapt your approach based on your own experiences.
We wholeheartedly encourage you to give grapevine cuttings water propagation a try. It’s an inexpensive, rewarding, and environmentally friendly way to expand your garden and enjoy the fruits (literally!) of your labor. Once you’ve successfully propagated your own grapevines, we’d love to hear about your experience! Share your tips, tricks, and photos in the comments below. Let’s build a community of grapevine enthusiasts and learn from each other’s successes and challenges. Happy propagating!
Frequently Asked Questions (FAQ)
What is the best time of year to take grapevine cuttings for water propagation?
The ideal time to take grapevine cuttings is during the dormant season, typically in late winter or early spring, before the buds begin to swell. This is when the vine is storing energy and the cuttings are most likely to root successfully. Avoid taking cuttings during the growing season, as they may not have enough stored energy to develop roots. Look for healthy, one-year-old wood that is pencil-thick and free from disease.
How long does it take for grapevine cuttings to root in water?
Rooting time can vary depending on several factors, including the variety of grapevine, the temperature, and the quality of the cutting. Generally, you can expect to see roots emerge within 2-6 weeks. Be patient and continue to change the water regularly. Once the roots are a few inches long, the cuttings are ready to be transplanted into soil.
What type of water should I use for grapevine cuttings water propagation?
Clean, fresh water is essential for successful rooting. Tap water is generally fine, but if your tap water is heavily chlorinated, it’s best to let it sit out for 24 hours to allow the chlorine to dissipate. Alternatively, you can use rainwater or distilled water. Avoid using softened water, as it contains salts that can inhibit root growth.
How often should I change the water?
It’s important to change the water every few days to prevent the growth of algae and bacteria, which can harm the cuttings. A good rule of thumb is to change the water every 2-3 days, or whenever it starts to look cloudy. When changing the water, gently rinse the cuttings to remove any debris.
What do I do if my grapevine cuttings start to rot?
If you notice any signs of rot, such as discoloration or a foul odor, remove the affected cutting immediately to prevent the spread of disease. You can try to salvage the remaining cuttings by changing the water more frequently and ensuring that they are not overcrowded. It’s also important to use clean tools when taking cuttings to minimize the risk of infection.
Can I use rooting hormone to help grapevine cuttings root in water?
Yes, using rooting hormone can increase the success rate of grapevine cuttings water propagation. Rooting hormone contains auxins, which are plant hormones that stimulate root growth. Simply dip the bottom of the cutting in rooting hormone powder or liquid before placing it in water. Follow the instructions on the rooting hormone package for best results.
What type of soil should I use when transplanting rooted grapevine cuttings?
When transplanting rooted grapevine cuttings, use a well-draining potting mix that is rich in organic matter. A mixture of equal parts potting soil, perlite, and compost is a good option. Avoid using heavy clay soil, as it can become waterlogged and suffocate the roots.
How much sunlight do grapevine cuttings need after they are transplanted?
After transplanting, place the grapevine cuttings in a location that receives bright, indirect sunlight. Avoid exposing them to direct sunlight, as this can scorch the leaves. As the plants grow, gradually acclimate them to more sunlight. Grapevines need at least 6-8 hours of sunlight per day to thrive.
How often should I water grapevine cuttings after they are transplanted?
Water the grapevine cuttings regularly, keeping the soil consistently moist but not waterlogged. Check the soil moisture by sticking your finger into the soil. If the top inch of soil feels dry, it’s time to water. Avoid overwatering, as this can lead to root rot.
What are some common problems with grapevine cuttings water propagation and how can I fix them?
Some common problems include:
* **Rotting:** Change the water more frequently and ensure that the cuttings are not overcrowded.
* **Lack of root growth:** Try using rooting hormone and ensure that the cuttings are receiving enough light.
* **Algae growth:** Change the water more frequently and consider using an opaque container.
By addressing these issues promptly, you can increase your chances of success with grapevine cuttings water propagation. Remember, patience and observation are key!
Leave a Comment