

Easy cleaning hacks for home – who doesn’t crave them? Let’s be honest, cleaning isn’t usually anyone’s favorite pastime. We all dream of sparkling homes without spending hours scrubbing and sweating. But what if I told you that achieving a clean and tidy space could be easier and faster than you ever imagined?
For centuries, people have sought clever ways to maintain their homes. From ancient civilizations using natural remedies to modern-day innovations, the quest for efficient cleaning methods is a timeless pursuit. Think about it – our grandmothers probably had a whole arsenal of DIY cleaning solutions passed down through generations! These weren’t just about cleanliness; they were about resourcefulness and making the most of what you had.
In today’s busy world, time is precious. That’s why these easy cleaning hacks for home are more valuable than ever. We’re all juggling work, family, and personal lives, leaving little room for extensive cleaning routines. These DIY tricks are designed to save you time, money, and effort, allowing you to enjoy a cleaner, healthier home without sacrificing your precious free time. Plus, many of these hacks utilize items you already have around the house, making them eco-friendly and budget-friendly. So, get ready to discover some game-changing cleaning secrets that will transform your home maintenance routine!
Easy Cleaning Hacks for Your Home: DIY Style!
Hey there, fellow cleaning enthusiasts! Let’s face it, cleaning isn’t exactly anyone’s favorite pastime. But a clean home is a happy home, right? So, I’ve compiled some of my absolute favorite DIY cleaning hacks that are not only super effective but also surprisingly easy and budget-friendly. Get ready to transform your cleaning routine!
Cleaning Your Microwave Like a Pro
Microwaves – they’re lifesavers for reheating leftovers, but they can quickly become a splattered, sticky mess. Forget harsh chemicals and endless scrubbing. This hack uses the power of steam and lemon!
What you’ll need:
* 1 lemon
* 1 cup of water
* Microwave-safe bowl
* Sponge or cloth
Step-by-step instructions:
1. Prepare the Lemon Solution: Cut the lemon in half. Squeeze the juice from both halves into the microwave-safe bowl. Then, drop the lemon halves into the bowl as well.
2. Add Water: Pour one cup of water into the bowl with the lemon juice and lemon halves.
3. Microwave Magic: Place the bowl in the microwave and heat on high for 3-5 minutes. You want the water to boil and create a good amount of steam.
4. Let it Steam: Once the timer goes off, don’t open the microwave immediately! Let the steam work its magic for another 5-10 minutes. This will loosen all the grime and splatters.
5. Wipe it Clean: Carefully remove the bowl (it will be hot!). Use a sponge or cloth to easily wipe away all the loosened food particles. You’ll be amazed at how effortlessly everything comes off!
6. Final Touches: For any stubborn spots, you can dip your sponge or cloth into the lemon water and scrub gently.
De-Gunking Your Showerhead
Hard water can wreak havoc on your showerhead, causing mineral buildup that reduces water pressure and makes your shower less enjoyable. This vinegar soak is a game-changer!
What you’ll need:
* White vinegar
* Plastic bag (gallon-sized works best)
* Rubber band or twist tie
Step-by-step instructions:
1. Fill the Bag with Vinegar: Pour enough white vinegar into the plastic bag to completely submerge your showerhead.
2. Secure the Bag: Carefully position the bag over the showerhead, ensuring the showerhead is fully immersed in the vinegar. Use a rubber band or twist tie to securely attach the bag to the showerhead neck.
3. Soak Overnight: Let the showerhead soak in the vinegar overnight (or for at least a few hours). This allows the vinegar to dissolve the mineral deposits.
4. Remove and Rinse: Remove the bag and discard the vinegar. Turn on the shower and let the water run for a few minutes to flush out any remaining vinegar and loosened debris.
5. Scrub if Needed: If you still see some stubborn buildup, use an old toothbrush or a small scrub brush to gently scrub the showerhead.
6. Enjoy a Powerful Shower: Enjoy your shower with improved water pressure!
Cleaning Your Blender Like a Pro
Cleaning a blender can be tricky, especially after making smoothies or sauces. This simple hack will save you time and effort.
What you’ll need:
* Dish soap
* Water
Step-by-step instructions:
1. Rinse the Blender: Immediately after using your blender, rinse out any remaining food particles with water.
2. Add Soap and Water: Fill the blender halfway with warm water. Add a squirt of dish soap.
3. Blend it Up: Secure the lid and blend on high speed for about 30-60 seconds.
4. Rinse Thoroughly: Pour out the soapy water and rinse the blender thoroughly with clean water.
5. Air Dry: Let the blender air dry completely before storing it.
Freshening Up Your Mattress
Mattresses can harbor dust mites, dead skin cells, and odors. This simple baking soda treatment will leave your mattress feeling fresh and clean.
What you’ll need:
* Baking soda
* Essential oil (optional, for fragrance)
* Sieve or strainer
* Vacuum cleaner with upholstery attachment
Step-by-step instructions:
1. Strip the Bed: Remove all bedding, including sheets, blankets, and mattress protectors.
2. Prepare the Baking Soda: In a bowl, mix baking soda with a few drops of your favorite essential oil (lavender, tea tree, or eucalyptus are great choices for their antibacterial and deodorizing properties). This step is optional, but it will add a pleasant scent to your mattress.
3. Sprinkle the Baking Soda: Using a sieve or strainer, evenly sprinkle the baking soda mixture over the entire surface of your mattress.
4. Let it Sit: Allow the baking soda to sit on the mattress for at least 30 minutes, or even better, for a few hours. The longer it sits, the more effectively it will absorb odors and moisture.
5. Vacuum Thoroughly: Using the upholstery attachment of your vacuum cleaner, thoroughly vacuum the entire surface of the mattress, removing all traces of baking soda.
6. Flip and Repeat: Flip the mattress and repeat steps 3-5 on the other side.
7. Air Out: Let the mattress air out for a few hours before making the bed with fresh linens.
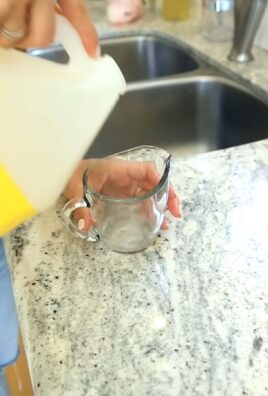
Cleaning Grout with Baking Soda and Vinegar
Grout can be a breeding ground for dirt and mildew. This powerful combination of baking soda and vinegar will leave your grout sparkling clean.
What you’ll need:
* Baking soda
* White vinegar
* Spray bottle
* Old toothbrush or grout brush
* Water
Step-by-step instructions:
1. Apply Baking Soda: Sprinkle baking soda generously over the grout lines you want to clean.
2. Spray with Vinegar: Fill a spray bottle with white vinegar and spray it directly onto the baking soda-covered grout lines. You’ll see a fizzing reaction, which is perfectly normal and helps to loosen the dirt and grime.
3. Let it Fizz: Allow the baking soda and vinegar mixture to fizz and sit on the grout lines for about 5-10 minutes.
4. Scrub the Grout: Use an old toothbrush or a grout brush to scrub the grout lines thoroughly. Apply some pressure and work in small sections.
5. Rinse with Water: Rinse the grout lines with clean water to remove the baking soda and vinegar residue. You can use a damp sponge or cloth to wipe away the excess water.
6. Repeat if Necessary: For stubborn stains or heavily soiled grout, you may need to repeat the process.
Cleaning Burnt Pots and Pans
Burnt food stuck to the bottom of pots and pans can be a nightmare to clean. This baking soda and vinegar method is surprisingly effective.
What you’ll need:
* Baking soda
* White vinegar
* Water
* Dish soap
* Sponge or scrub brush
Step-by-step instructions:
1. Cover the Burnt Area: Sprinkle a generous amount of baking soda over the burnt food residue in the pot or pan.
2. Add Vinegar and Water: Pour a cup of water and a cup of white vinegar into the pot or pan.
3. Boil the Mixture: Bring the mixture to a boil on the stovetop. Let it simmer for about 10-15 minutes, stirring occasionally.
4. Let it Cool: Remove the pot or pan from the heat and let it cool down slightly.
5. Scrub Away: Use a sponge or scrub brush to scrub away the loosened burnt food residue. You should find that it comes off much easier than before.
6. Wash as Usual: Wash the pot or pan with dish soap and water as you normally would.
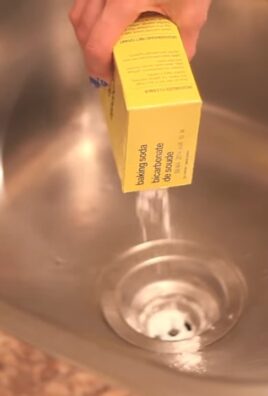
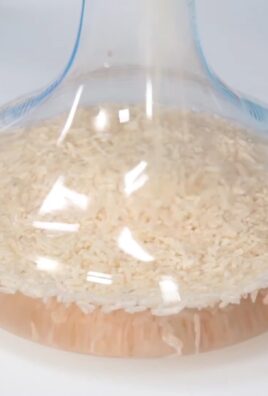
Cleaning Your Dishwasher
Your dishwasher cleans your dishes, but it needs cleaning too! This simple vinegar and baking soda method will keep it fresh and efficient.
What you’ll need:
* White vinegar
* Baking soda
Step-by-step instructions:
1. Empty the Dishwasher: Make sure your dishwasher is completely empty.
2. Vinegar Wash: Place a dishwasher-safe cup or bowl filled with one cup of white vinegar on the top rack of the dishwasher.
3. Run a Hot Cycle: Run the dishwasher on a hot water cycle. The vinegar will help to dissolve grease, grime, and mineral deposits.
4. Baking Soda Boost: After the vinegar cycle is complete, sprinkle one cup of baking soda on the bottom of the dishwasher.
5.
Conclusion
So, there you have it! Mastering these easy cleaning hacks for home isn’t just about saving money; it’s about reclaiming your time and creating a healthier, happier living space. We’ve explored simple, effective solutions using ingredients you likely already have in your pantry. From banishing stubborn stains to creating sparkling surfaces, these DIY methods offer a powerful alternative to harsh chemical cleaners.
But why is this a must-try? Because it’s empowering! You’re taking control of your cleaning routine, knowing exactly what’s going into the products you use and minimizing your environmental impact. Plus, the satisfaction of seeing a grimy surface transform with your own homemade concoction is incredibly rewarding.
Don’t be afraid to experiment with variations. For instance, if you’re tackling a particularly tough stain, try adding a few drops of essential oil like tea tree or lemon for extra cleaning power and a refreshing scent. For a gentler approach on delicate surfaces, dilute your cleaning solution with more water. You can even infuse your homemade cleaners with herbs like rosemary or lavender for a natural fragrance boost. Consider using different types of vinegar, like apple cider vinegar, for its gentler scent and added benefits. Remember to always test your cleaning solution on an inconspicuous area first to ensure it doesn’t damage the surface.
The beauty of these easy cleaning hacks for home lies in their adaptability. Tailor them to your specific needs and preferences. Have a favorite essential oil blend? Incorporate it into your all-purpose cleaner. Prefer a stronger scent? Add a few extra drops of your chosen essential oil. The possibilities are endless!
We urge you to give these DIY cleaning tricks a try. Start with one or two that resonate with you and see the difference they can make. You might be surprised at how effective and enjoyable cleaning can be when you’re using natural, homemade solutions.
But the journey doesn’t end here! We want to hear about your experiences. Share your successes, your challenges, and your own variations in the comments below. What are your favorite easy cleaning hacks for home? What ingredients have you found to be particularly effective? Let’s create a community where we can learn from each other and inspire each other to embrace a cleaner, greener lifestyle. Your insights could be invaluable to someone else who’s just starting out on their DIY cleaning journey. So, go ahead, get cleaning, and share your story! Let’s make our homes sparkle, naturally!
Frequently Asked Questions (FAQ)
Are these DIY cleaning hacks safe for all surfaces?
While most of these easy cleaning hacks for home are generally safe, it’s crucial to exercise caution and test them on an inconspicuous area first. Certain surfaces, like marble or granite, can be sensitive to acidic cleaners like vinegar or lemon juice. Always dilute your cleaning solutions appropriately and avoid using abrasive scrubbers that could scratch delicate surfaces. For wooden furniture, use a gentle cleaner and avoid excessive moisture. If you’re unsure about a particular surface, consult the manufacturer’s instructions or a professional cleaner. Remember, prevention is key! Regularly wiping down surfaces and addressing spills promptly can prevent stains from setting in and make cleaning easier in the long run.
How long do homemade cleaning solutions last?
The shelf life of your homemade cleaning solutions depends on the ingredients used. Solutions containing water are more prone to bacterial growth and should be used within a week or two. Solutions made with vinegar or alcohol have a longer shelf life, typically lasting for several months. To maximize the shelf life of your homemade cleaners, store them in airtight containers in a cool, dark place. Label each container with the date it was made so you can keep track of its freshness. If you notice any changes in color, odor, or consistency, discard the solution immediately. It’s always best to make smaller batches of cleaning solutions to ensure they’re used up before they expire.
Can I use essential oils in all of these cleaning hacks?
Essential oils can be a wonderful addition to your easy cleaning hacks for home, adding fragrance and boosting cleaning power. However, it’s important to use them safely and responsibly. Not all essential oils are created equal, so choose high-quality, pure essential oils from reputable sources. Some essential oils, like tea tree and lemon, have antibacterial and antifungal properties, making them ideal for cleaning. Others, like lavender and chamomile, have calming and relaxing scents, perfect for creating a more pleasant cleaning experience. When using essential oils, start with a small amount (a few drops per batch of cleaning solution) and adjust as needed. Be aware that some essential oils can be irritating to the skin or respiratory system, so always use them in a well-ventilated area and avoid direct contact with skin. Also, be mindful of pets and children, as some essential oils can be toxic to them.
What are some alternatives to vinegar for cleaning?
While vinegar is a popular and effective cleaning agent, some people may prefer to avoid its strong scent or are concerned about its acidity. Fortunately, there are several alternatives you can use in your easy cleaning hacks for home. Baking soda is a gentle abrasive that can be used to scrub surfaces and deodorize. Lemon juice is another acidic cleaner that can be used to remove stains and disinfect. Hydrogen peroxide is a powerful disinfectant that can be used to clean and whiten surfaces. Castile soap is a gentle, all-purpose cleaner that can be used on a variety of surfaces. Borax is a natural mineral that can be used to clean, disinfect, and deodorize. When using any of these alternatives, be sure to test them on an inconspicuous area first and follow the manufacturer’s instructions.
How can I make my cleaning routine more eco-friendly?
Embracing easy cleaning hacks for home is already a great step towards a more eco-friendly lifestyle. But there are other ways to minimize your environmental impact. Use reusable cleaning cloths and sponges instead of disposable paper towels. Invest in a refillable spray bottle to reduce plastic waste. Choose cleaning products with biodegradable ingredients and minimal packaging. Compost food scraps and other organic waste to reduce landfill waste. Conserve water by using only what you need and fixing leaks promptly. By making small changes to your cleaning routine, you can significantly reduce your environmental footprint and create a healthier planet for future generations. Consider using microfiber cloths, which are highly effective at cleaning and require less water and cleaning solution. Support companies that prioritize sustainability and ethical sourcing.
Leave a Comment