

DIY Wood Polish: Is your furniture looking a little dull? Are you tired of spending a fortune on commercial polishes filled with harsh chemicals? I get it! There’s something incredibly satisfying about bringing the natural beauty of wood back to life, and even more so when you can do it yourself, using ingredients you probably already have in your pantry.
For centuries, people have been concocting their own cleaning and polishing solutions. Think about it – before the age of mass-produced products, resourceful homemakers relied on simple, natural ingredients to care for their belongings. This tradition of resourcefulness is something I deeply admire, and it’s what inspired me to create this guide to making your own DIY wood polish.
But why bother with DIY, you might ask? Well, besides the cost savings and the satisfaction of creating something yourself, homemade wood polish is often gentler on your furniture and the environment. Many commercial polishes contain silicones and other additives that can build up over time, leaving a sticky residue. With my simple recipes, you can avoid these harsh chemicals and nourish your wood with natural oils that will enhance its beauty and protect it for years to come. So, let’s dive in and discover how easy it is to create your own amazing wood polish!
DIY Wood Polish: Revive Your Furniture with Natural Ingredients
Hey there, fellow DIY enthusiasts! Are your wooden furniture pieces looking a little dull? Don’t rush out to buy expensive commercial polishes filled with mystery ingredients. I’m going to show you how to whip up your own fantastic wood polish using simple, natural ingredients you probably already have in your pantry. This DIY wood polish is not only cost-effective but also gentle on your furniture and the environment. Let’s get started!
What You’ll Need
Before we dive into the recipe, let’s gather our supplies. This is a simple project, so the list is short and sweet:
* **Olive Oil:** This is the base of our polish, providing moisture and shine.
* **Lemon Juice (or White Vinegar):** Acts as a mild cleaner and helps cut through grime. Lemon juice also adds a lovely fresh scent.
* **Essential Oil (Optional):** For an extra boost of fragrance. I personally love using lavender, orange, or cedarwood.
* **Clean, Soft Cloths:** Microfiber cloths work best, but any soft cotton cloth will do. You’ll need one for applying the polish and another for buffing.
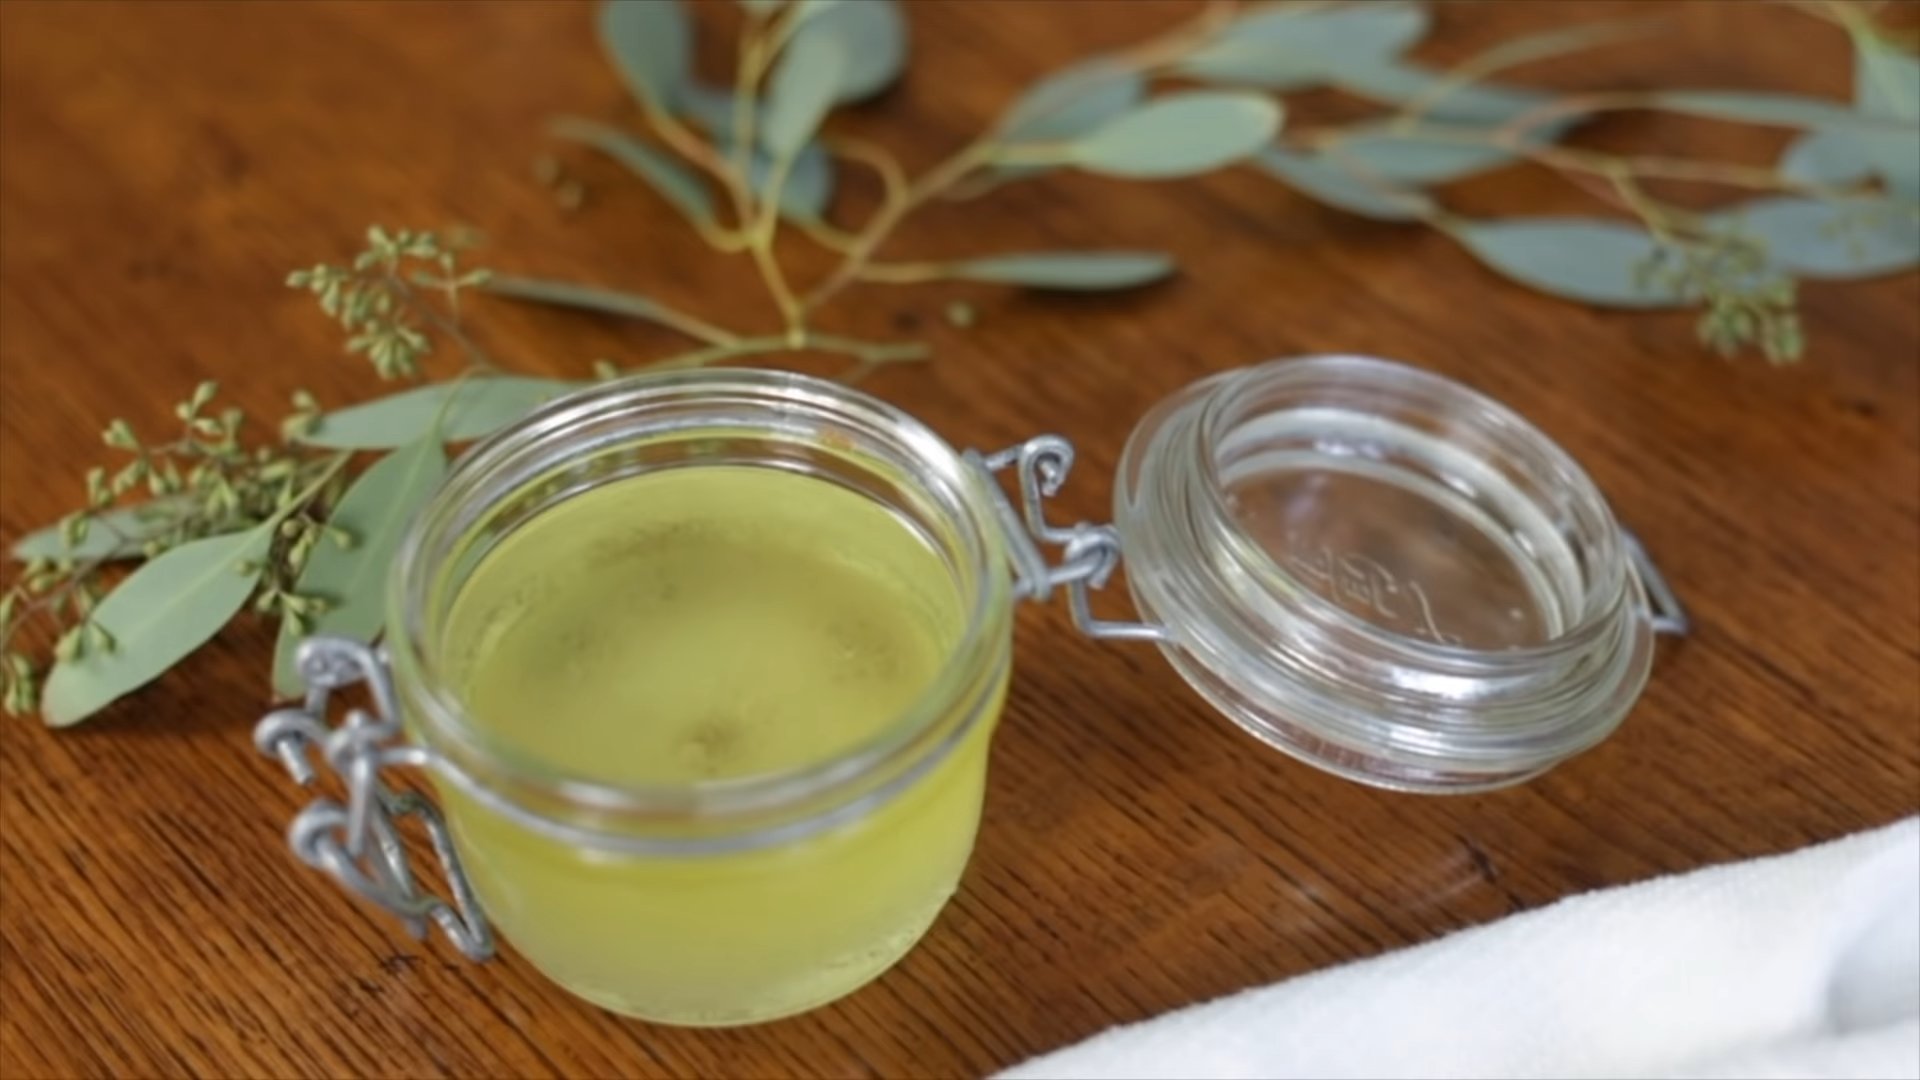
* **Glass Jar or Bottle:** For mixing and storing your homemade polish.
* **Measuring Spoons:** To ensure accurate measurements.
The Recipe: Simple Ratios for Success
The beauty of this DIY wood polish is its simplicity. The basic ratio is:
* 2 parts Olive Oil
* 1 part Lemon Juice (or White Vinegar)
You can easily adjust the quantities based on how much polish you want to make. I usually start with a small batch to test it out on an inconspicuous area of my furniture.
Step-by-Step Instructions: Polishing Like a Pro
Now for the fun part! Let’s get our hands dirty (well, not really dirty – more like oily and lemony!).
1. **Combine the Ingredients:** In your glass jar or bottle, carefully measure out the olive oil and lemon juice (or white vinegar). For example, you could use 1/2 cup of olive oil and 1/4 cup of lemon juice.
2. **Add Essential Oil (Optional):** If you’re using essential oil, add a few drops (5-10 drops per 3/4 cup of total liquid) to the mixture. I find that less is more when it comes to essential oils, so start with a small amount and add more if needed.
3. **Mix Thoroughly:** Secure the lid on your jar or bottle and shake well to combine all the ingredients. The mixture might look a little cloudy at first, but that’s perfectly normal.
4. **Test on an Inconspicuous Area:** Before applying the polish to the entire piece of furniture, it’s always a good idea to test it on a small, hidden area, like the back of a leg or the underside of a table. This will ensure that the polish doesn’t react negatively with the wood finish. Apply a small amount of polish to the test area, let it sit for a few minutes, and then wipe it off with a clean cloth. Check for any discoloration or damage.
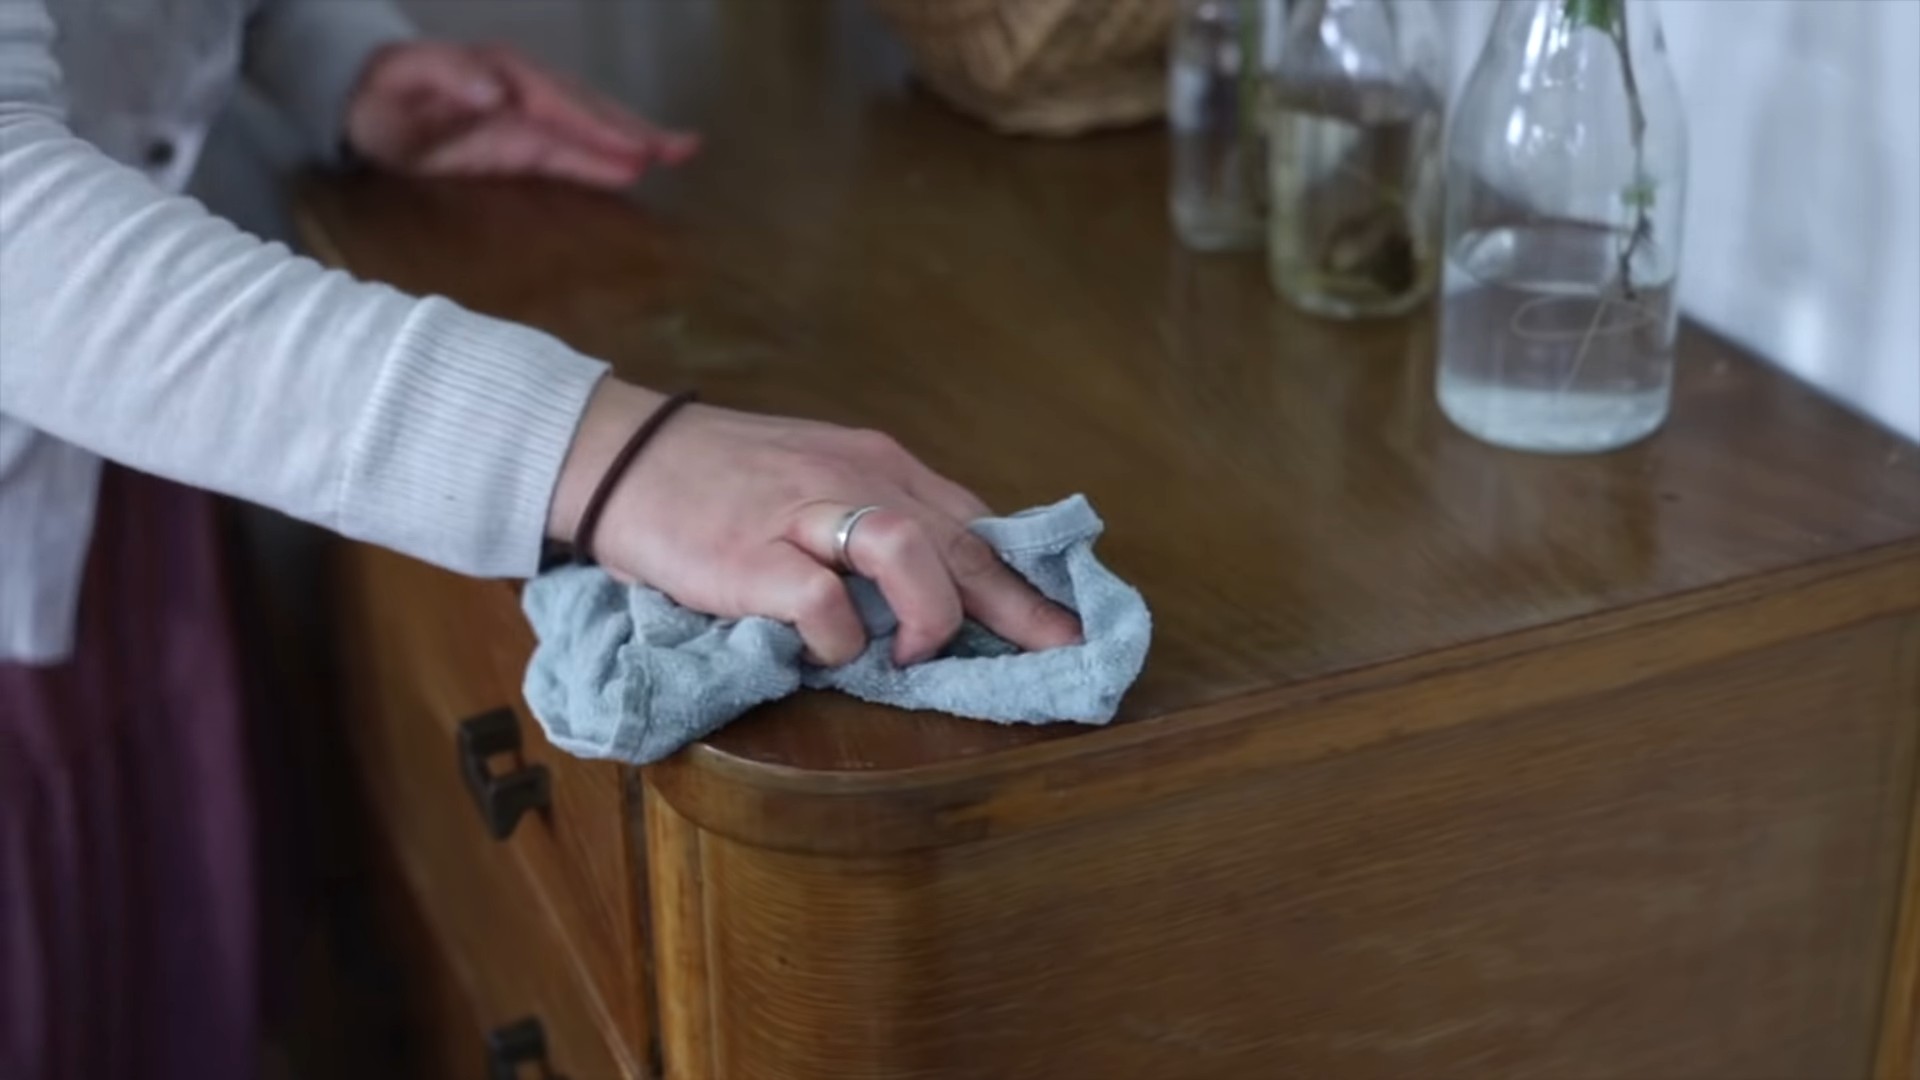
5. **Apply the Polish:** Once you’ve confirmed that the polish is safe to use, dampen a clean, soft cloth with a small amount of the polish. You don’t want to saturate the cloth – just a light coating is enough.
6. **Work in Sections:** Apply the polish to the furniture in small sections, using a circular motion. Be sure to cover the entire surface evenly.
7. **Let it Sit (Briefly):** Allow the polish to sit on the wood for a few minutes (2-5 minutes) to allow it to penetrate and moisturize the wood.
8. **Buff to a Shine:** Using a clean, dry cloth, buff the furniture in a circular motion until it shines. This step is crucial for removing any excess polish and bringing out the natural luster of the wood.
9. **Admire Your Work:** Step back and admire your beautifully polished furniture! You’ll notice a significant improvement in the wood’s appearance – it will look richer, more vibrant, and have a lovely sheen.
Troubleshooting and Tips for Success
Even with a simple recipe like this, you might encounter a few minor issues. Here are some tips to help you achieve the best results:
* **Streaky Finish:** If you notice streaks after polishing, it could be due to using too much polish or not buffing thoroughly enough. Try using a smaller amount of polish and buffing with more pressure.
* **Dull Finish:** A dull finish could indicate that the wood is very dry and needs more moisture. You might need to apply a second coat of polish.
* **Sticky Residue:** A sticky residue can occur if the polish isn’t absorbed properly. This could be due to a build-up of old polish or dirt. Try cleaning the furniture with a mild soap and water solution before applying the DIY polish.
* **Wood Type Matters:** This polish works well on most finished wood surfaces. However, it’s always best to test it on an inconspicuous area first, especially on antique or delicate pieces.
* Frequency of Polishing: How often you polish your furniture depends on how much use it gets and the environment it’s in. Generally, polishing every few months is sufficient.
* Don’t Overdo It: Applying too much polish can lead to a build-up of residue, which can attract dust and dirt. A little goes a long way!
Variations and Customization
One of the best things about DIY is the ability to customize recipes to suit your preferences. Here are a few variations you can try:
* **Beeswax Polish:** For a more protective and durable finish, you can add melted beeswax to the mixture. Melt a small amount of beeswax (about 1 tablespoon per cup of olive oil) in a double boiler or microwave, and then stir it into the olive oil and lemon juice mixture while it’s still warm. Be sure to let the mixture cool completely before using it. This will create a thicker, paste-like polish.
* **Vinegar for Tough Stains:** If your furniture has stubborn stains or grime, you can use white vinegar instead of lemon juice. Vinegar is a stronger cleaner and can help remove dirt and grease more effectively.
* **Nut Oil Alternative:** If you’re allergic to olive oil, you can use another type of nut oil, such as almond oil or walnut oil. These oils have similar moisturizing properties and can provide a beautiful shine.
* Tea Tree Oil for Antimicrobial Properties:** Adding a few drops of tea tree oil can give your polish antimicrobial properties, which is great for furniture that gets a lot of use.
Storing Your Homemade Wood Polish
Proper storage is essential for maintaining the quality of your DIY wood polish. Here are a few tips:
* **Airtight Container:** Store your polish in an airtight glass jar or bottle to prevent it from drying out or oxidizing.
* **Cool, Dark Place:** Keep the polish in a cool, dark place, away from direct sunlight and heat. This will help preserve its freshness and effectiveness.
* **Shake Before Use:** Before each use, shake the jar or bottle well to ensure that the ingredients are properly mixed.
* Shelf Life: This DIY wood polish typically has a shelf life of several months. However, it’s best to use it within a few weeks for optimal results. If you notice any changes in the color, smell, or consistency of the polish, it’s best to discard it.
Safety Precautions
While this DIY wood polish is made with natural ingredients, it’s still important to take a few safety precautions:
* **Test on an Inconspicuous Area:** As mentioned earlier, always test the polish on a small, hidden area before applying it to the entire piece of furniture.
* **Avoid Contact with Eyes:** Avoid getting the polish in your eyes. If contact occurs, rinse thoroughly with water.
* **Keep Out of Reach of Children and Pets:** Store the polish in a safe place, out of reach of children and pets.
* **Ventilation:** When polishing furniture, work in a well-ventilated area.
Why Choose DIY Wood Polish?
There are many reasons to choose DIY wood polish over commercial products:
* **Natural Ingredients:** You know exactly what’s going into your polish, so you can avoid harsh chemicals and synthetic fragrances.
* **Cost-Effective:** Making your own wood polish is much cheaper than buying commercial products.
* **Environmentally Friendly:** By using natural ingredients, you’re reducing your environmental impact.
* **Customizable:** You can customize the recipe to suit your preferences and the specific needs of your furniture.
* Satisfaction: There’s something incredibly satisfying about creating your own cleaning and polishing products.
So, there you have it! A simple, effective, and natural DIY wood polish recipe that will leave your furniture looking its best. Give it a try, and I’m sure you’ll be amazed at the results. Happy polishing!
Conclusion
So, there you have it! Crafting your own DIY wood polish is not only incredibly simple and cost-effective, but it’s also a fantastic way to ensure the longevity and beauty of your wooden furniture and surfaces. Forget those harsh chemicals and expensive store-bought products. With just a few readily available ingredients, you can create a polish that nourishes, protects, and enhances the natural luster of your wood.
Why is this DIY trick a must-try? Because it empowers you to take control of what you’re using in your home. You know exactly what’s going into your polish, eliminating any concerns about potentially harmful chemicals or allergens. Plus, it’s a sustainable choice, reducing your reliance on commercially produced products and their associated packaging waste. The savings alone are a compelling reason to switch! Think about it – how much do you spend on wood polish each year? This DIY alternative can drastically cut those costs.
But the benefits extend beyond just cost and health. This homemade polish often outperforms store-bought options, leaving a richer, deeper shine that truly revitalizes your wood. It penetrates the surface, conditioning the wood from within and preventing it from drying out and cracking.
Looking for variations? Absolutely! For a deeper conditioning treatment, consider adding a few drops of essential oils like cedarwood or sandalwood. These oils not only impart a pleasant fragrance but also offer additional protective properties. Cedarwood, for example, is known for its insect-repelling qualities, making it a great addition for antique furniture. Another variation involves using beeswax for a more durable, water-resistant finish. Simply melt a small amount of beeswax into your oil mixture, ensuring it’s fully dissolved before applying. For lighter woods, you might want to use a lighter oil, such as almond oil, to avoid darkening the wood. Experiment and find the perfect blend that suits your specific wood type and desired finish.
We wholeheartedly encourage you to give this DIY wood polish a try. It’s a rewarding experience that will leave your furniture looking its absolute best. Don’t be intimidated – it’s truly a simple process. Gather your ingredients, follow the instructions, and prepare to be amazed by the results.
And most importantly, we want to hear about your experience! Share your photos, tips, and variations in the comments below. Let us know what worked best for you, what challenges you encountered, and any creative tweaks you made to the recipe. Your feedback will not only help other readers but also contribute to a growing community of DIY enthusiasts who are passionate about preserving the beauty of wood. So, go ahead, unleash your inner woodworker and create a polish that will make your furniture shine! We can’t wait to see what you create!
Frequently Asked Questions (FAQ)
What kind of oil should I use for my DIY wood polish?
The best oil to use depends on the type of wood you’re polishing and the finish you desire. Mineral oil is a popular choice because it’s readily available, inexpensive, and doesn’t go rancid. However, it doesn’t offer much protection against moisture. Olive oil is another option, but it can sometimes leave a sticky residue if not applied sparingly. For a more durable and protective finish, consider using linseed oil (boiled linseed oil is preferred as it dries faster). Walnut oil is a good choice for darker woods, as it can enhance their natural color. Almond oil is a lighter option suitable for lighter woods. Always test the oil on an inconspicuous area first to ensure it doesn’t discolor the wood.
How often should I use my DIY wood polish?
The frequency of polishing depends on the usage and environment of your furniture. For furniture that gets frequent use, such as dining tables or coffee tables, polishing every 1-2 months is recommended. For furniture that’s less frequently used, such as dressers or side tables, polishing every 3-6 months should suffice. In dry climates, you may need to polish more frequently to prevent the wood from drying out. Conversely, in humid climates, you may need to polish less frequently to avoid buildup. Always observe the condition of your wood and adjust the frequency accordingly. If the wood looks dull or feels dry, it’s time for a polish.
Can I use this DIY wood polish on all types of wood?
While this DIY wood polish is generally safe for most types of wood, it’s always best to test it on an inconspicuous area first, especially if you’re dealing with antique or delicate furniture. Avoid using it on unfinished wood, as the oil can soak in unevenly and cause staining. For painted or lacquered wood, use caution and apply the polish sparingly, as it can sometimes soften the finish. If you’re unsure about the type of wood or finish, consult a professional furniture restorer.
How do I store my DIY wood polish?
Store your DIY wood polish in an airtight container in a cool, dark place. This will help prevent the oil from going rancid and maintain its effectiveness. A glass jar with a tight-fitting lid is ideal. Be sure to label the container clearly with the contents and date of preparation. Properly stored, your DIY wood polish should last for several months. If you notice any changes in color, odor, or consistency, discard the polish.
What if my DIY wood polish leaves a sticky residue?
A sticky residue is usually caused by using too much oil or not buffing the surface properly. To remove the residue, try wiping the surface with a clean, dry cloth. If that doesn’t work, dampen the cloth with a small amount of mineral spirits or white vinegar and gently wipe the surface. Follow up with a dry cloth to remove any remaining residue. In the future, use less oil and be sure to buff the surface thoroughly after applying the polish.
Can I add essential oils to my DIY wood polish?
Yes, adding essential oils can enhance the fragrance and protective properties of your DIY wood polish. Cedarwood, sandalwood, and lemon essential oils are popular choices. Cedarwood is known for its insect-repelling properties, sandalwood adds a warm, woody scent, and lemon oil can help to brighten the wood. Use essential oils sparingly, adding only a few drops per batch of polish. Always test the polish on an inconspicuous area first to ensure the essential oil doesn’t discolor the wood.
Is DIY wood polish safe for children and pets?
While the ingredients in most DIY wood polish recipes are generally considered safe, it’s still important to exercise caution, especially if you have children or pets. Keep the polish out of reach of children and pets, and avoid using it on surfaces that they may come into contact with, such as cribs or pet beds. If you’re concerned about potential allergies or sensitivities, choose ingredients that are known to be hypoallergenic. Always supervise children when they are helping with DIY projects.
How do I clean my wood furniture before polishing?
Before applying your DIY wood polish, it’s important to clean the surface of your furniture to remove any dust, dirt, or grime. Use a soft, damp cloth to wipe down the surface. For stubborn stains or buildup, you can use a mild soap solution (a few drops of dish soap in a bucket of water). Be sure to rinse the surface thoroughly with a clean, damp cloth and allow it to dry completely before polishing. Avoid using harsh chemicals or abrasive cleaners, as they can damage the finish.
Leave a Comment