

DIY Wall Box Shelf: Transform your living space with a touch of creativity and functionality! Have you ever looked at a blank wall and thought, “This needs something… but what?” I know I have! That’s where the magic of a DIY wall box shelf comes in. It’s not just about adding storage; it’s about adding personality and a unique focal point to your home.
Wall shelves, in various forms, have been around for centuries, evolving from simple ledges in ancient dwellings to ornate displays in grand estates. They’ve always served a practical purpose, but also reflected the style and craftsmanship of the era. Today, we’re taking that tradition and putting our own spin on it with a modern, customizable twist.
In today’s world, where space is often at a premium, and individuality is highly valued, the DIY wall box shelf offers the perfect solution. It’s a fantastic way to declutter, showcase your favorite items, and express your personal style, all while saving money and enjoying the satisfaction of creating something with your own hands. Plus, let’s be honest, who doesn’t love a good DIY project that makes their home look amazing? This guide will walk you through the process, step-by-step, so you can create a stunning and functional piece that you’ll be proud to display.
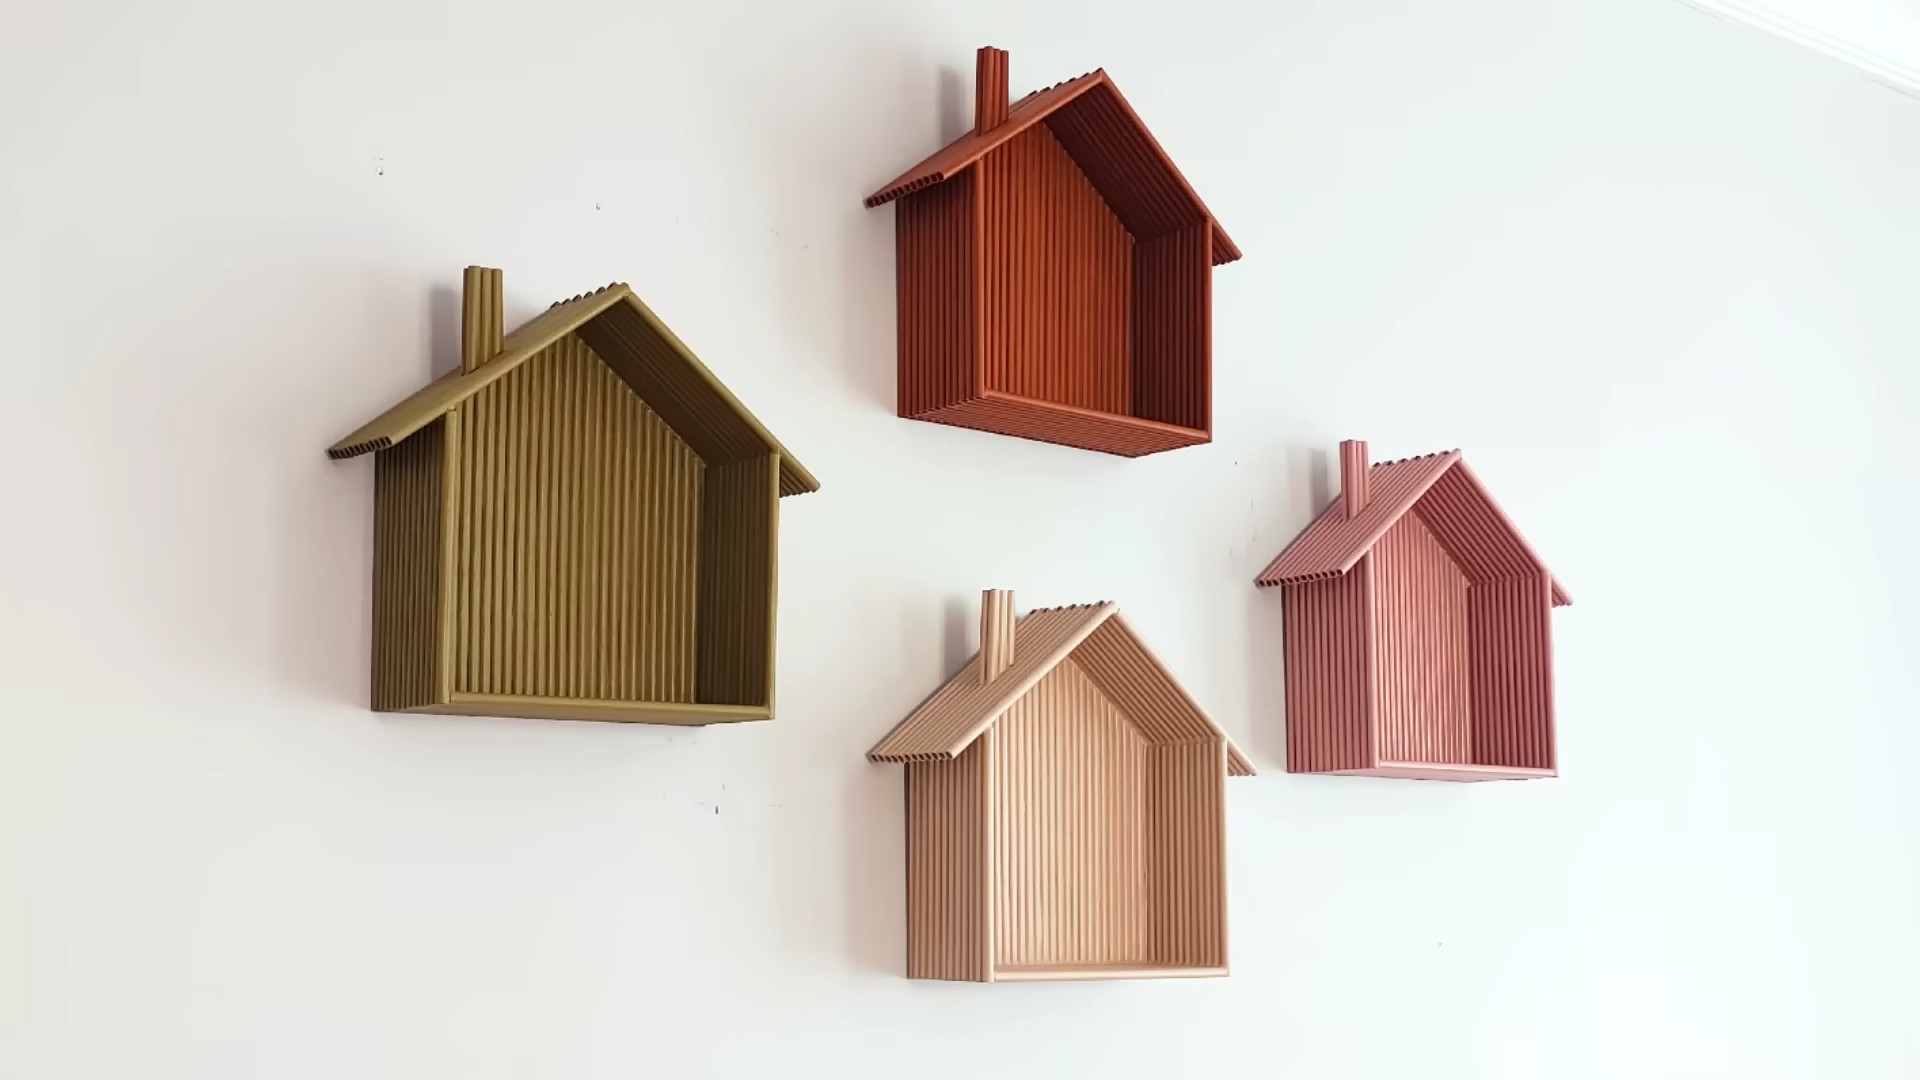
DIY Floating Wall Box Shelves: A Weekend Project for Stylish Storage
Okay, let’s dive into building some seriously cool floating wall box shelves! I’ve always loved the clean, modern look of these, and honestly, they’re way easier to make than you might think. This project is perfect for adding a touch of personality and extra storage to any room. I’ll walk you through every step, so even if you’re a beginner, you’ll be hanging these beauties in no time.
Materials You’ll Need:
Before we get started, let’s gather our supplies. Here’s what you’ll need:
* **Lumber:** This is the heart of our project! I recommend using pine or poplar for a budget-friendly option. You’ll need enough to create the sides, top, bottom, and back of your boxes. The amount will depend on the size and number of shelves you want to build. I usually go for 1×6 or 1×8 boards, depending on the desired depth.
* **Wood Glue:** A good quality wood glue is essential for strong, lasting joints.
* **Brad Nails or Screws:** I prefer using brad nails with a nail gun for a cleaner look, but screws work just as well. Just make sure they’re the right length for your lumber thickness.
* **Wood Filler:** For filling any nail holes or imperfections.
* **Sandpaper:** Various grits (80, 120, 220) for smoothing the wood.
* **Primer:** To prepare the wood for paint or stain.
* **Paint or Stain:** Choose your favorite color or stain to match your décor.
* **Clear Coat (Optional):** For added protection and durability.
* **French Cleat Hanger:** This is what makes the shelves “float”! You can buy these online or at most hardware stores.
* **Screws for Mounting:** To attach the French cleat to the wall and the shelf. Make sure they’re long enough to go through the cleat and into a wall stud.
* **Safety Glasses:** Always protect your eyes!
* **Hearing Protection:** Especially if you’re using power tools.
* **Dust Mask:** To avoid inhaling sawdust.
Tools You’ll Need:
* **Measuring Tape:** Accurate measurements are crucial.
* **Pencil:** For marking your cuts.
* **Square:** To ensure your cuts are straight and your boxes are square.
* **Saw:** A miter saw is ideal for making precise cuts, but a circular saw or even a hand saw will work.
* **Nail Gun or Drill:** For attaching the wood pieces together.
* **Sander:** An orbital sander will make sanding much faster and easier, but you can also sand by hand.
* **Clamps:** To hold the wood pieces together while the glue dries.
* **Level:** To ensure your shelves are perfectly level when you hang them.
* **Stud Finder:** To locate wall studs for secure mounting.
* **Paintbrushes or Rags:** For applying primer, paint, or stain.
Planning Your Shelves: Size and Design
Before you start cutting wood, take some time to plan the size and design of your shelves. Consider:
* **Where will you hang the shelves?** Measure the space to determine the maximum size.
* **What will you put on the shelves?** This will help you determine the depth and height.
* **How many shelves do you want?** Consider creating a set of varying sizes for a more visually appealing arrangement.
I usually sketch out a quick design on paper to visualize the final product. This also helps me calculate the amount of lumber I need.
Building the Boxes: Step-by-Step Instructions
Okay, let’s get building!
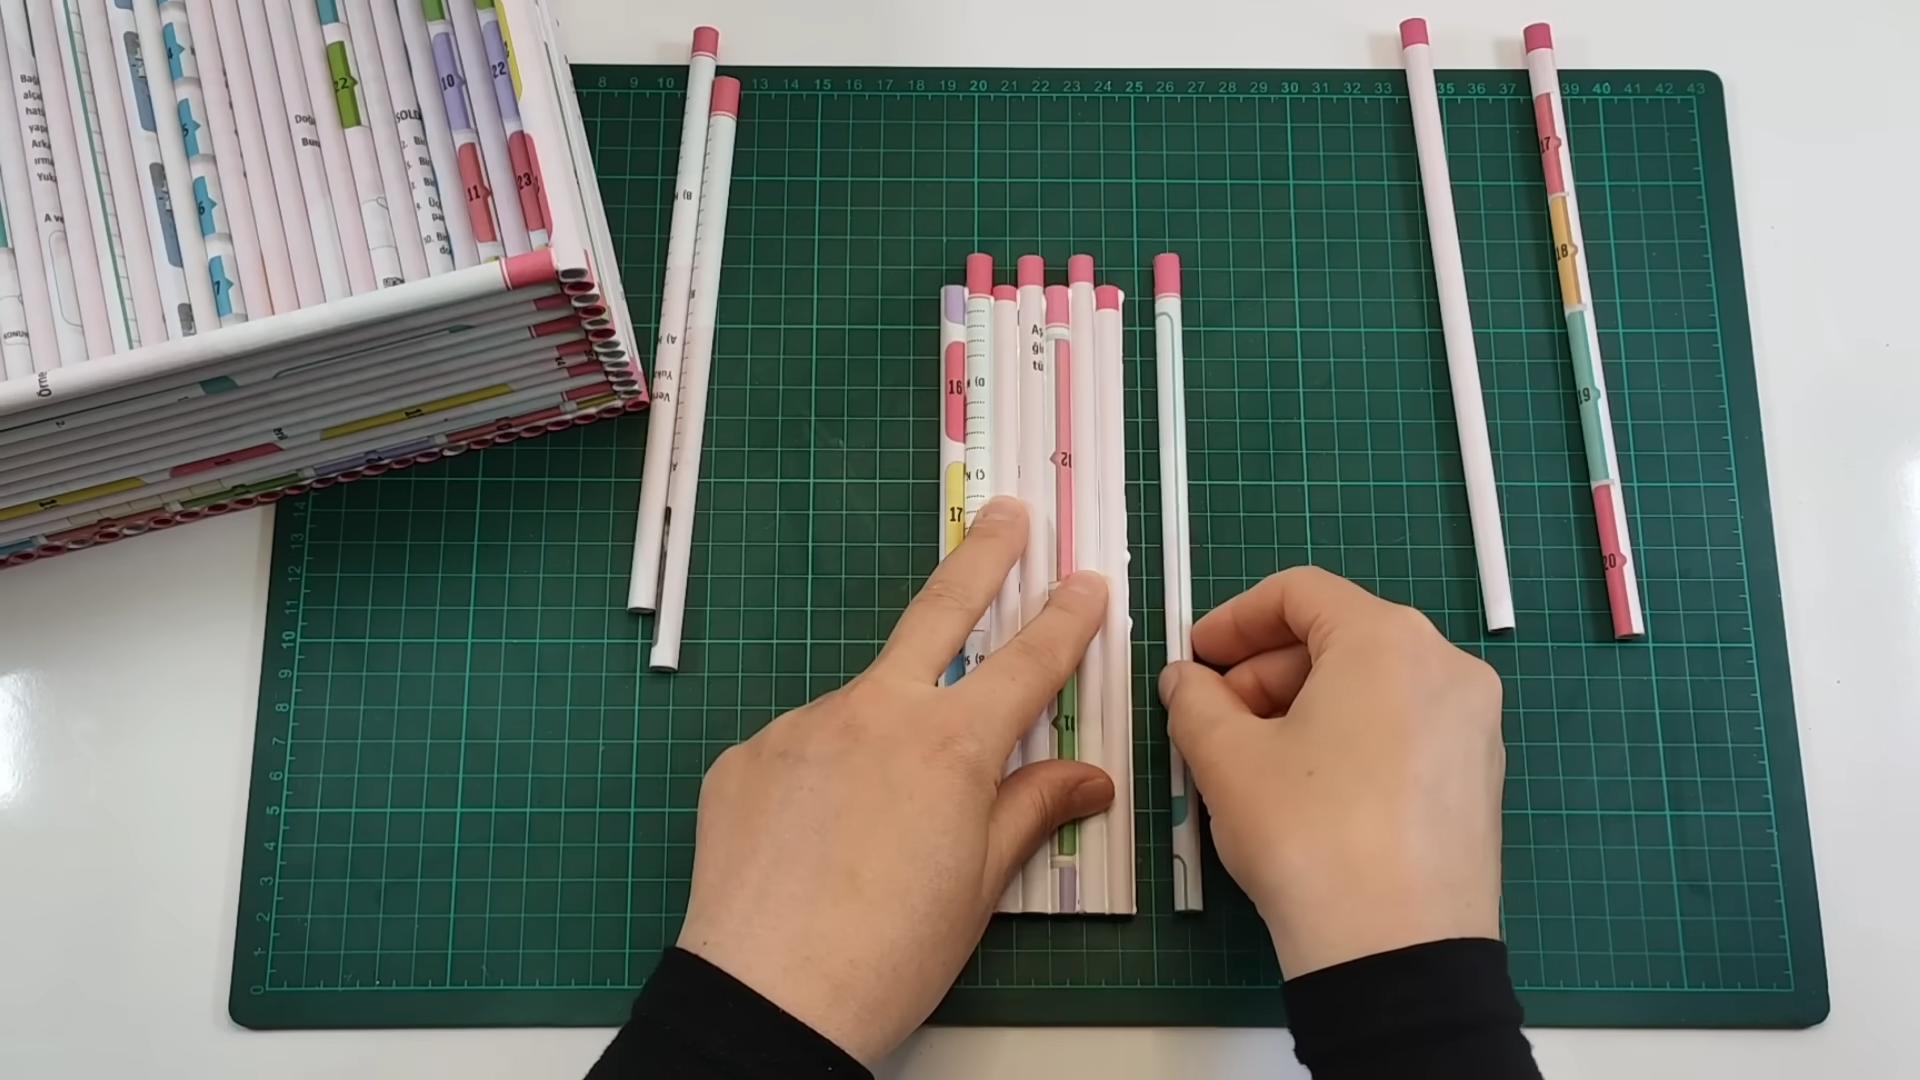
1. **Cut the Wood:** Using your measurements, cut the lumber for the sides, top, bottom, and back of each box. Remember to double-check your measurements before cutting! Accuracy is key for a professional-looking finish. I always cut the back piece slightly smaller than the overall box dimensions so it fits neatly inside.
2. **Assemble the Box Frame:** Apply wood glue to the edges of the side pieces and attach them to the top and bottom pieces. Use clamps to hold the pieces together while the glue dries. I usually let the glue dry for at least 30 minutes, but overnight is even better.
3. **Reinforce the Joints:** Once the glue is dry, reinforce the joints with brad nails or screws. If using nails, drive them in at an angle for extra strength. If using screws, pre-drill pilot holes to prevent the wood from splitting.
4. **Attach the Back:** Apply wood glue to the edges of the back piece and attach it to the back of the box frame. Again, use clamps to hold it in place while the glue dries. Reinforce with brad nails or screws.
5. **Fill Holes and Imperfections:** Once the glue is completely dry, use wood filler to fill any nail holes, screw holes, or imperfections in the wood. Let the wood filler dry completely according to the manufacturer’s instructions.
6. **Sand the Boxes:** Sand the entire surface of each box, starting with 80-grit sandpaper to remove any rough spots or excess wood filler. Then, move on to 120-grit sandpaper to smooth the surface. Finally, use 220-grit sandpaper for a super-smooth finish. Remember to sand with the grain of the wood.
Finishing the Shelves: Painting or Staining
Now for the fun part – adding color!
1. **Apply Primer:** Apply a coat of primer to the entire surface of each box. This will help the paint or stain adhere better and provide a more even finish. Let the primer dry completely according to the manufacturer’s instructions.
2. **Paint or Stain:** Choose your favorite paint or stain and apply it to the boxes. I usually apply two coats for a richer color and better coverage. Let each coat dry completely before applying the next. If you’re using stain, wipe off the excess with a clean rag.
3. **Apply Clear Coat (Optional):** For added protection and durability, apply a clear coat to the finished boxes. This will help protect the paint or stain from scratches and wear. Let the clear coat dry completely according to the manufacturer’s instructions.
Mounting the Shelves: Using French Cleats
French cleats are the secret to making these shelves appear to float!
1. **Prepare the French Cleat:** A French cleat is essentially a piece of wood cut at a 45-degree angle. One piece attaches to the wall, and the other attaches to the shelf. When you hang the shelf, the two pieces interlock, creating a strong and secure connection. If you bought a pre-made French cleat, it will already be cut at the correct angle. If you’re making your own, use a table saw or circular saw to cut a piece of wood at a 45-degree angle.
2. **Attach One Cleat Piece to the Shelf:** Attach one piece of the French cleat to the back of the shelf, making sure the angled edge is facing upwards. Use screws that are long enough to go through the cleat and into the shelf, but not so long that they poke through the front.
3. **Locate Wall Studs:** Use a stud finder to locate the wall studs where you want to hang the shelf. It’s crucial to attach the cleat to a stud for maximum support.
4. **Attach the Other Cleat Piece to the Wall:** Attach the other piece of the French cleat to the wall, making sure the angled edge is facing downwards and that it’s aligned with a wall stud. Use screws that are long enough to go through the cleat and into the stud. Use a level to ensure the cleat is perfectly level.
5. **Hang the Shelf:** Carefully lift the shelf and slide the cleat on the back of the shelf onto the cleat on the wall. The two pieces should interlock securely.
6. **Double-Check Level:** Use a level to make sure the shelf is perfectly level. If it’s not, you may need to adjust the position of the cleat on the wall slightly.
7. **Repeat for Remaining Shelves:** Repeat steps 1-6 for each of your shelves.
Arranging Your Shelves: Creating a Stylish Display
Now that your shelves are hung, it’s time to decorate! Here are a few tips for creating a stylish display:
* **Vary the Heights:** Arrange your shelves at different heights to create visual interest.
* **Mix and Match:** Combine different types of objects, such as books, plants, and decorative items.
* **Create Balance:** Distribute the weight of the objects evenly across the shelves.
* **Leave Some Empty Space:** Don’t overcrowd the shelves. Leaving some empty space will help create a more balanced and visually appealing display.
* **Add Personal Touches:** Incorporate items that reflect your personality and style.
And that’s it! You’ve successfully built and hung
Conclusion
So, there you have it! Creating your own DIY wall box shelf isn’t just a cost-effective alternative to store-bought options; it’s a chance to unleash your creativity and tailor a storage solution perfectly suited to your unique space and style. We’ve walked you through the process, highlighting the simplicity and adaptability of this project. But why is this DIY trick a must-try?
Firstly, it’s about personalization. Forget generic shelves that don’t quite fit the aesthetic of your home. With a DIY wall box shelf, you control every aspect, from the dimensions and materials to the paint color and finishing touches. Want a rustic, reclaimed wood look? Go for it! Prefer a sleek, modern vibe with minimalist hardware? The choice is entirely yours. This level of customization is simply unmatched by mass-produced furniture.
Secondly, it’s incredibly budget-friendly. Store-bought shelves, especially those with unique designs or made from quality materials, can be surprisingly expensive. By building your own, you can significantly reduce costs, especially if you repurpose existing materials or shop for lumber during sales. This makes it an accessible project for anyone, regardless of their budget.
Thirdly, it’s a rewarding experience. There’s a unique sense of satisfaction that comes from creating something with your own hands. Building a DIY wall box shelf is a tangible accomplishment that you can proudly display in your home. It’s a project that can be enjoyed by individuals or even as a fun family activity.
But the possibilities don’t end with the basic design. Consider these variations to further personalize your DIY wall box shelf:
* Floating Shelves: Instead of attaching the box directly to the wall, use hidden shelf brackets for a clean, floating appearance.
* Geometric Designs: Experiment with different shapes and arrangements. Combine multiple boxes of varying sizes to create a visually striking geometric display.
* Built-in Lighting: Integrate LED strip lights into the shelf to illuminate your displayed items and add a touch of ambiance.
* Fabric Backing: Add a fabric backing to the inside of the box for a pop of color and texture. This is especially effective for displaying delicate items.
* Chalkboard Paint: Paint the back of the box with chalkboard paint to create a functional and decorative surface for notes and reminders.
* Add Doors: Install small cabinet doors to create a hidden storage compartment within the shelf.
We strongly encourage you to give this DIY wall box shelf project a try. It’s a simple, affordable, and rewarding way to add personalized storage to your home. Don’t be afraid to experiment with different materials, colors, and designs to create something truly unique.
Most importantly, we want to hear about your experience! Share your finished projects with us on social media using #DIYWallBoxShelf. We can’t wait to see what you create! Let us know what challenges you faced, what modifications you made, and any tips you have for other DIY enthusiasts. Your feedback will help us improve our instructions and inspire others to embark on their own DIY adventures. So, grab your tools, gather your materials, and get ready to transform your space with a custom-made DIY wall box shelf!
Frequently Asked Questions
What tools do I need to build a DIY wall box shelf?
The essential tools include a saw (hand saw, circular saw, or miter saw), a drill with various drill bits, a measuring tape, a level, sandpaper, wood glue, screws or nails, and safety glasses. Depending on the finish you desire, you might also need paintbrushes, rollers, or spray paint. A stud finder is helpful for securely mounting the shelf to the wall. Clamps are also useful for holding pieces together while the glue dries.
What type of wood is best for a DIY wall box shelf?
The best type of wood depends on your budget and desired aesthetic. Pine is a cost-effective and readily available option that’s easy to work with. However, it’s a softwood and may be more prone to dents and scratches. Hardwoods like oak, maple, or walnut are more durable and offer a richer appearance, but they are also more expensive and can be more challenging to work with. Plywood is another affordable option, especially for larger shelves, but it may require edge banding for a cleaner look. Reclaimed wood is a great eco-friendly choice that adds character and charm. Consider the weight of the items you plan to store on the shelf when choosing your wood.
How do I ensure the shelf is securely attached to the wall?
The most important factor is to attach the shelf to wall studs. Use a stud finder to locate the studs behind your drywall. Drive screws through the back of the shelf and into the studs. If you can’t align the shelf with studs, use drywall anchors. There are various types of drywall anchors available, each with different weight capacities. Choose anchors that are appropriate for the weight of the shelf and the items you plan to store on it. Always follow the manufacturer’s instructions for installing drywall anchors. For heavier shelves, consider using a combination of stud mounting and drywall anchors.
How do I finish the wood for my DIY wall box shelf?
There are many ways to finish the wood, depending on the look you want to achieve. Sanding is crucial for a smooth finish. Start with a coarser grit sandpaper and gradually move to finer grits. You can stain the wood to enhance its natural grain or change its color. Apply stain evenly and wipe off any excess. After staining, apply a sealant like polyurethane or varnish to protect the wood and provide a durable finish. Paint is another option, offering a wide range of colors and finishes. Apply primer before painting for better adhesion and coverage. For a rustic look, consider distressing the wood by sanding off some of the paint or stain.
Can I make a DIY wall box shelf without using power tools?
Yes, you can definitely make a DIY wall box shelf without power tools, although it will require more time and effort. A hand saw can be used to cut the wood, although it will take longer than using a power saw. A hand drill can be used to drill pilot holes and drive screws. Sandpaper can be used to smooth the edges and surfaces. When using hand tools, it’s important to be patient and take your time to ensure accurate cuts and secure connections. Consider using pre-cut lumber from a hardware store to minimize the amount of cutting required.
How do I calculate the dimensions for my DIY wall box shelf?
Consider the space where you plan to hang the shelf and the items you want to display or store on it. Measure the width, height, and depth of the space and the items. The shelf should be wide enough to accommodate the items without overcrowding them. The depth of the shelf should be sufficient to prevent items from tipping over. The height of the shelf should be appropriate for the overall space and the items being displayed. Consider the proportions of the shelf in relation to the surrounding furniture and décor. It’s always a good idea to create a sketch or diagram of the shelf with the dimensions clearly labeled before you start building.
What if I make a mistake while building the shelf?
Don’t panic! Mistakes happen. If you cut a piece of wood too short, you may be able to use it for a smaller part of the shelf or repurpose it for another project. If you drill a hole in the wrong place, you can fill it with wood filler and sand it smooth. If you accidentally damage the wood, you can often repair it with wood glue and clamps. The key is to be patient and resourceful. Don’t be afraid to experiment and learn from your mistakes. Remember, even experienced DIYers make mistakes.
How can I customize my DIY wall box shelf to match my décor?
The possibilities for customization are endless! Choose wood and finishes that complement your existing furniture and décor. Paint the shelf in a color that matches your walls or accents. Add decorative hardware, such as knobs or pulls, to enhance the style. Line the back of the shelf with fabric or wallpaper to add a pop of color and texture. Use stencils or paint to create patterns or designs on the shelf. Add decorative trim or molding to the edges of the shelf. Consider the overall style of your home and choose customizations that reflect your personal taste.

Leave a Comment