

DIY Towel Slippers: Imagine sinking your feet into plush comfort after a long, tiring day, without spending a fortune! That’s the magic of crafting your own DIY towel slippers. Forget those flimsy, disposable slippers – we’re talking about creating something cozy, sustainable, and uniquely *you*.
The concept of repurposing textiles into footwear isn’t new. Throughout history, resourceful individuals have found ways to transform scraps into practical items. Think of the traditional Japanese “zori,” often made from rice straw, or the rag rugs of early American settlers, sometimes repurposed into simple shoes. This DIY spirit is alive and well, and we’re tapping into it with these comfy towel slippers!
Why do you need this DIY trick in your life? Well, besides the sheer joy of creating something with your own hands, these DIY towel slippers are incredibly practical. They’re perfect for padding around the house, keeping your feet warm on chilly mornings, or even as a thoughtful, handmade gift. Plus, it’s a fantastic way to give old towels a new lease on life, reducing waste and saving you money. I’m excited to show you how easy it is to make your own pair. Let’s get started!
DIY Towel Slippers: Cozy Comfort at Your Feet!
Hey there, fellow DIY enthusiasts! Are you tired of cold floors greeting your feet every morning? Or maybe you’re just looking for a fun and easy project to use up those old towels? Well, look no further! I’m going to walk you through creating your very own super comfy towel slippers. Trust me, once you slip these on, you’ll never want to take them off!
Materials You’ll Need
Before we dive in, let’s gather our supplies. Here’s what you’ll need:
* Old Towels: The thicker, the better! Bath towels work great, but even hand towels can be used for smaller sizes. I recommend having at least two towels on hand, especially if you’re making a larger size or want extra padding.
* Scissors: A good pair of fabric scissors is essential for clean cuts.
* Sewing Machine (Optional): While you can hand-sew these slippers, a sewing machine will make the process much faster and more durable. If you’re a beginner, don’t worry! I’ll provide tips for both machine and hand sewing.
* Thread: Choose a thread color that complements your towels. I usually go for a neutral color like white, beige, or gray.
* Pins: These are crucial for holding the fabric in place while you sew.
* Pencil or Fabric Marker: For tracing your foot and marking cutting lines.
* Cardboard or Thick Paper (for template): This will help you create a consistent shape for your slippers. Cereal boxes work perfectly!
* Measuring Tape or Ruler: To measure your foot and create the template.
* Non-Slip Material (Optional): If you’re worried about slipping, you can add non-slip fabric or rubber dots to the soles. You can find these at most craft stores.
* Embellishments (Optional): Buttons, ribbons, lace, or anything else you want to use to personalize your slippers!
Creating Your Template
This is a crucial step, so take your time and be accurate! A good template will ensure your slippers fit comfortably.
1. Trace Your Foot: Place a piece of cardboard or thick paper on a flat surface. Stand on the cardboard and carefully trace around your foot with a pencil or fabric marker. Make sure to keep the pencil perpendicular to the cardboard for an accurate outline.
2. Add Seam Allowance: Now, we need to add some extra space for the seams. Add about 1/2 inch (1.25 cm) all the way around the traced outline. This will give you enough room to sew the pieces together without making the slippers too small.
3. Shape the Toe: The traced outline might look a bit awkward, especially around the toes. Round out the toe area to create a more slipper-like shape.
4. Create the Upper Piece Template: This is the part that will cover the top of your foot. To create this template, measure the distance from the base of your toes to about halfway up your foot. This will be the length of your upper piece. The width should be wide enough to comfortably cover the top of your foot. I usually make mine about 4-5 inches (10-12.5 cm) wide. Draw a rectangle on your cardboard with these measurements. Round the corners of the rectangle for a more comfortable fit.
5. Cut Out the Templates: Carefully cut out both the sole template and the upper piece template. You now have your patterns!
Cutting the Fabric
Now that we have our templates, it’s time to cut out the fabric pieces.
1. Cut the Soles: Place the sole template on your towel fabric. Pin it in place to prevent it from shifting. Using your scissors, carefully cut out two sole pieces for each slipper. That’s four sole pieces total (two for each foot). I like to cut two layers of towel at once to save time, but make sure the fabric doesn’t slip.
2. Cut the Upper Pieces: Place the upper piece template on your towel fabric. Pin it in place. Cut out two upper pieces for each slipper. That’s four upper pieces total (two for each foot).
3. Optional: Cut Non-Slip Soles: If you’re using non-slip material, cut out two sole pieces using the sole template.
Sewing the Slippers
Alright, let’s get to the fun part – sewing! Remember, you can either use a sewing machine or hand-sew these slippers. I’ll provide instructions for both methods.
Using a Sewing Machine
1. Prepare the Soles: Stack two sole pieces together for each slipper. If you’re using non-slip material, place it on the bottom of the stack. Pin the layers together.
2. Sew the Soles: Using a sewing machine, sew around the perimeter of the sole pieces, about 1/4 inch (0.6 cm) from the edge. This will create a sturdy sole for your slippers.
3. Prepare the Upper Pieces: Fold each upper piece in half lengthwise, with the right sides (the sides you want to show) facing each other. Pin the folded edge.
4. Sew the Upper Pieces: Sew along the folded edge of each upper piece, about 1/4 inch (0.6 cm) from the edge. This will create a rounded shape for the top of the slipper.
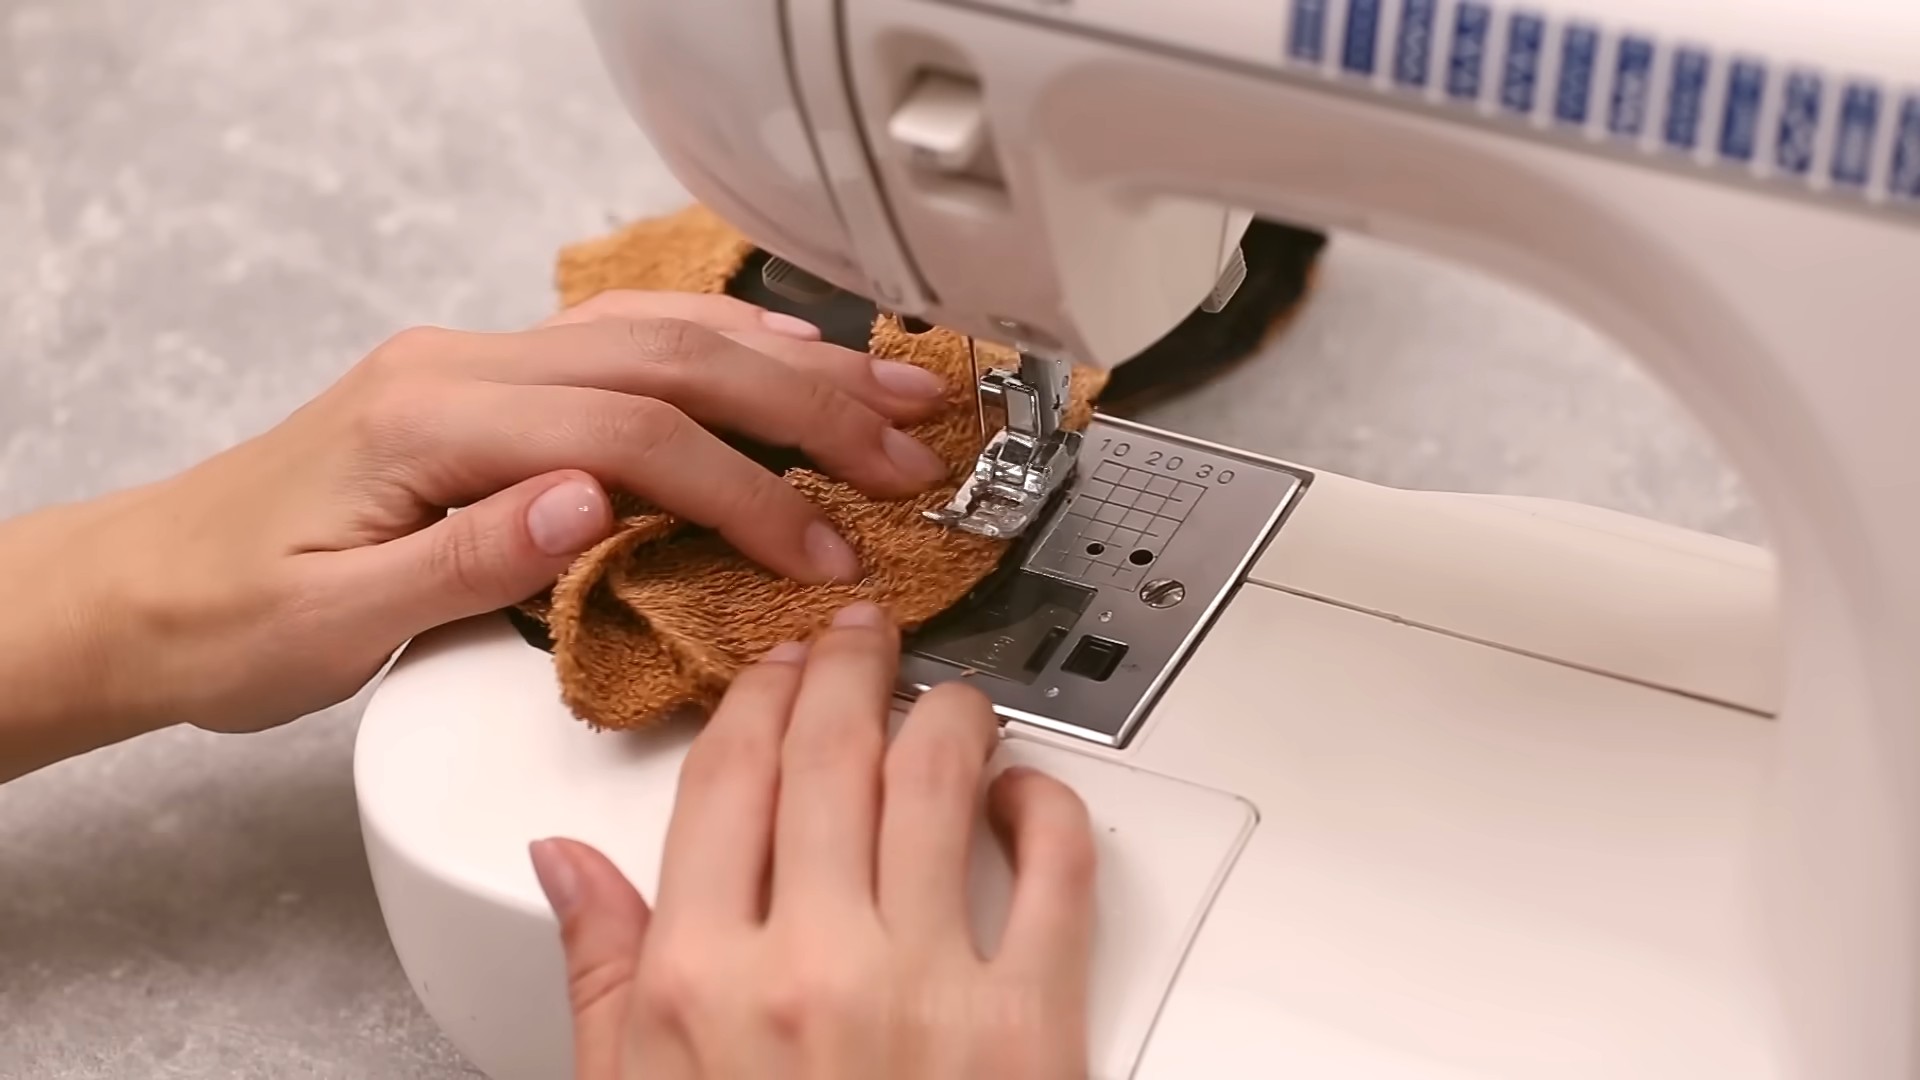
5. Attach the Upper Pieces to the Soles: This is where things get a little tricky. Center the sewn edge of the upper piece on top of the sole, with the right side of the upper piece facing up. Pin the upper piece to the sole, making sure the edges are aligned.
6. Sew the Upper Pieces to the Soles: Carefully sew the upper piece to the sole, about 1/4 inch (0.6 cm) from the edge. Go slowly and make sure the fabric stays aligned. You might need to use your fingers to guide the fabric as you sew around the curves.
7. Reinforce the Seams: For extra durability, sew a second line of stitching around the perimeter of the upper piece, close to the first line.
8. Trim Excess Fabric: Trim any excess fabric around the seams to create a clean finish.
Hand Sewing
1. Prepare the Soles: Stack two sole pieces together for each slipper. If you’re using non-slip material, place it on the bottom of the stack. Pin the layers together.
2. Sew the Soles: Using a running stitch or a back stitch, sew around the perimeter of the sole pieces, about 1/4 inch (0.6 cm) from the edge. Make sure your stitches are close together for a strong seam.
3. Prepare the Upper Pieces: Fold each upper piece in half lengthwise, with the right sides facing each other. Pin the folded edge.
4. Sew the Upper Pieces: Using a running stitch or a back stitch, sew along the folded edge of each upper piece, about 1/4 inch (0.6 cm) from the edge.
5. Attach the Upper Pieces to the Soles: Center the sewn edge of the upper piece on top of the sole, with the right side of the upper piece facing up. Pin the upper piece to the sole, making sure the edges are aligned.
6. Sew the Upper Pieces to the Soles: Carefully sew the upper piece to the sole using a whip stitch or a blanket stitch. These stitches will create a strong and decorative seam.
7. Reinforce the Seams: For extra durability, sew a second line of stitching around the perimeter of the upper piece, close to the first line.
8. Trim Excess Fabric: Trim any excess fabric around the seams to create a clean finish.
Adding Embellishments (Optional)
Now’s your chance to get creative and personalize your slippers!
* Buttons: Sew buttons onto the upper pieces for a cute and decorative touch.
* Ribbons: Add ribbons around the edges of the upper pieces or tie them into bows.
* Lace: Sew lace trim around the edges of the slippers for a delicate and feminine look.
* Embroidery: Embroider your initials or a fun design onto the upper pieces.
Final Touches
1. Check for Loose Threads: Trim any loose threads to prevent them from unraveling.
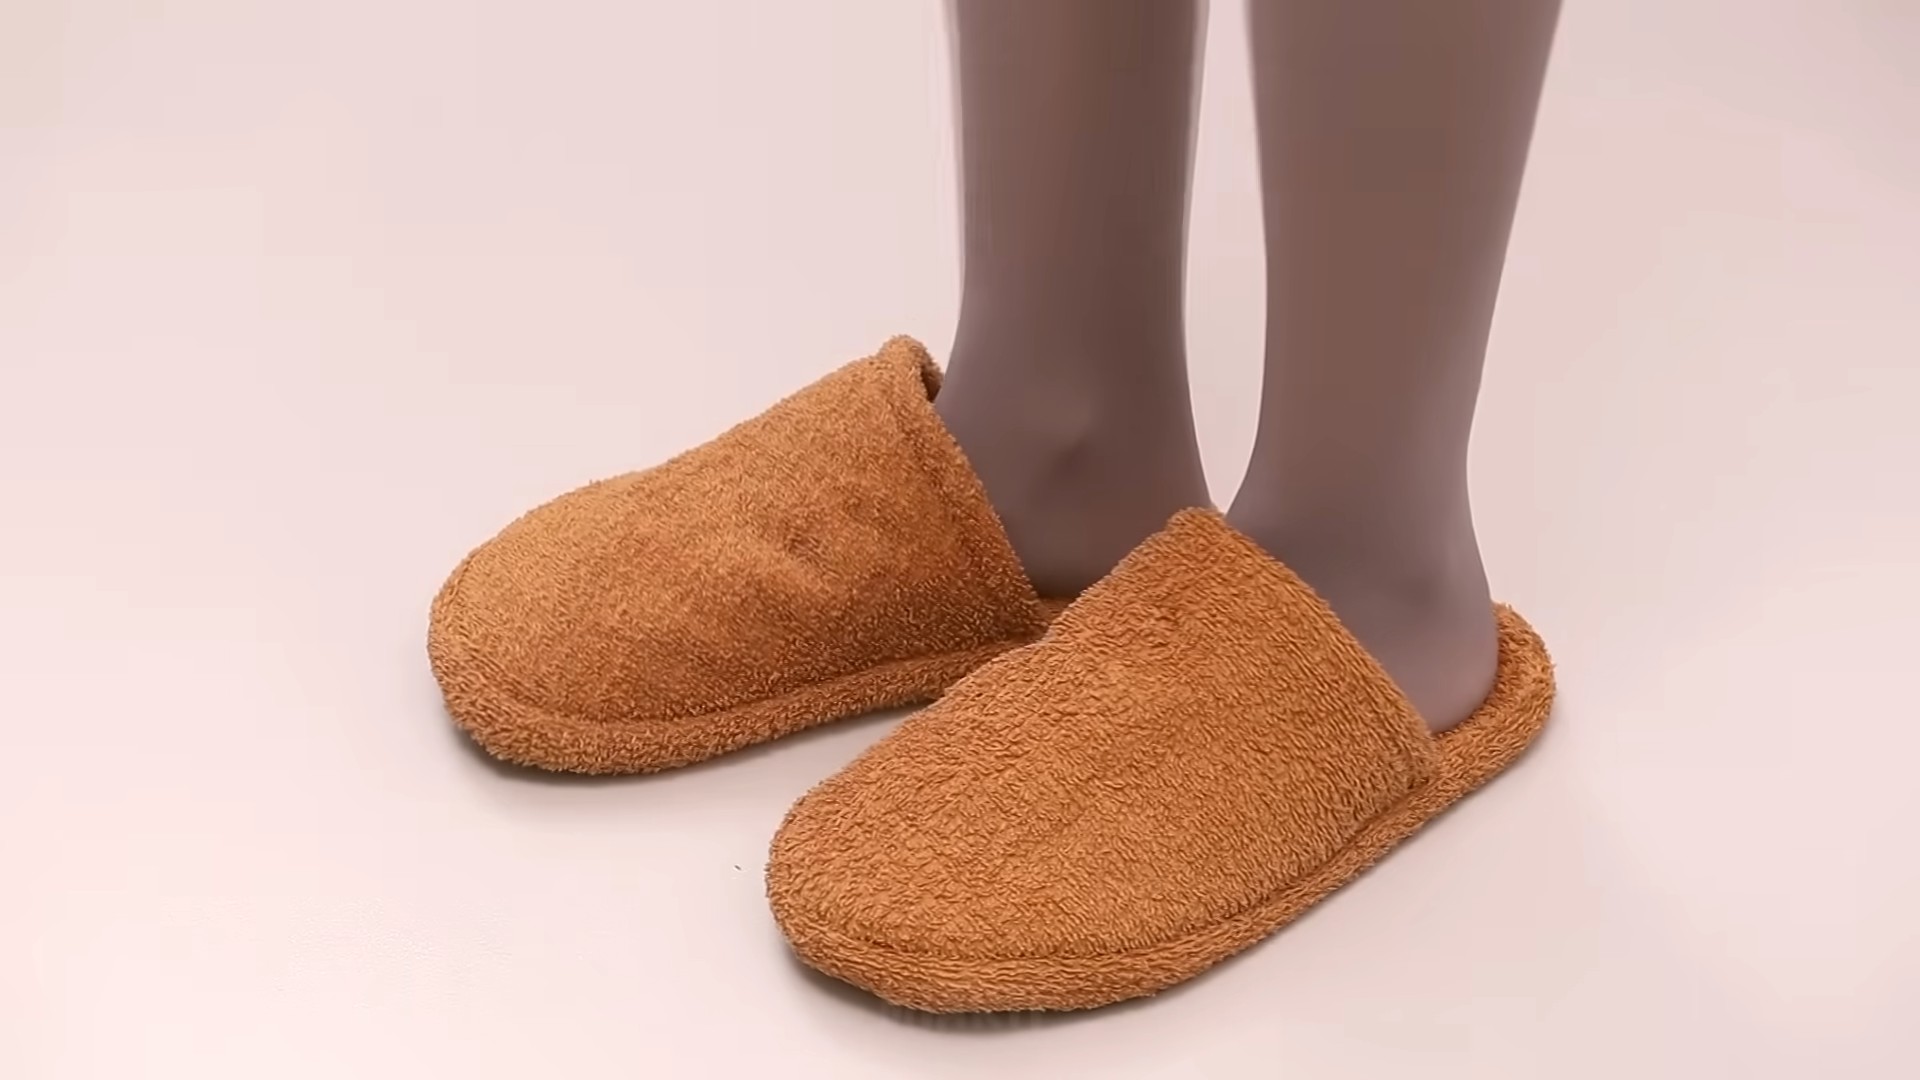
2. Try Them On: Slip on your new towel slippers and enjoy the cozy comfort!
And there you have it! Your very own pair of DIY towel slippers. I hope you enjoyed this project as much as I do. Now go ahead and make a pair for your friends and family – they’ll love you for it! Happy crafting!
Conclusion
So, there you have it! Transforming old towels into cozy, custom-fit slippers is not just a fun craft project; it’s a practical and sustainable way to give new life to something you might otherwise discard. The beauty of this DIY towel slippers project lies in its simplicity and adaptability. You don’t need to be a sewing expert to achieve fantastic results, and the satisfaction of creating something useful and comfortable with your own hands is incredibly rewarding.
Why is this a must-try? Because it’s economical, eco-friendly, and endlessly customizable. Think about it: you’re saving money by repurposing materials, reducing waste by keeping those towels out of landfills, and creating slippers that perfectly match your style and comfort preferences. Store-bought slippers often fall short in terms of fit and durability, but with this DIY approach, you’re in complete control.
Beyond the basic design, the possibilities for variation are truly endless. Want extra cushioning? Add a layer of fleece or memory foam to the sole. Prefer a more secure fit? Incorporate elastic around the ankle. Feeling creative? Embellish your slippers with embroidery, appliques, or even repurposed fabric scraps. You could even create themed slippers for holidays or special occasions! Imagine cozy Christmas slippers made from red and green towels, or fun, summery slippers adorned with beach-themed appliques.
Consider using different types of towels for different effects. A thick, plush bath towel will create incredibly soft and absorbent slippers, perfect for after a shower. A lighter-weight hand towel might be better suited for warmer weather. You can even combine different towels to create interesting textures and patterns.
Don’t be afraid to experiment with different sizes and shapes. Create slippers for the whole family, from tiny toddler sizes to extra-large adult sizes. You can even adapt the pattern to create different styles, such as open-toe slippers or slipper socks.
The environmental benefits are significant. By choosing to repurpose old towels, you’re actively reducing textile waste, which is a major contributor to pollution. The fashion industry is a significant polluter, and by embracing DIY projects like this, you’re taking a small but meaningful step towards a more sustainable lifestyle.
Moreover, this project is a fantastic way to teach children about resourcefulness and creativity. Involve them in the process of selecting materials, cutting out patterns, and decorating their own slippers. It’s a fun and educational activity that promotes problem-solving skills and fosters a sense of accomplishment.
So, what are you waiting for? Gather your old towels, dust off your sewing machine (or grab a needle and thread), and get ready to create your own pair of incredibly comfortable and stylish DIY towel slippers. We’re confident that you’ll love the process and the results.
We encourage you to try this DIY trick and share your experience with us! Post photos of your finished slippers on social media using #DIYTowelSlippers and tell us about your creative variations and any tips you discovered along the way. We can’t wait to see what you create! Let’s inspire others to embrace sustainable crafting and create cozy comfort from everyday materials. Your feedback and shared experiences will help others discover the joy and practicality of this simple yet rewarding project.
Frequently Asked Questions (FAQ)
What kind of towels work best for making DIY towel slippers?
The best towels for this project are those that are still in good condition but no longer suitable for their original purpose. This could include towels that are slightly worn, faded, or have minor stains. In terms of material, cotton towels are generally the most comfortable and absorbent. However, you can also use microfiber towels or even a blend of different materials. Thicker towels will provide more cushioning and warmth, while thinner towels will be more breathable. Experiment with different types of towels to find what works best for your preferences. Avoid using towels that are heavily damaged or have large holes, as these may not be strong enough to withstand the wear and tear of being used as slippers.
Do I need a sewing machine to make these slippers?
No, a sewing machine is not absolutely necessary, although it will definitely speed up the process and create a more durable finished product. You can easily hand-sew these slippers using a basic running stitch or backstitch. If you’re new to sewing, there are plenty of online tutorials that can teach you the basics. Hand-sewing is a great option if you don’t have access to a sewing machine or if you prefer a more relaxed and meditative crafting experience. Just be sure to use a strong thread and take your time to ensure that the seams are secure.
How do I determine the right size for my DIY towel slippers?
The easiest way to determine the right size is to trace your foot onto a piece of paper and add about an inch or two around the perimeter for seam allowance and wiggle room. You can then use this template to cut out the towel pieces for the sole of the slipper. For the upper part of the slipper, you can measure the circumference of your foot at the widest point and use that measurement to create a pattern that will comfortably cover your foot. It’s always better to err on the side of making the slippers slightly too large rather than too small, as you can always adjust the fit later. You can also find printable slipper patterns online that you can adapt to your specific foot size.
How can I make my DIY towel slippers more durable?
There are several ways to increase the durability of your DIY towel slippers. First, use a strong thread and reinforce the seams with multiple rows of stitching. Second, consider adding a non-slip sole to the bottom of the slippers. You can purchase non-slip fabric or rubber sheets at most craft stores and glue or sew them onto the soles. Third, use a thicker towel or add extra layers of fabric to the sole for added cushioning and support. Finally, avoid wearing your slippers in wet or dirty environments, as this can accelerate wear and tear.
Can I wash my DIY towel slippers?
Yes, you can generally wash your DIY towel slippers, but it’s important to take certain precautions to prevent damage. First, check the care instructions for the towels you used to make the slippers. If the towels are machine washable, you can usually wash the slippers on a gentle cycle with cold water. However, it’s best to air dry them to prevent shrinking or damage to any embellishments you may have added. If you’re unsure about whether your slippers are machine washable, it’s always best to hand wash them with a mild detergent.
What are some creative ways to decorate my DIY towel slippers?
The possibilities for decorating your DIY towel slippers are endless! You can use embroidery to add intricate designs, appliques to create fun and whimsical patterns, or fabric paint to personalize your slippers with your favorite colors and motifs. You can also add buttons, beads, sequins, or other embellishments to create a unique and eye-catching look. Consider using repurposed fabric scraps to add a touch of eco-friendly flair. You can even create themed slippers for holidays or special occasions. Let your imagination run wild and have fun experimenting with different decorating techniques!
How can I make these slippers non-slip?
Making your DIY towel slippers non-slip is crucial for safety, especially on smooth floors. Several options exist:
* Fabric Paint: Apply thick lines or dots of fabric paint to the soles. Once dry, this creates a textured surface.
* Puffy Paint: Similar to fabric paint, puffy paint adds a raised, grippy texture.
* Non-Slip Fabric: Purchase non-slip fabric (often used for rugs) and cut pieces to fit the soles. Sew or glue them securely.
* Rubber Soles: Repurpose rubber from old yoga mats, shoe soles, or even thick rubber gloves. Cut to size and attach with strong adhesive or stitching.
* Silicone Caulk: Apply small dots or lines of silicone caulk to the soles. Let it cure completely for a durable, non-slip surface.
Always test the non-slip properties on your floors before wearing the slippers regularly.
What if I don’t have enough of one towel to make a pair of slippers?
Don’t worry! You can easily mix and match different towels to create a unique and patchwork-style pair of slippers. Use different colored or patterned towels for the soles and uppers, or even combine smaller pieces of towels to create a quilted effect. This is a great way to use up scraps of fabric and add a personal touch to your slippers. Just make sure that the different towels are of similar thickness and texture to ensure a comfortable fit.
Can I make these slippers for children?
Absolutely! These DIY towel slippers are a fantastic project for children. Simply adjust the pattern to fit their smaller feet. Involve them in the process of choosing the towels, cutting out the patterns, and decorating their own slippers. This is a fun and educational activity that promotes creativity and resourcefulness. Make sure to supervise children closely when using scissors or sewing machines. You can also use child-safe glues and embellishments to avoid any potential hazards.
Leave a Comment