

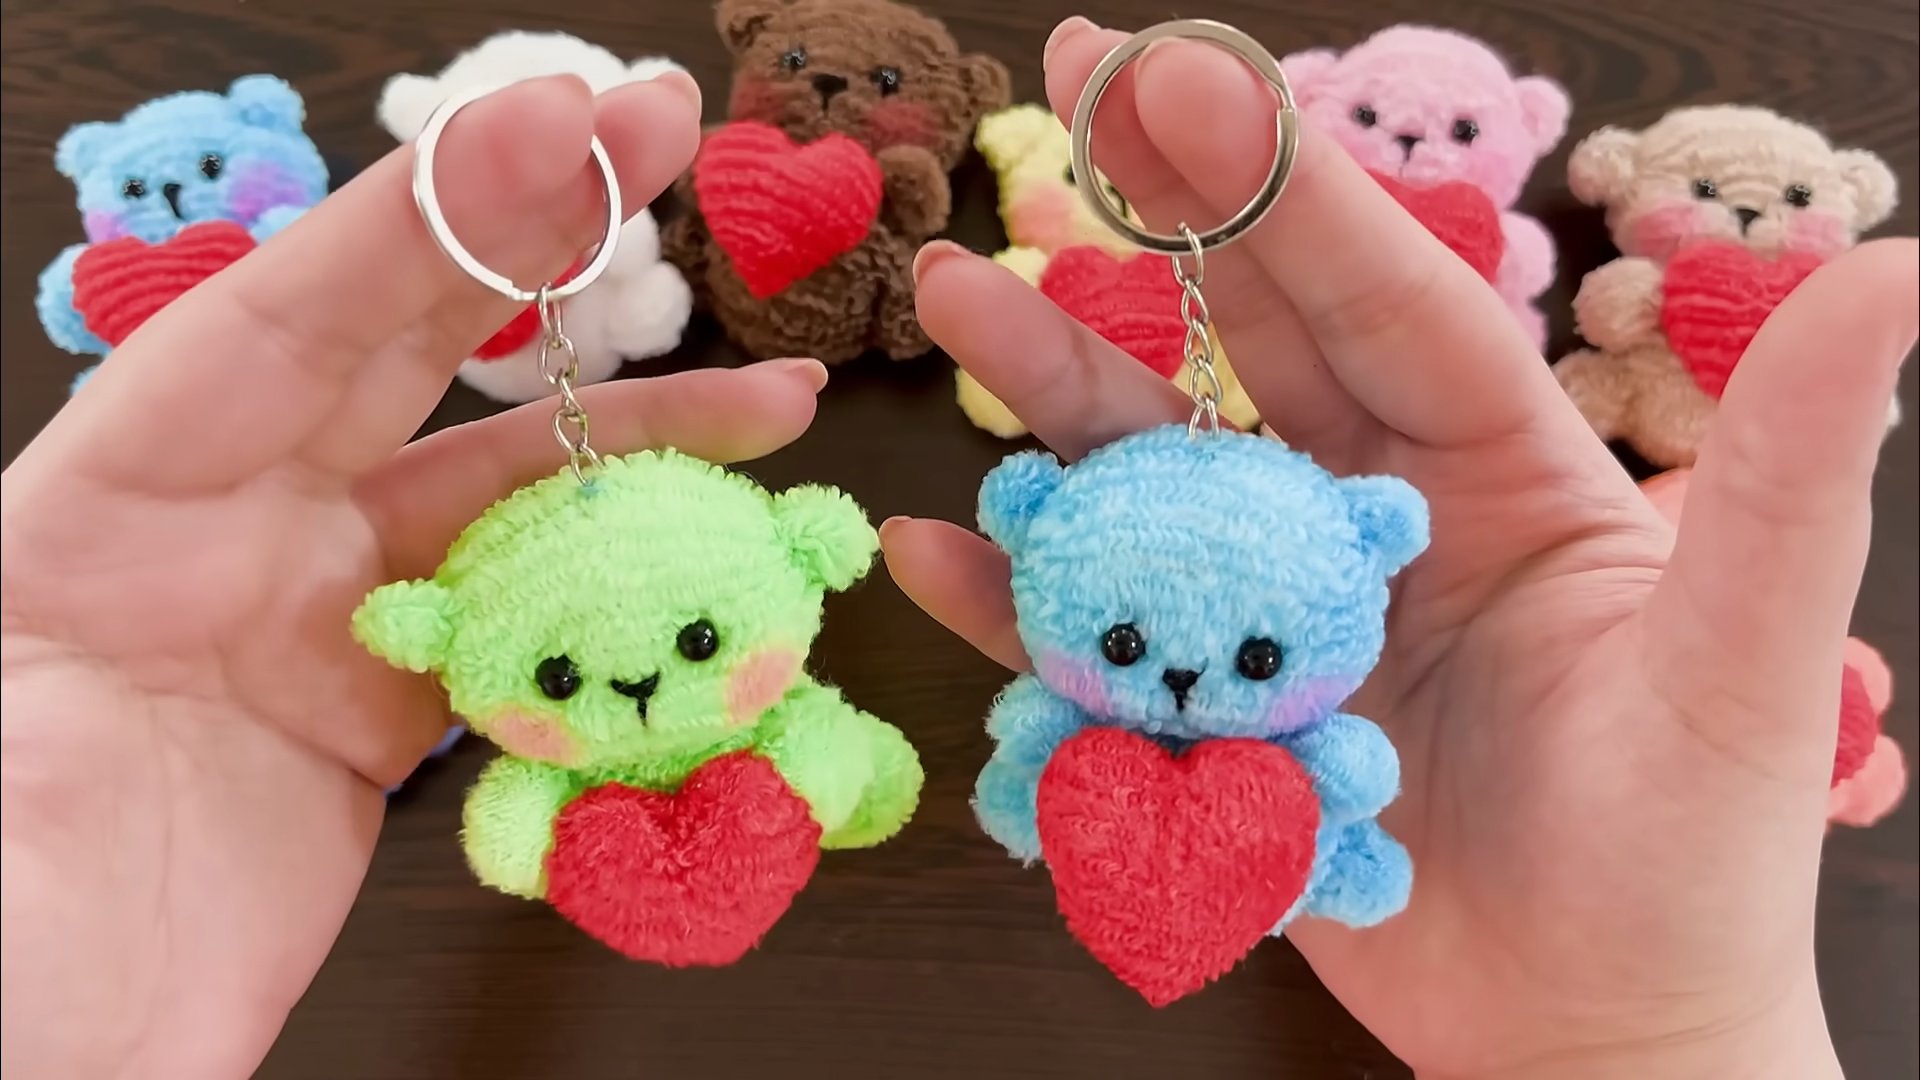
DIY Teddy Bear Keychain: Your Pocket-Sized Companion! Ever feel like you need a little dose of cuteness and comfort to brighten your day? I know I do! That’s why I’m so excited to share this adorable and surprisingly simple DIY project with you: creating your very own DIY Teddy Bear Keychain.
Keychains have been around for ages, evolving from simple ways to keep keys organized to personalized statements of style. Think about it – from ancient Roman key rings to the elaborate fobs of the Victorian era, keychains have always been more than just functional. They’re little pieces of history we carry with us. And what better way to add a touch of modern charm than with a miniature teddy bear?
In a world that often feels overwhelming, having a small, comforting reminder of joy can make a big difference. This DIY Teddy Bear Keychain is not only a fun craft project, but it’s also a fantastic way to personalize your belongings, create unique gifts for friends and family, or even use up those leftover fabric scraps you’ve been hoarding. Plus, who can resist the charm of a tiny, huggable bear dangling from their keys or bag? Let’s get crafting and bring a little bit of happiness wherever we go!
DIY Adorable Teddy Bear Keychain: A Step-by-Step Guide
Hey there, crafty friends! Ever wanted a super cute, personalized keychain? Well, today I’m going to show you how to make your very own adorable teddy bear keychain. It’s a fun project, perfect for using up scraps of fabric, and makes a fantastic gift! Let’s get started!
What You’ll Need
Before we dive in, let’s gather all the materials. This will make the process smoother and more enjoyable.
* Fabric Scraps: Felt is ideal because it doesn’t fray easily, but you can use any soft fabric you like – fleece, cotton, even old t-shirts! Choose colors that you love for the bear’s body, ears, and any accessories you want to add.
* Embroidery Floss: This is for stitching the bear together and adding details like the eyes, nose, and mouth. Pick colors that complement your fabric choices.
* Embroidery Needle: A sharp needle with a large eye will make threading the floss much easier.
* Scissors: You’ll need a good pair of scissors for cutting out the fabric pieces.
* Stuffing: Poly-fil stuffing is perfect for giving your teddy bear a plump and cuddly shape. You can also use cotton balls or fabric scraps if you’re trying to be extra resourceful.
* Keychain Ring: This is what will attach your teddy bear to your keys, bag, or zipper.
* Jump Ring (Optional): A small jump ring can be helpful for attaching the keychain ring to the teddy bear’s head.
* Pliers (Optional): If you’re using a jump ring, pliers will make it easier to open and close it securely.
* Pencil or Fabric Marker: For tracing the pattern onto your fabric.
* Paper for Pattern: To draw or print out your teddy bear pattern.
* Pins: To hold the fabric pieces together while you stitch.
* Beads or Buttons (Optional): For adding extra embellishments like eyes or a cute little bow.
Creating Your Teddy Bear Pattern
The first step is to create a pattern for your teddy bear. You can either draw your own or find a free template online. I’ll walk you through drawing a simple one.
1. Draw the Body: Start by drawing a basic teddy bear shape on a piece of paper. Think of a slightly rounded rectangle for the body, with a rounded bottom. The size is up to you, but I recommend something around 3-4 inches tall for a keychain.
2. Add the Head: Draw a circle or oval for the head, overlapping the top of the body. Make sure it’s proportional to the body size.
3. Draw the Ears: Add two small circles or semi-circles on top of the head for the ears.
4. Draw the Arms and Legs: Draw two arms and two legs extending from the sides and bottom of the body. Keep them simple and rounded.
5. Refine the Shape: Go over your drawing and refine the lines. Make sure everything is smooth and symmetrical.
6. Separate the Pieces: Now, trace the head, body, arms, legs, and ears onto separate pieces of paper. This will make it easier to cut them out and use them as templates.
7. Add Seam Allowance: Add a small seam allowance (about 1/4 inch) around each pattern piece. This is the extra fabric you’ll need for stitching.
Cutting Out the Fabric Pieces
Now that you have your pattern, it’s time to cut out the fabric pieces.
1. Pin the Pattern: Pin the paper pattern pieces onto your chosen fabric. Make sure the fabric is flat and smooth.
2. Cut Around the Pattern: Carefully cut around each pattern piece, following the lines. Use sharp scissors for clean cuts.
3. Repeat for Back Pieces: You’ll need two pieces for the body, two for the head, four for the arms, four for the legs, and four for the ears (two for each ear).
4. Organize Your Pieces: Keep your fabric pieces organized so you don’t lose any.
Sewing the Teddy Bear Together
This is where the magic happens! We’ll start by sewing the smaller pieces and then assemble the whole bear.
Sewing the Ears
1. Pin the Ear Pieces: Take two ear pieces and pin them together, right sides facing out.
2. Stitch Around the Edge: Using embroidery floss and a blanket stitch (or a simple running stitch if you prefer), stitch around the edge of the ear, leaving the bottom open.
3. Repeat for the Other Ear: Repeat the process for the other ear.
Sewing the Arms and Legs
1. Pin the Arm/Leg Pieces: Take two arm pieces (or leg pieces) and pin them together, right sides facing out.
2. Stitch Around the Edge: Stitch around the edge, leaving the top open.
3. Stuff Lightly: Lightly stuff the arm or leg with poly-fil. Don’t overstuff, or it will be difficult to attach to the body.
4. Repeat for the Other Arm and Legs: Repeat the process for the other arm and both legs.
Sewing the Head
1. Pin the Head Pieces: Pin the two head pieces together, right sides facing out.
2. Attach the Ears: Position the ears between the head pieces, with the open ends facing inwards. Pin them in place.
3. Stitch Around the Head: Stitch around the edge of the head, including the ears, leaving a small opening at the bottom for stuffing.
4. Stuff the Head: Stuff the head firmly with poly-fil.
5. Close the Opening: Stitch the opening closed.
Sewing the Body
1. Pin the Body Pieces: Pin the two body pieces together, right sides facing out.
2. Attach the Arms and Legs: Position the arms and legs between the body pieces, with the open ends facing inwards. Pin them in place.
3. Attach the Head: Position the head on top of the body, with the bottom of the head facing inwards. Pin it in place.
4. Stitch Around the Body: Stitch around the edge of the body, including the arms, legs, and head, leaving a small opening on the side for stuffing.
5. Stuff the Body: Stuff the body firmly with poly-fil.
6. Close the Opening: Stitch the opening closed.
Adding the Details
Now it’s time to bring your teddy bear to life with some adorable details!
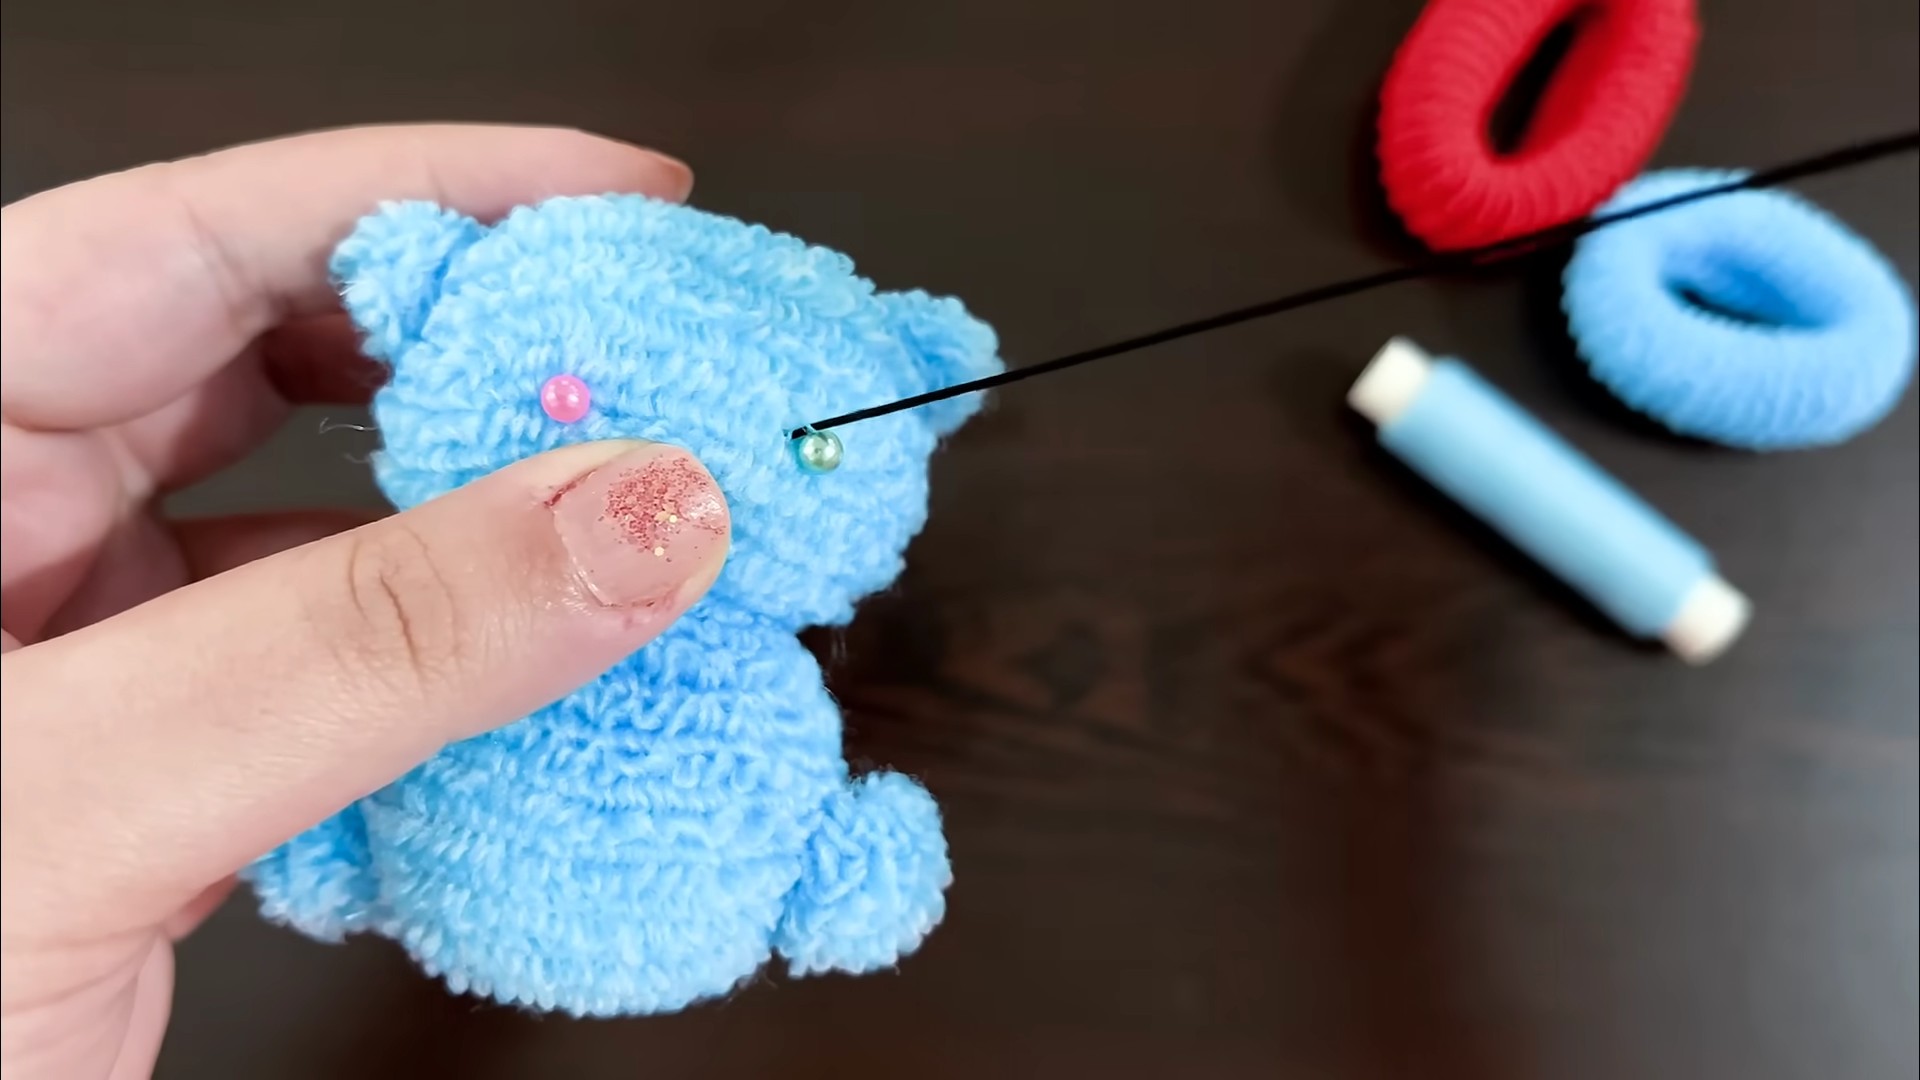
1. Embroider the Face: Use embroidery floss to stitch the eyes, nose, and mouth onto the teddy bear’s face. You can use simple stitches like a straight stitch or a satin stitch. If you’re using beads or buttons for the eyes, sew them on securely.
2. Add Accessories (Optional): Get creative and add any accessories you like! You can make a tiny bow out of ribbon and sew it onto the teddy bear’s head or neck. You can also add a small scarf or a little hat.
Attaching the Keychain
The final step is to attach the keychain ring so you can show off your adorable creation!
1. Find the Center: Locate the center top of the teddy bear’s head.
2. Attach the Jump Ring (Optional): If you’re using a jump ring, carefully open it with pliers and attach it to the top of the teddy bear’s head. Close the jump ring securely.
3. Attach the Keychain Ring: Attach the keychain ring to the jump ring (if you used one) or directly to the fabric at the top of the teddy bear’s head. Make sure it’s securely attached so your teddy bear doesn’t fall off your keys. You can use a few stitches to reinforce the attachment.
Final Touches
Give your teddy bear a final once-over. Trim any loose threads and make sure everything is securely attached. And there you have it – your very own adorable teddy bear keychain!
Tips and Tricks:
* Use contrasting colors: Using contrasting colors for the fabric and embroidery floss can make the details stand out more.
* Experiment with different fabrics: Don’t be afraid to experiment with different types of fabric to create different textures and looks.
* Add a personal touch: Personalize your teddy bear by adding initials or a small charm.
* Practice your stitches: If you’re new to embroidery, practice your stitches on a scrap piece of fabric before working on the teddy bear.
* Don’t be afraid to make mistakes: Everyone makes mistakes! If you mess up, just take a deep breath and try again. The most important
Conclusion
So, there you have it! Transforming a simple teddy bear into an adorable and personalized keychain is not only incredibly easy but also immensely rewarding. This DIY teddy bear keychain project is more than just a craft; it’s a chance to unleash your creativity, add a touch of whimsy to your everyday life, and create a unique accessory that reflects your personality.
Why is this a must-try? Because it’s accessible to everyone, regardless of crafting experience. It’s a fantastic way to repurpose old teddy bears that might otherwise be forgotten, giving them a new lease on life as charming companions on your keys, bags, or backpacks. Plus, the customization options are endless!
Think beyond the standard teddy bear. Consider using miniature plush animals of all kinds – bunnies, cats, dogs, even mythical creatures like unicorns or dragons! Experiment with different embellishments. Add tiny hats, bows, miniature backpacks, or even personalized tags with names or initials. Use different types of keychains – classic rings, lobster clasps, or even decorative carabiners. For a more durable finish, consider applying a fabric sealant to protect the fur and embellishments from wear and tear. You could even add a small bell for a delightful jingle!
If you’re feeling particularly adventurous, try creating a themed keychain. A beach-themed bear with miniature sunglasses and a tiny beach ball, a holiday-themed bear with a miniature Santa hat and a tiny gift, or a sports-themed bear with a miniature jersey and a tiny ball. The possibilities are truly limitless.
This DIY project is also a wonderful activity to do with children. It’s a fun and engaging way to spend quality time together, fostering creativity and teaching basic crafting skills. Imagine the joy on their faces as they transform their beloved teddy bears into personalized keychains they can proudly display.
But the best part? You’ll have a unique and eye-catching accessory that’s sure to spark conversations and bring a smile to your face every time you see it. It’s a small detail that can make a big difference, adding a touch of personality and charm to your everyday routine.
We wholeheartedly encourage you to give this DIY teddy bear keychain project a try. It’s a simple, affordable, and incredibly satisfying way to express your creativity and create something truly special. Don’t be afraid to experiment, personalize, and make it your own.
And most importantly, we want to hear about your experience! Share your creations with us on social media using #DIYTeddyBearKeychain. We can’t wait to see your unique and adorable teddy bear keychains! Let’s inspire each other and spread the joy of crafting!
Frequently Asked Questions (FAQ)
What kind of teddy bear is best for making a keychain?
The best type of teddy bear for a keychain is one that is relatively small and lightweight. A bear that is too large or heavy will be cumbersome to carry around on your keys or bag. Look for bears that are around 4-6 inches in height. The material of the bear doesn’t matter as much, but a bear with shorter fur might be easier to work with. Avoid bears with delicate embellishments that might easily fall off. Pre-loved teddy bears are perfect for this project, giving them a new purpose!
What kind of keychain hardware should I use?
There are several options for keychain hardware. A standard split ring is a classic and reliable choice. Lobster clasps are great for attaching the keychain to bags or zippers. Carabiner clips offer a more rugged and sporty look. Consider the size and weight of your teddy bear when choosing the hardware. A larger bear might require a sturdier ring or clip. You can find keychain hardware at most craft stores or online retailers. Make sure the hardware is made of durable metal to withstand daily use.
How do I attach the keychain to the teddy bear securely?
The most secure way to attach the keychain to the teddy bear is to use a needle and thread to sew it directly onto the bear’s body. Choose a strong thread that matches the color of the bear’s fur. Sew the keychain ring or clasp to a sturdy part of the bear, such as the back of the neck or the top of the head. Reinforce the stitching by going over it several times. You can also use a small amount of fabric glue to further secure the keychain. Avoid attaching the keychain to limbs or other delicate parts of the bear, as they are more likely to tear.
Can I use hot glue instead of sewing?
While hot glue can be used to attach the keychain, it is not as durable as sewing. Hot glue can become brittle over time and may eventually detach, especially with frequent use. If you choose to use hot glue, make sure to use a high-quality glue and apply it generously to both the keychain and the bear. Allow the glue to cool completely before using the keychain. For a more secure hold, consider using a combination of hot glue and sewing. Use the hot glue to initially position the keychain and then sew it in place for added strength.
How can I personalize my teddy bear keychain?
There are countless ways to personalize your teddy bear keychain! You can add miniature accessories such as hats, bows, scarves, or glasses. Use fabric markers to draw designs or write names on the bear’s fur. Attach small charms or beads to the keychain ring. Create a miniature outfit for the bear using scraps of fabric. You can even embroider a design onto the bear’s belly. Get creative and let your imagination run wild! Consider the recipient’s interests and hobbies when personalizing the keychain.
How do I clean my teddy bear keychain?
To clean your teddy bear keychain, gently spot clean it with a damp cloth and mild soap. Avoid submerging the entire keychain in water, as this can damage the stuffing and embellishments. Use a soft brush to remove any dirt or debris from the fur. Allow the keychain to air dry completely before using it. For stubborn stains, you can try using a fabric stain remover, but be sure to test it on a small, inconspicuous area first. To prevent your keychain from getting dirty, store it in a clean and dry place when not in use.
Is this project suitable for children?
This project can be suitable for children with adult supervision. Younger children may need help with the sewing and gluing steps. Make sure to use child-safe materials and tools. This is a great opportunity to teach children basic crafting skills and encourage their creativity. Adapt the project to the child’s skill level by simplifying the steps or providing pre-cut materials. Always supervise children when using needles, scissors, or hot glue guns.
What if I don’t have a teddy bear?
If you don’t have a teddy bear, you can use any small plush animal or even create your own! You can find inexpensive plush animals at thrift stores, dollar stores, or online retailers. If you’re feeling ambitious, you can sew your own teddy bear using a pattern and some fabric scraps. There are many free teddy bear patterns available online. This is a great way to create a truly unique and personalized keychain.
How do I make the keychain more durable?
To make your teddy bear keychain more durable, use high-quality materials and construction techniques. Choose a strong thread and reinforce the stitching. Use a durable keychain ring or clasp. Apply a fabric sealant to protect the fur and embellishments from wear and tear. Avoid exposing the keychain to harsh chemicals or extreme temperatures. Store the keychain in a safe place when not in use. Regularly inspect the keychain for any signs of damage and repair them promptly.
Can I sell these DIY teddy bear keychains?
Yes, you can sell these DIY teddy bear keychains! They make great gifts and are popular items at craft fairs and online marketplaces. Be sure to price your keychains appropriately, taking into account the cost of materials and your time. You may also need to obtain any necessary permits or licenses to sell your products. Consider creating a unique brand and packaging for your keychains to make them stand out from the competition.
Leave a Comment