

DIY Teacher’s Day Card: Show your appreciation with a heartfelt, handmade creation! Let’s be honest, finding the perfect gift for your favorite teacher can be a real head-scratcher. Store-bought cards often feel impersonal, lacking that special touch that truly conveys your gratitude. But fear not, because this article is packed with inspiring and easy-to-follow DIY Teacher’s Day card ideas that will make your teacher feel truly valued.
The tradition of celebrating teachers dates back centuries, with roots in ancient civilizations that recognized the profound impact educators have on shaping future generations. From simple tokens of appreciation to elaborate ceremonies, expressing gratitude to teachers has always been a vital part of many cultures. In modern times, Teacher’s Day provides a dedicated opportunity to acknowledge their hard work and dedication.
Why settle for a generic card when you can craft a unique masterpiece? I believe that a DIY Teacher’s Day card is more than just a piece of paper; it’s a tangible expression of your thoughtfulness and creativity. It’s a way to personalize your message and create a lasting memory for your teacher. Plus, it’s a fun and rewarding project that you can enjoy! So, grab your craft supplies, unleash your inner artist, and let’s create some unforgettable Teacher’s Day cards together!
DIY Teacher’s Day Card: A Heartfelt Handmade Gift
Okay, let’s get crafty! Teacher’s Day is around the corner, and what better way to show your appreciation than with a handmade card? Forget store-bought ones; a DIY card is personal, thoughtful, and shows you put in the effort. This guide will walk you through creating a beautiful and unique Teacher’s Day card that your teacher will cherish. I’m going to show you how to make a pop-up apple card – it’s surprisingly easy and super impressive!
Materials You’ll Need
Before we dive in, let’s gather our supplies. Don’t worry, you probably have most of these lying around already!
* Cardstock: Red, green, white (or cream), and any color you like for the card base. I recommend heavier cardstock for durability.
* Scissors: A good pair of scissors is essential for clean cuts.
* Craft Knife (Optional): This is helpful for more intricate cuts, but not strictly necessary.
* Glue Stick: A glue stick is less messy than liquid glue and dries quickly.
* Ruler: For accurate measurements and straight lines.
* Pencil: For sketching and marking.
* Eraser: For correcting mistakes.
* Markers or Colored Pencils: For adding details and personal touches.
* Double-Sided Tape (Optional): For extra secure adhesion.
* Embellishments (Optional): Stickers, glitter, ribbon, buttons – anything to add some sparkle!
* Cutting Mat (If using a craft knife): Protect your work surface!
Creating the Card Base
First things first, we need a foundation for our masterpiece.
1. Cut the Card Base: Take your chosen cardstock color for the base and cut it to your desired size. I usually go for a standard A2 size (5.5 x 4.25 inches when folded), so I cut a piece of cardstock to 8.5 x 5.5 inches.
2. Score the Card Base: Use a ruler and a scoring tool (or the blunt edge of your scissors) to score the cardstock at the 4.25-inch mark. This will create a clean fold.
3. Fold the Card Base: Carefully fold the cardstock along the scored line to create the card base. Crease it firmly for a professional look.
Making the Pop-Up Apple
This is where the magic happens! Don’t be intimidated; it’s easier than it looks.
1. Cut the Apple Shape: On your red cardstock, draw or trace an apple shape. You can find templates online if you’re not confident drawing freehand. The size will depend on the size of your card, but I usually aim for about 3 inches in height. Cut out the apple shape.
2. Create the Pop-Up Mechanism: This is the key to the pop-up effect.
* Fold the Apple in Half: Gently fold the apple in half vertically, making a crease down the center.
* Make the Cuts: Now, unfold the apple. Along the center crease, make two parallel cuts. The length of these cuts will determine how far the apple pops out. I usually make them about 1 inch long and about 1/2 inch apart.
* Push the Fold Out: Gently push the section between the two cuts forward, creating a small “box” or platform. This is what will make the apple pop up.
3. Add the Leaf and Stem:
* Cut the Leaf: On your green cardstock, cut out a small leaf shape.
* Cut the Stem: On brown or black cardstock, cut out a tiny stem shape.
* Attach the Leaf and Stem: Glue the leaf and stem to the top of the apple.
Assembling the Card
Now, let’s put everything together!
1. Position the Pop-Up Apple: Open your card base. Carefully position the folded apple inside the card, aligning the center crease of the apple with the center crease of the card.
2. Glue the Apple in Place: Apply glue to the two outer sections of the apple (the parts that are *not* the pop-up “box”). Carefully press these sections onto the inside of the card, ensuring the apple is centered and aligned.
3. Test the Pop-Up: Gently close and open the card to test the pop-up mechanism. The apple should pop up smoothly when the card is opened. If it doesn’t, double-check that the cuts are deep enough and that the “box” is properly formed.
Adding Details and Personalization
This is where you can really let your creativity shine!
1. Add a Background (Optional): You can add a background to the inside of the card to make the apple stand out even more. Cut a piece of white or cream cardstock slightly smaller than the inside of the card and glue it in place.
2. Write a Message: Write a heartfelt message to your teacher. You can write it directly on the card or on a separate piece of paper and glue it in place. Some ideas include:
* “Thank you for being an amazing teacher!”
* “Happy Teacher’s Day! You’re the best!”
* “I appreciate everything you do.”
* “You’ve made a real difference in my life.”
3. Add Embellishments: Now, let’s add some sparkle!
* Stickers: Add some cute stickers related to school, apples, or anything your teacher likes.
* Glitter: A little glitter can add a touch of magic. Be careful not to use too much!
* Ribbon: Tie a small ribbon around the card for a festive touch.
* Buttons: Glue small buttons to the card for a fun and quirky look.
* Drawings: Add your own drawings or doodles to personalize the card even further.
4. Consider a “Worm” Detail: For a playful touch, draw a tiny worm peeking out of the apple! This adds a bit of humor and makes the card even more memorable.
Alternative Apple Design: Layered Apple
If you want a slightly different look, you can create a layered apple instead of the pop-up version.
1. Cut Multiple Apple Shapes: Cut out several apple shapes from red cardstock, each slightly smaller than the last.
2. Layer the Apples: Glue the apple shapes on top of each other, starting with the largest and ending with the smallest. This will create a 3D layered effect.
3. Add Details: Add a leaf and stem as before. You can also add details like seeds using a black marker.
4. Attach to the Card: Glue the layered apple to the front of your card.
Tips and Tricks for a Perfect Card
* Use High-Quality Materials: Using good quality cardstock and glue will make your card look more professional and last longer.
* Plan Your Design: Before you start cutting and gluing, sketch out your design on a piece of paper. This will help you visualize the finished product and avoid mistakes.
* Take Your Time: Don’t rush the process. Take your time and pay attention to detail.
* Don’t Be Afraid to Experiment: This is your card, so don’t be afraid to experiment with different colors, materials, and techniques.
* Personalize It: The most important thing is to make the card personal and heartfelt. Write a message that comes from the heart and reflects your appreciation for your teacher.
* Practice Makes Perfect: If you’re not happy with your first attempt, don’t give up! Practice makes perfect.
* Clean Up As You Go: Keep your workspace clean and organized to avoid messes and distractions.
* Let Glue Dry Completely: Before handling the card, make sure all the glue is completely dry to prevent smudging or tearing.
* Consider Your Teacher’s Style: Think about your teacher’s personality and style when designing the card. Do they prefer simple and elegant designs, or something more colorful and playful?
* Add a Photo: If you have a photo of yourself with your teacher, you can add it to the card for an extra personal touch.
Beyond the Apple: Other Teacher’s Day Card Ideas
While the pop-up apple is a classic, there are tons of other creative Teacher’s Day card ideas you can try!
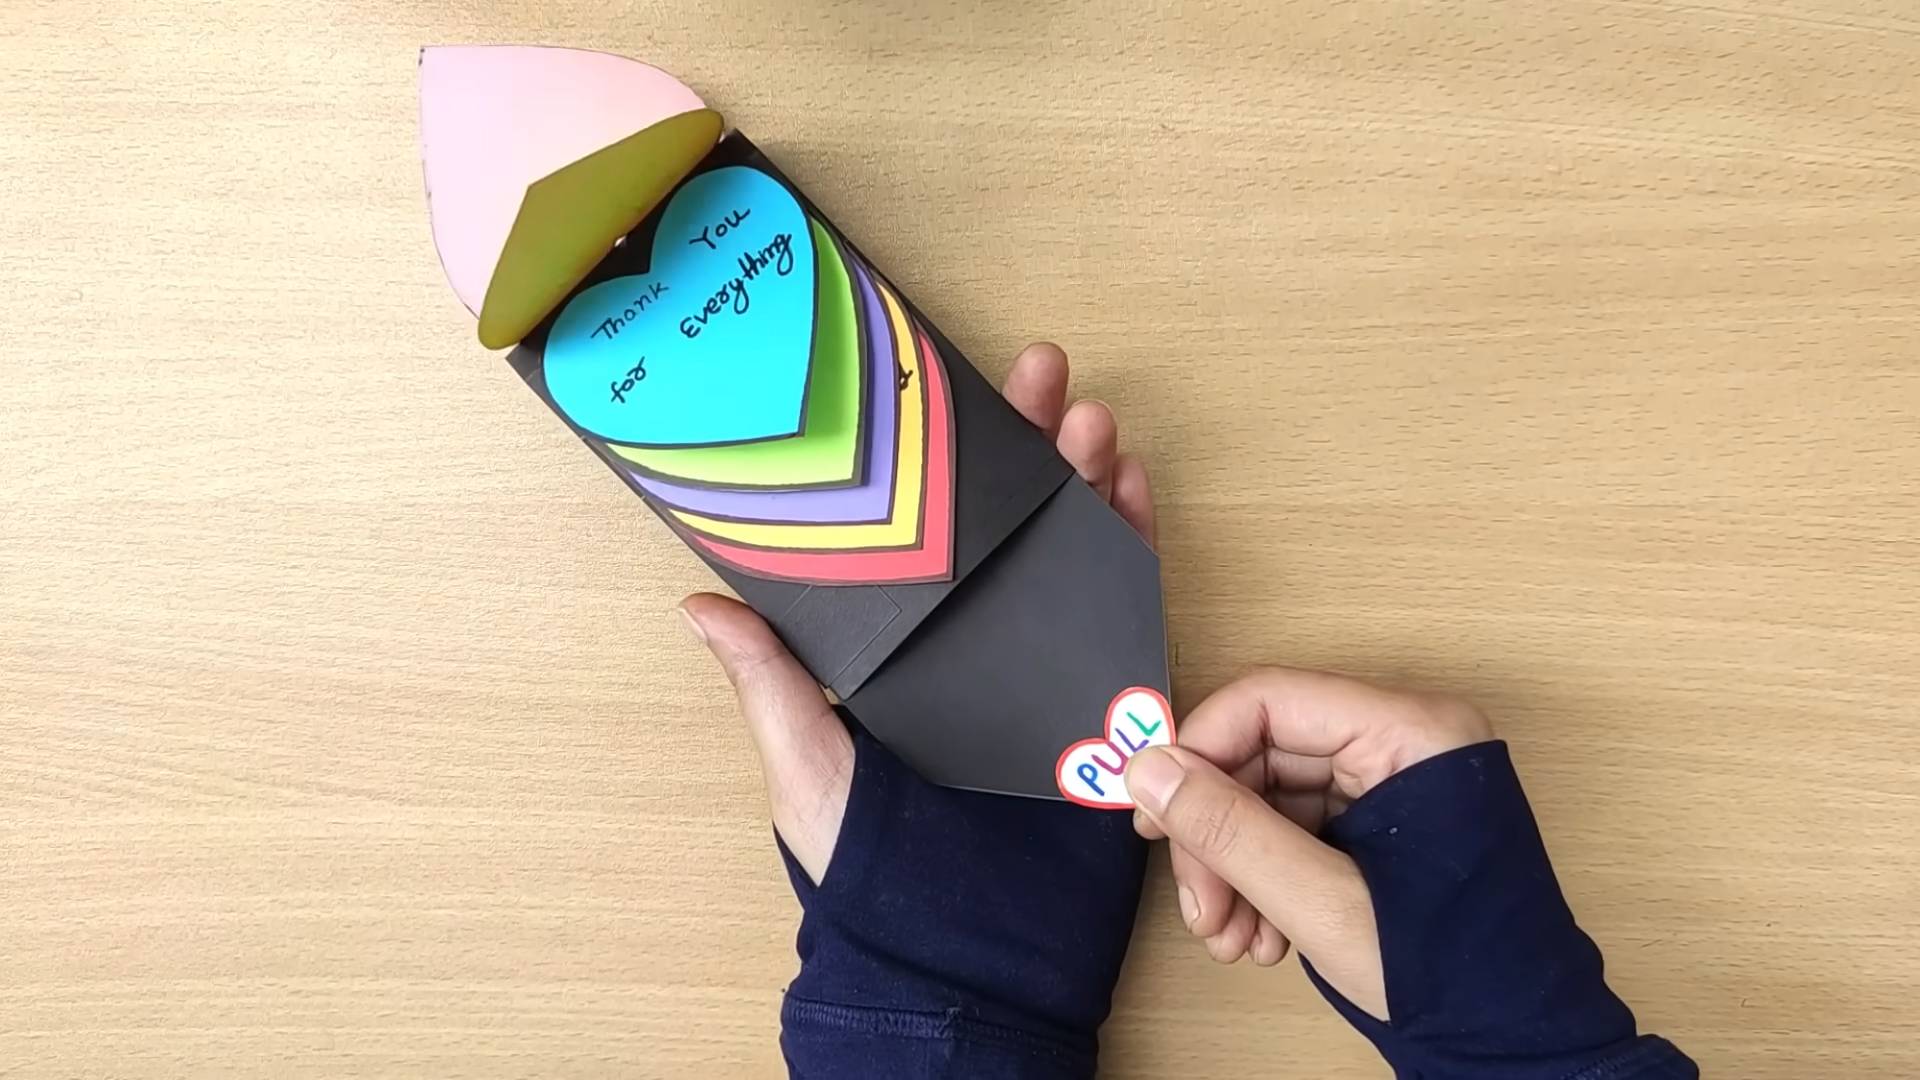
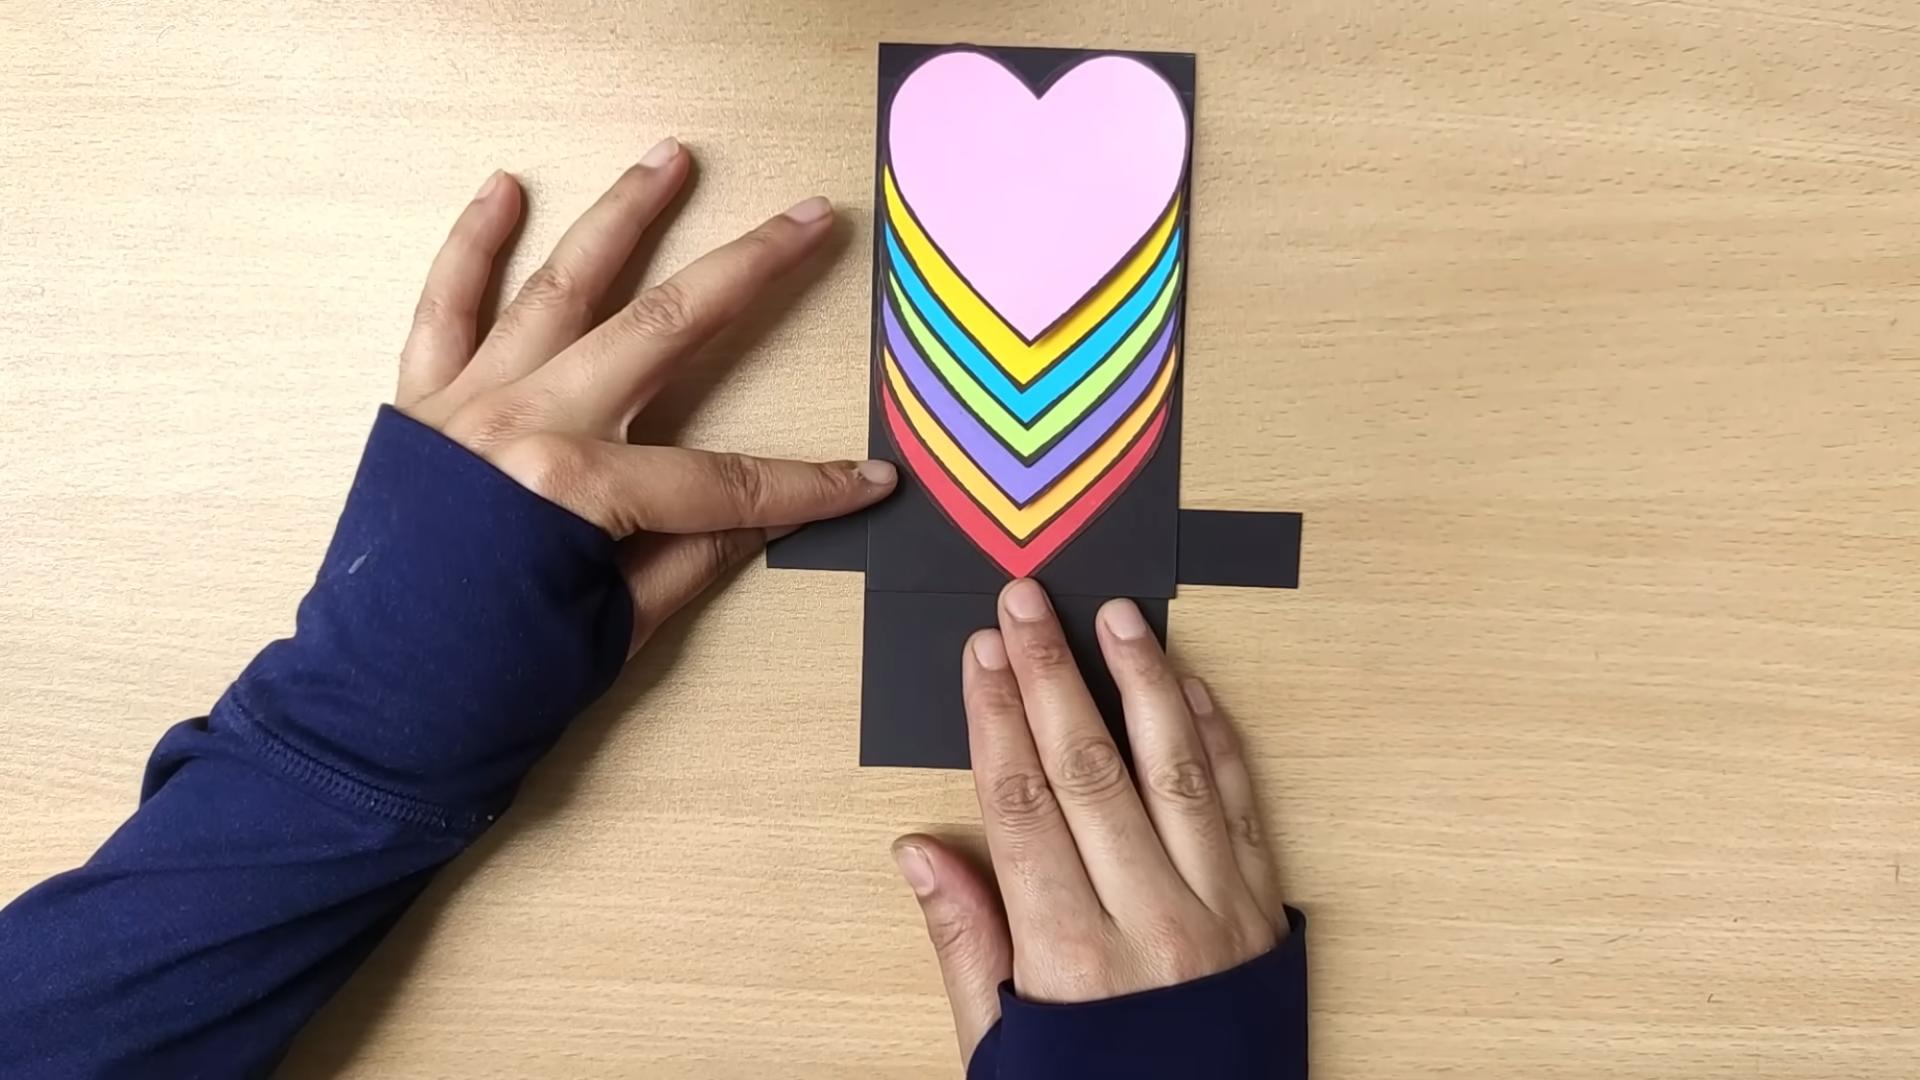
* Pencil Card: Create a card shaped like a pencil using yellow, pink, and black cardstock.
* Book Card: Make a card that looks like a miniature book, complete with a title and author.
* Chalkboard Card: Use black cardstock
Conclusion
Creating a heartfelt, personalized gift doesn’t have to break the bank or require advanced crafting skills. This DIY Teacher’s Day card project is a testament to that. It’s more than just a piece of paper; it’s a tangible expression of gratitude, a unique keepsake that your teacher will cherish for years to come. In a world saturated with generic, store-bought presents, a handmade card stands out, conveying a level of thoughtfulness and effort that truly resonates.
Why is this DIY Teacher’s Day card a must-try? Because it allows you to infuse your personality and appreciation into every fold, every color, and every carefully chosen word. It’s an opportunity to reflect on the impact your teacher has had on your life and translate those feelings into a beautiful, lasting tribute. The act of creating something with your own hands is inherently rewarding, and knowing that you’re giving a gift made with love makes it even more special.
But the beauty of this project lies in its adaptability. Feel free to experiment with different materials. Instead of construction paper, consider using cardstock for a more durable feel, or even recycled materials for an eco-friendly touch. Incorporate pressed flowers, glitter, or small embellishments to add visual interest. The possibilities are endless!
Consider these variations to personalize your DIY Teacher’s Day card even further:
* Theme it to their subject: If your teacher is a science enthusiast, incorporate elements like beakers or atoms into the design. For a literature teacher, consider using quotes from their favorite books.
* Add a personal touch: Include a photo of you and your teacher, or a drawing that represents a shared memory.
* Make it interactive: Create a pop-up card or a card with a hidden message.
* Involve others: If you’re creating the card as a class, have each student contribute a small drawing or message.
Ultimately, the goal is to create a card that reflects your unique relationship with your teacher and expresses your sincere appreciation for their hard work and dedication. Don’t be afraid to get creative and have fun with it!
We wholeheartedly encourage you to try this DIY Teacher’s Day card project. It’s a simple yet meaningful way to show your teacher how much you care. And once you’ve created your masterpiece, we’d love to see it! Share your creations with us on social media using #DIYTeachersDayCard. We can’t wait to see the amazing cards you come up with and hear about the joy it brings to your teachers. Let’s spread some handmade happiness this Teacher’s Day!
Frequently Asked Questions (FAQ)
What kind of paper is best for making a DIY Teacher’s Day card?
The best type of paper depends on the look and feel you’re going for. Construction paper is a budget-friendly option that’s readily available and comes in a wide range of colors. However, it can be a bit flimsy. Cardstock is a thicker, more durable option that will give your card a more professional look. Watercolor paper is a great choice if you plan on using watercolors or other wet media. Recycled paper is an eco-friendly option that adds a unique touch. Ultimately, the choice is yours! Consider the overall design and the materials you’ll be using when making your decision.
What if I’m not very artistic? Can I still make a good-looking card?
Absolutely! You don’t need to be a professional artist to create a beautiful and heartfelt card. Focus on simple designs and techniques. Stencils, stamps, and pre-made embellishments can be your best friends. You can also find plenty of free printable templates online that you can use as a starting point. Remember, the most important thing is the message you write inside. A sincere and heartfelt message will always trump a perfectly executed design. Don’t be afraid to embrace imperfections; they add character and charm to your handmade card.
What kind of message should I write inside the card?
The message should be personal and heartfelt. Start by thanking your teacher for their hard work and dedication. Mention something specific that you appreciate about them, such as their teaching style, their patience, or their ability to make learning fun. Share a positive memory or anecdote from their class. Express your gratitude for their impact on your life. Keep it concise and genuine. A simple “Thank you for being an amazing teacher” can go a long way.
Can I make this card with younger children?
Yes, this project can easily be adapted for younger children. Simplify the design and focus on activities that they can easily participate in, such as coloring, stamping, or gluing pre-cut shapes. Provide plenty of supervision and assistance. Let them express their creativity and don’t worry too much about perfection. The goal is to have fun and create a meaningful gift together.
Where can I find inspiration for my DIY Teacher’s Day card?
The internet is a treasure trove of inspiration! Search for “DIY Teacher’s Day card ideas” on Pinterest, Google Images, or YouTube. Look for tutorials and examples that match your skill level and the materials you have on hand. Don’t be afraid to adapt ideas and put your own spin on them. You can also find inspiration in everyday objects, such as nature, patterns, or colors.
What if I don’t have all the materials listed?
Don’t worry! Get creative and use what you have on hand. Substitute materials as needed. For example, if you don’t have construction paper, you can use printer paper or even newspaper. If you don’t have glitter, you can use sequins or small beads. The key is to be resourceful and make the most of what you have.
How can I make my card more durable?
To make your card more durable, use thicker paper, such as cardstock. You can also laminate the card or cover it with clear contact paper. Reinforce the folds with tape or glue. If you’re using embellishments, make sure they are securely attached.
Is it appropriate to give a gift card along with the DIY card?
Yes, a gift card is a thoughtful addition to your DIY card. Choose a gift card that aligns with your teacher’s interests or hobbies. A gift card to a local bookstore, coffee shop, or craft store is always a good option. However, remember that the DIY card is the main gift, and the gift card is just a small token of appreciation. The heartfelt message in your card will mean more than any monetary value.
How far in advance should I start making the card?
It’s best to start making the card a few days before Teacher’s Day to avoid feeling rushed. This will give you plenty of time to gather your materials, brainstorm ideas, and create your masterpiece. If you’re making the card with children, allow even more time.
What if my teacher has multiple students? Will my card still stand out?
Yes, your card will still stand out because it’s handmade and personalized. The fact that you took the time and effort to create something special will be appreciated, regardless of how many other students give cards. Focus on creating a heartfelt message and a unique design that reflects your appreciation for your teacher. The personal touch is what makes a DIY card so special.

Leave a Comment