

DIY Soda Can Crafts: Unleash your inner artist and eco-warrior! Ever look at a pile of empty soda cans and think, “There has to be more to life than the recycling bin?” I know I have! Well, you’re in the right place. This isn’t just about crafting; it’s about transforming everyday waste into something beautiful and functional.
For centuries, humans have found creative ways to repurpose materials. Think of the ancient art of mosaics, using broken pottery to create stunning visuals. While soda cans might not have the same historical gravitas, the spirit of resourcefulness is the same. In many cultures, frugality and ingenuity are highly valued, and what better way to embody those values than with some clever DIY soda can crafts?
In today’s world, where sustainability is more important than ever, finding ways to reduce our environmental footprint is crucial. Plus, let’s be honest, crafting is therapeutic! These DIY projects are perfect for anyone looking to add a personal touch to their home decor, create unique gifts, or simply unwind after a long day. I’m going to show you some amazing tricks and hacks that will turn those discarded cans into stunning creations. Get ready to be amazed at what you can create!
Upcycling Magic: Turning Soda Cans into Stunning DIY Decorations
Hey there, fellow crafters! Ever look at a pile of empty soda cans and think, “There has to be something more I can do with these?” Well, you’re in the right place! I’m going to show you how to transform those aluminum cylinders into beautiful and unique decorations. Get ready to unleash your inner artist and give those cans a second life!
What You’ll Need: The Essential Toolkit
Before we dive in, let’s gather our supplies. Having everything ready will make the process smooth and enjoyable.
* Empty Soda Cans: Obviously! Make sure they’re clean and dry. The number you need will depend on the project you choose.
* Scissors or Craft Knife: For cutting the aluminum. A craft knife is great for intricate details, but scissors work well for larger cuts.
* Cutting Mat: Protect your work surface!
* Ruler or Measuring Tape: Precision is key for some projects.
* Pencil or Marker: For marking your cuts and designs.
* Pliers (Optional): Helpful for bending and shaping the aluminum, especially for more complex designs. Needle-nose pliers are particularly useful.
* Sandpaper (Fine Grit): To smooth out any sharp edges. Safety first!
* Glue Gun and Glue Sticks: For assembling your creations. Low-temp glue guns are recommended for safety.
* Acrylic Paints: To add color and personality to your projects.
* Paintbrushes: A variety of sizes will be useful.
* Clear Acrylic Sealer: To protect your paint and give your creations a professional finish.
* Safety Glasses: Protect your eyes from flying debris when cutting.
* Gloves: Protect your hands from sharp edges.
* Optional Embellishments: Beads, glitter, sequins, buttons, wire – let your creativity run wild!
Project 1: Soda Can Flowers – Blooming Beauty
These flowers are surprisingly easy to make and look absolutely stunning. They’re perfect for adding a touch of whimsy to any room.
Step-by-Step Instructions:
1. Prepare the Can: Rinse out your soda can thoroughly and let it dry completely. This is crucial to prevent any sticky residue from interfering with your work.
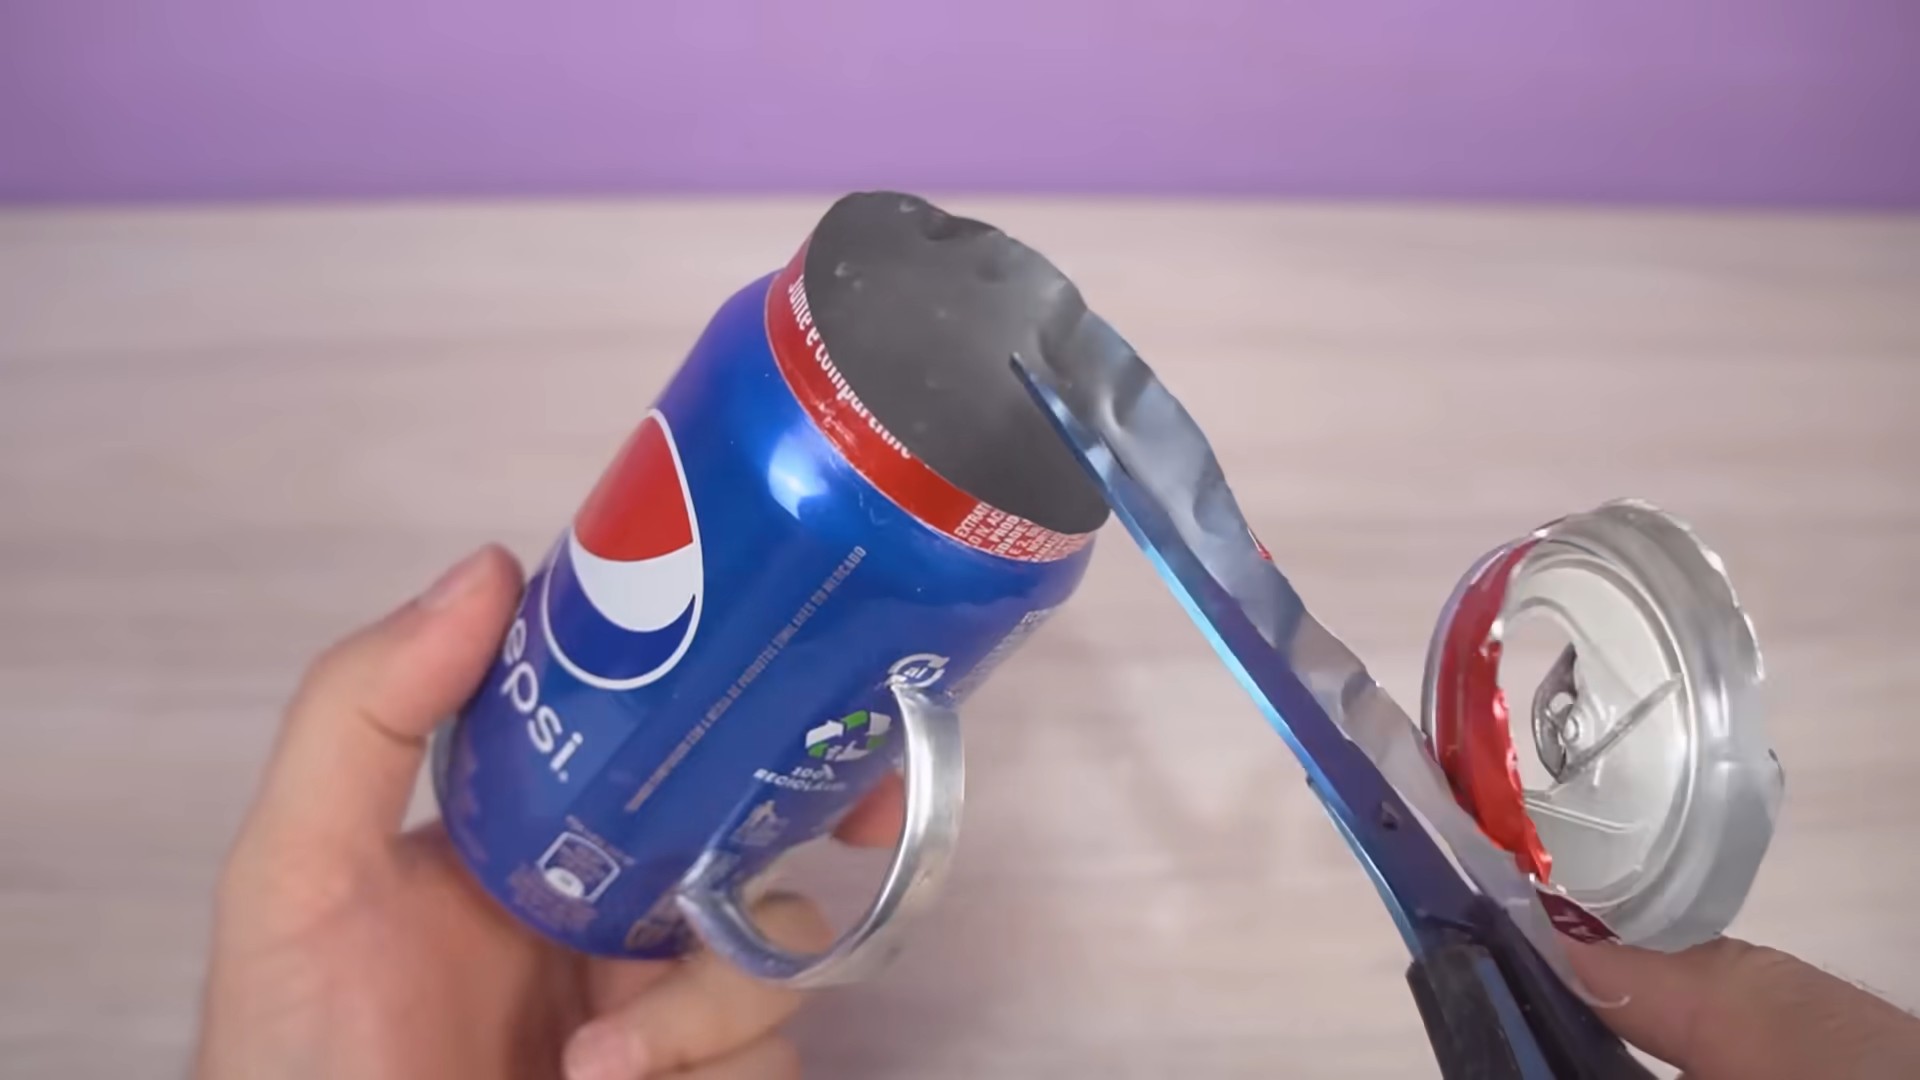
2. Cut Off the Top and Bottom: Using your scissors or craft knife, carefully cut off the top and bottom of the can. You’ll be left with a cylinder of aluminum.
3. Cut Open the Cylinder: Make a vertical cut down the cylinder to create a flat sheet of aluminum. Be careful, the edges can be sharp!
4. Cut Petal Shapes: Draw petal shapes onto the aluminum sheet. You can use a template or freehand it. I like to create a variety of petal sizes for a more natural look. Aim for at least 12-15 petals per flower.
5. Cut Out the Petals: Carefully cut out the petal shapes. Remember to wear your safety glasses!
6. Shape the Petals: This is where the magic happens! Gently bend and curve each petal to give it a more realistic shape. You can use your fingers or pliers to create the curves. I like to curl the edges of the petals slightly outward.
7. Sand the Edges: Use fine-grit sandpaper to smooth out any sharp edges on the petals. This is important for safety and will also give your flowers a more polished look.
8. Paint the Petals: Now it’s time to add color! Paint each petal with your desired acrylic paint. You can use a single color or create a gradient effect. Let the paint dry completely.
9. Assemble the Flower: Start by gluing the smallest petals together to form the center of the flower. Then, gradually add the larger petals, overlapping them as you go. Use your glue gun to secure each petal in place.
10. Add a Center: You can add a bead, button, or other embellishment to the center of the flower to cover the glue and add a finishing touch.
11. Seal the Flower: Once the glue is dry, spray the flower with a clear acrylic sealer to protect the paint and give it a glossy finish.
Project 2: Soda Can Butterflies – Fluttering Friends
These delicate butterflies are perfect for adding a touch of charm to your home decor. They can be used to decorate walls, windows, or even gifts.
Step-by-Step Instructions:
1. Prepare the Can: As with the flowers, rinse and dry your soda can thoroughly.
2. Cut Off the Top and Bottom: Cut off the top and bottom of the can to create a cylinder.
3. Cut Open the Cylinder: Make a vertical cut down the cylinder to create a flat sheet of aluminum.
4. Draw Butterfly Shapes: Draw butterfly shapes onto the aluminum sheet. You can find templates online or create your own designs. Remember to draw two wings for each butterfly.
5. Cut Out the Wings: Carefully cut out the butterfly wings.
6. Emboss the Wings (Optional): For added detail, you can emboss the wings using a stylus or embossing tool. This will create raised patterns on the aluminum.
7. Shape the Wings: Gently bend and curve the wings to give them a more realistic shape. You can use your fingers or pliers to create the curves.
8. Sand the Edges: Smooth out any sharp edges on the wings with fine-grit sandpaper.
9. Paint the Wings: Paint the wings with your desired acrylic paints. You can create intricate designs or keep it simple. Let the paint dry completely.
10. Create the Body: You can create the butterfly’s body using beads, wire, or even a small piece of aluminum.
11. Assemble the Butterfly: Glue the wings together and attach the body.
12. Seal the Butterfly: Spray the butterfly with a clear acrylic sealer to protect the paint and give it a glossy finish.
Project 3: Soda Can Lanterns – Illuminating Designs
These lanterns are a fantastic way to add a warm and inviting glow to your outdoor space. They’re perfect for patios, gardens, or balconies.
Step-by-Step Instructions:
1. Prepare the Can: Rinse and dry your soda can thoroughly.
2. Draw Your Design: Using a marker, draw your desired design onto the can. This could be anything from simple geometric patterns to intricate floral designs.
3. Cut Out the Design: Carefully cut out the design using a craft knife or small scissors. This is the most time-consuming part of the project, so be patient and take your time. Remember to wear your safety glasses!
4. Sand the Edges: Smooth out any sharp edges around the cutouts with fine-grit sandpaper.
5. Paint the Can (Optional): If you want to add color to your lantern, paint the can with acrylic paint. Let the paint dry completely.
6. Add a Handle: You can add a handle to your lantern using wire or string. Attach the handle to the top of the can using glue or by punching small holes and threading the wire through.
7. Add a Light Source: Place a battery-operated tea light or LED candle inside the lantern. Never use a real candle, as it could be a fire hazard.
Project 4: Soda Can Wind Chimes – Melodic Sounds
Create a whimsical wind chime using soda can tabs and other recycled materials. This project is a great way to add a touch of personality to your outdoor space.
Step-by-Step Instructions:
1. Collect Soda Can Tabs: Start collecting soda can tabs. You’ll need a good amount for this project.
2. Clean the Tabs: Wash the tabs with soap and water to remove any dirt or grime.
3. Prepare the Base: You can use a wooden hoop, a metal ring, or even a sturdy branch as the base for your wind chime.
4. Attach the Tabs: Use fishing line or wire to attach the soda can tabs to the base. You can create different patterns and lengths to achieve the desired sound.
5. Add Other Embellishments: You can add other embellishments to your wind chime, such as beads, buttons, or small pieces of metal.
6. Hang Your Wind Chime: Hang your wind chime in a breezy spot and enjoy the melodic sounds.
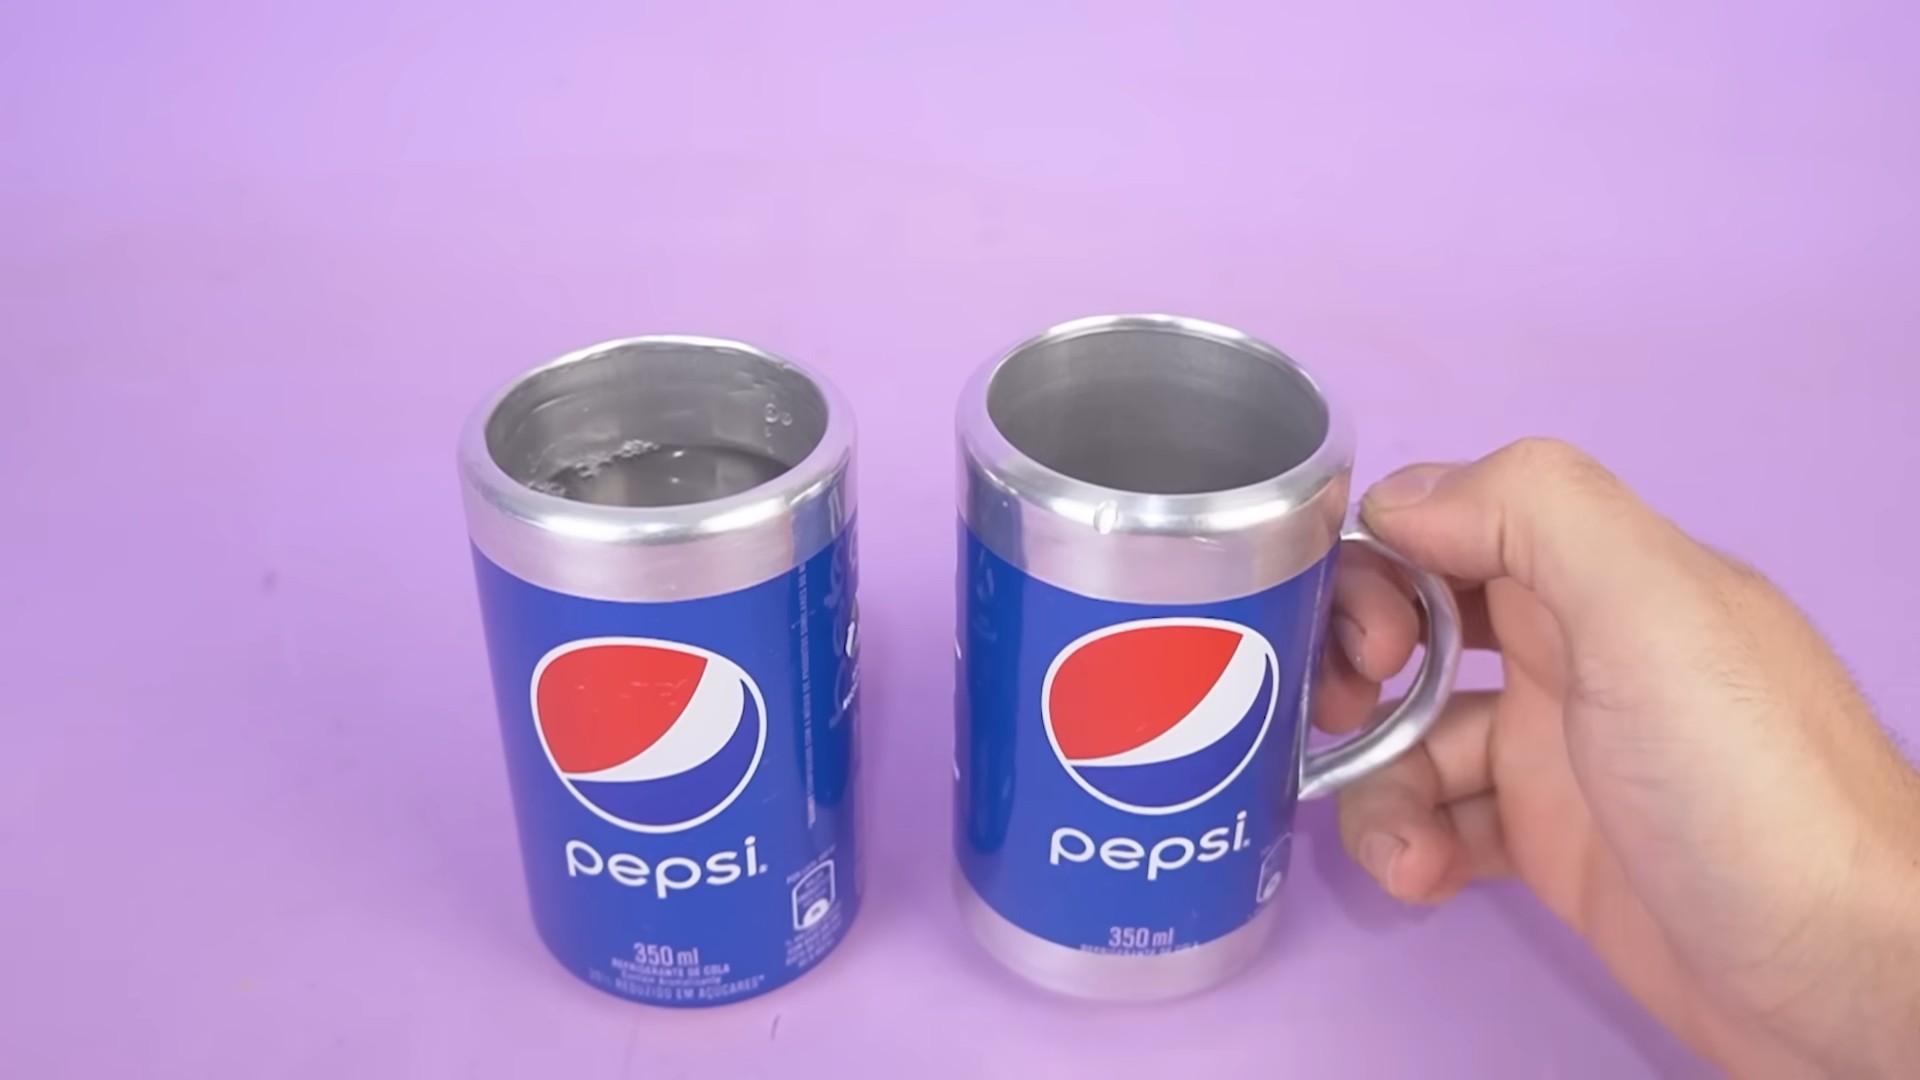
Project 5: Soda Can Coasters – Stylish Protection
Protect your furniture with these stylish and eco-friendly coasters made from soda cans.
Step-by-Step Instructions:
1. Prepare the Can: Rinse and dry your soda can thoroughly.
2. Cut Off the Top and Bottom: Cut off the top and bottom of the can to create a cylinder.
3. Cut Open the Cylinder: Make a
Conclusion
So, there you have it! Transforming humble soda cans into dazzling crafts is not just a fun activity; it’s a sustainable way to unleash your creativity and add a personal touch to your home decor, gifts, and even your wardrobe. We’ve explored a range of exciting projects, from shimmering ornaments to practical storage solutions, all proving that these discarded aluminum vessels have far more potential than meets the eye.
Why is this DIY trick a must-try? Because it’s incredibly accessible, budget-friendly, and environmentally conscious. You’re likely already consuming soda or other canned beverages, meaning the raw materials are readily available. Forget expensive craft supplies; with a few basic tools and a dash of imagination, you can create stunning pieces that rival store-bought items. Plus, you’re actively participating in recycling and reducing waste, contributing to a greener planet one craft at a time.
But the beauty of DIY soda can crafts lies in their versatility. Don’t feel limited by the projects we’ve outlined. Experiment with different can sizes, colors, and cutting techniques. Try incorporating other materials like beads, paint, fabric scraps, or even LED lights to add unique textures and dimensions to your creations.
Here are a few suggestions to spark your imagination:
* **Personalized Ornaments:** Instead of generic holiday decorations, craft ornaments shaped like stars, snowflakes, or even miniature soda cans, painted with festive colors and personalized with names or dates.
* **Mosaic Masterpieces:** Cut soda cans into small squares or triangles and create stunning mosaics on picture frames, flower pots, or even larger surfaces like tabletops.
* **Upcycled Jewelry:** Fashion earrings, pendants, or bracelets from intricately cut and shaped soda can pieces. Add beads, wire, and clasps to complete your unique jewelry designs.
* **Wind Chimes with a Twist:** Create wind chimes using soda can strips, adding glass beads or other decorative elements for a melodic and visually appealing outdoor decoration.
* **Miniature Planters:** Transform soda cans into charming miniature planters for succulents or herbs. Decorate them with paint, decoupage, or even fabric scraps to match your home decor.
The possibilities are truly endless. The key is to embrace experimentation and let your creativity guide you. Don’t be afraid to make mistakes; they’re often the stepping stones to innovative designs.
We wholeheartedly encourage you to embark on your own soda can crafting adventure. Gather your supplies, choose a project that excites you, and let the transformation begin. And most importantly, we want to hear about your experiences! Share your creations, tips, and challenges in the comments below. Let’s build a community of soda can crafting enthusiasts and inspire each other with our ingenuity. Show us your unique DIY soda can crafts! We can’t wait to see what you come up with.
Frequently Asked Questions (FAQs)
What tools do I need for DIY soda can crafts?
The essential tools for working with soda cans are relatively simple and inexpensive. You’ll need a pair of sturdy scissors or metal shears for cutting the cans. A craft knife can be useful for more intricate details. Safety is paramount, so invest in a good pair of work gloves to protect your hands from sharp edges. A ruler or measuring tape will help with precise cuts, and pliers can be handy for bending and shaping the metal. Depending on your project, you might also need paint, glue, beads, wire, or other decorative materials. Remember to always prioritize safety when working with sharp tools and metal.
How do I safely cut soda cans?
Safety is crucial when working with soda cans, as the edges can be very sharp. Always wear work gloves to protect your hands. Start by washing and drying the can thoroughly. Use sturdy scissors or metal shears to cut the top and bottom off the can. Then, carefully cut down the side of the can to create a flat sheet of aluminum. Be mindful of the sharp edges and avoid applying excessive pressure that could cause the metal to bend or tear unexpectedly. For intricate cuts, use a craft knife on a cutting mat. Dispose of any sharp scraps responsibly.
How do I prepare soda cans for crafting?
Proper preparation is key to successful soda can crafts. First, thoroughly wash the empty cans with soap and water to remove any residue. Rinse them well and allow them to dry completely. Once dry, you can remove the top and bottom of the can using a can opener or scissors. Be careful of sharp edges. Flatten the can by carefully cutting down the side, creating a rectangular sheet of aluminum. You can then clean the aluminum with rubbing alcohol to remove any remaining oils or fingerprints. This will ensure that paint and glue adhere properly.
What kind of paint works best on soda cans?
Acrylic paint is generally the best choice for painting soda cans. It adheres well to the aluminum surface, dries quickly, and is available in a wide range of colors. You can also use spray paint specifically designed for metal, which provides a smooth and even finish. Before painting, it’s a good idea to prime the surface with a metal primer to improve adhesion and prevent the paint from chipping. Apply thin, even coats of paint and allow each coat to dry completely before applying the next. Seal the finished product with a clear coat of varnish or sealant to protect the paint and add durability.
How can I prevent soda can crafts from rusting?
While aluminum doesn’t rust in the same way as iron, it can corrode over time, especially when exposed to moisture. To prevent corrosion, it’s important to protect your soda can crafts with a sealant. Apply a clear coat of varnish or sealant specifically designed for metal. This will create a barrier between the aluminum and the environment, preventing moisture and other elements from causing corrosion. You can also store your crafts in a dry place to further minimize the risk of corrosion. Regular cleaning with a soft cloth can also help to remove any dirt or debris that could contribute to corrosion.
Can I use different types of cans for these crafts?
Yes, you can definitely use different types of cans for these crafts! While soda cans are the most common choice, you can also use beer cans, juice cans, or even larger food cans. The key is to choose cans that are made of aluminum, as this material is easy to cut, shape, and paint. Different can sizes and shapes will offer unique possibilities for your crafts. For example, taller cans can be used to create larger ornaments or storage containers, while smaller cans can be used for jewelry or mosaic tiles. Experiment with different types of cans to see what works best for your projects.
Are there any safety precautions I should take when crafting with soda cans?
Absolutely! Safety should always be your top priority when crafting with soda cans. Always wear work gloves to protect your hands from sharp edges. Use sturdy scissors or metal shears for cutting the cans, and be careful not to apply excessive pressure that could cause the metal to bend or tear unexpectedly. When using a craft knife, always use a cutting mat and keep your fingers away from the blade. Dispose of any sharp scraps responsibly. If you’re working with paint or glue, make sure to work in a well-ventilated area. And finally, keep your crafting supplies out of reach of children and pets.
Where can I find inspiration for soda can crafts?
The internet is a treasure trove of inspiration for soda can crafts! Websites like Pinterest, YouTube, and Instructables are filled with tutorials, ideas, and tips for creating amazing projects from recycled cans. You can also find inspiration in craft books, magazines, and online forums dedicated to DIY projects. Don’t be afraid to experiment and put your own spin on existing ideas. The best way to find inspiration is to simply start crafting and see where your creativity takes you!

Leave a Comment