

DIY Recycled Glass projects are not just a trendy way to spruce up your home and garden; they’re a fantastic way to embrace sustainability and add a personal touch to your surroundings. Have you ever looked at a pile of empty wine bottles or jam jars and thought, “There has to be something more I can do with these?” Well, you’re in the right place! For centuries, resourceful individuals have found creative ways to repurpose discarded materials, transforming them into beautiful and functional objects. Think of ancient mosaics crafted from broken pottery or stained glass windows made from repurposed shards – the spirit of recycling is deeply rooted in human history.
But why should you dive into DIY recycled glass projects? In today’s world, where environmental consciousness is more important than ever, finding ways to reduce waste is crucial. Plus, let’s be honest, store-bought decorations can sometimes lack that unique, personal charm. With a little creativity and some simple techniques, you can transform ordinary glass items into stunning planters, whimsical garden art, or even elegant lighting fixtures. I’m excited to share some of my favorite DIY recycled glass tricks and hacks that will not only beautify your space but also give you a sense of accomplishment and contribute to a greener planet. Let’s get started!
Transforming Old Glass Bottles into Stunning Vases: A DIY Guide
Hey there, fellow crafters! I’m so excited to share one of my favorite DIY projects with you: turning those empty glass bottles you’re about to toss into gorgeous, unique vases. Not only is this a fantastic way to recycle and reduce waste, but it also lets you create personalized décor that perfectly matches your style. Trust me, it’s easier than you think, and the results are seriously rewarding!
What You’ll Need
Before we dive in, let’s gather our supplies. Here’s a list of everything you’ll need to transform those bottles into beautiful vases:
* **Empty Glass Bottles:** Wine bottles, beer bottles, juice bottles – anything goes! Just make sure they’re clean and dry.
* **Glass Cutter:** A good quality glass cutter is essential for a clean and safe cut. I recommend one with a carbide cutting wheel.
* **Safety Glasses:** Protecting your eyes is paramount! Don’t skip this step.
* **Gloves:** To protect your hands from sharp edges and potential chemicals.
* **Sandpaper (Various Grits):** We’ll need coarse, medium, and fine grit sandpaper to smooth the edges.
* **Water:** For the hot and cold water separation method.
* **Kettle or Pot:** To heat the water.
* **Ice Cubes:** To cool the water.
* **Towel or Cloth:** To protect your work surface and for handling the bottles.
* **Optional: Sandblaster or Etching Cream:** For creating frosted or textured effects.
* **Optional: Paint, Twine, Ribbon, or Other Decorations:** To personalize your vases.
* **Optional: Safety Mask:** If you are using etching cream or sandblasting.
Preparing Your Bottles
First things first, we need to get our bottles ready for their makeover.
1. **Clean the Bottles:** Wash the bottles thoroughly with soap and water to remove any labels, residue, or grime. You can soak them in warm, soapy water for a while to loosen stubborn labels. I find that using a scraper or a razor blade (carefully!) helps to remove any remaining adhesive.
2. **Dry the Bottles:** Make sure the bottles are completely dry before proceeding. This will ensure a clean and accurate cut.
Cutting the Glass
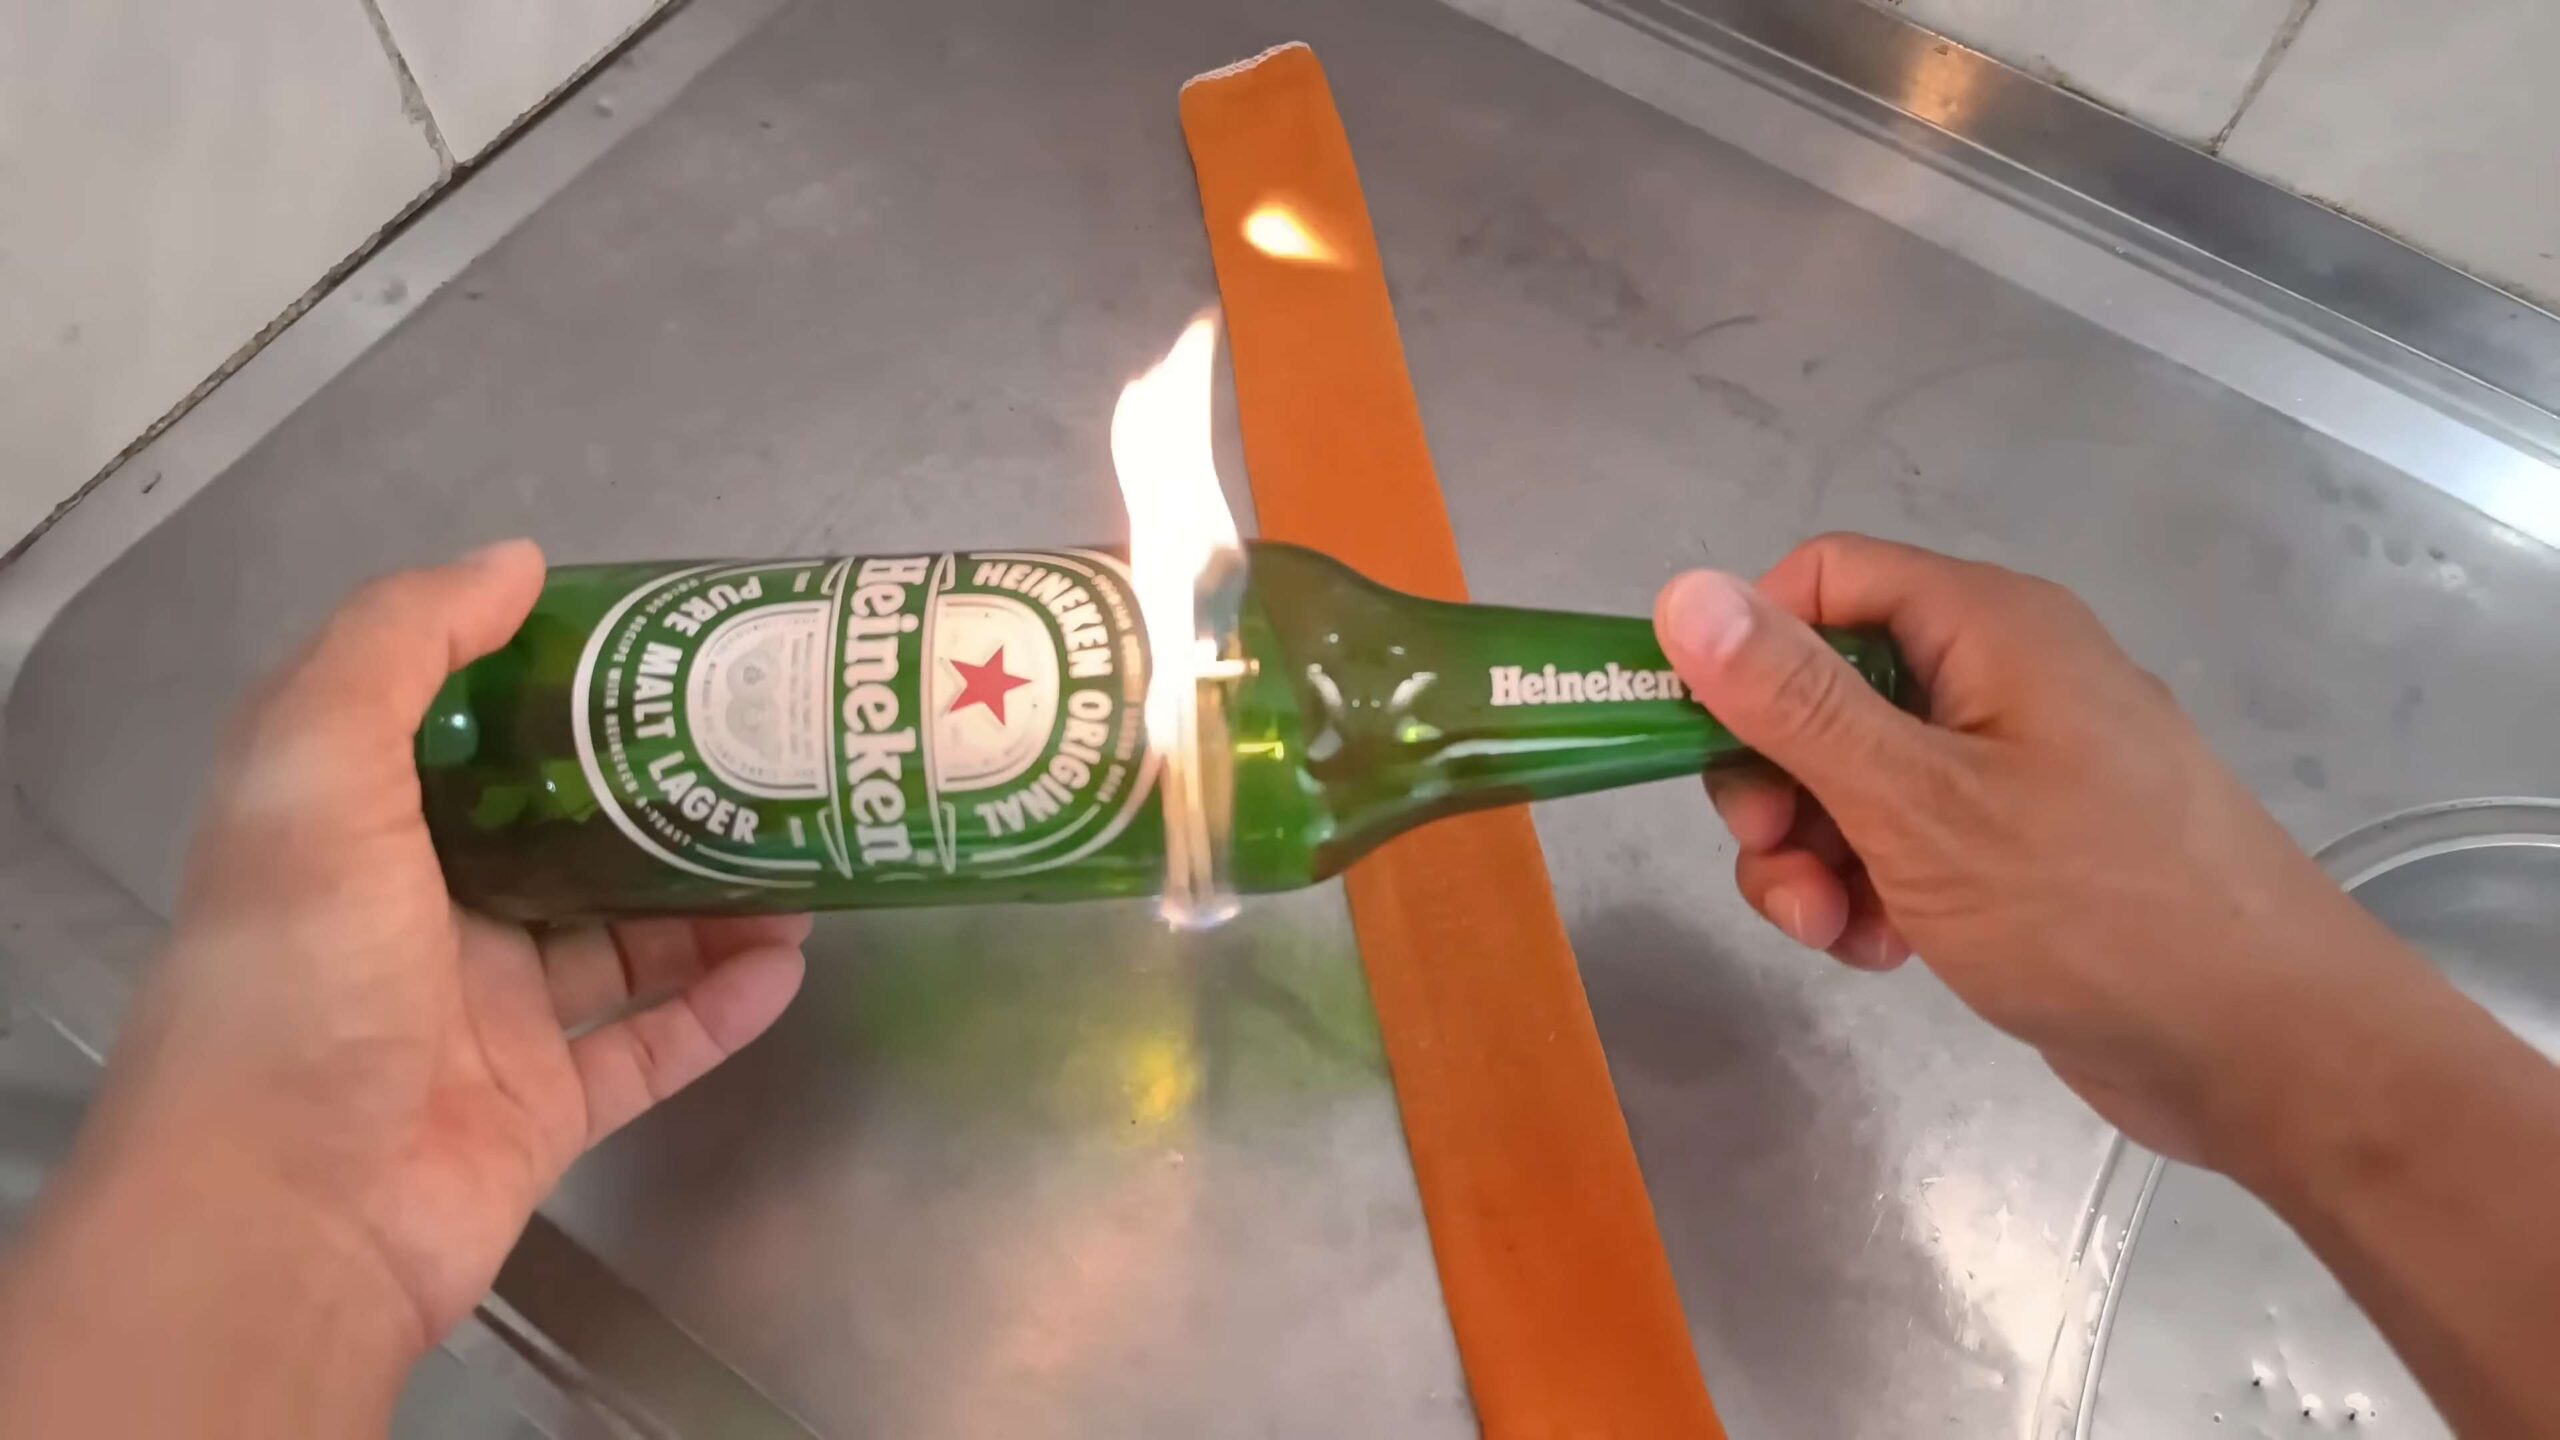
This is the most crucial step, so take your time and be careful! There are a few different methods you can use to cut glass bottles, but I’m going to walk you through the hot and cold water method, which I find to be the most accessible for beginners.
1. **Mark the Cutting Line:** Decide where you want to cut the bottle. Use a permanent marker to draw a straight, even line around the circumference of the bottle. This will be your guide for the glass cutter. You can use a ruler or a piece of string to ensure the line is straight.
2. **Score the Glass:** Put on your safety glasses and gloves. Using the glass cutter, firmly and evenly score the glass along the marked line. Apply consistent pressure and make only one pass around the bottle. Don’t press too hard, just enough to create a clean, continuous score. You should hear a slight scratching sound.
3. **Heat the Water:** Heat water in a kettle or pot until it’s boiling.
4. **Apply Hot and Cold Water:** Carefully pour the boiling water over the scored line. Rotate the bottle slowly to ensure the entire scored area is heated evenly.
5. **Immediately Apply Cold Water:** Immediately after the hot water, pour ice water (or apply ice cubes wrapped in a cloth) over the same scored line. The sudden temperature change should cause the glass to separate along the score. You might need to repeat the hot and cold water process several times.
6. **Gentle Separation:** If the bottle doesn’t separate on its own, gently tap the bottle around the scored line with a wooden or rubber mallet. Be patient and persistent, and it should eventually separate. If it’s being stubborn, try scoring the line again with the glass cutter and repeating the hot/cold water process.
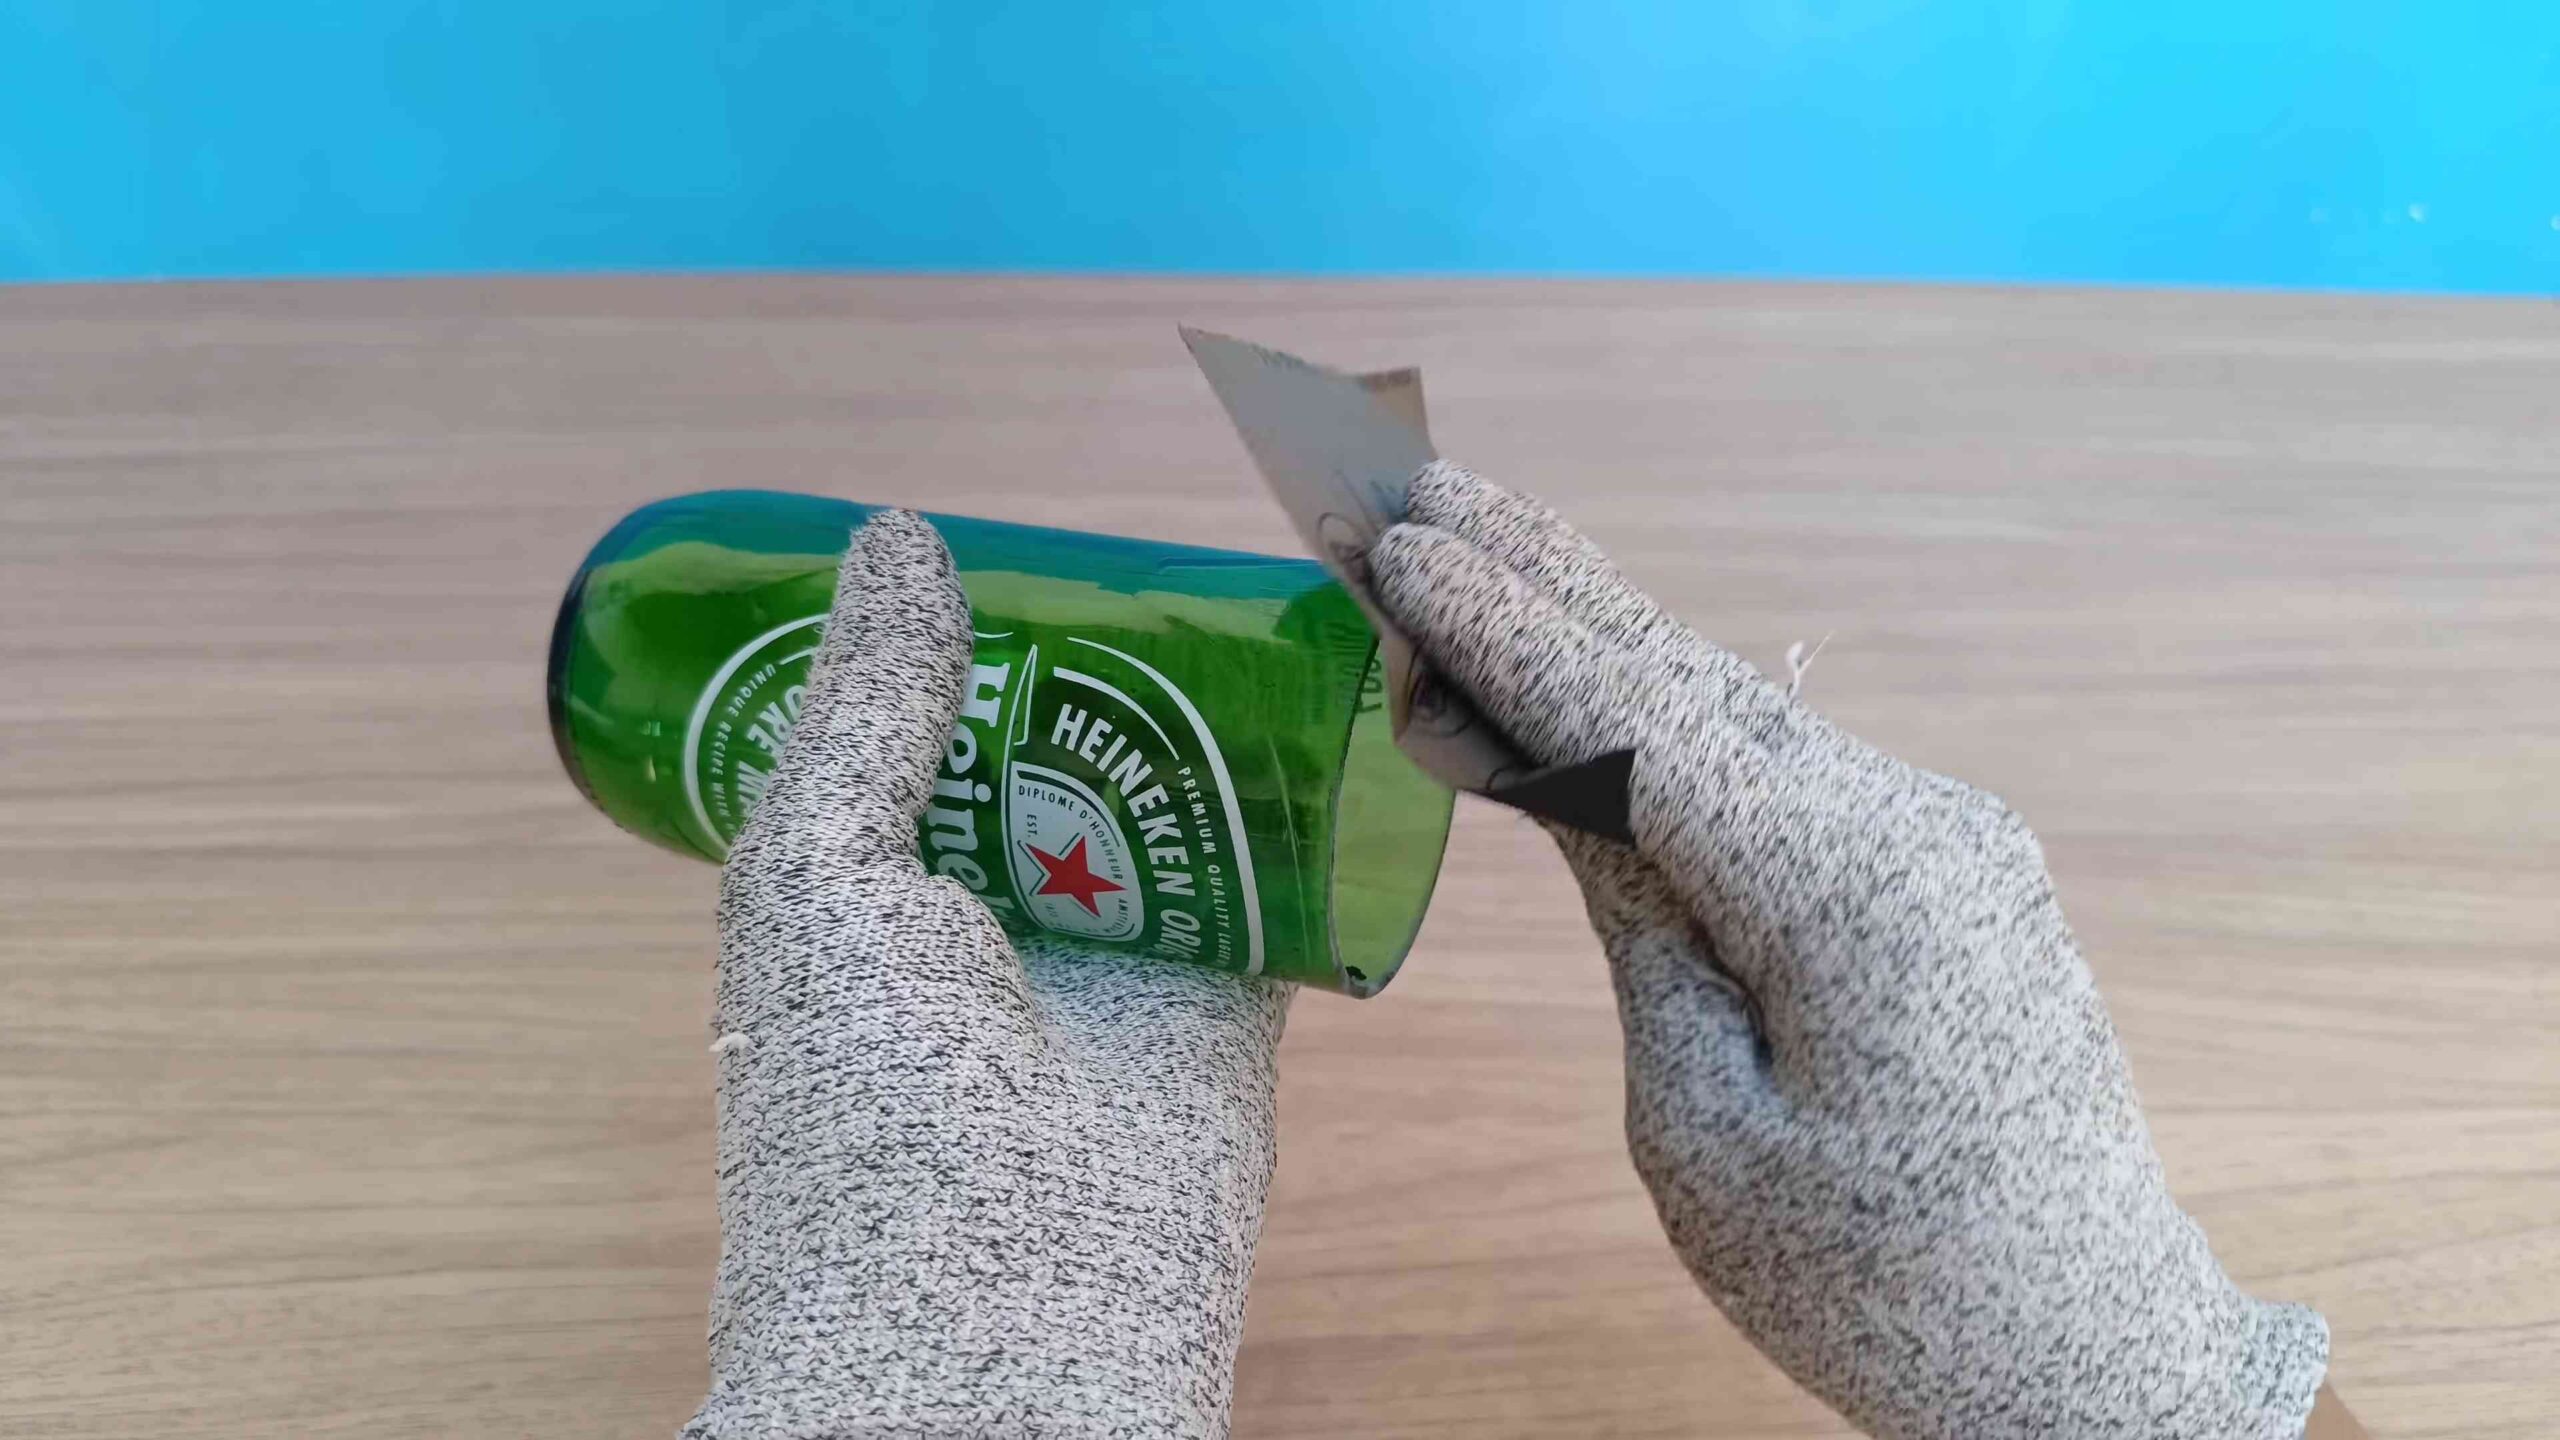
Smoothing the Edges
Now that we’ve successfully cut the bottle, we need to smooth the sharp edges to make them safe and aesthetically pleasing.
1. **Coarse Sanding:** Start with coarse-grit sandpaper (around 120 grit) to remove any large shards or rough edges. Wet the sandpaper and the edge of the glass to reduce friction and dust. Sand in a circular motion, applying even pressure.
2. **Medium Sanding:** Switch to medium-grit sandpaper (around 220 grit) to further smooth the edge. Continue sanding in a circular motion, paying attention to any remaining rough spots.
3. **Fine Sanding:** Finally, use fine-grit sandpaper (around 400 grit or higher) to achieve a smooth, polished finish. Continue wetting the sandpaper and the glass. This step will make the edge feel smooth to the touch.
4. **Rinse and Dry:** Rinse the vase thoroughly with water to remove any sanding residue. Dry it completely with a clean cloth.
Optional: Adding a Frosted or Textured Effect
If you want to add a little extra flair to your vases, you can create a frosted or textured effect using a sandblaster or etching cream.
Using Etching Cream
1. **Apply Stencil (Optional):** If you want to create a specific design, apply a stencil to the bottle using painter’s tape or adhesive stencils.
2. **Apply Etching Cream:** Wearing gloves and a safety mask, apply a thick, even layer of etching cream to the areas you want to frost. Follow the manufacturer’s instructions for application time.
3. **Rinse and Remove Stencil:** After the recommended time, rinse the etching cream off the bottle thoroughly with water. Remove the stencil (if used).
4. **Dry:** Dry the bottle completely.
Using a Sandblaster
1. **Prepare the Sandblaster:** Set up your sandblaster according to the manufacturer’s instructions.
2. **Apply Stencil (Optional):** As with etching cream, you can use stencils to create specific designs.
3. **Sandblast the Bottle:** Wearing safety glasses and a dust mask, carefully sandblast the areas you want to frost. Maintain a consistent distance and angle for an even finish.
4. **Clean the Bottle:** Remove any sandblasting residue with a brush or compressed air.
Decorating Your Vases
Now for the fun part: decorating! This is where you can really let your creativity shine. Here are a few ideas to get you started:
* **Painting:** Use acrylic paints, glass paints, or spray paint to add color and designs to your vases. You can paint the entire vase, create patterns, or add intricate details.
* **Twine or Ribbon:** Wrap twine or ribbon around the vase to add a rustic or elegant touch. You can use hot glue to secure the ends.
* **Glitter:** Add glitter for a sparkly effect. Apply glue to the vase and sprinkle glitter over it. Let it dry completely before shaking off the excess.
* **Decoupage:** Use Mod Podge to adhere decorative paper, fabric, or photos to the vase.
* **Stickers or Decals:** Apply stickers or decals for a quick and easy way to add personality to your vases.
* **Beads or Gems:** Glue beads or gems to the vase for a glamorous look.
Final Touches
Once you’ve finished decorating your vases, give them a final inspection to make sure everything is secure and looks the way you want it to. You might want to apply a sealant to protect the paint or decorations.
And that’s it! You’ve successfully transformed old glass bottles into beautiful, one-of-a-kind vases. Now you can fill them with your favorite flowers, greenery, or even just display them as decorative pieces. I hope you enjoyed this DIY project as much as I do! Happy crafting!
Conclusion
So, there you have it! Transforming discarded glass into something beautiful and functional is not only incredibly satisfying but also a fantastic way to contribute to a more sustainable lifestyle. This DIY recycled glass project is more than just a craft; it’s a statement. It’s a statement that says you care about the environment, that you’re resourceful, and that you appreciate the beauty in repurposing.
Why is this a must-try? Because it’s accessible, affordable, and adaptable. You likely already have the main ingredient – discarded glass jars and bottles – sitting in your recycling bin. The other materials are readily available at most craft stores or even online. And the best part? The possibilities are endless.
Think beyond simple drinking glasses. Consider creating stunning vases for your favorite flowers, unique candle holders to add ambiance to your evenings, or even mosaic tiles for a one-of-a-kind art project. For a rustic touch, leave the glass slightly textured after sanding. If you prefer a more polished look, invest in a good quality glass polishing compound. You can also experiment with different colors by adding glass paint or etching designs onto the surface.
Don’t be afraid to get creative and personalize your DIY recycled glass creations!
For a festive touch, consider using colored glass bottles and adding glitter or metallic paint. During the holidays, these recycled glass creations make thoughtful and personalized gifts. Imagine the joy of giving a handmade vase crafted from a bottle you once shared a special occasion with.
But the real magic of this project lies in its ability to transform something considered waste into something valuable and beautiful. It’s a tangible reminder that we can all make a difference, one recycled glass bottle at a time.
We truly believe that this DIY recycled glass project is a game-changer for anyone looking to reduce their environmental impact and unleash their creativity. It’s a simple yet powerful way to transform trash into treasure and add a personal touch to your home decor.
So, what are you waiting for? Gather your discarded glass, unleash your inner artist, and get ready to be amazed by the transformation. We encourage you to try this DIY recycled glass project and share your creations with us! We can’t wait to see what you come up with. Share your photos and tips on social media using #DIYRecycledGlass and inspire others to join the movement. Let’s turn trash into treasure together!
Frequently Asked Questions (FAQ)
What types of glass are suitable for recycling in this DIY project?
Almost any type of glass jar or bottle can be used for this project. However, it’s important to note that some types of glass are easier to work with than others. Thicker glass, like that found in wine bottles or mason jars, is generally more durable and easier to cut and sand. Thinner glass, like that found in some soda bottles, can be more fragile and require more careful handling. Avoid using tempered glass, as it can shatter unpredictably when cut. Also, ensure the glass is clean and free of any labels or residue before starting the project.
What safety precautions should I take when working with glass?
Safety is paramount when working with glass. Always wear safety glasses to protect your eyes from flying shards. Use heavy-duty gloves to protect your hands from cuts. When cutting glass, work in a well-ventilated area and use a glass cutter specifically designed for the type of glass you’re working with. Apply cutting oil to the glass cutter to ensure a clean and smooth cut. When sanding glass, wear a dust mask to avoid inhaling glass particles. Dispose of any broken glass shards carefully in a designated container. If you are using power tools, make sure you are familiar with their safe operation and wear appropriate safety gear.
What tools and materials do I need for this DIY recycled glass project?
The essential tools and materials include:
* Discarded glass jars or bottles
* Glass cutter
* Cutting oil
* Safety glasses
* Heavy-duty gloves
* Sandpaper (various grits, from coarse to fine)
* Water
* Dust mask
* Glass polishing compound (optional)
* Soft cloths
* Optional: Glass paint, etching cream, stencils, glitter, glue
How do I cut glass safely and effectively?
First, clean the glass thoroughly and mark the desired cutting line with a permanent marker. Apply a small amount of cutting oil to the glass cutter. Hold the glass cutter firmly and score the glass along the marked line with a single, even stroke. Apply gentle pressure while scoring. Next, tap the glass lightly along the scored line with the end of the glass cutter or a specialized tapping tool. The glass should break cleanly along the scored line. If the glass doesn’t break cleanly, you may need to score it again with more pressure. Always wear safety glasses and gloves during this process.
How do I sand the edges of the cut glass to make them smooth?
Start with a coarse grit sandpaper (e.g., 80 grit) to remove any sharp edges or rough spots. Wet the sandpaper and the glass to reduce friction and dust. Sand the edges of the glass in a circular motion, applying even pressure. Gradually move to finer grit sandpaper (e.g., 120 grit, 220 grit, 400 grit) to smooth the edges further. Rinse the glass frequently to remove any glass particles. Once the edges are smooth to the touch, you can use a glass polishing compound and a soft cloth to polish the glass to a high shine.
Can I use a Dremel or other power tool to cut or sand glass?
Yes, you can use a Dremel or other power tool with appropriate attachments to cut or sand glass. However, it’s crucial to use the correct attachments and settings and to wear appropriate safety gear. For cutting glass, use a diamond cutting wheel. For sanding glass, use a sanding drum or a sanding disc with various grits of sandpaper. Always work in a well-ventilated area and wear safety glasses and a dust mask. Start with a low speed and gradually increase it as needed. Apply light pressure and avoid overheating the glass. Practice on scrap glass before working on your final project.
How can I decorate my recycled glass creations?
There are many ways to decorate your recycled glass creations. You can use glass paint to add color and designs. You can use etching cream and stencils to create etched patterns. You can glue on beads, sequins, or other embellishments. You can wrap the glass with twine, ribbon, or fabric. You can even create mosaics by gluing small pieces of colored glass onto the surface. Let your imagination run wild and experiment with different techniques to create unique and personalized designs.
How do I clean my finished DIY recycled glass items?
Clean your finished DIY recycled glass items with warm soapy water and a soft cloth. Avoid using abrasive cleaners or scouring pads, as they can scratch the glass. For stubborn stains, you can use a mixture of vinegar and water. Rinse the glass thoroughly and dry it with a clean cloth. For items that are not food-safe, such as those decorated with paint or glue, hand wash only.

Leave a Comment