

DIY Pallet Wood Mirror: Transform your space with rustic charm! Have you ever looked at a plain, boring mirror and thought, “This needs some serious personality”? I know I have! That’s where the magic of upcycling comes in. We’re diving headfirst into a fun and rewarding project: creating a stunning mirror using reclaimed pallet wood.
Pallet wood, often discarded, holds a rich history. Originally designed for efficient shipping and storage, these humble wooden platforms have found new life in the hands of creative DIYers. The use of reclaimed materials speaks to a growing desire for sustainable living and a connection to simpler times. Think of it as giving a piece of history a beautiful second act!
Why should you embark on this DIY Pallet Wood Mirror adventure? Well, besides adding a unique, handcrafted touch to your home, it’s a fantastic way to save money and reduce waste. Store-bought mirrors can be expensive, and often lack the character that a handmade piece possesses. Plus, let’s be honest, there’s nothing quite like the satisfaction of saying, “I made that!” when someone compliments your stylish new decor. This project is perfect for adding a rustic, farmhouse, or even industrial vibe to any room. So, grab your tools, and let’s get started on creating a statement piece that reflects your personality and style!
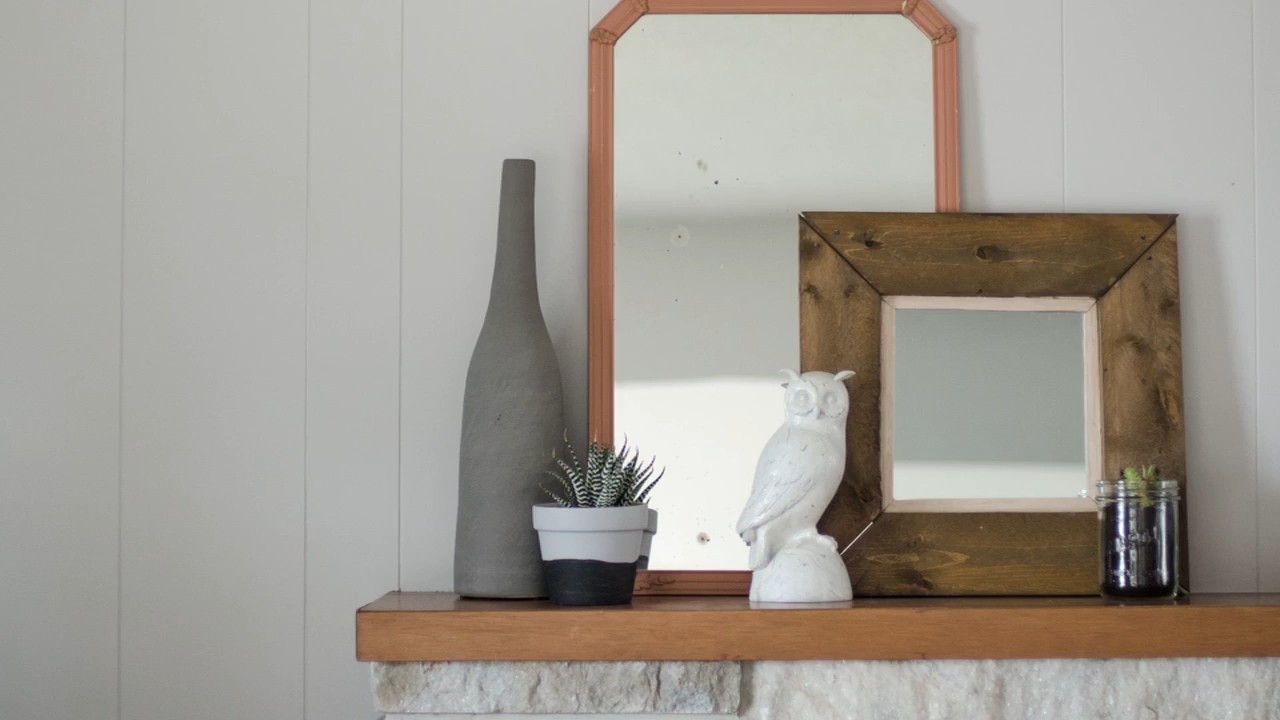
DIY Pallet Wood Mirror: Rustic Charm for Your Home
Hey there, fellow DIY enthusiasts! Today, I’m super excited to share a project that’s close to my heart: crafting a beautiful and rustic mirror using reclaimed pallet wood. This project is not only budget-friendly but also adds a unique, personalized touch to any room. Plus, it’s a great way to give those old pallets a new lease on life! So, grab your tools, and let’s get started!
Materials You’ll Need
Before we dive in, let’s gather all the necessary materials. Trust me, having everything organized beforehand will make the whole process much smoother.
* **Pallet Wood:** The star of the show! You’ll need enough pallet wood to create the frame around your mirror. Look for pallets that are in good condition and haven’t been treated with harsh chemicals.
* **Mirror:** Choose a mirror size that suits your space and the amount of pallet wood you have. I recommend measuring your desired frame size first, then finding a mirror that fits comfortably inside.
* **Wood Glue:** A strong wood glue is essential for bonding the pallet wood pieces together.
* **Nails or Screws:** For added reinforcement, you’ll need nails or screws. I prefer using screws as they provide a more secure hold.
* **Sandpaper:** Various grits (80, 120, and 220) for smoothing the wood and removing splinters.
* **Wood Stain or Paint (Optional):** If you want to change the color of the pallet wood, grab your favorite stain or paint.
* **Wood Sealer (Optional):** To protect the wood and enhance its durability.
* **Safety Glasses:** Always protect your eyes when working with wood.
* **Work Gloves:** To protect your hands from splinters and rough edges.
* **Measuring Tape:** Accurate measurements are crucial for a well-proportioned frame.
* **Pencil:** For marking measurements and cut lines.
* **Saw:** A circular saw, miter saw, or hand saw will work for cutting the pallet wood.
* **Drill (Optional):** If you’re using screws, a drill will make the job much easier.
* **Clamps:** To hold the wood pieces together while the glue dries.
* **Mirror Mounting Clips or Adhesive:** To securely attach the mirror to the frame.
* **Level:** To ensure your mirror hangs straight.
* **Picture Hanging Hardware:** D-rings, wire, or sawtooth hangers for mounting the mirror on the wall.
Disassembling the Pallet
Okay, let’s get our hands dirty! The first step is to carefully disassemble the pallet. This can be a bit challenging, but with the right technique, it’s totally manageable.
1. Safety First: Put on your safety glasses and work gloves. Pallet wood can be rough and splintery, so protection is key.
2. Locate the Fasteners: Examine the pallet to identify how the wood pieces are attached. They’re usually held together with nails or screws.
3. Pry the Boards Apart: Use a pry bar or hammer to gently separate the boards. Be careful not to damage the wood too much. If the nails are stubborn, you can try hammering them out from the back.
4. Remove Remaining Nails or Screws: Once the boards are separated, remove any remaining nails or screws. A nail puller or pliers can be helpful for this.
5. Inspect the Wood: Check each board for any signs of damage, rot, or excessive wear. Discard any pieces that are unsuitable for your project.
Preparing the Pallet Wood
Now that we have our pallet wood, it’s time to clean it up and get it ready for the frame.
1. Clean the Wood: Use a brush or cloth to remove any dirt, dust, or debris from the wood. If the wood is particularly dirty, you can wash it with soap and water, but make sure to let it dry completely before proceeding.
2. Sand the Wood: This is a crucial step for smoothing the surface and removing splinters. Start with a coarse grit sandpaper (80 grit) to remove any rough spots or imperfections. Then, move on to a medium grit (120 grit) to further smooth the surface. Finally, finish with a fine grit (220 grit) for a super smooth finish.
3. Cut the Wood to Size: Measure and cut the pallet wood pieces to the desired length for your mirror frame. Remember to account for the width of the wood when calculating the dimensions. I usually aim for a frame that extends a few inches beyond the mirror on each side.
4. Miter the Corners (Optional): For a more professional look, you can miter the corners of the frame at a 45-degree angle. This will create a seamless joint where the pieces meet. If you don’t have a miter saw, you can use a miter box and hand saw.
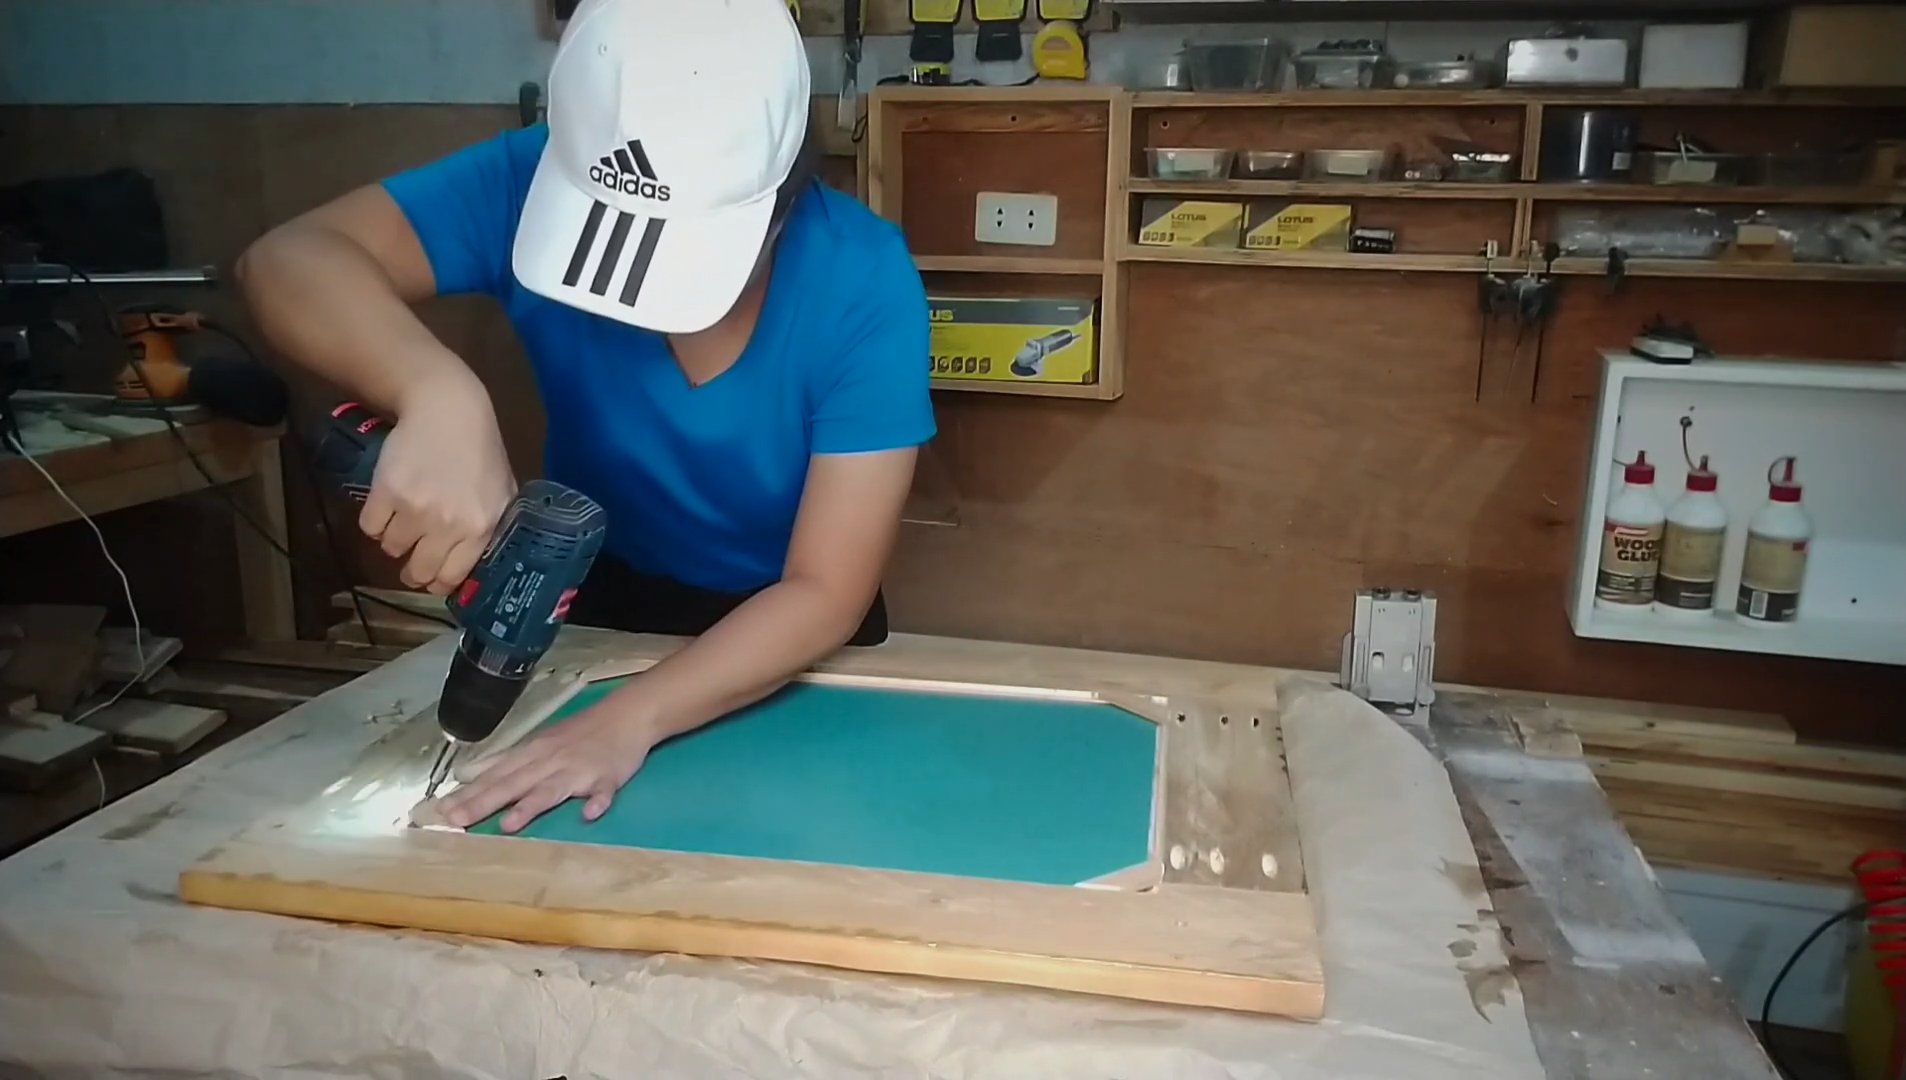
Assembling the Mirror Frame
Alright, the fun part! Let’s put those pallet wood pieces together and create our mirror frame.
1. Dry Fit the Pieces: Before applying any glue, dry fit the wood pieces together to make sure they fit properly and form a square or rectangle.
2. Apply Wood Glue: Apply a generous amount of wood glue to the edges of the wood pieces that will be joined together.
3. Join the Pieces: Carefully align the wood pieces and press them together firmly.
4. Secure with Clamps: Use clamps to hold the pieces together while the glue dries. This will ensure a strong and secure bond.
5. Add Reinforcement (Optional): For added reinforcement, you can drive nails or screws through the joints. Make sure to pre-drill pilot holes to prevent the wood from splitting.
6. Let the Glue Dry: Allow the glue to dry completely according to the manufacturer’s instructions. This usually takes at least 24 hours.
7. Remove the Clamps: Once the glue is dry, remove the clamps.
Finishing Touches
Now that our frame is assembled, let’s add some finishing touches to make it truly shine.
1. Sand the Frame: Give the entire frame a final sanding with fine-grit sandpaper to smooth out any imperfections and create a uniform surface.
2. Stain or Paint (Optional): If you want to change the color of the pallet wood, now’s the time to apply your favorite stain or paint. Follow the manufacturer’s instructions for application and drying time. I personally love the natural look of pallet wood, so I often skip this step.
3. Apply Wood Sealer (Optional): To protect the wood and enhance its durability, apply a coat of wood sealer. This will also help to prevent the wood from drying out and cracking over time.
4. Attach the Mirror: Carefully attach the mirror to the frame using mirror mounting clips or adhesive. Make sure the mirror is centered and securely fastened.
5. Attach Hanging Hardware: Attach D-rings, wire, or sawtooth hangers to the back of the frame for mounting the mirror on the wall. Position the hardware so that the mirror will hang straight.
Hanging Your Pallet Wood Mirror
Finally, the moment we’ve been waiting for! Let’s hang our beautiful pallet wood mirror and admire our handiwork.
1. Choose a Location: Select a suitable location for your mirror. Consider the size of the mirror, the amount of light in the room, and the overall decor.
2. Mark the Wall: Use a level to mark the location for the hanging hardware on the wall.
3. Install Hanging Hardware: Install the appropriate hanging hardware on the wall, such as nails, screws, or hooks.
4. Hang the Mirror: Carefully hang the mirror on the wall.
5. Check for Level: Use a level to ensure that the mirror is hanging straight. Adjust as needed.
Extra Tips and Tricks
Here are a few extra tips and tricks to help you create the perfect pallet wood mirror:
* Source Your Pallets Carefully: Not all pallets are created equal. Look for pallets that are in good condition and haven’t been treated with harsh chemicals. You can often find free pallets at local businesses or construction sites.
* Experiment with Different Finishes: Don’t be afraid to experiment with different stains, paints, and finishes to create a unique look. You can even try distressing the wood for a more rustic feel.
* Add Decorative Elements: Consider adding decorative elements to your mirror frame, such as seashells, rope, or metal accents.
* Get Creative with the Frame Design: You don’t have to stick to a simple square or rectangle frame. Get creative with the design and create a frame that reflects your personal style.
* Be Patient: DIY projects take time and patience. Don’t get discouraged if things don’t go perfectly the first time. Just keep practicing and you’ll
Conclusion
So, there you have it! Transforming discarded pallet wood into a stunning, rustic mirror is not just a project; it’s an experience. It’s about breathing new life into something old, creating a unique piece of décor that tells a story, and adding a touch of handcrafted charm to your home. This DIY pallet wood mirror project is a must-try for several compelling reasons.
First and foremost, it’s incredibly budget-friendly. Pallet wood is often free or very inexpensive, making this a fantastic way to create a high-impact piece without breaking the bank. Compared to purchasing a similar mirror from a retail store, you’ll save a significant amount of money, allowing you to invest in other areas of your home or simply enjoy the satisfaction of a successful DIY project.
Secondly, it’s a sustainable and eco-conscious choice. By repurposing pallet wood, you’re actively reducing waste and contributing to a more sustainable lifestyle. You’re giving a second life to materials that might otherwise end up in a landfill, making this project a win-win for both your home and the environment.
Thirdly, the possibilities for customization are endless. While we’ve outlined a basic approach, feel free to let your creativity run wild. Consider staining the wood in different shades to match your existing décor, adding decorative elements like rope or metal accents, or even incorporating LED lights for a truly unique and eye-catching piece. You could also experiment with different mirror shapes and sizes to create a gallery wall of pallet wood mirrors.
For a more modern look, try sanding the wood smooth and applying a clear coat finish. This will highlight the natural grain of the wood while providing a sleek and contemporary aesthetic. Alternatively, for a more distressed and weathered look, consider using a wire brush to accentuate the wood’s texture and applying a whitewash or milk paint finish.
If you’re feeling adventurous, you could even incorporate mosaic tiles or broken glass pieces into the pallet wood frame for a truly one-of-a-kind design. The key is to have fun and experiment until you achieve the look that you love.
Beyond aesthetics, this project offers a therapeutic and rewarding experience. Working with your hands, creating something from scratch, and seeing your vision come to life is incredibly satisfying. It’s a great way to de-stress, unleash your creativity, and add a personal touch to your home.
We encourage you to embrace the challenge and embark on your own DIY pallet wood mirror adventure. Don’t be afraid to experiment, make mistakes, and learn along the way. The beauty of DIY is that there are no strict rules, and the end result is always a reflection of your unique style and personality.
Once you’ve completed your project, we’d love to see your creations! Share your photos and experiences with us on social media using #DIYPalletMirror. We can’t wait to see what you come up with! Let’s inspire each other and celebrate the joy of DIY.
Ready to transform some old pallets into a stunning mirror? Let’s get started!
Frequently Asked Questions (FAQ)
What type of pallet wood is best for this project?
Ideally, you want to use heat-treated pallets (marked with “HT”) as they haven’t been treated with harmful chemicals. Avoid pallets marked with “MB” (methyl bromide) as this is a toxic fumigant. Look for pallets that are in good condition, with minimal cracks or damage. Hardwood pallets (oak, maple) are generally more durable and aesthetically pleasing than softwood pallets (pine, fir). However, softwood pallets are easier to work with if you’re a beginner. Ultimately, the best type of pallet wood depends on your personal preference and the availability in your area.
How do I safely disassemble a pallet?
Disassembling a pallet can be tricky, but safety is paramount. Wear safety glasses and gloves to protect yourself from splinters and flying debris. Use a pry bar, reciprocating saw, or specialized pallet buster tool to carefully separate the boards. Avoid using excessive force, as this can damage the wood or cause injury. If you’re using a saw, be sure to follow all safety precautions and wear appropriate hearing protection. Consider watching online tutorials for tips and techniques on safely disassembling pallets.
Do I need to treat the pallet wood before using it?
Yes, it’s highly recommended to treat the pallet wood before using it for your mirror frame. This will help to protect the wood from moisture, insects, and rot. Start by thoroughly cleaning the wood with soap and water to remove any dirt or debris. Once the wood is dry, apply a wood preservative or sealant to all surfaces, including the edges and ends. This will help to prevent the wood from warping or cracking over time. You can also apply a stain or paint to the wood to achieve your desired color and finish.
What type of adhesive should I use to attach the mirror to the pallet wood frame?
Use a mirror adhesive specifically designed for attaching mirrors to wood. Construction adhesive can damage the mirror’s backing and cause discoloration. Apply the adhesive in thin, even beads to the back of the mirror, following the manufacturer’s instructions. Press the mirror firmly onto the pallet wood frame and secure it with clamps or tape until the adhesive has fully cured. Be sure to clean any excess adhesive from the edges of the mirror with a damp cloth.
How do I hang the finished mirror on the wall?
There are several ways to hang your DIY pallet wood mirror on the wall. You can attach D-rings or sawtooth hangers to the back of the frame and hang it on nails or screws. Alternatively, you can use heavy-duty picture hanging strips, which are designed to hold a significant amount of weight without damaging the wall. Be sure to choose a hanging method that is appropriate for the weight of your mirror and the type of wall you’re hanging it on. Always use a level to ensure that the mirror is hanging straight.
Can I use this technique to make other types of mirrors?
Absolutely! The basic principles of this DIY project can be applied to create a variety of different mirror designs. You can experiment with different shapes and sizes of mirrors, different types of wood, and different decorative elements. For example, you could create a full-length mirror using reclaimed barn wood, or a small vanity mirror using driftwood. The possibilities are endless!
What if I don’t have access to pallet wood?
If you don’t have access to pallet wood, you can use other types of reclaimed wood, such as old fence boards, barn wood, or even scrap lumber from construction sites. You can also purchase new lumber from a hardware store, but be sure to choose wood that has a rustic or weathered appearance. The key is to find wood that has character and texture, which will add to the overall aesthetic of your mirror.
How do I protect the mirror from damage during the project?
Protecting the mirror from damage is crucial throughout the project. Always handle the mirror with care and avoid dropping or bumping it. Place the mirror on a soft surface, such as a blanket or towel, when you’re not working on it. Use painter’s tape to protect the edges of the mirror from scratches or splatters. If you’re using power tools, be sure to wear safety glasses to protect your eyes from flying debris.
What are some other variations I can try?
Beyond the suggestions in the conclusion, consider adding a shelf to the bottom of the mirror for storing small items like keys or makeup. You could also incorporate a coat rack into the design, making it a functional and stylish addition to your entryway. Another idea is to add a chalkboard panel to the frame, allowing you to write notes or messages. Get creative and personalize your mirror to suit your needs and style!
Leave a Comment