

DIY Origami Box Divider: Tired of rummaging through cluttered drawers, searching for that one elusive item? I know the feeling! We’ve all been there, battling the chaos of disorganized spaces. But what if I told you there’s a simple, elegant, and surprisingly fun solution?
The art of origami, with its roots stretching back centuries in Japan, isn’t just about creating beautiful paper cranes. It’s about transforming the ordinary into the extraordinary, and that’s exactly what we’re going to do with these DIY Origami Box Dividers. Think of it as a little piece of mindful crafting that brings order to your everyday life.
Historically, origami was a luxury, reserved for the elite due to the high cost of paper. Now, it’s accessible to everyone, and we can use its principles to solve modern-day organizational woes. These dividers are perfect for tidying up everything from your desk drawers and craft supplies to your jewelry box and even your sock drawer!
Let’s face it, a well-organized space is a happy space. It saves time, reduces stress, and allows you to focus on what truly matters. So, ditch the flimsy plastic dividers and embrace the beauty and functionality of origami. In this article, I’ll guide you step-by-step through creating your own custom-fit origami box dividers, transforming your cluttered spaces into havens of order and tranquility. Get ready to fold your way to a more organized life!
DIY Origami Box Dividers: Tidy Up Your Drawers with Paper!
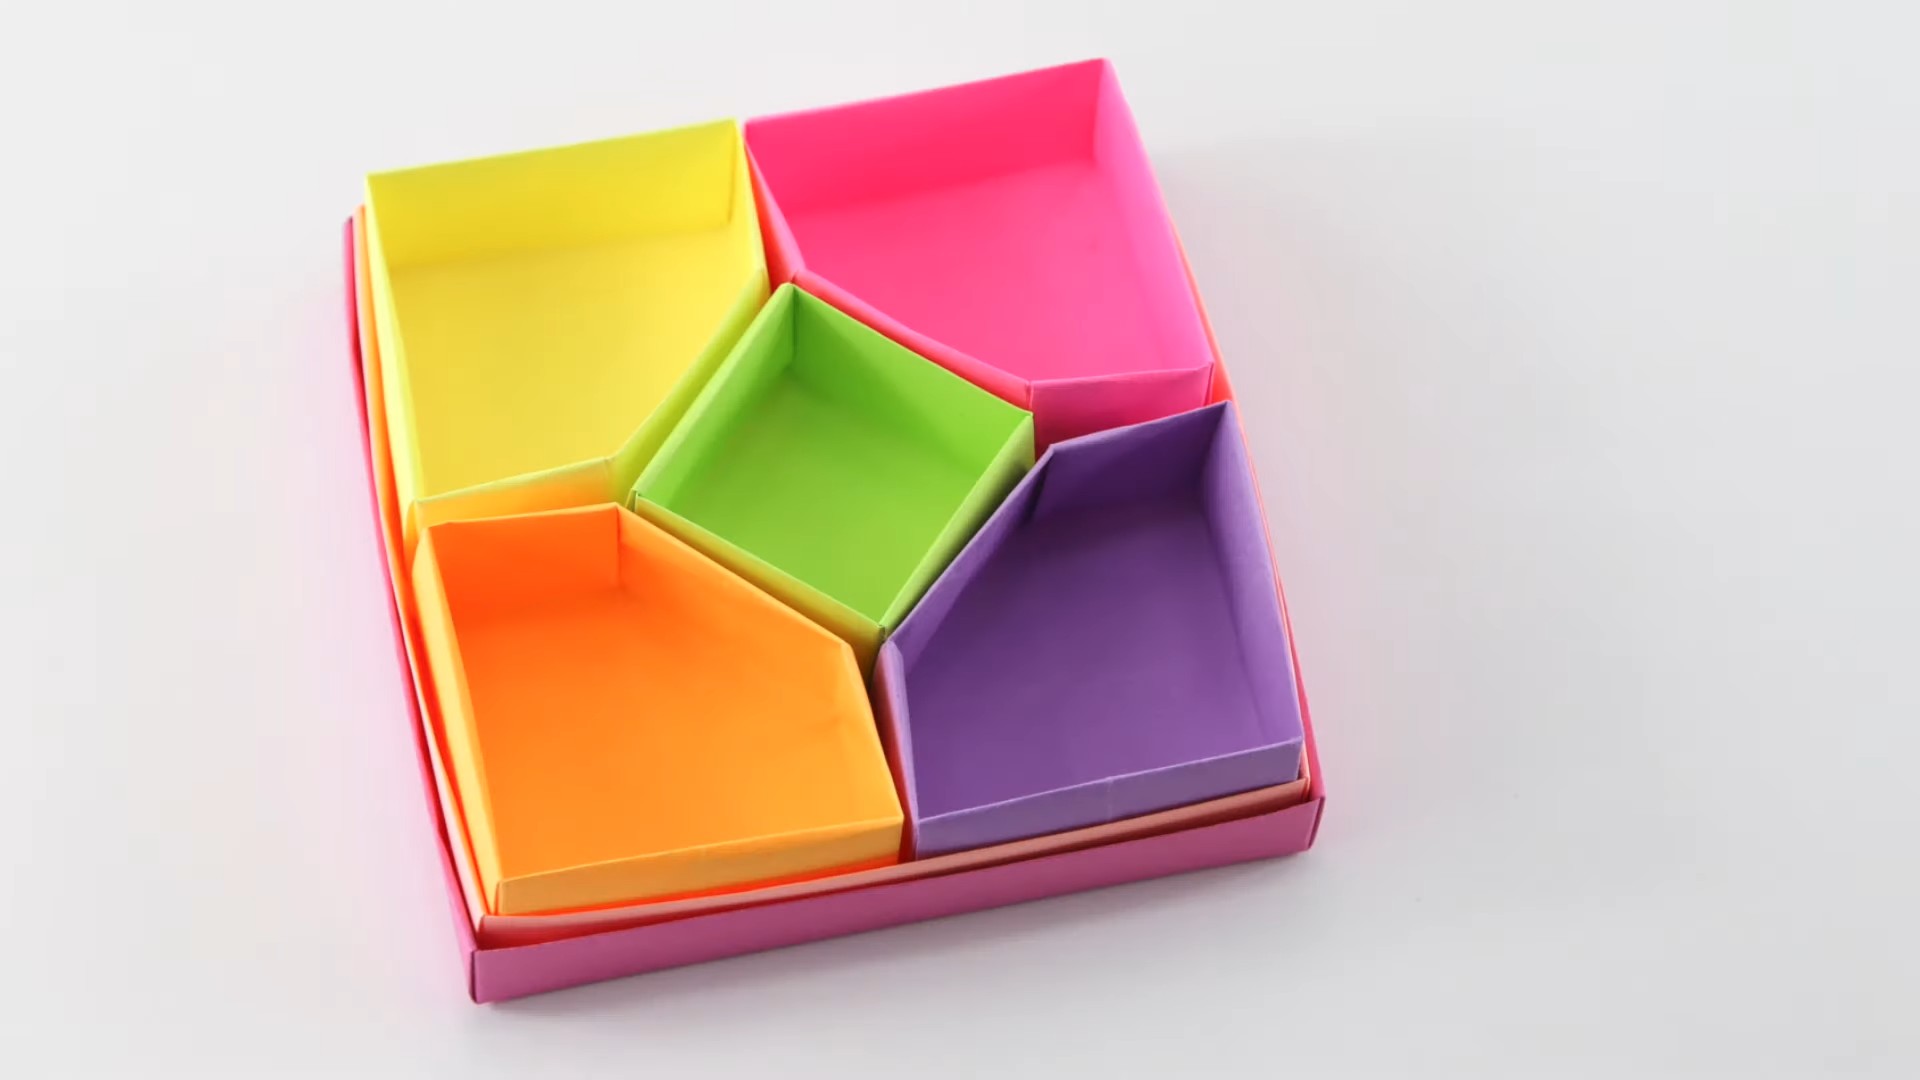
Okay, let’s be honest, we all have that one drawer (or maybe several!) that’s a chaotic mess of socks, underwear, or random office supplies. It’s a black hole where things go to disappear. But fear not! I’m going to show you how to create custom origami box dividers that will bring order and beauty to your drawers, all with just paper! This is a super fun and surprisingly effective way to organize your life, one fold at a time.
What You’ll Need
Before we dive in, let’s gather our supplies. The beauty of this project is that it’s incredibly budget-friendly.
* Paper: This is the star of the show! You can use origami paper, scrapbook paper, wrapping paper, or even sturdy printer paper. The thicker the paper, the sturdier your dividers will be. I personally love using patterned scrapbook paper for a pop of color and personality. Consider the size of your drawer when choosing the paper size. Larger drawers will require larger sheets of paper.
* Ruler: A ruler will help you make precise measurements and ensure your folds are straight. Trust me, straight folds are key to a professional-looking divider.
* Pencil: For marking measurements and guidelines. A light pencil mark is easily erased if needed.
* Scissors or Paper Cutter: For trimming the paper to the correct size. A paper cutter is especially helpful if you’re making a lot of dividers.
* Bone Folder (Optional): A bone folder is a tool used to create crisp, clean folds. It’s not essential, but it can definitely elevate the look of your dividers. You can also use the back of a spoon or a credit card in a pinch.
* Cutting Mat (Optional): Protect your work surface with a cutting mat, especially if you’re using a paper cutter.
* Double-Sided Tape or Glue (Optional): For extra security, you can use double-sided tape or glue to reinforce the folds. This is especially helpful if you’re using thinner paper.
* Your Drawer: Of course! We need something to organize. Measure the inside dimensions of your drawer carefully. This will determine the size of the paper you need to use.
Planning Your Dividers
Before you start folding, take some time to plan the layout of your dividers. This will help you determine the size and number of dividers you need.
* Measure Your Drawer: Accurately measure the length, width, and depth of your drawer’s interior. Write these measurements down.
* Decide on Compartment Sizes: Think about what you’ll be storing in the drawer and how you want to divide the space. Do you need small compartments for socks, larger compartments for t-shirts, or a combination of both?
* Sketch a Layout: Use a piece of paper to sketch out a rough layout of your dividers. This will help you visualize the final result and ensure that your dividers will fit properly.
* Calculate Paper Size: Based on your sketch, calculate the size of the paper you’ll need for each divider. Remember to account for the folds. A good rule of thumb is to start with a square piece of paper that’s at least twice the height of the desired divider.
Folding the Basic Divider
This is the fundamental fold that we’ll be using to create our dividers. It’s relatively simple, but it’s important to get it right.
1. Prepare Your Paper: Start with a square piece of paper. If your paper isn’t already square, use your ruler and scissors or paper cutter to trim it to the correct size.
2. Fold in Half Diagonally: Fold the paper in half diagonally, creating a triangle. Make sure the edges line up perfectly. Crease the fold firmly.
3. Unfold: Unfold the paper. You should now have a crease running diagonally across the square.
4. Fold in Half Diagonally (Opposite Direction): Fold the paper in half diagonally again, but this time fold it in the opposite direction. Crease the fold firmly.
5. Unfold: Unfold the paper. You should now have two creases running diagonally across the square, forming an “X”.
6. Fold in Half Horizontally: Fold the paper in half horizontally, bringing the top edge to the bottom edge. Crease the fold firmly.
7. Unfold: Unfold the paper. You should now have a horizontal crease running across the square.
8. Fold in Half Vertically: Fold the paper in half vertically, bringing the left edge to the right edge. Crease the fold firmly.
9. Unfold: Unfold the paper. You should now have a vertical crease running across the square.
10. Collapse into a Square: Now, gently collapse the paper along the creases. You should be able to push the corners inward, causing the paper to fold into a smaller square. This might take a little practice, but once you get the hang of it, it’s easy.
11. Fold the Top Flaps to the Center Line: Take the top two flaps of the square and fold them towards the center line. Crease the folds firmly.
12. Fold the Bottom Flaps to the Center Line: Repeat the previous step with the bottom two flaps. Fold them towards the center line and crease the folds firmly.
13. Fold in Half: Fold the entire piece in half, bringing the top edge to the bottom edge. Crease the fold firmly. This creates the basic divider shape.
Creating Different Divider Heights
The basic divider is a good starting point, but you can easily adjust the height of the divider to suit your needs.
1. Adjusting the Height: The height of the divider is determined by how far you fold the top and bottom flaps towards the center line in steps 11 and 12 of the basic divider instructions.
2. For a Taller Divider: Fold the flaps closer to the center line. The less you fold, the taller the divider will be.
3. For a Shorter Divider: Fold the flaps further towards the center line. The more you fold, the shorter the divider will be.
4. Experiment: Experiment with different folding amounts to find the perfect height for your dividers.
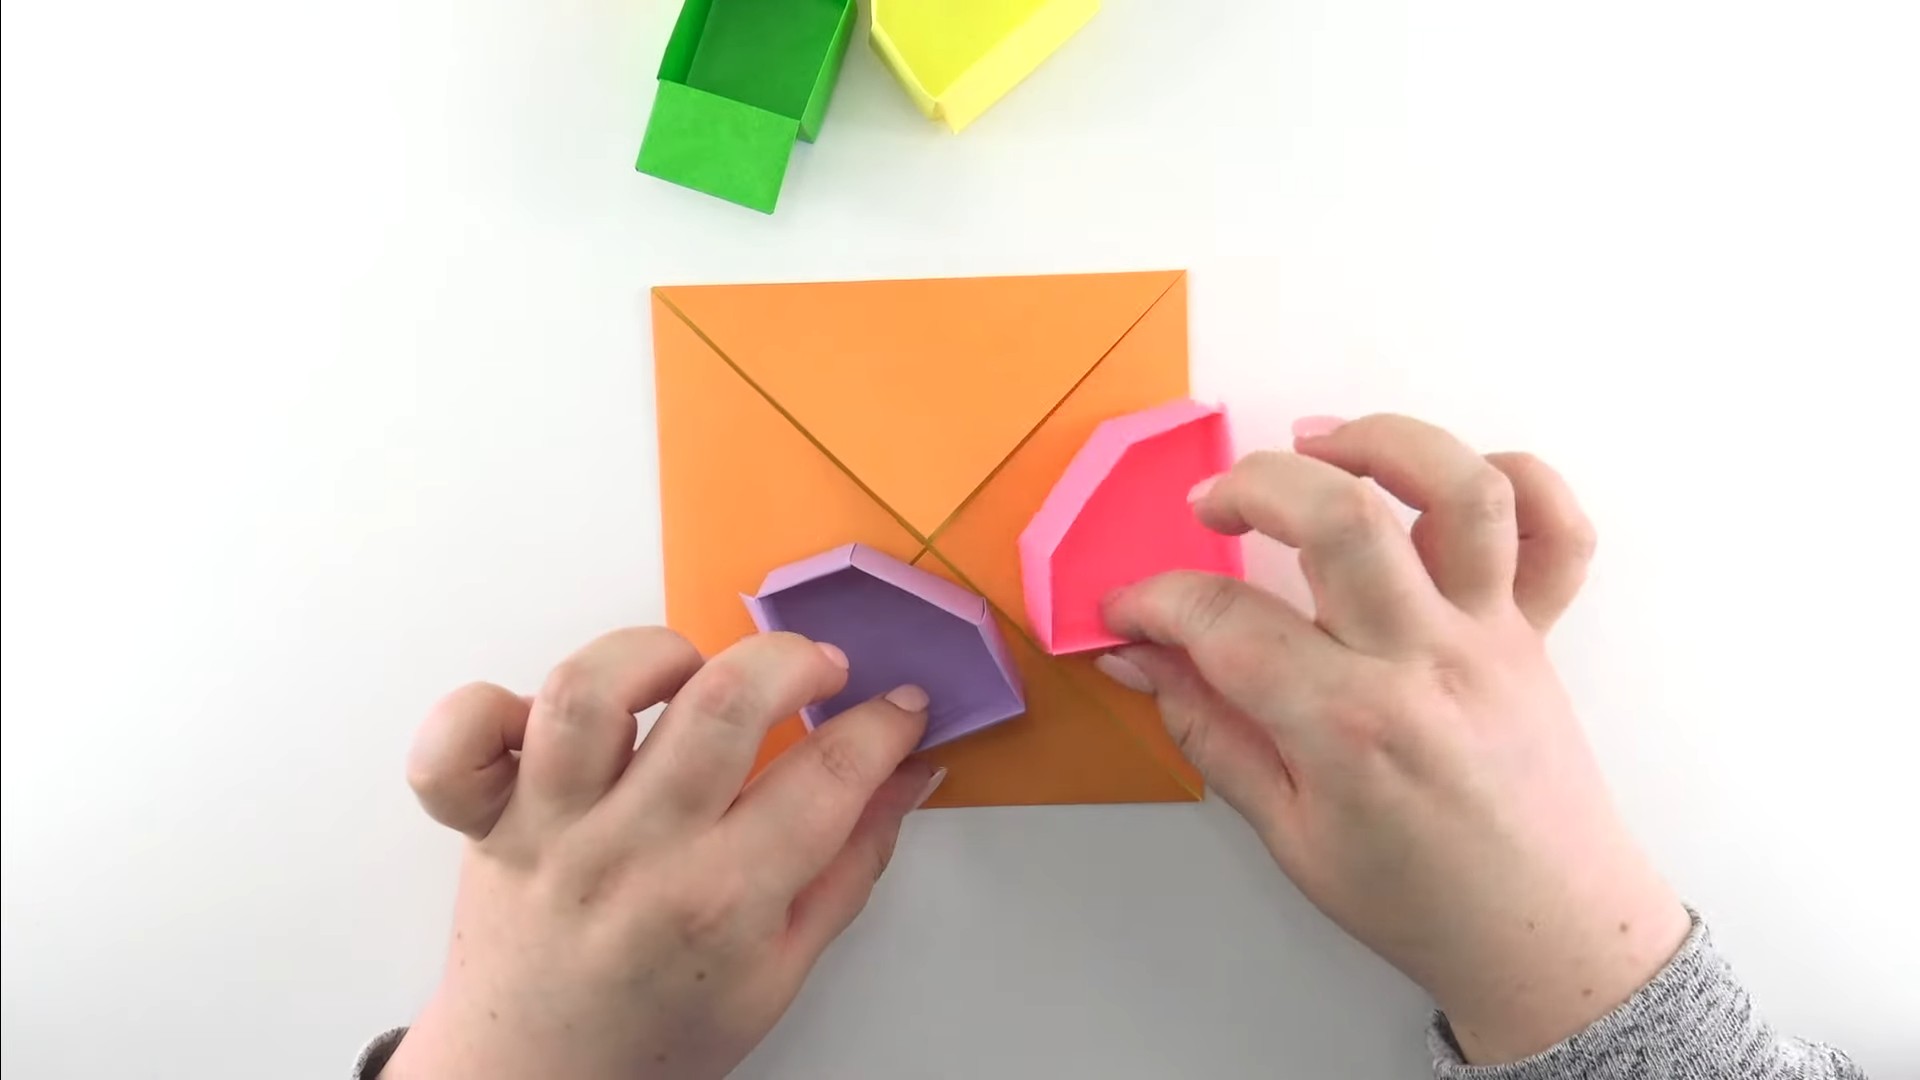
Assembling Your Dividers in the Drawer
Now comes the fun part – putting your dividers in the drawer and seeing your organization dreams come to life!
1. Place the Dividers: Arrange the dividers in your drawer according to your planned layout.
2. Adjust as Needed: Don’t be afraid to adjust the position of the dividers until you’re happy with the arrangement.
3. Secure the Dividers (Optional): If you want to ensure that the dividers stay in place, you can use double-sided tape or glue to secure them to the bottom of the drawer. This is especially helpful if you’re storing heavy items in the drawer.
4. Fill Your Drawer: Now, fill your drawer with your belongings, organizing them into the compartments created by the dividers.
5. Admire Your Work: Step back and admire your beautifully organized drawer!
Advanced Techniques and Variations
Once you’ve mastered the basic divider, you can try some more advanced techniques and variations to create even more customized dividers.
* Interlocking Dividers: Create slots in your dividers so they can interlock with each other, creating a more stable and secure grid. To do this, make small cuts along the edges of the dividers before folding.
* Dividers with Lids: Add lids to your dividers to keep dust and debris out. To do this, create a separate piece of paper that’s slightly larger than the divider and fold it into a lid shape.
* Dividers with Pockets: Add pockets to your dividers to store small items like jewelry or hair accessories. To do this, attach a small piece of paper to the inside of the divider, creating a pocket.
* Using Different Paper Types: Experiment with different types of paper to create dividers with different textures and appearances. For example, you could use textured paper, metallic paper, or even fabric-covered paper.
* Adding Decorations: Decorate your dividers with paint, markers, stickers, or other embellishments to add a personal touch.
Tips and Tricks for Success
Here are a few extra tips and tricks to help you create the best possible origami box dividers:
* Practice Makes Perfect: Don’t be discouraged if your first few dividers aren’t perfect. The more you practice, the better you’ll get.
* Use a Bone Folder: A bone folder will help you create crisp, clean folds, which will make your dividers look more professional.
* Measure Accurately: Accurate measurements are essential for creating dividers that fit properly in your drawer.
* Choose the Right Paper: The type of paper you use will affect the
Conclusion
So, there you have it! Transforming ordinary paper into functional and aesthetically pleasing origami box dividers is not just a craft project; it’s a game-changer for your organizational needs. We’ve walked you through the simple steps to create these ingenious dividers, and hopefully, you’re already envisioning the possibilities.
Why is this DIY origami box divider trick a must-try? Because it’s incredibly versatile, cost-effective, and customizable. Forget those flimsy, mass-produced plastic dividers that never quite fit right. With origami, you can tailor the size, shape, and even the color of your dividers to perfectly suit your drawers, boxes, and containers. Imagine opening your drawers to find everything neatly arranged, from your socks and underwear to your craft supplies and office essentials. The satisfaction is immense!
Beyond the practical benefits, this project offers a mindful and creative outlet. The act of folding paper is surprisingly therapeutic, allowing you to disconnect from the digital world and engage in a tactile, meditative activity. Plus, it’s a fantastic way to upcycle old magazines, newspapers, or even wrapping paper, giving them a new lease on life and reducing waste.
Looking for variations? Absolutely! Experiment with different paper types. Sturdier cardstock will create more robust dividers, ideal for heavier items. Decorative paper, patterned origami paper, or even fabric-backed paper can add a touch of personality and style to your organizational system. Consider adding embellishments like stickers, washi tape, or even small labels to further customize your dividers. For larger boxes, you can create a grid system by interlocking multiple origami dividers. Think about using different colors to categorize items within your box – for example, blue for socks, green for underwear, and yellow for accessories. You can also adjust the height of the dividers to accommodate different sized items. Lower dividers are perfect for smaller items like jewelry, while taller dividers are better suited for larger items like scarves or belts.
Don’t be afraid to get creative and adapt the basic origami box divider design to your specific needs and preferences. The possibilities are truly endless!
We wholeheartedly encourage you to give this DIY project a try. It’s a simple, rewarding, and incredibly useful skill to have. Once you’ve mastered the basic fold, you’ll be amazed at how quickly you can transform your cluttered spaces into organized havens.
And most importantly, we want to hear about your experience! Share your creations with us on social media using #OrigamiBoxDividers and tell us how this DIY trick has helped you organize your life. We can’t wait to see your innovative designs and hear your success stories. Happy folding!
Frequently Asked Questions (FAQ)
What kind of paper is best for making origami box dividers?
The best paper for origami box dividers depends on the intended use and the desired aesthetic. For general use and lighter items, standard origami paper or printer paper works well. These are easy to fold and come in a wide variety of colors and patterns. However, for heavier items or for dividers that need to be more durable, consider using cardstock or thicker paper. Cardstock provides more structure and is less likely to tear or bend under pressure. You can also experiment with decorative paper, wrapping paper, or even fabric-backed paper for a more unique and stylish look. Keep in mind that thicker papers may be more challenging to fold, so practice with scrap paper first.
How do I measure the paper to ensure the dividers fit my box perfectly?
Accurate measurements are crucial for creating origami box dividers that fit snugly and effectively. Start by measuring the interior dimensions of your box or drawer. Determine the desired height of the dividers. Then, calculate the size of the paper needed based on the origami folding pattern you’re using. A good rule of thumb is to create a test divider with scrap paper first. Fold it according to the instructions and then place it in your box to see if it fits properly. Adjust the paper size as needed until you achieve the perfect fit. Remember to account for the thickness of the paper when calculating the dimensions, especially if you’re using thicker cardstock.
Can I use these origami dividers in drawers with soft-close mechanisms?
Yes, you can generally use origami dividers in drawers with soft-close mechanisms. However, it’s important to ensure that the dividers are securely in place and don’t shift or move around when the drawer is opened or closed. If the dividers are loose, they could potentially interfere with the soft-close mechanism and cause it to malfunction. To prevent this, consider using double-sided tape or adhesive putty to secure the dividers to the bottom of the drawer. You can also create a snug fit by carefully measuring the dividers and ensuring they fill the space completely.
How do I clean the origami box dividers if they get dusty or dirty?
Cleaning origami box dividers is relatively simple, but it’s important to be gentle to avoid damaging the paper. For light dust, you can use a soft brush or a dry cloth to gently wipe the surface of the dividers. For more stubborn dirt or stains, you can use a slightly damp cloth with a mild soap solution. Be sure to wring out the cloth thoroughly to avoid getting the paper too wet. Gently wipe the affected area and then dry it immediately with a clean, dry cloth. Avoid using harsh chemicals or abrasive cleaners, as these can damage the paper and fade the colors.
Are these origami dividers suitable for storing food items?
While origami box dividers are great for organizing a variety of items, they are generally not recommended for storing food items directly. Paper is porous and can absorb moisture and odors, which can contaminate food. Additionally, some papers may contain chemicals or dyes that are not food-safe. If you want to use origami dividers in your pantry or kitchen, consider using them to organize packaged food items, such as spice packets, tea bags, or snack bars. You can also line the dividers with food-safe plastic wrap or parchment paper to create a barrier between the paper and the food.
How long will these origami box dividers last?
The lifespan of origami box dividers depends on several factors, including the type of paper used, the frequency of use, and the environmental conditions. Dividers made from thicker cardstock will generally last longer than those made from thinner paper. Frequent handling and exposure to moisture or humidity can shorten their lifespan. To prolong the life of your origami dividers, avoid placing them in damp or humid environments. Handle them gently and avoid putting excessive weight on them. If a divider becomes damaged or worn, simply replace it with a new one. The beauty of origami is that it’s easy and inexpensive to create new dividers whenever needed.
Can I use these dividers in moving boxes?
Yes, origami box dividers can be incredibly useful for organizing items within moving boxes. They can help prevent items from shifting and breaking during transport. Use sturdier paper like cardstock for added durability. Consider reinforcing the corners with tape for extra support.
What if I make a mistake while folding?
Don’t worry! Mistakes happen. The beauty of origami is that you can simply unfold the paper and start again. If the paper becomes creased or torn, you can try to smooth it out with your fingers or a bone folder. If the damage is too severe, simply grab a new sheet of paper and start over. Practice makes perfect, so don’t be discouraged if your first few attempts aren’t perfect.
Where can I find more origami folding patterns?
There are countless resources available online and in libraries for learning new origami folding patterns. Websites like YouTube, Instructables, and Origami Resource Center offer a wide variety of tutorials and diagrams. You can also find origami books at most bookstores and libraries. Experiment with different patterns and find the ones that you enjoy the most and that best suit your organizational needs.
Leave a Comment