

DIY Lavender Sachets: Ever wished you could bottle the calming scent of a summer meadow and keep it with you all year round? Well, you absolutely can! For centuries, lavender has been cherished not only for its beauty but also for its incredible fragrance and therapeutic properties. From ancient Romans using it to scent their baths to medieval Europeans strewing it on floors to ward off illness, lavender has a rich and fragrant history.
Today, amidst our busy lives, we all crave a little tranquility. That’s where these simple, yet incredibly effective, DIY Lavender Sachets come in. Imagine tucking one into your pillowcase for a restful night’s sleep, placing one in your drawers to keep your clothes smelling fresh, or even gifting one to a friend who needs a little extra relaxation. I’m going to show you how to create these little bundles of bliss yourself. Not only is it a fun and rewarding project, but it’s also a fantastic way to save money and personalize your home with a touch of natural aromatherapy. Let’s dive in and discover how to make your own lavender sachets!
DIY Lavender Sachets: A Fragrant and Easy Project
Hey there, fellow crafters! I’m so excited to share this super simple and rewarding DIY project with you: making your own lavender sachets! These little bags of fragrant goodness are perfect for freshening up drawers, closets, cars, or even just keeping on your nightstand for a calming aroma. Plus, they make amazing, personalized gifts! Let’s get started!
What You’ll Need
Before we dive in, let’s gather our supplies. Don’t worry, you probably have a lot of this stuff already!
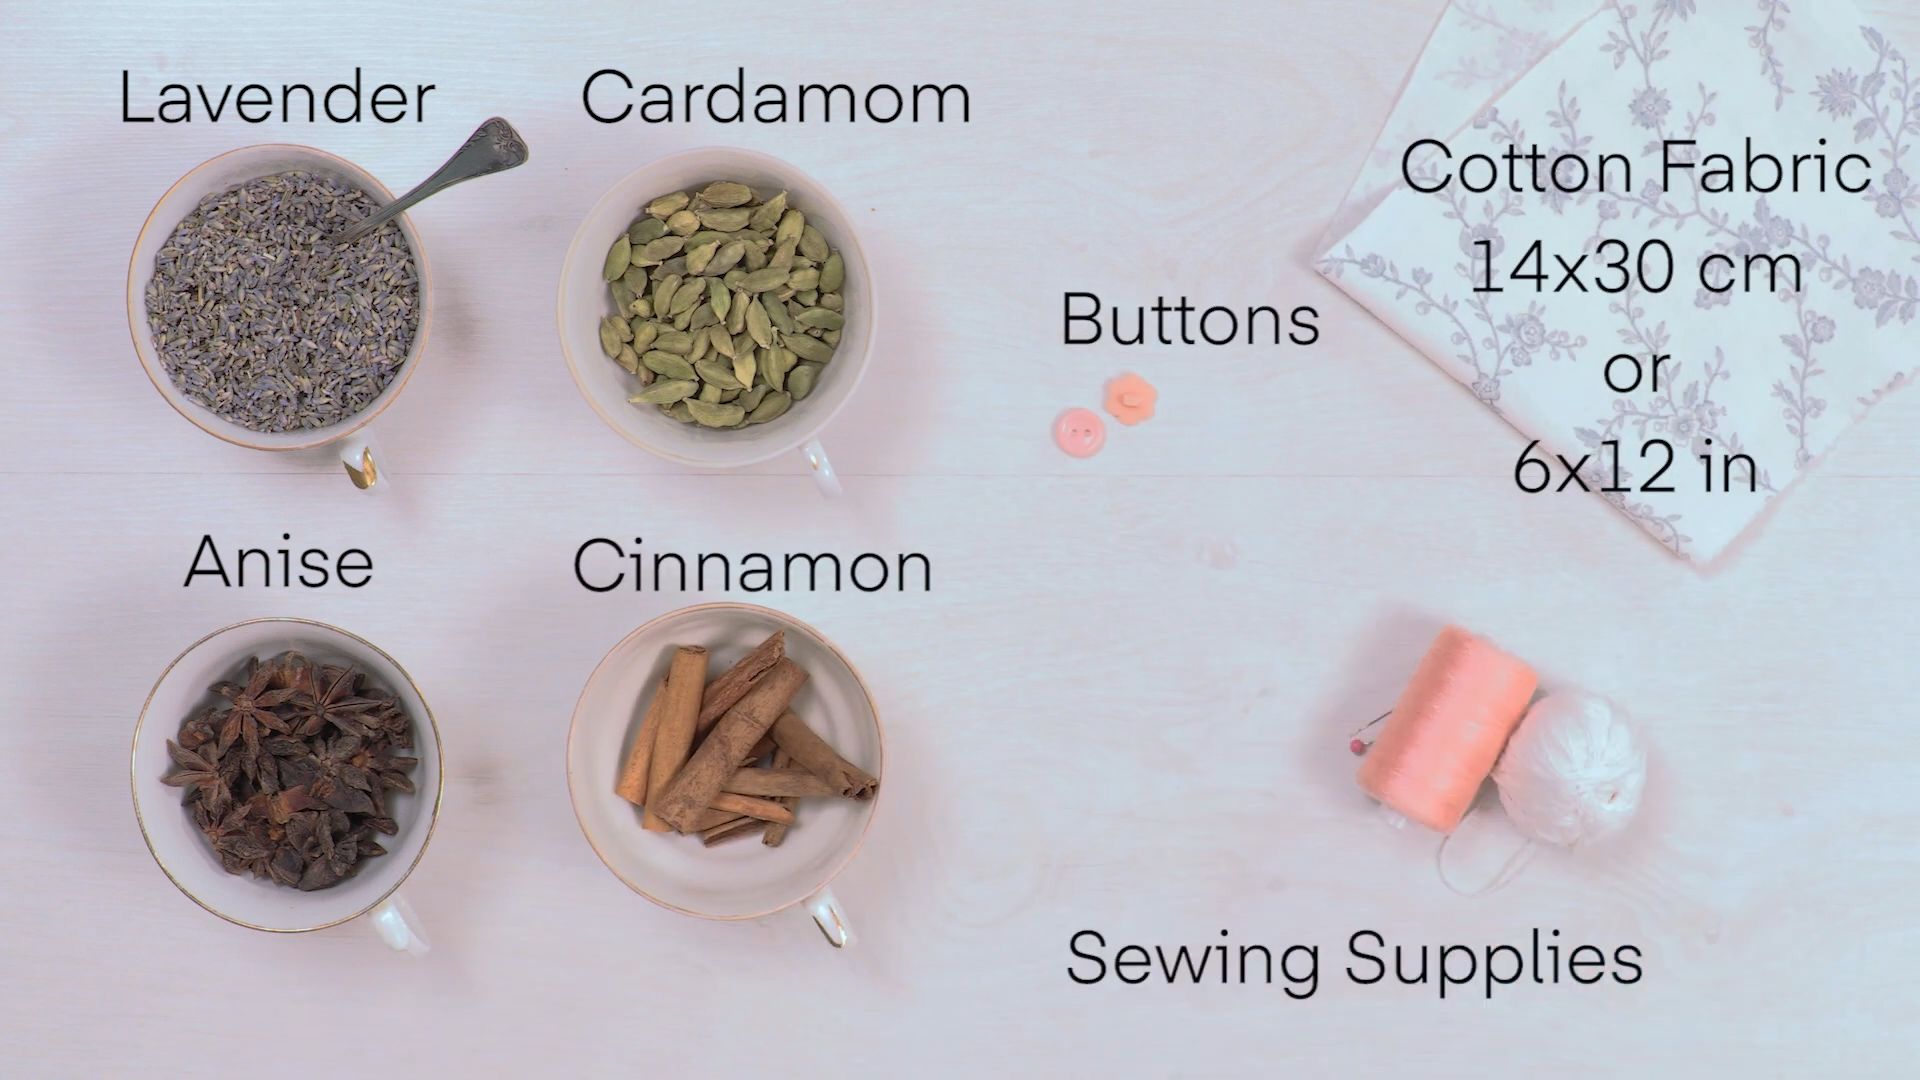
* Dried Lavender Buds: This is the star of the show! You can buy dried lavender buds online, at craft stores, or even grow and dry your own (which is super satisfying, by the way!). The amount you need depends on how many sachets you want to make. I usually buy a big bag because I can’t resist making a whole bunch.
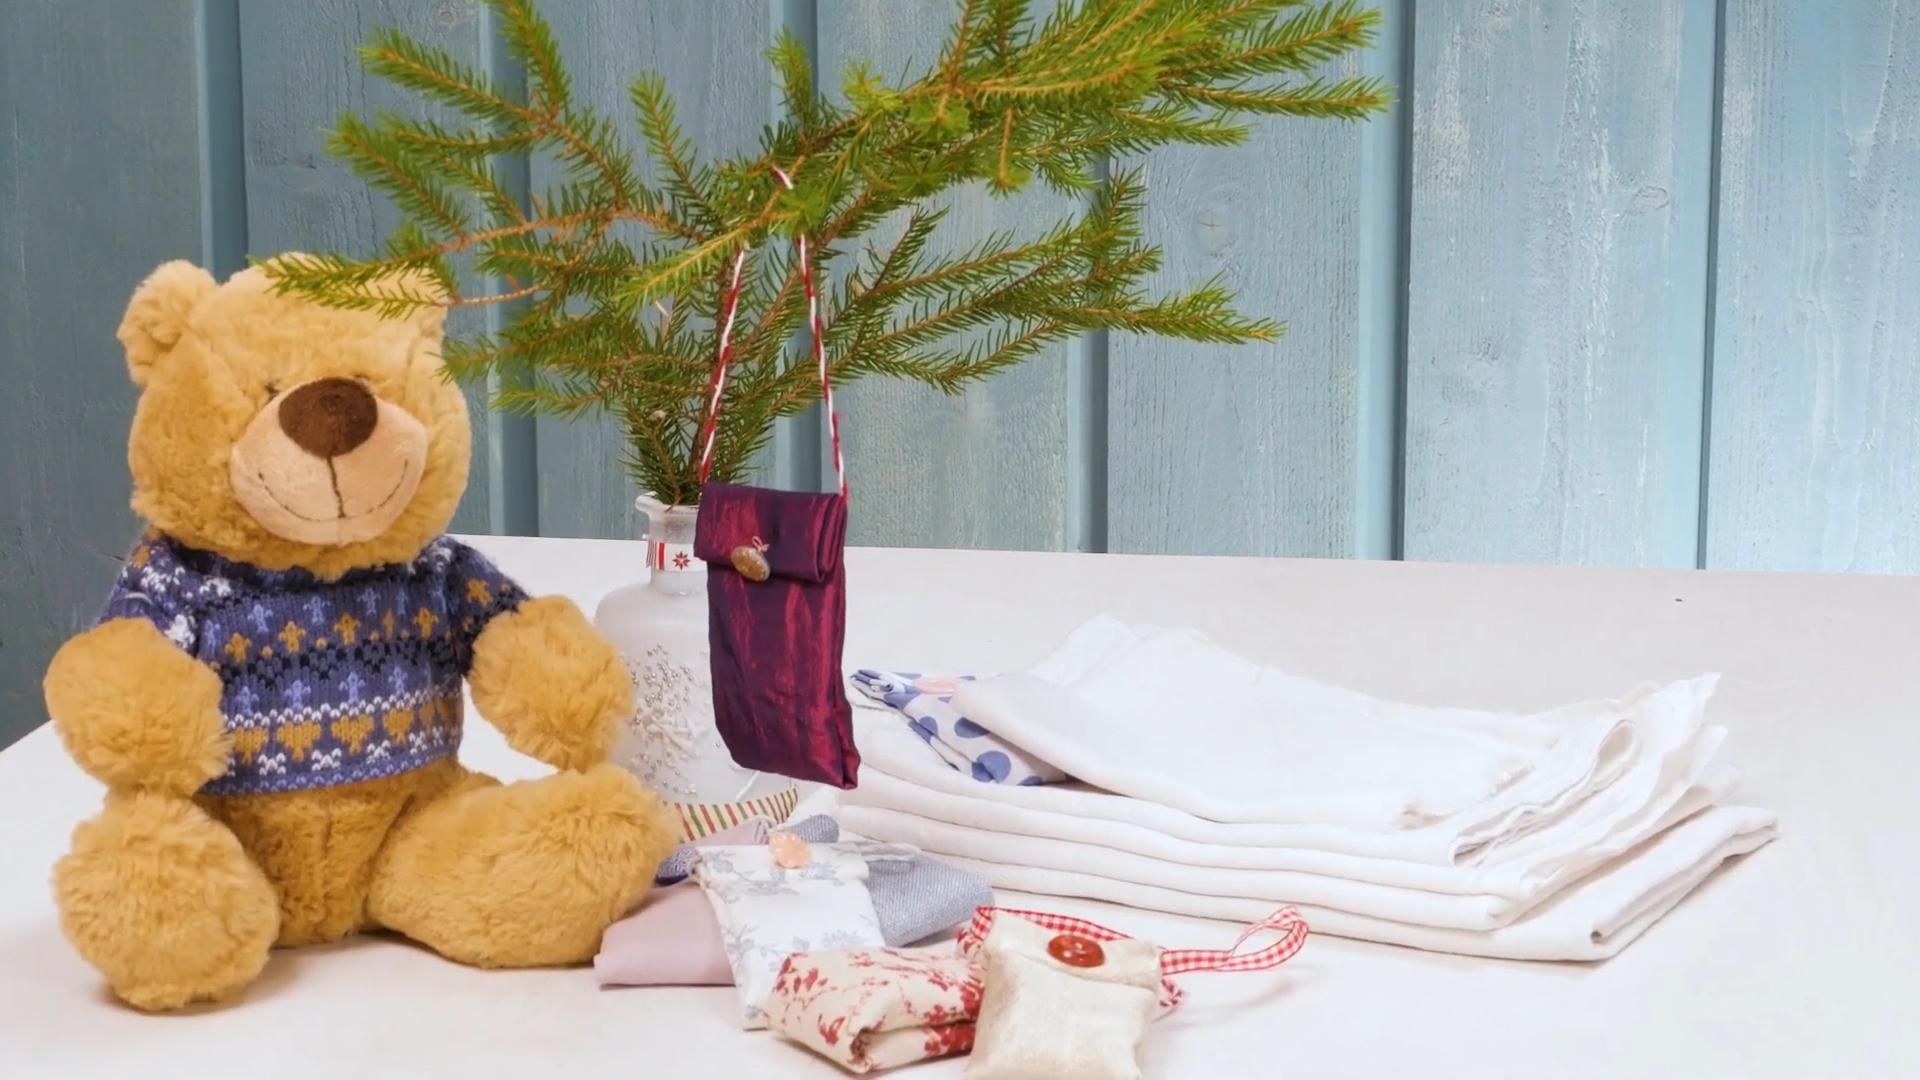
* Fabric: You’ll need some breathable fabric for your sachets. Cotton, linen, muslin, or even burlap work great. Scraps are perfect for this project, so raid your fabric stash!
* Scissors or Rotary Cutter: For cutting your fabric. A rotary cutter and mat are super handy if you’re making a lot of sachets, but scissors work just fine.
* Sewing Machine or Needle and Thread: You can sew these sachets by hand or with a sewing machine. I prefer using my machine because it’s faster, but hand-sewing is perfectly acceptable and adds a lovely handmade touch.
* Measuring Tape or Ruler: To ensure your sachets are the same size.
* Pins: To hold the fabric in place while sewing.
* Funnel (Optional): Makes filling the sachets with lavender much easier and less messy. A paper cone works in a pinch!
* Embellishments (Optional): Get creative! Buttons, ribbons, lace, embroidery floss – anything you like to personalize your sachets.
* Essential Oils (Optional): If you want to boost the fragrance, you can add a few drops of lavender essential oil to the dried buds.
Preparing Your Fabric
Okay, let’s get our fabric ready. This step is crucial for creating neat and uniform sachets.
1. Decide on the Size: Think about where you’ll be using your sachets and choose a size accordingly. I usually make mine around 4×4 inches or 3×5 inches. These sizes are small enough to fit in drawers but large enough to hold a good amount of lavender.
2. Cut the Fabric: Cut two squares or rectangles of fabric for each sachet. Remember to add a seam allowance (about 1/2 inch) to each side. So, if you want a 4×4 inch sachet, cut two 5×5 inch squares.
3. Iron the Fabric: This is an optional step, but it makes sewing much easier and gives your sachets a more professional look. Wrinkled fabric can be tricky to sew, so a quick press is always a good idea.
Sewing the Sachets
Now for the fun part: sewing! Whether you’re using a machine or hand-sewing, the basic process is the same.
1. Pin the Fabric: Place the two pieces of fabric together with the right sides facing each other (the pretty sides should be on the inside). Pin around all four edges, leaving a 2-3 inch opening on one side. This opening is where you’ll fill the sachet with lavender.
2. Sew the Seams: Sew around the pinned edges, using a 1/2 inch seam allowance. Remember to leave that opening! If you’re using a sewing machine, backstitch at the beginning and end of each seam to secure the stitches. If you’re hand-sewing, use a sturdy stitch like a backstitch or running stitch.
3. Clip the Corners: Carefully clip the corners of the fabric, being careful not to cut through the stitches. This will help the corners look neater when you turn the sachet right side out.
4. Turn Right Side Out: Gently turn the sachet right side out through the opening. Use a pencil or chopstick to push out the corners and make them nice and sharp.
5. Press the Seams: Iron the seams flat, paying special attention to the opening. Fold the edges of the opening inward and press them to create a clean edge.
Filling the Sachets
Almost there! Now it’s time to fill our sachets with that lovely lavender.
1. Prepare the Lavender: If you’re using essential oils, add a few drops to the dried lavender buds and mix well. This will give your sachets an extra boost of fragrance.
2. Fill the Sachet: Use a funnel or carefully spoon the lavender buds into the sachet through the opening. Don’t overfill it – you want it to be plump but not bursting at the seams. I usually fill mine about 3/4 full.
3. Close the Opening: Now it’s time to close up that opening. You can do this by hand-sewing it closed with a hidden stitch (also known as a ladder stitch) or by using your sewing machine to topstitch around the entire sachet. A hidden stitch gives a cleaner, more invisible finish, but topstitching is faster and adds a decorative touch.
Embellishing Your Sachets (Optional)
This is where you can really let your creativity shine! Here are a few ideas for embellishing your lavender sachets:
* Ribbon: Tie a ribbon around the sachet for a simple and elegant touch.
* Lace: Add a strip of lace to the front of the sachet for a vintage-inspired look.
* Buttons: Sew on a few buttons for a playful and whimsical feel.
* Embroidery: Embroider a design or initial onto the sachet for a personalized touch.
* Tags: Attach a small tag with a handwritten message or the recipient’s name.
Different Sachet Styles
Want to mix things up a bit? Here are a few variations on the basic sachet design:
* Drawstring Sachets: Instead of sewing the opening closed, create a drawstring closure. Simply fold over the top edge of the sachet and sew a casing for the drawstring. Thread a ribbon or cord through the casing and tie it in a knot.
* Heart-Shaped Sachets: Cut your fabric into heart shapes instead of squares or rectangles. These are perfect for Valentine’s Day or as a romantic gift.
* Scented Pillows: Make larger sachets and fill them with a combination of lavender and other herbs like chamomile or rosemary for a relaxing sleep aid.
* No-Sew Sachets: If you’re not a fan of sewing, you can use fabric glue to create your sachets. Simply glue the edges of the fabric together, leaving an opening for filling, and then glue the opening closed.
Tips and Tricks
Here are a few extra tips to help you make the perfect lavender sachets:
* Use High-Quality Lavender: The better the quality of the lavender, the stronger and longer-lasting the fragrance will be.
* Store Your Sachets Properly: To keep your sachets fresh, store them in an airtight container when not in use.
* Refresh the Fragrance: Over time, the fragrance of your sachets may fade. To refresh them, simply squeeze the sachet gently to release more of the lavender oil or add a few drops of lavender essential oil.
* Experiment with Different Fabrics: Don’t be afraid to try different fabrics to see what you like best. Silk, velvet, and even felt can be used to create unique and beautiful sachets.
* Make it a Group Activity: Making lavender sachets is a fun and relaxing activity to do with friends or family. Gather your supplies, put on some music, and enjoy the process!
Troubleshooting
Sometimes things don’t go exactly as planned. Here are a few common problems and how to fix them:
* Sachet is Too Loose: If your sachet is too loose, it means you didn’t fill it enough. Simply add more lavender buds until it’s plump and firm.
* Seams are Coming Undone: If your seams are coming undone, it means your stitches weren’t secure enough. Go back and reinforce the seams with more stitches.
* Lavender is Leaking Out: If lavender is leaking out of your sachet, it means there’s a hole in the fabric or the seams aren’t completely closed. Patch the hole or resew the seams.
* Sachet Smells Faint: If your sachet doesn’t smell strong enough, add a few drops of lavender essential oil to the buds or replace the old lavender with fresh buds.
Safety Considerations
While lavender is generally safe, here are a few safety considerations to
Conclusion
So, there you have it! Crafting your own DIY lavender sachets is more than just a fun afternoon project; it’s an investment in your well-being, a fragrant declaration of self-care, and a sustainable alternative to commercially produced air fresheners. We’ve explored the simple steps, the readily available materials, and the myriad benefits that these little bundles of aromatic joy can bring to your life.
Why is this DIY trick a must-try? Because it empowers you to control the ingredients, ensuring that you’re only breathing in pure, natural lavender goodness. No harsh chemicals, no synthetic fragrances, just the soothing scent of lavender, carefully curated by you. It’s also incredibly cost-effective. A small bag of dried lavender goes a long way, allowing you to create multiple sachets for a fraction of the price of store-bought options. Plus, the act of creating something with your own hands is inherently rewarding, fostering a sense of accomplishment and connection to your surroundings.
But the beauty of DIY lies in its adaptability. Feel free to experiment with variations to personalize your lavender sachets even further.
Variations and Suggestions:
* Herbal Blends: Don’t limit yourself to just lavender! Combine it with other complementary herbs like chamomile for enhanced relaxation, rosemary for mental clarity, or rose petals for a touch of romance.
* Essential Oil Boost: For an extra burst of fragrance, add a few drops of lavender essential oil to your dried lavender before filling the sachets. Be mindful of the concentration, as essential oils are potent.
* Fabric Choices: While muslin is a classic choice, consider using other breathable fabrics like linen, cotton, or even repurposed scraps of old clothing. Get creative with patterns and colors to match your décor.
* Decorative Touches: Embellish your sachets with embroidery, ribbons, buttons, or beads to add a personal touch. These make wonderful handmade gifts for friends and family.
* Rice or Flaxseed Filler: For a heavier sachet, add a small amount of rice or flaxseed to the lavender. This will also help to retain the scent longer.
* Cedar Chips: Adding cedar chips to your lavender sachets can help to repel moths, making them perfect for storing clothes.
These DIY lavender sachets are not just air fresheners; they are mood enhancers, sleep aids, and natural pest repellents all rolled into one delightful package. They are a testament to the power of simple ingredients and mindful crafting.
We wholeheartedly encourage you to try this DIY trick. Gather your supplies, set aside some time, and immerse yourself in the calming aroma of lavender. We are confident that you’ll find the process both enjoyable and rewarding.
And most importantly, we want to hear about your experience! Share your creations, your variations, and your tips in the comments below. Let’s build a community of lavender lovers, sharing our knowledge and inspiring each other to embrace the beauty of homemade goodness. What fabric did you use? What other herbs did you add? Did you give them as gifts? We can’t wait to see what you create! Embrace the power of DIY and transform your home with the soothing scent of lavender.
FAQ
Q: What exactly are lavender sachets and what are they used for?
A: Lavender sachets are small, porous bags filled with dried lavender buds. They are primarily used for their fragrance, which is known for its calming and relaxing properties. They can be placed in drawers, closets, under pillows, or hung in cars to freshen the air and provide a pleasant scent. They also act as a natural moth repellent.
Q: Where can I buy dried lavender?
A: Dried lavender can be found at a variety of locations. Craft stores like Michaels or Hobby Lobby often carry it in their floral or candle-making sections. Health food stores and specialty spice shops are also good options. Online retailers like Amazon and Etsy offer a wide selection of dried lavender, often in bulk. If you have access to fresh lavender, you can dry it yourself by hanging bunches upside down in a cool, dark, and dry place for several weeks.
Q: What kind of fabric should I use for the sachets?
A: The best fabric for lavender sachets is a breathable, natural material that allows the fragrance to permeate. Muslin is a popular and inexpensive choice. Other good options include linen, cotton, cheesecloth, or even organza for a more decorative look. Avoid using synthetic fabrics like polyester, as they don’t breathe as well and may trap moisture.
Q: How much dried lavender do I need for each sachet?
A: The amount of dried lavender you need will depend on the size of your sachets and your personal preference for fragrance strength. A good starting point is about 1/4 to 1/2 cup of dried lavender per sachet. You can always add more if you want a stronger scent.
Q: How long will the lavender scent last in the sachets?
A: The scent of lavender in the sachets will typically last for several months, depending on the quality of the lavender and the environment in which the sachets are stored. To refresh the scent, you can gently squeeze the sachet to release more of the oils from the lavender buds. You can also add a few drops of lavender essential oil to the sachet to boost the fragrance.
Q: Can I use lavender essential oil instead of dried lavender?
A: While you can use lavender essential oil, it’s best to use it in conjunction with dried lavender rather than as a direct substitute. Essential oil on its own will dissipate quickly. Adding a few drops of lavender essential oil to the dried lavender will enhance and prolong the fragrance. You can also use a carrier like rice or flaxseed to absorb the essential oil and then mix it with the dried lavender.
Q: Are lavender sachets safe for pets and children?
A: Lavender is generally considered safe for pets and children, but it’s important to exercise caution. While the scent of lavender is often calming, some animals may be sensitive to it. Keep the sachets out of reach of pets and young children to prevent them from ingesting the dried lavender, which could cause mild digestive upset. If you notice any adverse reactions, discontinue use.
Q: Can I wash the lavender sachets?
A: It’s generally not recommended to wash lavender sachets, as this can damage the fabric and diminish the fragrance of the lavender. If the sachet becomes soiled, spot clean it gently with a damp cloth and mild soap. Allow it to air dry completely before using it again.
Q: How can I make my lavender sachets more effective as moth repellents?
A: To enhance the moth-repelling properties of your lavender sachets, consider adding cedar chips to the lavender mixture. Cedarwood is a natural moth repellent and complements the scent of lavender. You can also place the sachets directly in drawers and closets where moths are likely to be present. Regularly check and refresh the sachets to maintain their effectiveness.
Q: What are some other creative uses for DIY lavender sachets?
A: Beyond freshening drawers and closets, lavender sachets can be used in a variety of creative ways. Place them under your pillow to promote relaxation and sleep. Keep one in your car to freshen the air and reduce stress during commutes. Tuck them into your luggage to keep your clothes smelling fresh while traveling. Give them as thoughtful handmade gifts to friends and family. You can even use them as potpourri in decorative bowls. The possibilities are endless!
Leave a Comment