

DIY Handmade Scrapbook Gift: Looking for a heartfelt and unique present that screams “I put thought into this!”? Forget generic store-bought items; let’s dive into the wonderful world of crafting a DIY handmade scrapbook gift! For generations, scrapbooks have been treasured repositories of memories, acting as tangible time capsules filled with photos, mementos, and stories. From Victorian-era albums meticulously documenting family histories to modern-day travel journals bursting with color, the art of scrapbooking has always been about preserving what matters most.
But why should you embark on this creative journey? In our increasingly digital world, the personal touch is often lost. A DIY handmade scrapbook gift offers something truly special: a personalized, one-of-a-kind keepsake that shows you care. It’s a chance to relive shared experiences, celebrate milestones, and create a lasting legacy. Plus, let’s be honest, it’s incredibly therapeutic! I find the process of organizing photos, choosing embellishments, and writing heartfelt captions to be incredibly relaxing and rewarding. So, if you’re ready to unleash your inner artist and create a gift that will be cherished for years to come, keep reading! I’m going to share some fantastic tips and tricks to make your DIY handmade scrapbook gift a resounding success.
Creating a Personalized DIY Scrapbook: A Heartfelt Gift
Hey there, fellow crafters! I’m so excited to share one of my favorite DIY projects with you: creating a personalized scrapbook. It’s the perfect gift for birthdays, anniversaries, graduations, or just because! Nothing says “I care” like a handmade, memory-filled scrapbook. Let’s dive in!
Gathering Your Supplies
Before we get started, let’s make sure we have everything we need. This will save you time and frustration later on. Trust me, I’ve been there!
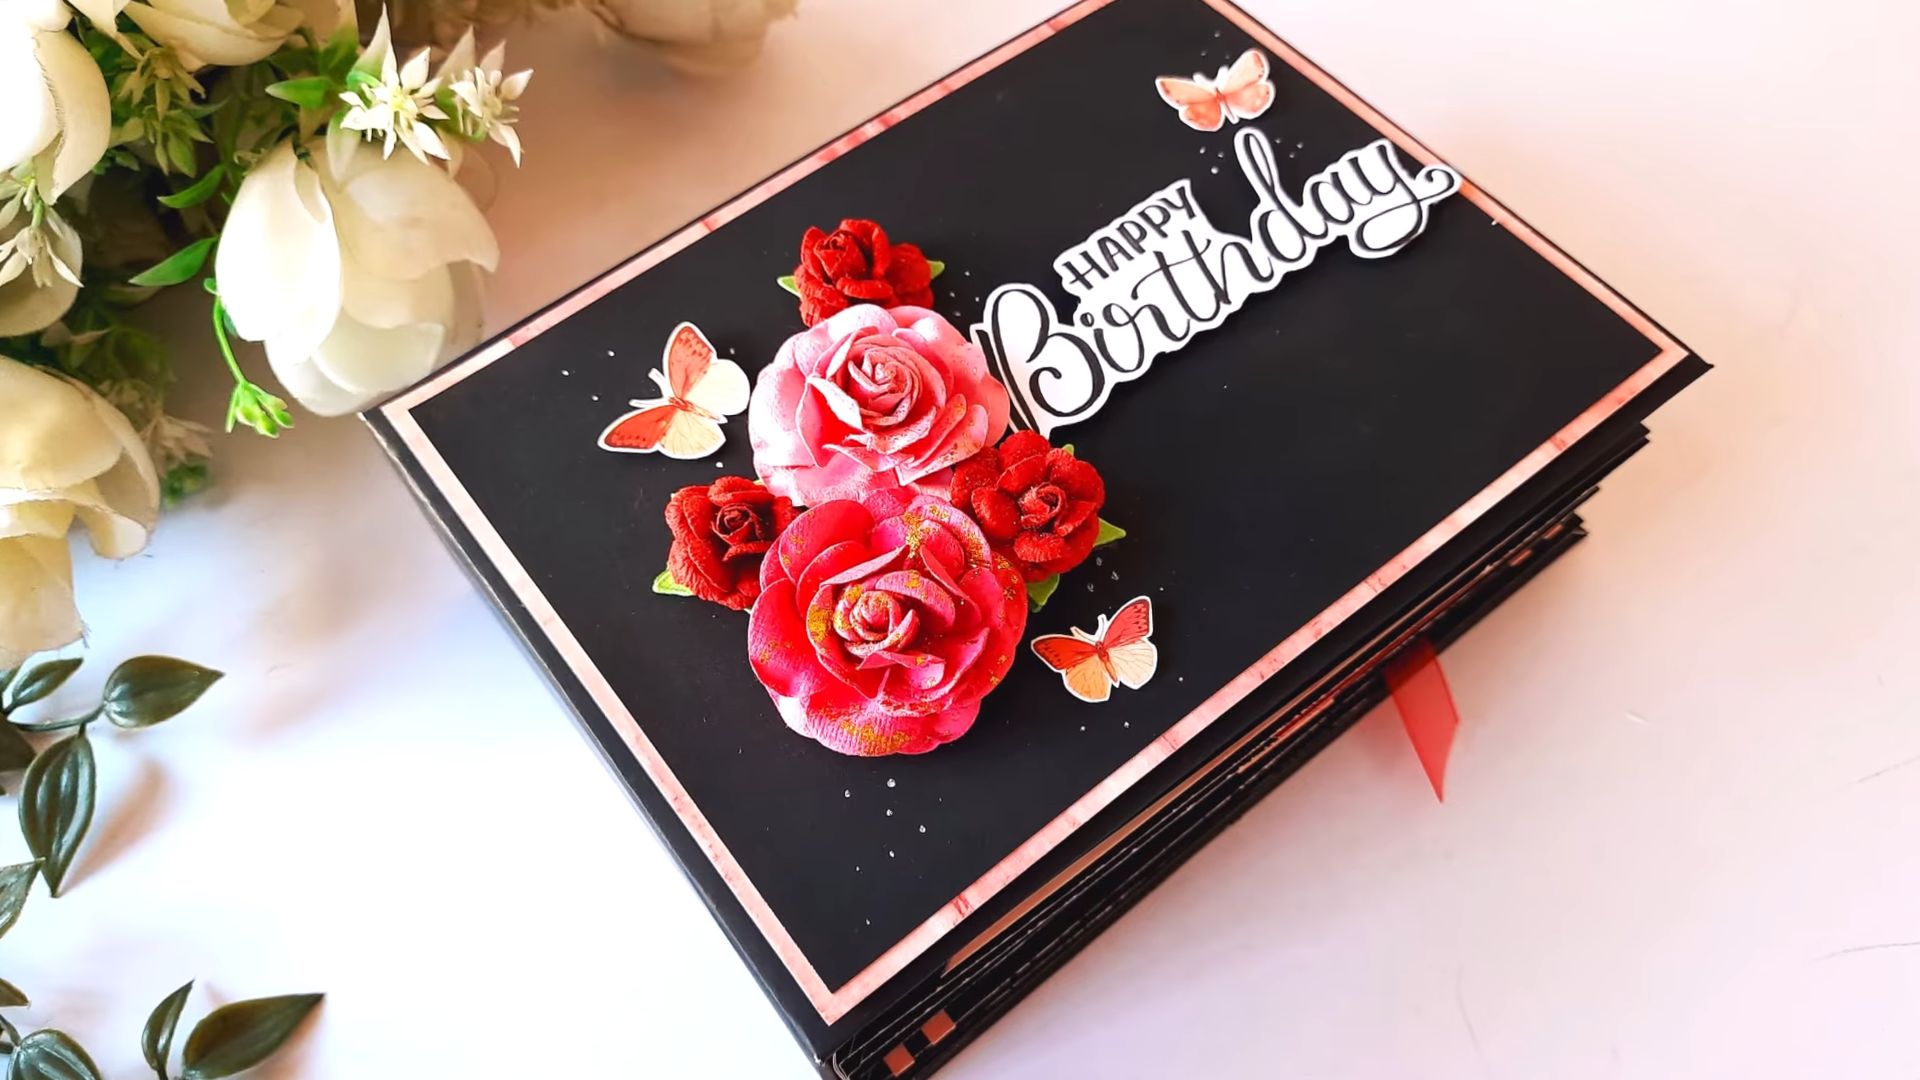
* Scrapbook Album: Choose a size and style that suits your needs. I personally love the 12×12 inch albums, as they offer plenty of space for photos and embellishments. You can find albums with post-bound, ring-bound, or strap-hinge bindings.
* Photos: This is the heart of your scrapbook! Gather all the photos you want to include. Print them out in various sizes to add visual interest.
* Patterned Paper: Select a variety of patterned papers that complement your photos and the overall theme of your scrapbook. Think about colors, textures, and designs.
* Cardstock: Cardstock is essential for creating sturdy photo mats, journaling blocks, and embellishments. Choose colors that coordinate with your patterned paper.
* Adhesive: You’ll need a reliable adhesive to attach your photos, paper, and embellishments. I recommend using photo-safe adhesive runners, glue dots, or double-sided tape. Avoid liquid glue, as it can warp your photos and paper.
* Scissors and Paper Trimmer: A good pair of scissors and a paper trimmer will help you cut your paper and photos accurately.
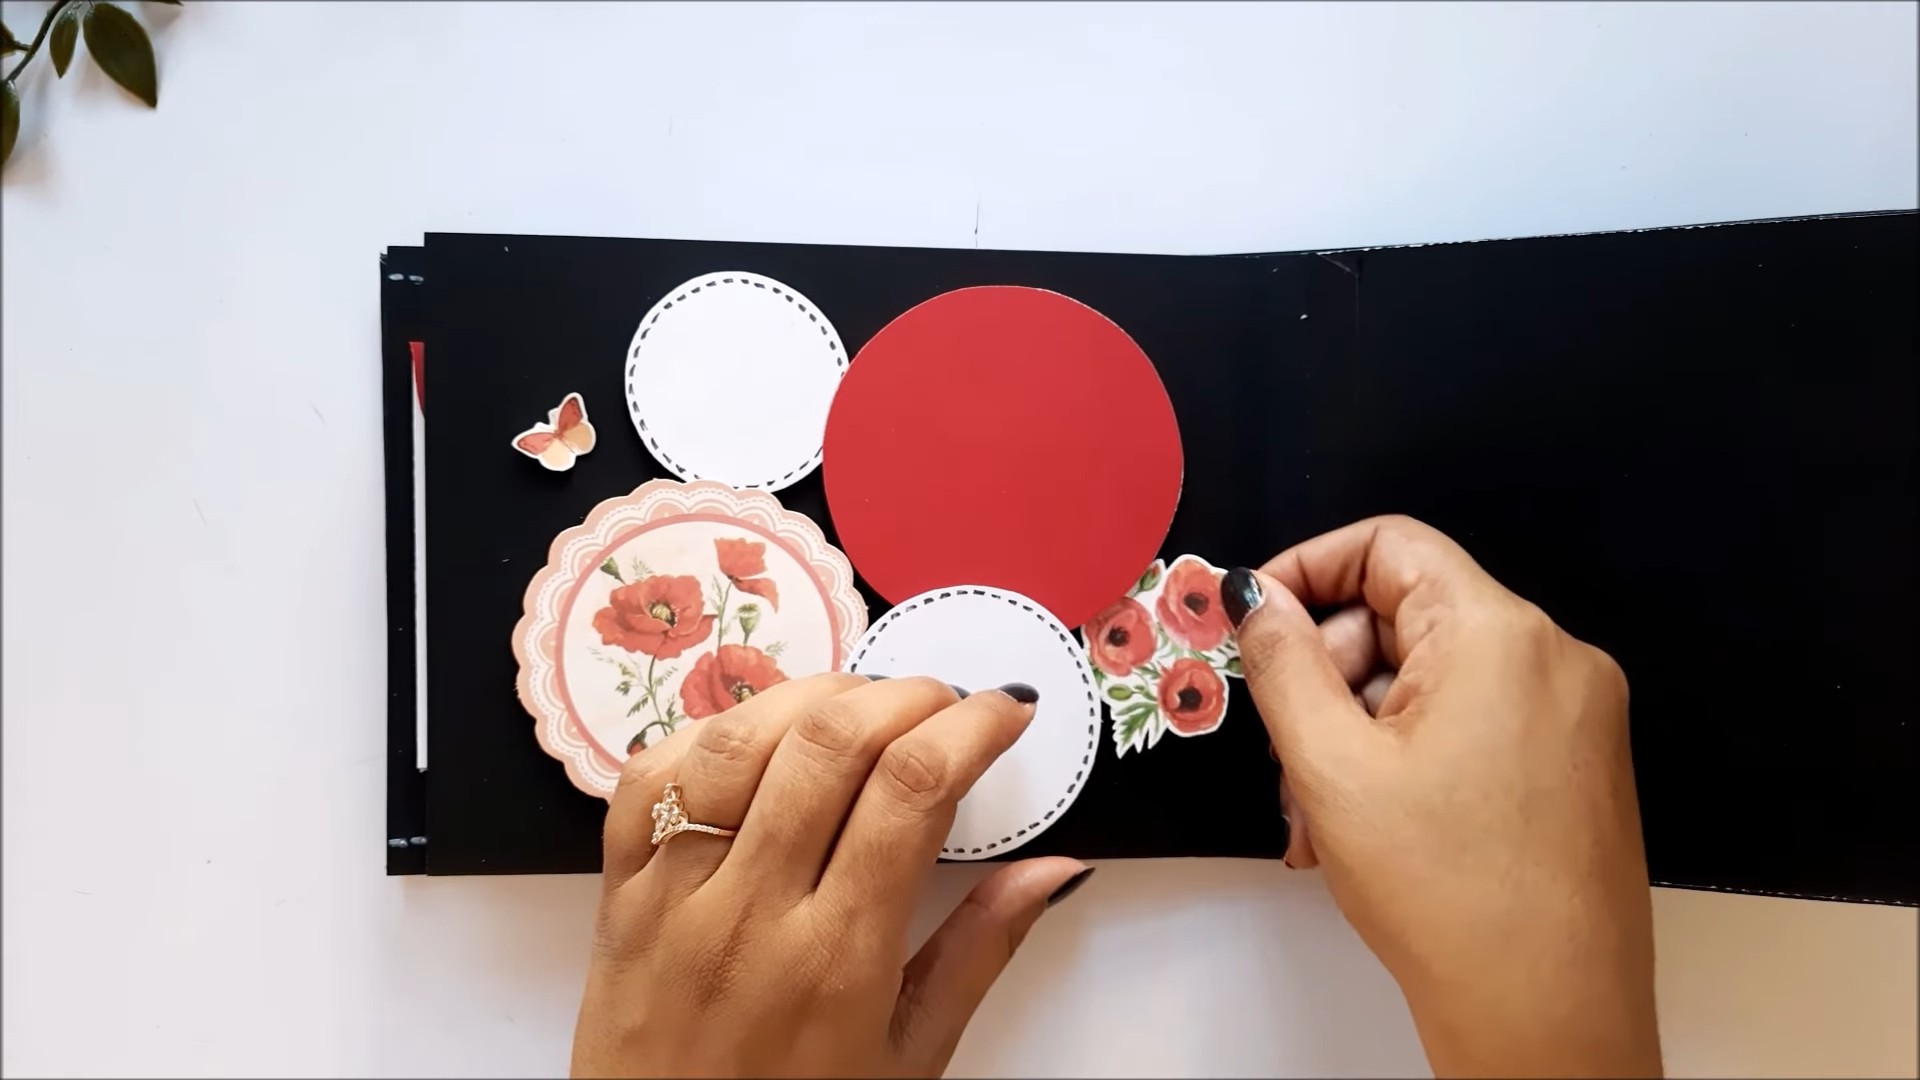
* Embellishments: This is where you can really get creative! Gather a variety of embellishments, such as stickers, die-cuts, ribbons, buttons, brads, and washi tape.
* Journaling Pens: You’ll need pens to write captions, stories, and memories alongside your photos. Choose pens that won’t bleed or fade over time. I prefer archival-quality pens.
* Optional Tools: Consider using a corner rounder, hole punch, stencils, and stamps to add extra flair to your scrapbook.
Planning Your Layouts
Before you start gluing everything down, it’s a good idea to plan your layouts. This will help you create a cohesive and visually appealing scrapbook.
* Choose a Theme: Decide on a theme for your scrapbook. This could be a specific event, person, or time period. Having a theme will help you narrow down your photo selection and choose appropriate embellishments.
* Sort Your Photos: Organize your photos chronologically or by event. This will make it easier to tell a story with your scrapbook.
* Sketch Your Layouts: Use a pencil and paper to sketch out your layouts. Experiment with different photo arrangements, paper placements, and embellishment ideas.
* Consider the Flow: Think about how the pages will flow together. Use similar colors, patterns, and embellishments to create a sense of continuity.
* Leave White Space: Don’t overcrowd your pages. Leave some white space to give your eyes a place to rest.
Creating Your Scrapbook Pages
Now for the fun part! Let’s start creating those scrapbook pages.
Page 1: The Title Page
1. Choose a Background Paper: Select a patterned paper or cardstock for the background of your title page.
2. Add a Title: Create a title for your scrapbook using letter stickers, die-cuts, or a journaling pen. Make it eye-catching and relevant to the theme of your scrapbook. For example, if it’s a wedding scrapbook, you could title it “Our Wedding Journey.”
3. Include a Photo: Add a favorite photo that represents the overall theme of your scrapbook.
4. Add Embellishments: Embellish your title page with stickers, ribbons, or other decorative elements.
5. Journaling (Optional): You can add a brief introduction or dedication on the title page.
Subsequent Pages: Building the Story
1. Select Background Paper: Choose a patterned paper or cardstock for the background of your page.
2. Mat Your Photos: Cut pieces of cardstock slightly larger than your photos to create mats. This will help your photos stand out and add a layer of dimension. I usually add about 1/4 inch around the photo.
3. Arrange Your Photos: Experiment with different photo arrangements until you find one that you like. Consider using a variety of photo sizes and orientations.
4. Adhere Your Photos: Use your adhesive to attach your photos to the cardstock mats and then to the background paper. Make sure they are securely attached.
5. Add Journaling: Write captions, stories, and memories alongside your photos. Use a journaling pen that won’t bleed or fade over time. Be honest and heartfelt! These are the details that will make the scrapbook truly special.
6. Embellish Your Page: Add stickers, die-cuts, ribbons, buttons, brads, and washi tape to embellish your page. Use embellishments that complement your photos and the overall theme of your scrapbook.
7. Layering Techniques: Don’t be afraid to layer your photos, paper, and embellishments. Layering adds depth and visual interest to your pages.
8. Creating Clusters: Group embellishments together in clusters to create focal points on your page.
9. Using Washi Tape: Washi tape is a versatile embellishment that can be used to add color, texture, and patterns to your pages. Use it to create borders, frames, or accents.
10. Adding Dimension: Use foam squares or pop dots to add dimension to your embellishments. This will make them stand out from the page.
11. Don’t Overdo It: Remember to leave some white space on your pages. Too many embellishments can make your pages look cluttered and overwhelming.
Tips and Tricks for a Stunning Scrapbook
Here are a few extra tips and tricks I’ve learned over the years to help you create a truly stunning scrapbook:
* Use Photo-Safe Adhesive: This is crucial! You don’t want your photos to be damaged by the adhesive over time.
* Protect Your Photos: Handle your photos with care to avoid fingerprints and scratches.
* Store Your Scrapbook Properly: Store your scrapbook in a cool, dry place away from direct sunlight to prevent fading and damage.
* Get Inspired: Look at other scrapbooks for inspiration. Browse online galleries, magazines, and craft books to get ideas for layouts, embellishments, and journaling.
* Don’t Be Afraid to Experiment: Scrapbooking is all about creativity. Don’t be afraid to try new techniques and experiment with different materials.
* Make It Personal: The most important thing is to make your scrapbook personal and meaningful. Include photos, stories, and memories that are special to you and the recipient.
* Incorporate Mementos: Add ticket stubs, brochures, maps, and other mementos to your scrapbook to add extra depth and interest.
* Use Different Fonts: Experiment with different fonts to add visual interest to your journaling. You can use hand lettering, computer fonts, or a combination of both.
* Add Quotes and Song Lyrics: Include quotes and song lyrics that are relevant to your photos and memories.
* Involve Others: Ask friends and family to contribute photos, stories, and memories to your scrapbook. This will make it even more special and meaningful.
* Take Breaks: Scrapbooking can be time-consuming. Take breaks to avoid burnout and keep your creativity flowing.
* Have Fun! Scrapbooking should be a fun and relaxing activity. Don’t stress about making it perfect. Just enjoy the process of creating something beautiful and meaningful.
Final Touches and Presentation
Once you’ve completed all of your scrapbook pages, it’s time to add the final touches and present your gift.
1. Review Your Pages: Take a final look at your scrapbook pages to make sure everything is in place and that you’re happy with the overall design.
2. Add Page Protectors: Place each page in a page protector to protect it from dust, fingerprints, and damage.
3. Add a Closing Page: Create a closing page with a heartfelt message or a summary of the memories captured in the scrapbook.
4. Wrap Your Scrapbook: Wrap your scrapbook in decorative paper or ribbon to make it extra special.
5. Present Your Gift: Present your scrapbook to the recipient with a smile and a heartfelt message.
Creating a personalized scrapbook is a labor of love, but it’s so worth it! The recipient will cherish this thoughtful and meaningful gift for years to come. Happy crafting!
Conclusion
So, there you have it! Creating a DIY handmade scrapbook gift isn’t just about gluing photos onto paper; it’s about crafting a tangible expression of love, memories, and shared experiences. It’s about slowing down, putting your heart into something, and giving a gift that truly resonates with the recipient on a deeply personal level. In a world saturated with mass-produced items, a handmade scrapbook stands out as a unique and cherished treasure.
Why is this DIY trick a must-try? Because it’s more than just a gift; it’s an investment in relationships. It’s a way to relive joyful moments, celebrate milestones, and create a lasting legacy. It’s an opportunity to unleash your creativity, personalize every detail, and tailor the scrapbook to perfectly reflect the recipient’s personality and your shared bond. Forget generic presents that end up gathering dust; a DIY handmade scrapbook gift is a heartfelt keepsake that will be treasured for years to come.
Consider these variations to truly personalize your scrapbook:
* Theme it up: Instead of a general scrapbook, focus on a specific theme. Think “Our Adventures Together,” “Celebrating [Recipient’s Name]’s Graduation,” “The First Year of [Baby’s Name],” or even a humorous “Our Most Embarrassing Moments” scrapbook.
* Incorporate memorabilia: Don’t limit yourself to just photos! Include ticket stubs, pressed flowers, maps, brochures, handwritten notes, small trinkets, and anything else that holds sentimental value and adds texture and depth to the pages.
* Get digital: If you’re comfortable with digital design, create custom backgrounds, embellishments, and photo collages using software like Canva or Photoshop. Print them out and incorporate them into your scrapbook for a modern touch.
* Add interactive elements: Include pop-up elements, lift-the-flaps, hidden pockets, or even small envelopes containing handwritten letters or quotes. These interactive features will make the scrapbook even more engaging and memorable.
* Collaborate: If you’re creating a scrapbook for a couple or a group of friends, involve everyone in the process! Ask them to contribute photos, stories, and embellishments to make it a truly collaborative effort.
Don’t be intimidated by the thought of creating a “perfect” scrapbook. The beauty of a DIY handmade scrapbook gift lies in its imperfections. It’s the little quirks, the handwritten notes, and the personal touches that make it truly special. So, gather your supplies, unleash your creativity, and start crafting a gift that will be cherished for a lifetime.
We encourage you to try this DIY project and share your experience with us! Post photos of your finished scrapbooks on social media using #[YourBrandHashtag] or leave a comment below sharing your tips, challenges, and creative ideas. We can’t wait to see what you create! Let’s spread the joy of handmade gifts and inspire others to create their own unique treasures.
FAQ
What kind of glue should I use for my scrapbook?
Choosing the right adhesive is crucial for preserving your precious memories. Avoid using regular school glue or craft glue, as these can be acidic and may damage your photos and paper over time. Instead, opt for photo-safe, acid-free, and lignin-free adhesives. These types of glue are specifically designed to protect your materials from discoloration and deterioration.
Some popular options include:
* Photo mounting squares or corners: These are easy to use and allow you to reposition photos if needed.
* Acid-free glue sticks: These are great for adhering paper embellishments and smaller items.
* Double-sided tape: This provides a strong and permanent bond for larger photos and heavier embellishments.
* Liquid glue pens: These are ideal for intricate details and delicate items.
Always test your adhesive on a scrap piece of paper before applying it to your photos or scrapbook pages to ensure it doesn’t bleed or cause any damage.
What kind of paper is best for scrapbooking?
Just like with glue, the type of paper you use can significantly impact the longevity of your scrapbook. Look for acid-free and lignin-free paper, which will prevent yellowing and brittleness over time. Cardstock is a popular choice for scrapbook pages because it’s sturdy and durable. You can also use patterned paper, vellum, and other specialty papers to add visual interest.
Consider the weight of the paper as well. Thicker paper (80lb or higher) is less likely to warp or tear, especially if you’re adding heavy embellishments.
How do I protect my scrapbook from damage?
Once you’ve put in the effort to create a beautiful scrapbook, you’ll want to protect it from damage. Here are a few tips:
* Store it in a cool, dry place: Avoid storing your scrapbook in direct sunlight, as this can cause fading. Also, avoid damp or humid environments, as this can lead to mold and mildew.
* Use a scrapbook album with page protectors: Page protectors will shield your photos and embellishments from dust, fingerprints, and scratches.
* Handle your scrapbook with clean hands: Oils and dirt from your hands can transfer to the pages and cause damage over time.
* Consider a scrapbook storage box: A storage box will provide an extra layer of protection from dust, light, and moisture.
How can I make my scrapbook more personal?
The key to creating a truly special DIY handmade scrapbook gift is to personalize it as much as possible. Here are some ideas:
* Include handwritten notes and captions: Share your thoughts, feelings, and memories associated with each photo or event.
* Add personal anecdotes and stories: Don’t just describe what’s happening in the photos; tell the stories behind them.
* Incorporate inside jokes and nicknames: These personal touches will make the scrapbook even more meaningful to the recipient.
* Use the recipient’s favorite colors and themes: Tailor the scrapbook to their individual tastes and preferences.
* Include photos of the recipient’s loved ones and pets: These are sure to bring a smile to their face.
Where can I find inspiration for my scrapbook?
If you’re feeling stuck or uninspired, there are plenty of resources available to help you get your creative juices flowing:
* Online scrapbooking communities: Websites and forums dedicated to scrapbooking are great places to find inspiration, tips, and tutorials.
* Pinterest: Pinterest is a treasure trove of scrapbooking ideas, layouts, and embellishment techniques.
* Scrapbooking magazines: These magazines feature beautiful scrapbook layouts and provide step-by-step instructions for various techniques.
* Craft stores: Many craft stores offer scrapbooking classes and workshops where you can learn new skills and get inspired by other crafters.
* Your own memories: The best inspiration often comes from your own personal experiences and memories. Take some time to reflect on the special moments you want to capture in your scrapbook.
What if I make a mistake?
Don’t worry, mistakes happen! The beauty of a DIY project is that you can always fix them. If you accidentally glue something in the wrong place, try using a craft knife or adhesive remover to carefully remove it. If you make a typo in your handwriting, you can cover it up with a sticker or embellishment. Remember, the imperfections are part of what makes your scrapbook unique and special. Embrace the process and don’t be afraid to experiment!
Leave a Comment