

DIY Grout Cleaner Baking Soda: Sounds like a science experiment, right? Well, in a way, it is! But trust me, this isn’t your average volcano-making, baking-soda-and-vinegar explosion. This is about reclaiming your sparkling clean tiles and banishing that dingy, discolored grout that’s been silently mocking you for far too long.
For centuries, people have sought natural and effective ways to keep their homes clean. Before the age of harsh chemicals and complicated cleaning solutions, simple ingredients like baking soda were the go-to for tackling tough stains and grime. Think of your grandmother’s cleaning secrets – chances are, baking soda was a star player! This tradition continues today, as more and more of us are looking for eco-friendly and budget-friendly alternatives to commercial cleaners.
Why do you need this DIY grout cleaner baking soda trick in your arsenal? Because let’s face it, grout is a magnet for dirt, mildew, and all sorts of unpleasantness. Store-bought grout cleaners can be expensive and often contain harsh chemicals that can irritate your skin and damage your tiles. I’m here to show you a simple, safe, and incredibly effective way to get your grout looking brand new again, using ingredients you probably already have in your pantry. Get ready to say goodbye to grimy grout and hello to a brighter, cleaner home!
DIY Grout Cleaner: Baking Soda Power!
Hey there, fellow DIY enthusiasts! Are you tired of staring at dingy, discolored grout lines? I know I was! Store-bought grout cleaners can be harsh and expensive, so I decided to tackle the problem with a simple, natural solution: baking soda! This method is surprisingly effective, budget-friendly, and much gentler on your home and the environment. Let’s get those grout lines sparkling again!
What You’ll Need
Before we dive in, let’s gather our supplies. This is a pretty straightforward project, so you probably already have most of these items on hand.
* Baking Soda: The star of the show! This acts as a mild abrasive and deodorizer.
* White Vinegar: The acid in vinegar helps to break down grime and stains. You can also use lemon juice as a substitute.
* Water: For creating a paste and rinsing.
* Spray Bottle: For applying vinegar or lemon juice.
* Old Toothbrush or Grout Brush: Essential for scrubbing those grout lines. An old electric toothbrush with a small head can also work wonders!
* Sponge or Cloth: For wiping away the cleaner and rinsing.
* Gloves: To protect your hands from the vinegar and scrubbing.
* Eye Protection (Optional): Just in case of splashes.
* Small Bowl or Container: For mixing the baking soda paste.
* Paper Towels: For soaking up excess moisture.
Preparing the Area
Before we start cleaning, it’s important to prep the area. This will make the cleaning process more effective and prevent any damage.
1. Clear the Area: Remove any rugs, mats, or obstacles from the area you’ll be cleaning. This will give you plenty of room to work.
2. Sweep or Vacuum: Get rid of any loose dirt, dust, or debris on the tile surface. This prevents you from just pushing the dirt around when you start scrubbing.
3. Ventilate the Room: Open windows or turn on a fan to ensure good ventilation. This is especially important if you’re using vinegar, as it can have a strong odor.
Making the Baking Soda Paste
Now for the fun part: creating our cleaning concoction! I’ve found that the right consistency is key for effective cleaning.
1. Combine Baking Soda and Water: In your small bowl, mix baking soda with a small amount of water. Start with about 1/2 cup of baking soda and add water a tablespoon at a time.
2. Mix to a Paste: Stir the mixture until it forms a thick, spreadable paste. You want it to be thick enough to stick to the grout lines, but not so thick that it’s difficult to apply. It should resemble the consistency of toothpaste. If it’s too runny, add more baking soda. If it’s too thick, add a little more water.
Applying the Baking Soda Paste
Now it’s time to get that paste onto the grout! This is where the toothbrush comes in handy.
1. Apply the Paste: Using your fingers or a small spoon, apply the baking soda paste generously to the grout lines. Make sure to cover the entire area you want to clean.
2. Let it Sit: Allow the paste to sit on the grout for at least 5-10 minutes. For heavily stained grout, you can let it sit for up to 30 minutes. This gives the baking soda time to penetrate and loosen the grime.
Scrubbing the Grout
This is where the elbow grease comes in! But don’t worry, the baking soda has already done a lot of the work.
1. Grab Your Toothbrush: Dip your toothbrush or grout brush in a little water to dampen it.
2. Scrub the Grout Lines: Scrub the grout lines vigorously with the toothbrush. Use a back-and-forth motion, focusing on areas with heavy staining. You should see the grime starting to lift.
3. Rinse the Brush: Rinse the toothbrush frequently with water to remove the dirt and grime. This will prevent you from just spreading the dirt around.
4. Repeat as Needed: If some areas are particularly stubborn, you may need to repeat the scrubbing process.
The Vinegar Boost (Optional, but Recommended!)
For extra cleaning power, I highly recommend using vinegar after scrubbing with the baking soda paste. The chemical reaction between the baking soda and vinegar helps to break down even more grime.
1. Fill Your Spray Bottle: Fill your spray bottle with white vinegar. You can dilute it with a little water if you’re concerned about the smell, but I usually use it straight.
2. Spray the Grout Lines: Spray the vinegar generously onto the grout lines that you’ve already scrubbed with the baking soda paste. You’ll notice a fizzing reaction – that’s the baking soda and vinegar working their magic!
3. Let it Fizz: Allow the vinegar to fizz for a few minutes. This gives it time to further break down the grime.
4. Scrub Again (Optional): If you want, you can scrub the grout lines again with the toothbrush after spraying with vinegar. This will help to loosen any remaining grime.
Rinsing and Drying
Almost there! Now it’s time to rinse away the cleaner and reveal your sparkling grout.
1. Rinse with Water: Use a clean sponge or cloth and plenty of water to rinse away the baking soda and vinegar mixture. Make sure to remove all traces of the cleaner.
2. Wipe Dry: Use a clean, dry cloth or paper towels to wipe the tile and grout dry. This will prevent water spots and help to prevent mildew growth.
3. Repeat as Needed: If you see any remaining residue, repeat the rinsing and drying process.
Dealing with Stubborn Stains
Sometimes, even with baking soda and vinegar, you might encounter some stubborn stains. Don’t worry, there are a few things you can try!
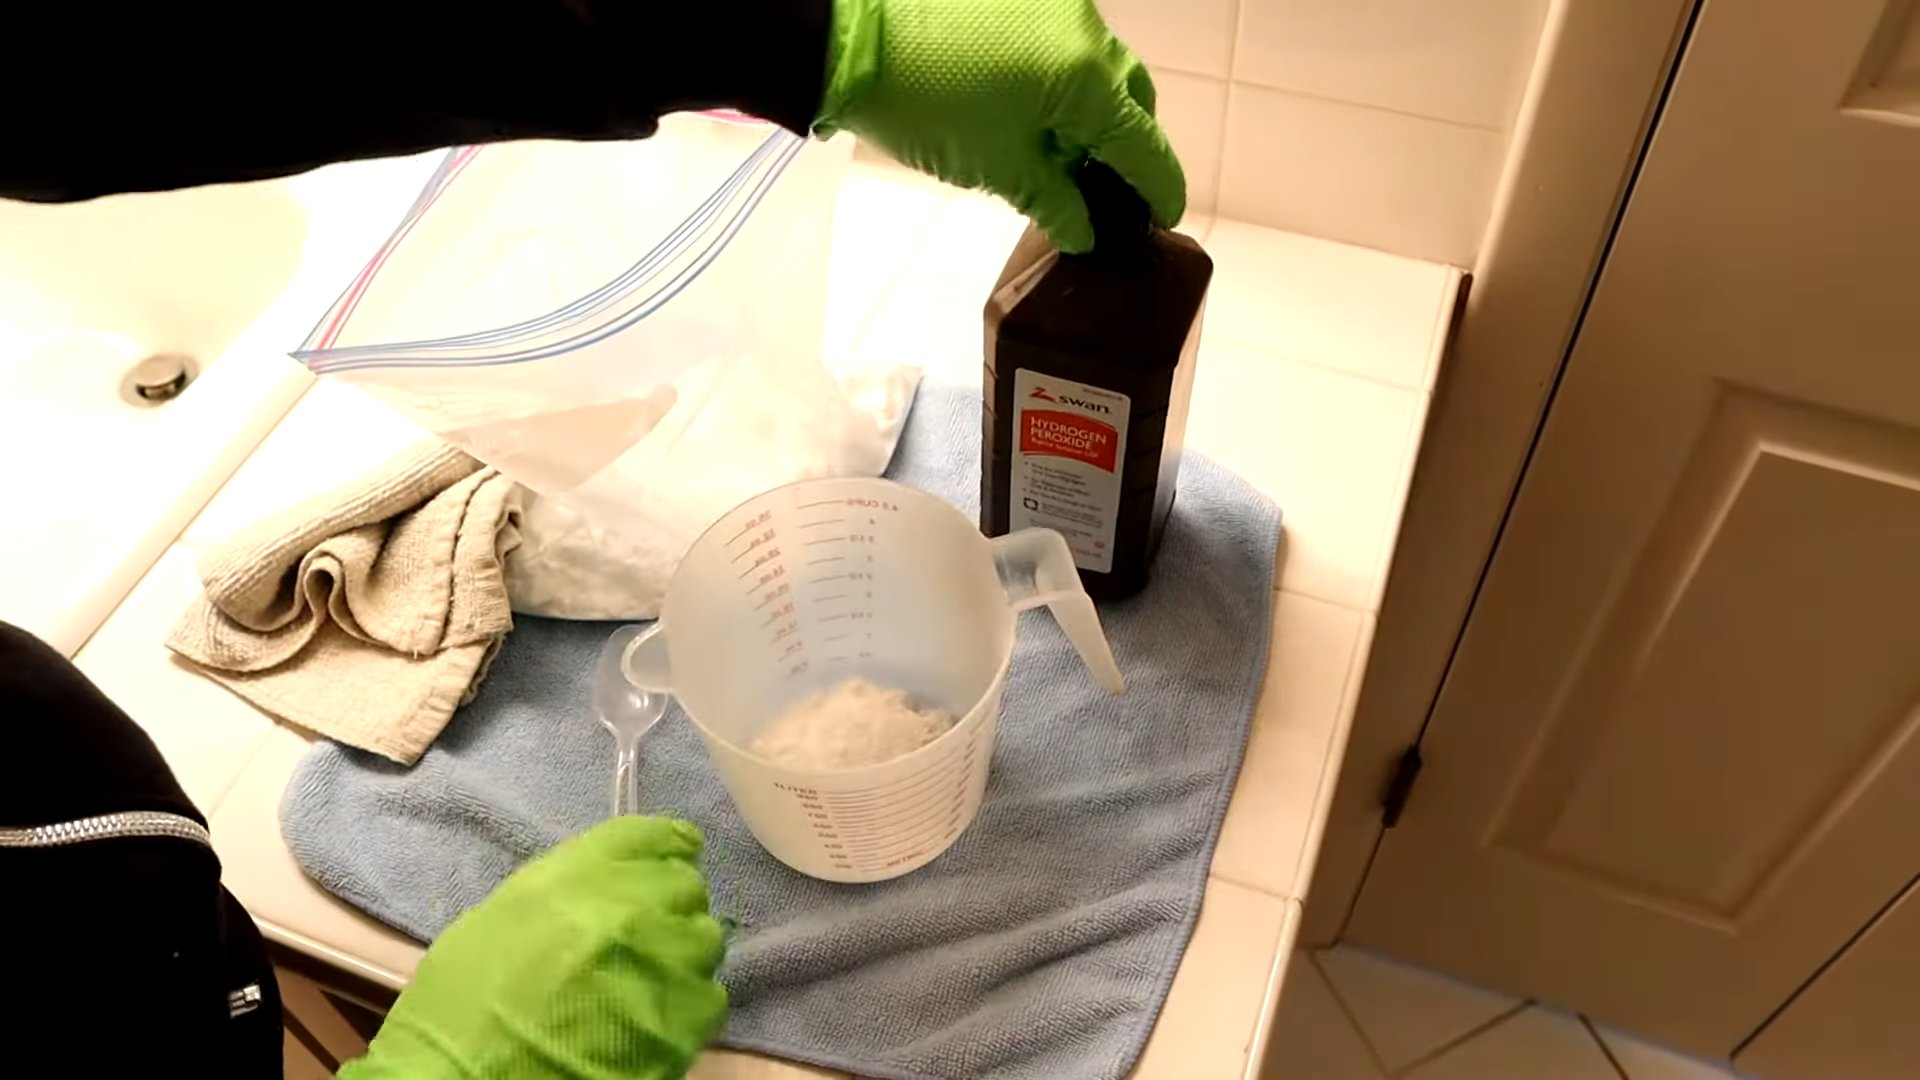
* Baking Soda and Hydrogen Peroxide Paste: Mix baking soda with hydrogen peroxide to form a paste. Apply the paste to the stained grout and let it sit for 10-15 minutes. Then, scrub with a toothbrush and rinse with water.
* Commercial Grout Cleaner: If all else fails, you can try a commercial grout cleaner. Be sure to follow the instructions on the label and wear gloves and eye protection.
* Steam Cleaner: A steam cleaner can be very effective at removing stubborn stains from grout. The high-pressure steam loosens the grime, making it easier to wipe away.
Preventing Future Stains
Once you’ve got your grout looking sparkling clean, you’ll want to keep it that way! Here are a few tips for preventing future stains:
* Seal Your Grout: Applying a grout sealer will help to protect the grout from stains and moisture. You can find grout sealers at most home improvement stores.
* Wipe Up Spills Immediately: The sooner you wipe up spills, the less likely they are to stain the grout.
* Regular Cleaning: Clean your grout regularly with a mild cleaner to prevent grime from building up. A simple solution of soap and water can work wonders.
* Good Ventilation: Ensure good ventilation in your bathroom to prevent mildew growth.
Alternative Methods and Considerations
While baking soda and vinegar are my go-to for grout cleaning, there are other methods you might want to consider, depending on your specific situation.
* Lemon Juice: As mentioned earlier, lemon juice can be used as a substitute for vinegar. It has a similar acidic effect and a pleasant scent.
* Borax: Borax is another natural cleaner that can be effective on grout. Mix it with water to form a paste and apply it to the grout lines.
* Commercial Grout Pens: If your grout is permanently stained, you can use a grout pen to cover up the discoloration. These pens are available in a variety of colors to match your grout.
* Test in an Inconspicuous Area: Before using any cleaning solution on your grout, it’s always a good idea to test it in an inconspicuous area to make sure it doesn’t damage the tile or grout.
Troubleshooting Common Issues
Sometimes, things don’t go exactly as planned. Here are a few common issues you might encounter and how to troubleshoot them:
* Grout Still Looks Dirty: If your grout still looks dirty after cleaning, you may need to repeat the cleaning process or try a stronger cleaning solution.
* Tile is Damaged: If you notice any damage to your tile after cleaning, it’s possible that the cleaning solution was too harsh. In the future, use a milder cleaner or dilute the cleaning solution with water.
* Vinegar Smell Lingers: If the vinegar smell lingers after cleaning, you can try airing out the room or using an air freshener.
Final Thoughts
Cleaning grout can

Conclusion
So, there you have it! This simple, yet incredibly effective, DIY grout cleaner using baking soda is a game-changer for anyone battling dingy, stained grout. Forget expensive, harsh chemicals that fill your home with fumes and potentially damage your surfaces. This method is not only budget-friendly and environmentally conscious, but it also delivers remarkable results. The power of baking soda, combined with a little elbow grease, is truly astonishing.
Why is this DIY grout cleaner a must-try? Because it’s safe, effective, and readily accessible. You likely already have baking soda in your pantry, making it a convenient solution for tackling those stubborn grout stains. Plus, it’s a fantastic alternative to commercial cleaners that often contain harsh chemicals that can irritate your skin and respiratory system. This method is gentle enough for regular use, helping you maintain sparkling clean grout without the worry.
But the beauty of this DIY grout cleaner doesn’t stop there. Feel free to experiment with variations to suit your specific needs and preferences. For instance, if you’re dealing with particularly stubborn stains, consider adding a few drops of tea tree oil to your baking soda paste. Tea tree oil is a natural disinfectant and antifungal agent, which can help to break down mold and mildew that may be contributing to the discoloration. Another option is to substitute white vinegar for water when making the paste. The acidity of the vinegar can help to dissolve mineral deposits and further enhance the cleaning power of the baking soda. Just be sure to test any variations on an inconspicuous area first to ensure they don’t damage your grout or tiles.
For colored grout, proceed with caution. While baking soda is generally safe, highly pigmented grout could potentially fade with repeated use of any cleaning agent, even natural ones. Always test a small, hidden area first. You can also try diluting the baking soda paste with more water to make it less abrasive.
We’re confident that once you try this DIY grout cleaner, you’ll be amazed by the results. It’s a simple, effective, and affordable way to restore your grout to its former glory. Say goodbye to dingy, stained grout and hello to a sparkling clean home!
Now, it’s your turn! We encourage you to give this DIY grout cleaner a try and see the difference for yourself. Don’t be afraid to experiment with the variations we’ve suggested to find the perfect formula for your specific needs. And most importantly, we want to hear about your experience! Share your before-and-after photos, tips, and tricks in the comments below. Let’s create a community of clean grout enthusiasts and help each other achieve sparkling clean homes! Your feedback will not only help other readers but also inspire us to continue sharing valuable DIY solutions. Let us know if this **DIY grout cleaner baking soda** method worked for you!
Frequently Asked Questions (FAQ)
1. Is baking soda safe to use on all types of grout?
Generally, baking soda is safe to use on most types of grout, including cementitious and epoxy grout. However, it’s always a good idea to test the baking soda paste on a small, inconspicuous area first, especially if you have colored grout. Highly pigmented grout could potentially fade with repeated use of any cleaning agent, even natural ones. If you notice any discoloration or damage, discontinue use immediately. For delicate or antique tiles, consult with a professional cleaner before using any DIY cleaning solutions.
2. How often should I clean my grout with baking soda?
The frequency of cleaning depends on the amount of traffic and exposure to dirt and grime in the area. For high-traffic areas like bathrooms and kitchens, you may want to clean your grout every one to two weeks. For less frequently used areas, you can clean your grout every month or as needed. Regular cleaning will help prevent stains from setting in and make it easier to maintain sparkling clean grout.
3. What kind of brush should I use to scrub the grout?
A stiff-bristled brush is ideal for scrubbing grout. You can use a grout brush specifically designed for this purpose, or an old toothbrush works well for smaller areas and tight corners. Avoid using metal brushes, as they can scratch or damage the grout and tiles. When scrubbing, apply firm, even pressure and work in small sections.
4. Can I use this DIY grout cleaner on other surfaces besides grout?
While this DIY grout cleaner is primarily designed for grout, it can also be used on other surfaces, such as tile, porcelain, and ceramic. However, it’s important to test the paste on a small, inconspicuous area first to ensure it doesn’t damage the surface. Avoid using this cleaner on delicate surfaces like marble, granite, or natural stone, as baking soda can be abrasive and may scratch or etch these materials.
5. What if the baking soda paste doesn’t remove all the stains?
If the baking soda paste doesn’t remove all the stains, you can try a few different approaches. First, let the paste sit on the grout for a longer period of time, up to 30 minutes, to allow it to penetrate the stains. You can also try adding a few drops of hydrogen peroxide to the paste to boost its cleaning power. For particularly stubborn stains, you may need to repeat the cleaning process several times. If all else fails, consider using a commercial grout cleaner specifically designed for tough stains.
6. How do I prevent grout from getting stained in the first place?
Prevention is key to maintaining clean grout. Here are a few tips to help prevent grout from getting stained:
* Seal your grout: Applying a grout sealer will help protect it from stains and make it easier to clean.
* Wipe up spills immediately: Don’t let spills sit on your grout, as they can quickly stain.
* Ventilate your bathroom: Proper ventilation will help prevent mold and mildew growth, which can discolor grout.
* Use a squeegee after showering: This will help remove excess water and prevent water stains.
* Clean your grout regularly: Regular cleaning will prevent stains from setting in and make it easier to maintain sparkling clean grout.
7. Can I use this method on colored grout?
Yes, you can use this method on colored grout, but with caution. As mentioned earlier, highly pigmented grout could potentially fade with repeated use of any cleaning agent, even natural ones. Always test a small, hidden area first. You can also try diluting the baking soda paste with more water to make it less abrasive. If you notice any discoloration, discontinue use immediately.
8. What are some other natural alternatives to baking soda for cleaning grout?
Besides baking soda, there are several other natural alternatives you can use to clean grout:
* White vinegar: Vinegar is a natural disinfectant and can help dissolve mineral deposits.
* Lemon juice: Lemon juice is acidic and can help remove stains and brighten grout.
* Hydrogen peroxide: Hydrogen peroxide is a mild bleaching agent and can help remove stubborn stains.
* Borax: Borax is a natural mineral that can be used to clean and disinfect grout.
Remember to always test any cleaning solution on a small, inconspicuous area first to ensure it doesn’t damage your grout or tiles.
9. Is it necessary to seal the grout after cleaning?
Sealing the grout after cleaning is highly recommended, especially in high-traffic areas like bathrooms and kitchens. Grout is porous, which means it can easily absorb water, dirt, and grime. Sealing the grout will create a protective barrier that prevents these substances from penetrating the grout and causing stains. It will also make it easier to clean the grout in the future. Choose a high-quality grout sealer that is specifically designed for your type of grout.
10. What if I have mold or mildew growing in my grout?
If you have mold or mildew growing in your grout, you’ll need to take extra steps to remove it. First, try cleaning the grout with a baking soda paste and a few drops of tea tree oil, which is a natural antifungal agent. Let the paste sit on the grout for at least 30 minutes before scrubbing. If the mold or mildew persists, you can try using a commercial mold and mildew remover. Be sure to follow the manufacturer’s instructions carefully and wear gloves and eye protection when using these products. In severe cases, you may need to replace the grout entirely.


Leave a Comment