

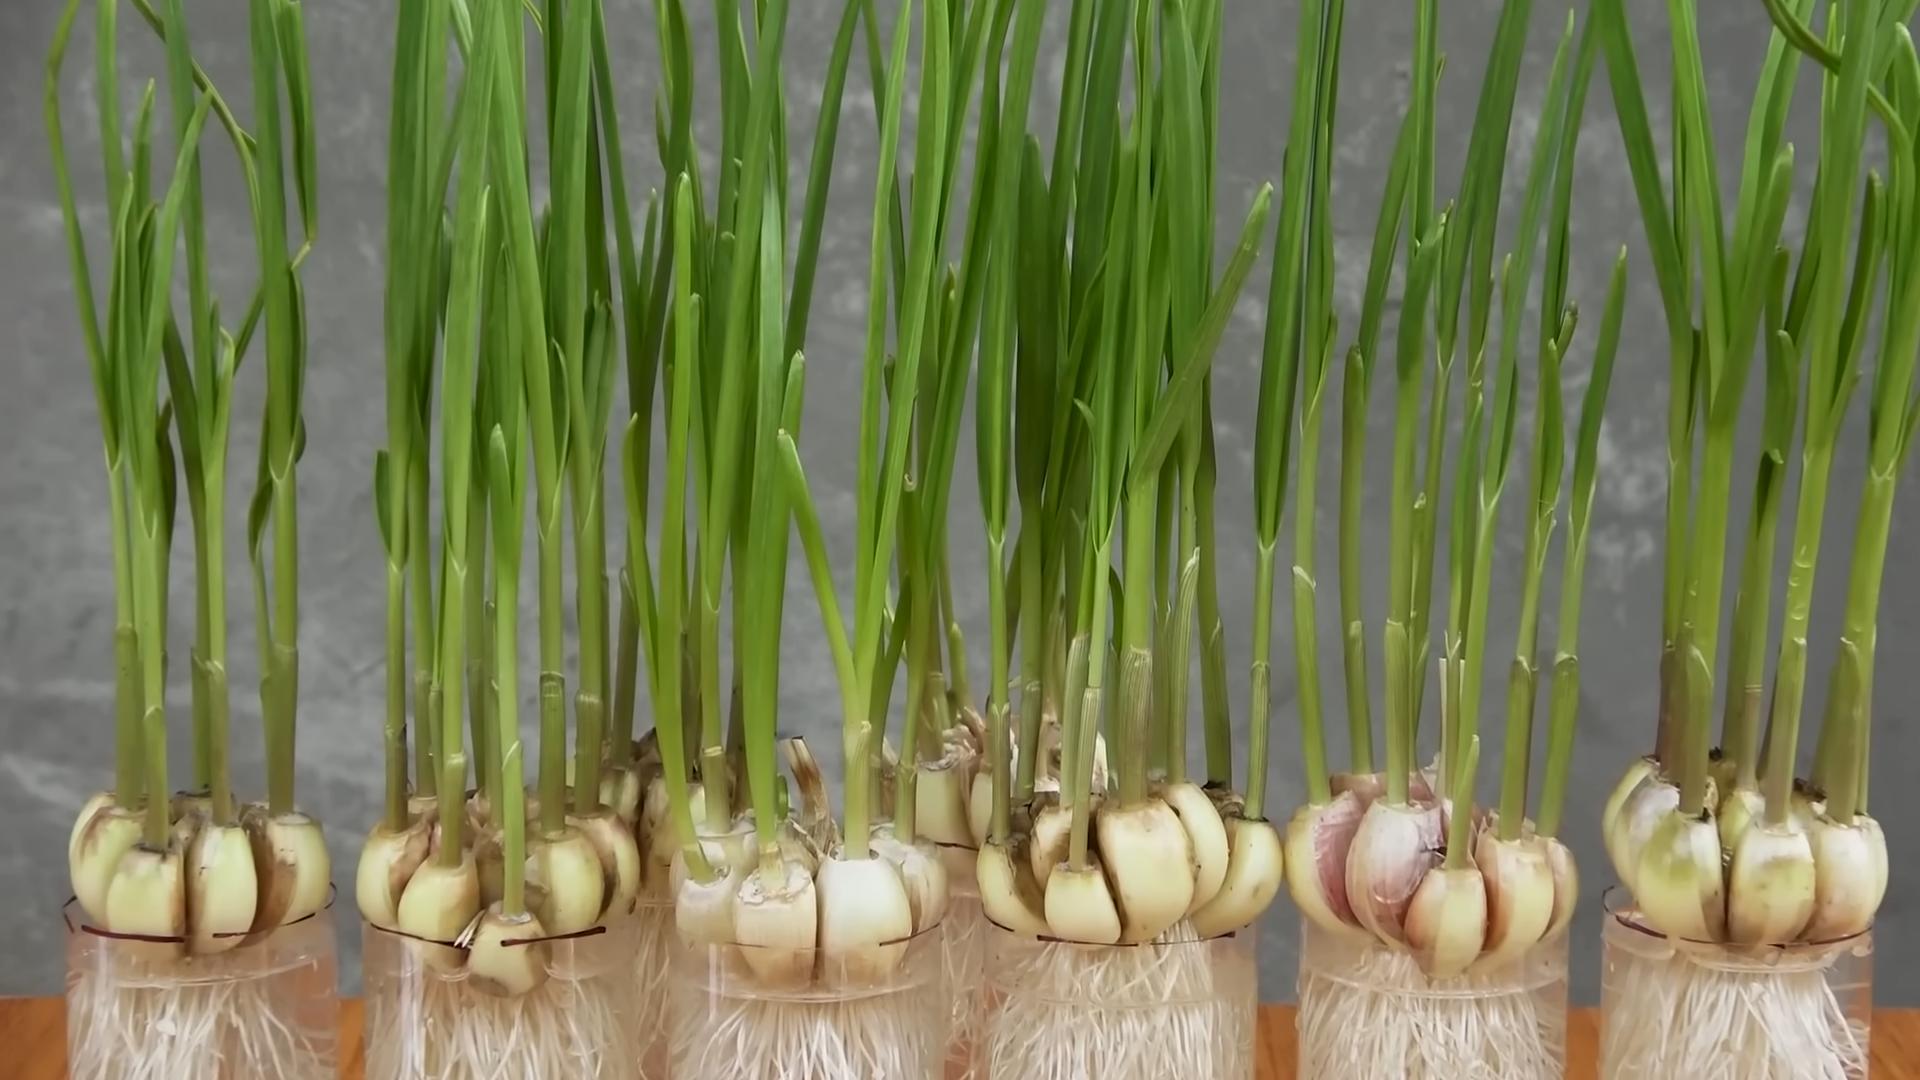
DIY Garlic Bottle Growing: Ever dreamt of having a constant supply of fresh garlic right at your fingertips, without the hassle of a traditional garden? I know I have! Imagine snipping off fresh, flavorful garlic greens to add a zing to your meals whenever you please. This isn’t just a gardener’s fantasy; it’s a reality you can create with a simple plastic bottle and a few basic supplies.
For centuries, humans have cultivated garlic, not just for its culinary prowess but also for its medicinal properties. From ancient Egypt, where it fueled the pyramid builders, to modern kitchens worldwide, garlic has been a staple. But let’s face it, sometimes space is limited, or we simply crave a more convenient way to grow our own. That’s where this ingenious DIY trick comes in!
This DIY Garlic Bottle Growing method is perfect for apartment dwellers, balcony gardeners, or anyone who wants to experiment with a fun and space-saving gardening technique. It’s incredibly rewarding to watch those little green shoots emerge, knowing you’ve created a mini-garlic farm from something that would otherwise end up in the recycling bin. Plus, you’ll avoid those pesky trips to the store when you only need a clove or two. So, grab a bottle, some soil, and let’s get growing! I’m excited to share this easy and effective method with you.
Grow Garlic Indoors From a Single Clove: A DIY Guide
Okay, garlic lovers, gather ’round! Have you ever thought about growing your own garlic indoors? It’s surprisingly easy, super rewarding, and a fantastic way to have fresh garlic greens at your fingertips. Plus, it’s a fun project that even beginners can tackle. I’m going to walk you through the whole process, step-by-step, so you can enjoy the satisfaction of homegrown garlic, even if you don’t have a garden. We’re going to focus on growing garlic greens, which are delicious in salads, stir-fries, and as a garnish. While you might not get a full bulb indoors, the greens are well worth the effort!
What You’ll Need
Before we dive in, let’s make sure you have everything you need. This is a pretty low-cost project, which is always a win!
* Garlic Cloves: Choose organic garlic if possible. You can use garlic from the grocery store, but organic is less likely to be treated with chemicals that might inhibit growth. Look for firm, plump cloves with no signs of mold or sprouting.
* A Glass Bottle: An empty wine bottle, a large mason jar, or even a repurposed plastic bottle will work. The key is that it needs to be able to hold water and have a neck narrow enough to support the garlic clove without it falling in.
* Water: Tap water is fine, but filtered water is even better.
* Small Pebbles or Gravel (Optional): These can help with drainage and prevent the garlic clove from sitting directly in the water.
* Toothpicks (Optional): If your bottle opening is too wide, toothpicks can be used to create a platform for the garlic clove.
* Sunny Spot: A windowsill that gets at least 4-6 hours of sunlight per day is ideal.
* Patience: Growing anything takes time, so be prepared to wait a few weeks for your garlic greens to sprout.
Step-by-Step Instructions: Growing Garlic Greens in a Bottle
Alright, let’s get our hands dirty (well, not really dirty, since we’re using water!). Follow these steps, and you’ll be enjoying fresh garlic greens in no time.
1. Prepare Your Garlic Clove: Gently separate a clove from the garlic bulb. Be careful not to damage the clove. You want it to be intact and healthy. Don’t peel the clove; leave the papery skin on. This helps protect it and retain moisture.
2. Prepare Your Bottle: Thoroughly clean your bottle with soap and water. Rinse it well to remove any soap residue. If you’re using pebbles or gravel, add a layer to the bottom of the bottle. This will help with drainage and prevent the garlic clove from sitting directly in the water, which can lead to rot.
3. Add Water: Fill the bottle with enough water so that the bottom of the garlic clove will be submerged, but not the entire clove. You want the roots to be able to access the water, but you don’t want the clove to be sitting in water, as this can cause it to rot.
4. Position the Garlic Clove: This is where the bottle shape comes into play. The goal is to suspend the garlic clove with the root end (the flatter, wider end) facing down in the water.
* Narrow-Necked Bottle: If your bottle has a narrow neck, you might be able to simply rest the clove on the opening. Make sure it’s stable and won’t fall in.
* Wider-Necked Bottle: If the opening is too wide, you’ll need to get creative. This is where the toothpicks come in handy. Insert three or four toothpicks around the middle of the garlic clove, creating a “platform” that will rest on the bottle opening. This will suspend the clove above the water. Make sure the toothpicks are securely in place.
5. Find a Sunny Spot: Place your bottle in a sunny windowsill or another location that receives at least 4-6 hours of sunlight per day. Sunlight is essential for the garlic greens to grow.
6. Monitor the Water Level: Check the water level every day or two and add more water as needed to keep the bottom of the garlic clove submerged. You don’t want the water to dry out completely.
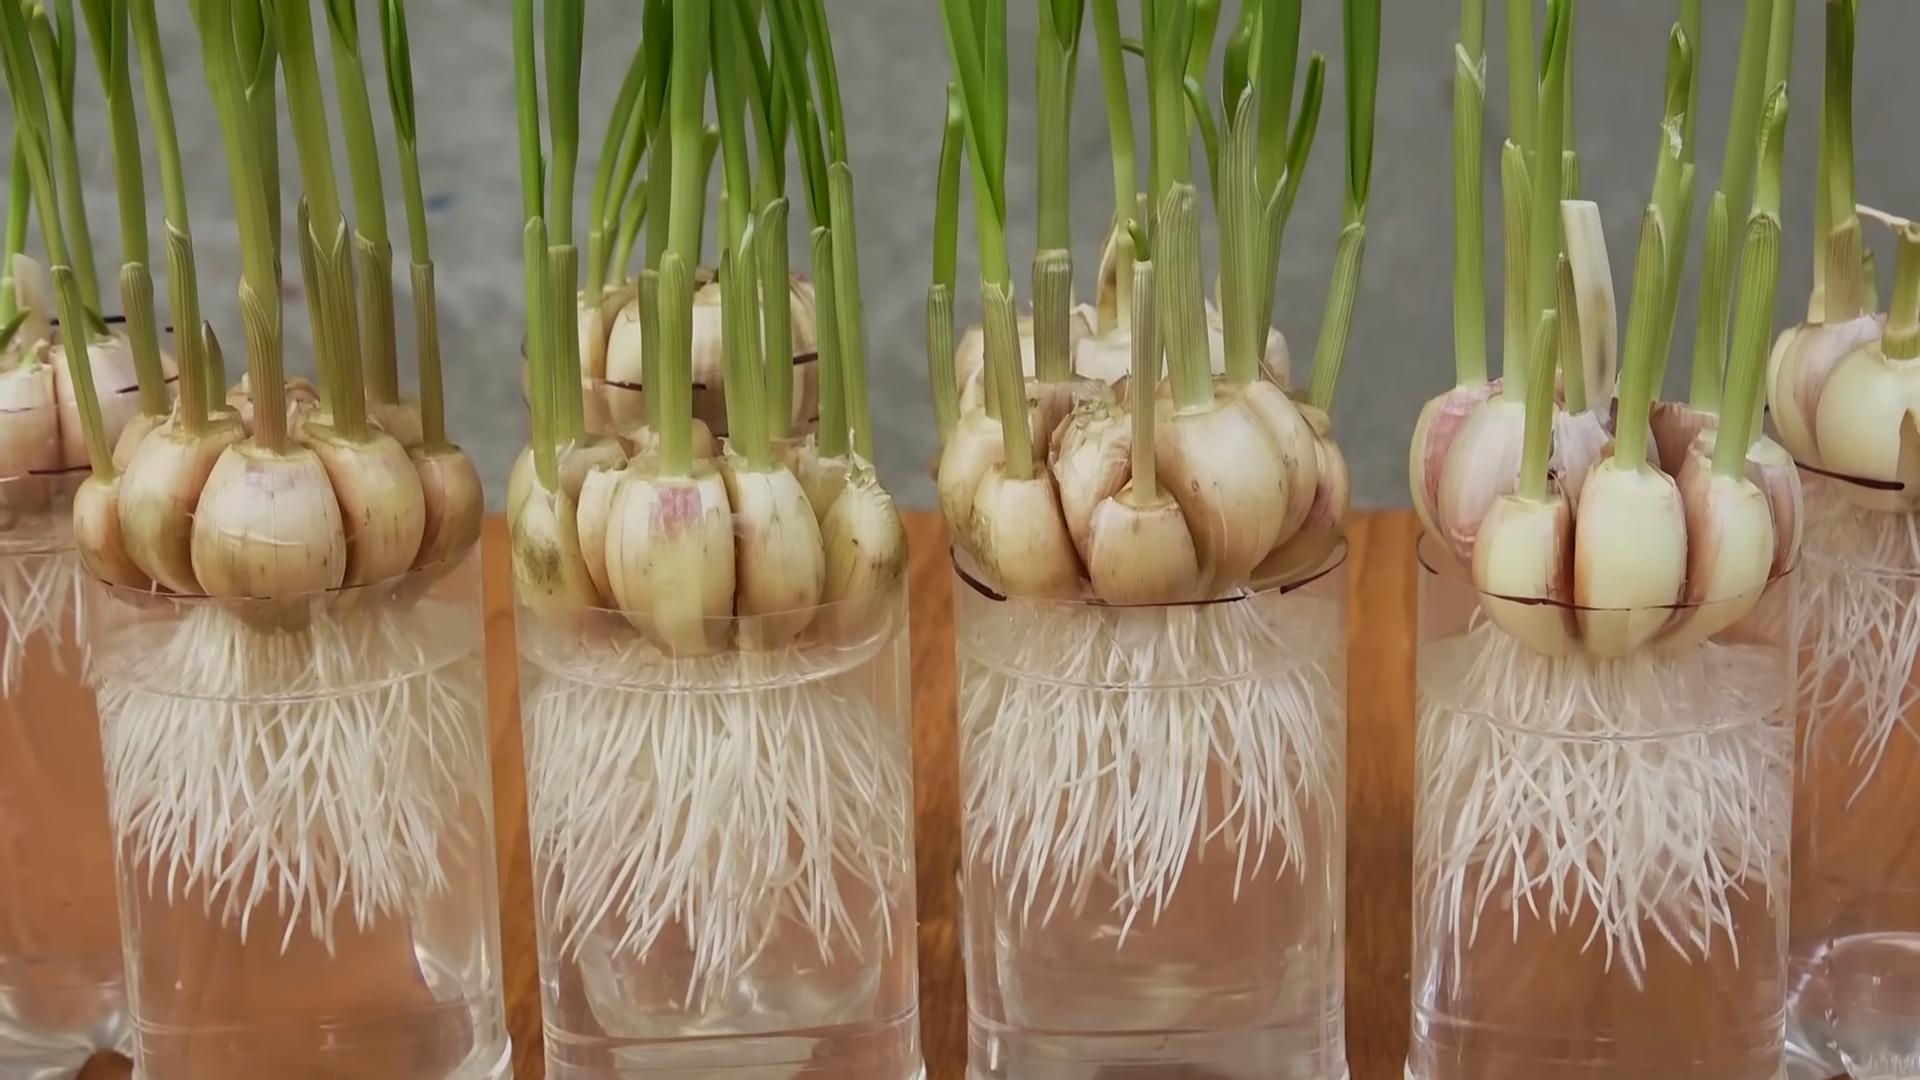
7. Observe and Wait: Now comes the waiting game. Within a few days to a week, you should start to see roots emerging from the bottom of the garlic clove. Soon after, green shoots will start to sprout from the top.
8. Rotate the Bottle: To ensure even growth, rotate the bottle every few days. This will prevent the garlic greens from leaning too much towards the light source.
9. Harvest Your Garlic Greens: Once the garlic greens are a few inches tall, you can start harvesting them. Use scissors to snip off the greens as needed. Don’t cut them too close to the clove, as this can damage the plant. The more you harvest, the more they will grow!
10. Replace the Water Regularly: Every week or two, replace the water in the bottle with fresh water. This will help prevent the growth of algae and keep the water clean.
Troubleshooting Tips
Even with the best intentions, things don’t always go as planned. Here are a few common issues you might encounter and how to fix them:
* Garlic Clove Rotting: If your garlic clove starts to rot, it’s likely because it’s sitting in too much water. Remove the clove from the bottle, discard the water, and clean the bottle thoroughly. Start again with a fresh clove and make sure only the bottom of the clove is submerged in water.
* No Growth: If you don’t see any growth after a week or two, make sure your garlic clove is getting enough sunlight. Also, check the water level and make sure the clove is not rotting. Sometimes, the garlic clove is simply not viable. Try starting with a different clove.
* Yellowing Greens: Yellowing greens can be a sign of overwatering or lack of nutrients. Make sure you’re not overwatering the garlic clove. You can also try adding a drop or two of liquid fertilizer to the water.
* Algae Growth: Algae can grow in the water, especially if the bottle is exposed to a lot of sunlight. To prevent algae growth, replace the water regularly and clean the bottle thoroughly. You can also try using a darker-colored bottle to block out some of the light.
Extending the Life of Your Garlic Greens
While you won’t get a full garlic bulb from this method, you can extend the life of your garlic greens by following these tips:
* Regular Harvesting: The more you harvest, the more the greens will grow. Regular harvesting encourages new growth.
* Fertilizing: Add a drop or two of liquid fertilizer to the water every few weeks to provide the garlic greens with the nutrients they need to thrive.
* Repotting (Optional): If you want to try growing a full garlic bulb, you can repot the garlic clove in a pot with soil once the roots are well-established. However, keep in mind that growing a full bulb indoors can be challenging.
Using Your Homegrown Garlic Greens
Now for the best part: enjoying the fruits (or rather, greens!) of your labor. Garlic greens have a milder flavor than garlic cloves, making them a versatile ingredient in a variety of dishes.
* Salads: Chop up the garlic greens and add them to your favorite salad for a boost of flavor.
* Stir-Fries: Add the garlic greens to stir-fries for a delicious and aromatic touch.
* Garnish: Use the garlic greens as a garnish for soups, stews, and other dishes.
* Pesto: Blend the garlic greens with basil, pine nuts, Parmesan cheese, and olive oil to make a flavorful pesto.
* Dips: Add chopped garlic greens to dips for a subtle garlic flavor.
Why Grow Garlic in a Bottle?
You might be wondering, why go through all this trouble to grow garlic in a bottle when you can just buy garlic at the store? Here are a few reasons why I think it’s worth it:
* Freshness: There’s nothing like the taste of freshly harvested garlic greens. They have a vibrant flavor that you just can’t get from store-bought garlic.
* Convenience: Having garlic greens at your fingertips is incredibly convenient. You can snip off a few greens whenever you need them, without having to run to the store.
* Sustainability: Growing your own garlic greens is a sustainable way to reduce your reliance on store-bought produce.
* Fun and Educational: It’s a fun and educational project that can be enjoyed by people of all ages. It’s a great way to learn about plant growth and the importance of sustainable living.
* Space-Saving: This method is perfect for people who live
Conclusion
So, there you have it! Transforming a simple garlic clove into a thriving, space-saving garden using our DIY garlic bottle growing method is not just a fun project; it’s a game-changer for anyone who loves fresh garlic but lacks the garden space. We’ve walked you through the process, highlighting the simplicity and sustainability of this ingenious technique. But why is this DIY trick a must-try?
Firstly, it’s incredibly efficient. Imagine having a constant supply of fresh garlic greens right at your fingertips, ready to add a burst of flavor to your dishes. No more last-minute trips to the grocery store or settling for dried garlic when you crave that vibrant, pungent taste. This method allows you to cultivate garlic greens indoors, regardless of the season or your living situation.
Secondly, it’s a fantastic way to reduce waste. Instead of discarding those sprouting garlic cloves, you’re giving them a new lease on life, turning them into a valuable resource. This aligns perfectly with a more sustainable lifestyle, minimizing your environmental impact and maximizing the potential of what you already have.
Thirdly, it’s a rewarding experience. There’s something deeply satisfying about nurturing a plant from a single clove to a flourishing green oasis. Watching your garlic greens grow is not only visually appealing but also a testament to your own resourcefulness and gardening skills.
But the possibilities don’t end there! Feel free to experiment with different types of garlic. While standard garlic works beautifully, you might want to try elephant garlic for larger, milder greens, or explore heirloom varieties for unique flavors and textures. You can also vary the growing medium. While we recommend a well-draining potting mix, you could also try using coco coir or even a hydroponic setup for a different approach. Consider adding a diluted liquid fertilizer every few weeks to boost growth and ensure your garlic greens are packed with nutrients.
Furthermore, think about the presentation. Get creative with your bottle selection! Use recycled glass bottles, plastic bottles, or even decorative containers to add a touch of personal style to your indoor garden. You can also group multiple garlic bottles together to create a visually stunning display.
We are confident that you’ll find this DIY garlic bottle growing method to be both practical and enjoyable. It’s a simple, sustainable, and rewarding way to cultivate fresh garlic greens right in your own home. So, gather your supplies, follow our instructions, and get ready to experience the joy of growing your own garlic.
Now, we want to hear from you! We encourage you to try this DIY trick and share your experience with us. Post photos of your garlic bottle gardens on social media using #DIYGarlicBottle and tag us so we can see your creations. Let us know what challenges you faced, what variations you tried, and what you learned along the way. Your feedback will help us improve this guide and inspire others to embark on their own garlic-growing adventures. Happy growing!
Frequently Asked Questions (FAQ)
What kind of garlic should I use for bottle growing?
You can use any type of garlic for bottle growing, but some varieties tend to perform better than others. Standard garlic cloves from the grocery store are a great starting point and generally sprout readily. Elephant garlic, known for its larger size and milder flavor, is another excellent option, producing substantial greens. Experimenting with different heirloom varieties can also be rewarding, allowing you to discover unique flavors and textures. Just ensure the cloves are firm and healthy, with no signs of mold or rot. Avoid using garlic that has been treated with anti-sprouting chemicals, as this will hinder growth.
How much sunlight does my garlic bottle garden need?
Garlic greens thrive in bright, indirect sunlight. Aim for at least 4-6 hours of sunlight per day. A windowsill facing east or west is often ideal. If you don’t have access to sufficient natural light, you can supplement with a grow light. Position the grow light a few inches above the garlic greens and keep it on for 12-14 hours per day. Rotate the bottle regularly to ensure all sides receive adequate light, preventing the greens from leaning towards the light source.
How often should I water my garlic bottle garden?
Watering frequency depends on several factors, including the size of the bottle, the type of potting mix, and the ambient temperature. Generally, you should water when the top inch of the soil feels dry to the touch. Avoid overwatering, as this can lead to root rot. Ensure the bottle has adequate drainage to prevent water from accumulating at the bottom. When watering, pour slowly and evenly until the water drains out of the drainage holes. Reduce watering frequency during cooler months when the garlic greens are not actively growing.
How long does it take for garlic greens to grow in a bottle?
The time it takes for garlic greens to grow in a bottle varies depending on the variety of garlic, the growing conditions, and the care provided. Typically, you can expect to see sprouts emerging within 1-2 weeks of planting. The greens will continue to grow rapidly, reaching a harvestable size within 3-4 weeks. Regular harvesting encourages further growth, so you can enjoy a continuous supply of fresh garlic greens for several months.
Can I reuse the garlic cloves after harvesting the greens?
Yes, you can often reuse the garlic cloves after harvesting the greens, but the subsequent growth may be less vigorous. After harvesting the greens, leave the clove in the bottle and continue to water and fertilize as usual. The clove may produce another set of greens, although they may be smaller and less abundant. Alternatively, you can carefully remove the clove from the bottle and plant it in the garden to grow a full garlic bulb.
What kind of potting mix should I use?
A well-draining potting mix is essential for successful garlic bottle growing. A mixture of equal parts potting soil, perlite, and vermiculite is ideal. This combination provides good drainage, aeration, and moisture retention. Avoid using garden soil, as it can be too heavy and compact, leading to poor drainage and root rot. You can also use coco coir as a growing medium, either alone or mixed with perlite.
How do I harvest the garlic greens?
Harvesting garlic greens is simple and straightforward. Use a pair of scissors or sharp knife to cut the greens about an inch above the soil line. Avoid cutting too close to the base of the plant, as this can damage the clove. Harvest the outer leaves first, allowing the inner leaves to continue growing. Regular harvesting encourages further growth and ensures a continuous supply of fresh garlic greens.
Can I fertilize my garlic bottle garden?
Yes, fertilizing your garlic bottle garden can help promote healthy growth and abundant greens. Use a diluted liquid fertilizer specifically formulated for vegetables or herbs. Apply the fertilizer every 2-3 weeks, following the instructions on the product label. Avoid over-fertilizing, as this can burn the roots and damage the plant. Organic fertilizers, such as compost tea or fish emulsion, are also excellent options.
What if my garlic cloves don’t sprout?
If your garlic cloves don’t sprout, there could be several reasons. First, ensure the cloves are firm and healthy, with no signs of mold or rot. Second, check that the cloves have been planted with the pointed end facing upwards. Third, make sure the potting mix is moist but not waterlogged. Fourth, provide adequate warmth and sunlight. If the cloves still don’t sprout after a few weeks, try using a different batch of garlic or a different variety.
Are there any pests or diseases that affect garlic bottle gardens?
Garlic bottle gardens are generally resistant to pests and diseases, but they can occasionally be affected by aphids, spider mites, or fungal infections. Inspect your plants regularly for any signs of infestation or disease. If you notice any pests, try washing them off with a strong stream of water or using an insecticidal soap. For fungal infections, improve air circulation and avoid overwatering. You can also use a fungicide if necessary.
Can I grow other herbs in a bottle alongside garlic?
While it’s technically possible to grow other herbs in a bottle alongside garlic, it’s generally not recommended. Garlic has allelopathic properties, meaning it releases chemicals that can inhibit the growth of other plants. Additionally, garlic has different watering and nutrient requirements than many other herbs. For best results, grow garlic in its own bottle.
How do I prevent my garlic bottle garden from smelling too strong?
Garlic naturally has a strong odor, but you can minimize the smell of your garlic bottle garden by ensuring good ventilation. Place the bottle in a well-ventilated area, such as near a window or under a fan. You can also use an activated carbon filter to absorb odors. Avoid overwatering, as this can exacerbate the smell.
What do I do with the garlic greens once I harvest them?
Garlic greens are a versatile ingredient that can be used in a variety of dishes. They have a milder flavor than garlic cloves and can be used as a substitute for chives or scallions. Add them to salads, soups, stir-fries, omelets, or dips. You can also use them to make garlic-infused oil or vinegar. Store harvested garlic greens in the refrigerator for up to a week.
Is DIY garlic bottle growing a good way to get fresh garlic?
Yes, DIY garlic bottle growing is an excellent way to get fresh garlic greens, especially if you have limited space or live in an apartment. While you won’t get full garlic bulbs using
Leave a Comment