

DIY Cup Key Holder: Tired of losing your keys in the abyss of your handbag or the mysterious depths of your junk drawer? I know I am! We’ve all been there, frantically searching for those little metal lifesavers just as we’re about to walk out the door. Well, fret no more! This simple, yet ingenious, DIY project will not only solve your key-losing woes but also add a touch of quirky charm to your home decor.
The concept of key holders, while seemingly modern, actually has roots that stretch back centuries. Think of the elaborate key cabinets of grand estates, or the simple hooks used in ancient homes to keep keys safe and accessible. While those might have been functional, they often lacked personality. That’s where our DIY Cup Key Holder comes in – it’s a modern twist on a classic necessity, injecting fun and creativity into everyday organization.
In today’s fast-paced world, efficiency and organization are key (pun intended!). This DIY project is perfect for anyone looking to declutter their entryway, add a personal touch to their home, and, most importantly, never lose their keys again. Plus, it’s a fantastic way to upcycle those lonely teacups you’ve been hoarding! So, grab your crafting supplies, and let’s get started on creating a stylish and practical solution to your key-keeping conundrum. I promise, you’ll wonder how you ever lived without it!
DIY Upcycled Cup Key Holder: A Charming & Functional Project
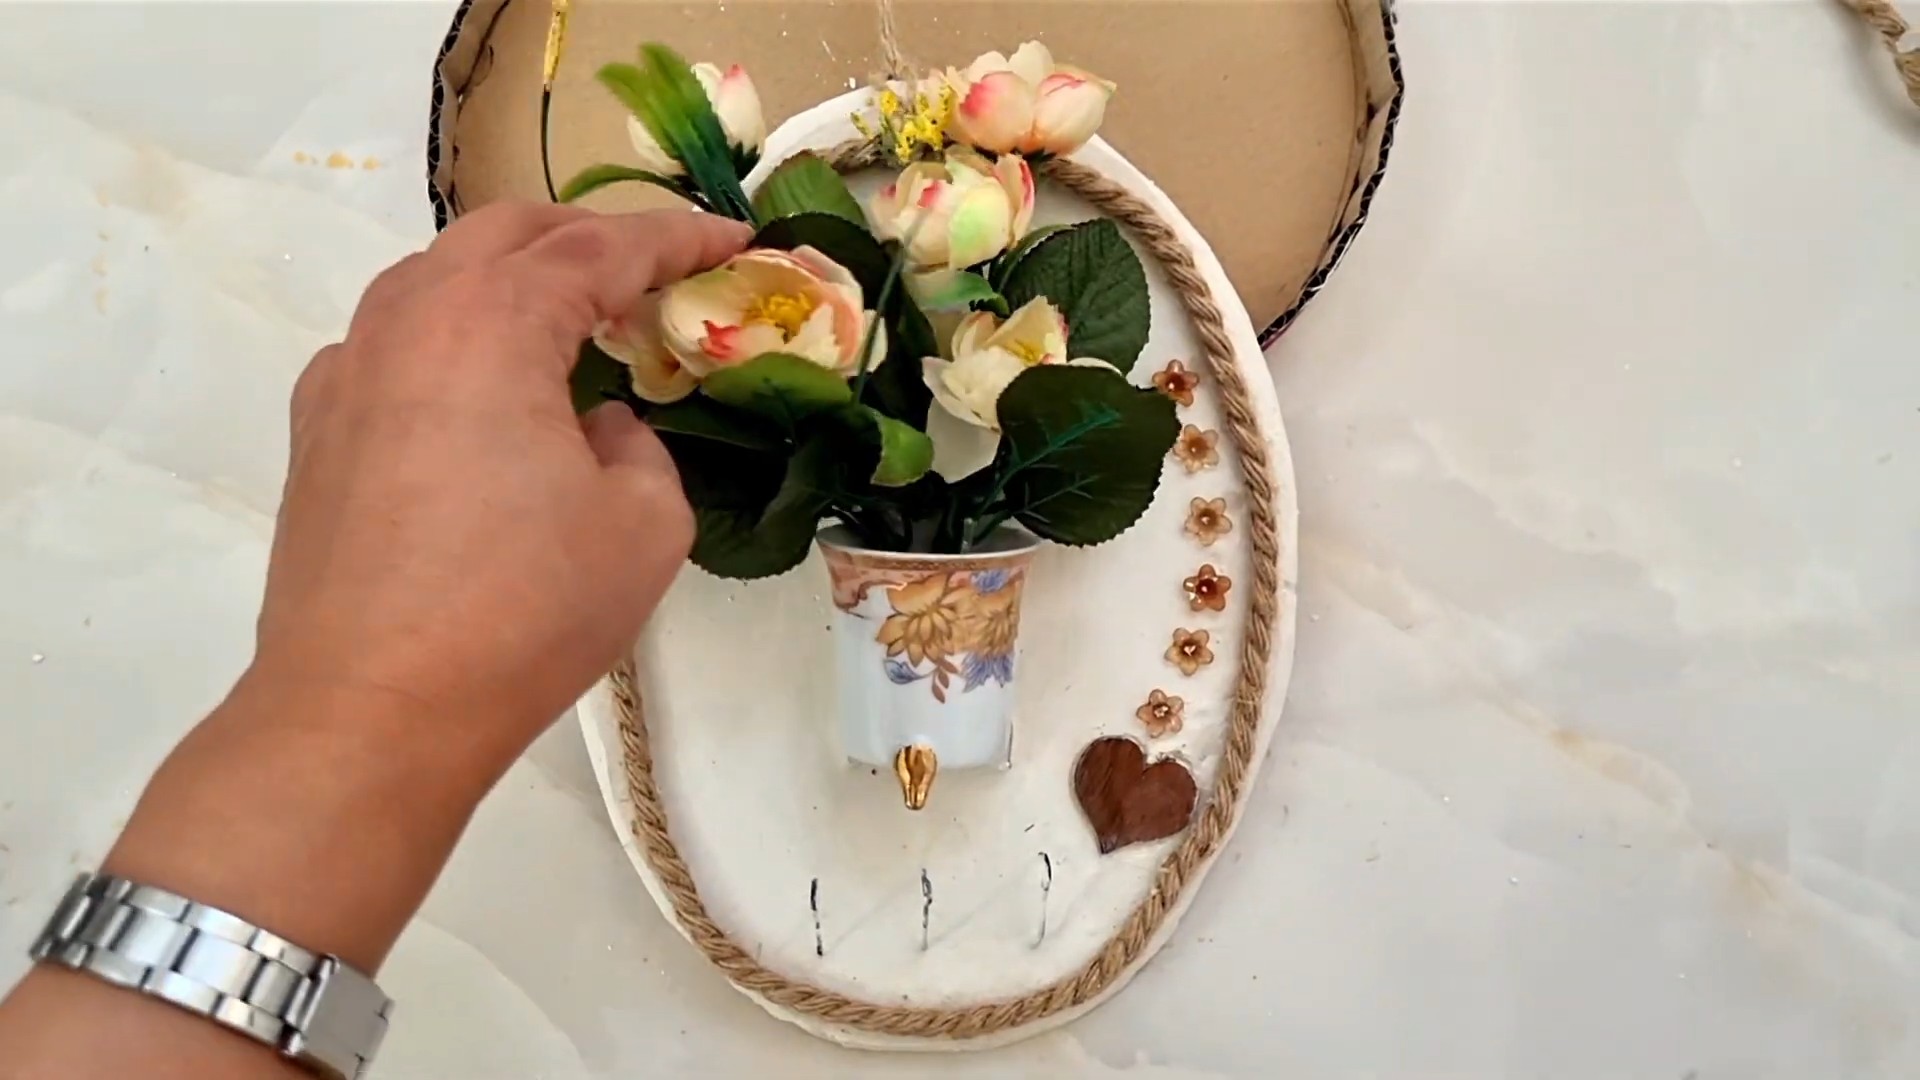
Hey there, fellow DIY enthusiasts! Are you tired of losing your keys? Do you have a collection of adorable teacups gathering dust in your cabinet? Well, I’ve got the perfect project for you: a DIY upcycled cup key holder! This is a super cute and practical way to keep your keys organized and add a touch of vintage charm to your entryway. Plus, it’s a great way to give those forgotten teacups a new lease on life. Let’s get started!
Materials You’ll Need
Before we dive in, let’s gather all the necessary materials. Here’s what you’ll need:
* **Teacups and Saucers:** Choose teacups and saucers that you love! Mismatched sets can look really charming. Make sure they are sturdy enough to hold keys. I recommend using at least 3 cups for a decent key holding capacity.
* **Wooden Board:** A piece of wood to mount your teacups on. The size will depend on how many cups you’re using and how much space you want between them. I used a piece of reclaimed wood that was about 24 inches long and 6 inches wide. You can find suitable wood at most hardware stores or even repurpose an old shelf.
* **Strong Adhesive:** This is crucial! You’ll need a strong adhesive that can bond ceramic to wood. I recommend using epoxy or a construction adhesive like Liquid Nails. Make sure to read the instructions carefully and choose an adhesive that’s suitable for both materials.
* **Key Hooks (Optional):** If you want to hang heavier keychains or multiple keys on each cup, you can add small key hooks underneath each cup. These can be found at most hardware stores.
* **Screws or Nails:** For attaching the wooden board to the wall. Choose screws or nails that are appropriate for your wall type.
* **Picture Hanging Hardware:** D-rings or sawtooth hangers for the back of the wooden board.
* **Drill (Optional):** If you’re using key hooks or need to pre-drill holes for screws.
* **Sandpaper:** To smooth any rough edges on the wooden board.
* **Paint or Stain (Optional):** To customize the wooden board to your liking.
* **Measuring Tape or Ruler:** For accurate placement of the cups.
* **Pencil:** For marking placement.
* **Safety Glasses:** To protect your eyes from dust and debris.
* **Gloves:** To protect your hands from the adhesive.
* **Clamps (Optional):** To hold the cups in place while the adhesive dries.
* **Level:** To ensure the key holder is straight when mounted on the wall.
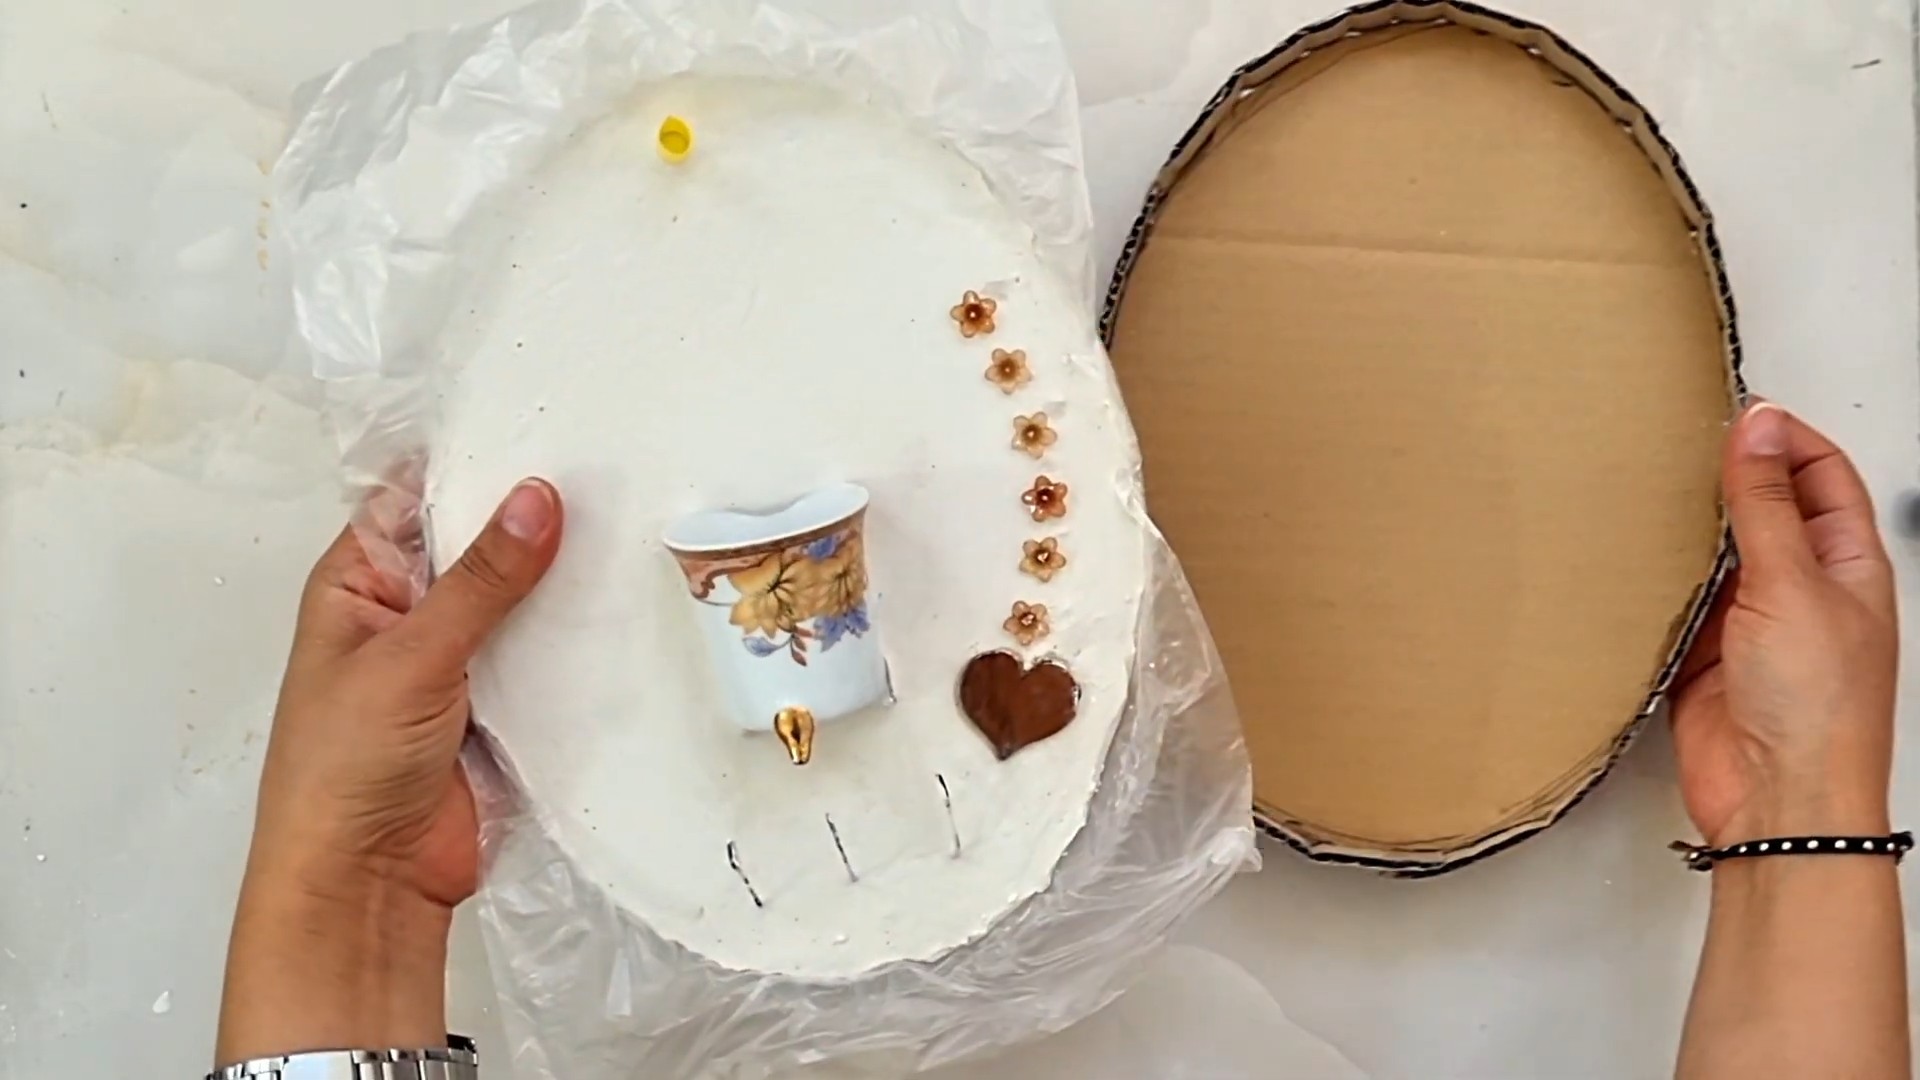
Preparing the Wooden Board
The wooden board is the foundation of our key holder, so let’s get it ready.
1. **Sand the Wood:** Start by sanding the wooden board to remove any rough edges or splinters. This will give it a smooth surface and make it easier to paint or stain. I used a medium-grit sandpaper followed by a fine-grit sandpaper.
2. **Clean the Wood:** After sanding, wipe down the wood with a damp cloth to remove any dust. Let it dry completely before moving on to the next step.
3. **Paint or Stain (Optional):** If you want to customize the look of your key holder, now’s the time to paint or stain the wooden board. I chose to stain mine with a dark walnut stain to give it a rustic look. Follow the instructions on the paint or stain can and allow it to dry completely before proceeding. You can also leave the wood natural for a more minimalist look.
4. **Attach Picture Hanging Hardware:** Flip the wooden board over and attach the picture hanging hardware to the back. I used D-rings and screws. Make sure the hardware is securely attached and can support the weight of the key holder and your keys. Position the hardware so that the key holder will hang straight.
Attaching the Teacups
This is the most important part! We need to make sure the teacups are securely attached to the wooden board.
1. **Plan the Placement:** Before you start gluing, arrange the teacups and saucers on the wooden board to determine the best placement. Consider the size and shape of the cups and saucers, and leave enough space between them so that keys can hang freely. Use a measuring tape or ruler to ensure that the cups are evenly spaced. I like to arrange them in a slightly staggered pattern for a more whimsical look.
2. **Mark the Placement:** Once you’re happy with the arrangement, use a pencil to mark the center of each saucer on the wooden board. This will help you align the cups correctly when you glue them.
3. **Apply Adhesive:** Put on your gloves to protect your hands. Apply a generous amount of adhesive to the bottom of each saucer. Make sure to cover the entire surface that will be in contact with the wooden board. Don’t be stingy with the adhesive – you want to make sure the cups are securely attached.
4. **Attach the Saucers:** Carefully align each saucer with the pencil mark on the wooden board and press it firmly into place. Hold it for a few seconds to allow the adhesive to start bonding.
5. **Secure with Clamps (Optional):** If you have clamps, you can use them to hold the saucers in place while the adhesive dries. This will ensure a strong bond. If you don’t have clamps, you can use heavy objects to weigh down the saucers.
6. **Let the Adhesive Dry:** Follow the instructions on the adhesive can for drying time. This is crucial! Don’t rush this step, or the cups may not be securely attached. I recommend letting the adhesive dry for at least 24 hours.
7. **Attach the Cups to the Saucers:** Once the saucers are securely attached to the wooden board, repeat the process to attach the teacups to the saucers. Apply adhesive to the bottom of each teacup and press it firmly onto the center of the saucer. Use clamps or heavy objects to hold the cups in place while the adhesive dries. Again, allow the adhesive to dry completely before moving on.
Adding Key Hooks (Optional)
If you want to add extra hanging space for your keys, you can install key hooks underneath each cup.
1. **Mark the Placement:** Decide where you want to place the key hooks under each cup. I recommend centering them under the cup for a balanced look. Use a pencil to mark the placement of the screw holes.
2. **Pre-Drill Holes (Optional):** If you’re using small screws, you may want to pre-drill pilot holes to prevent the wood from splitting. Use a drill bit that’s slightly smaller than the diameter of the screws.
3. **Attach the Key Hooks:** Use a screwdriver to attach the key hooks to the wooden board. Make sure the screws are tight, but don’t overtighten them, or you could strip the wood.
Mounting the Key Holder
Now that your key holder is complete, it’s time to mount it on the wall.
1. **Choose a Location:** Select a location near your entryway that’s convenient and easily accessible. Make sure the wall is strong enough to support the weight of the key holder and your keys.
2. **Use a Level:** Use a level to ensure that the key holder is straight before you attach it to the wall.
3. **Mark the Screw Holes:** Hold the key holder against the wall and mark the location of the screw holes with a pencil.
4. **Pre-Drill Holes (Optional):** If you’re attaching the key holder to drywall, you may want to use wall anchors to provide extra support. Pre-drill holes for the wall anchors according to the manufacturer’s instructions.
5. **Attach the Key Holder:** Use screws or nails to attach the key holder to the wall. Make sure the screws or nails are long enough to penetrate the wall studs or wall anchors.
6. **Hang Your Keys:** Once the key holder is securely mounted, you can start hanging your keys!
Final Touches and Tips
* Test the Strength: Before you load up your key holder with all your keys, give it a gentle tug to make sure it’s securely attached to the wall.
* Consider the Weight: Be mindful of the weight of your keys. If you have a lot of heavy keychains, you may want to use stronger adhesive or add more key hooks.
* Customize It: Feel free to get creative and customize your key holder to match your décor. You can add embellishments like beads, ribbons, or stencils.
* Clean Regularly: Dust your key holder regularly to keep it looking its best.
* Safety First: Always wear safety glasses and gloves when working with adhesives and power tools.
And there you have it! A beautiful and functional upcycled cup key holder that will keep your keys organized and add a touch of charm to your home. I hope you enjoyed this DIY project as much as I did. Happy crafting!
Conclusion
So, there you have it! Transforming ordinary cups into a charming and functional DIY cup key holder is not just a craft project; it’s a small revolution in home organization and a testament to the beauty of repurposing. We’ve walked you through the simple steps, highlighting the ease and affordability of this clever solution. But why is this DIY trick a must-try?
Firstly, it’s incredibly practical. No more frantic searches for your keys as you’re rushing out the door. This key holder provides a designated spot, ensuring your keys are always within easy reach. Think of the time and stress you’ll save! Secondly, it’s a fantastic way to add a personal touch to your entryway or any space where you need a little organizational flair. It’s a conversation starter, a unique piece of décor that reflects your creativity and resourcefulness.
Beyond the practical and aesthetic benefits, this DIY project is also eco-friendly. By repurposing old cups, you’re reducing waste and giving new life to items that might otherwise end up in the trash. It’s a small act of sustainability that can make a big difference.
But the beauty of this project lies in its versatility. Feel free to experiment with different types of cups. Vintage teacups, mismatched mugs, even sturdy paper cups can be used to create a key holder that perfectly complements your style. Consider painting the cups in vibrant colors, adding decorative embellishments like beads or ribbons, or even decoupaging them with your favorite patterns.
For a more rustic look, use wooden cups or mugs and stain them with a dark finish. You could even attach small hooks inside the cups for hanging larger keychains or even small lanyards. If you’re feeling particularly ambitious, create a multi-tiered key holder by stacking cups on top of each other, secured with strong adhesive.
Another variation is to personalize each cup for different family members. Paint their names on the cups or use different colors to represent each person’s keys. This not only adds a personal touch but also helps to keep everyone’s keys organized.
Consider the placement of your DIY cup key holder. It doesn’t have to be limited to your entryway. You could place one in your garage, near your back door, or even in your office to keep your workspace tidy.
This DIY cup key holder is more than just a craft; it’s a solution, a statement, and a sustainable choice.
We wholeheartedly encourage you to give this DIY trick a try. It’s a fun, rewarding project that will transform your space and simplify your life. And most importantly, we want to hear about your experience! Share your creations with us on social media using #DIYCupKeyHolder. We can’t wait to see your unique interpretations and creative variations. Let’s inspire each other to create beautiful and functional spaces, one repurposed cup at a time.
Frequently Asked Questions
What kind of adhesive should I use to attach the cups to the wall?
Choosing the right adhesive is crucial for the success and longevity of your DIY cup key holder. We recommend using a strong, multi-surface adhesive that is specifically designed for bonding to both the cup material (ceramic, plastic, metal, etc.) and the wall surface (drywall, wood, tile, etc.). Construction adhesive is a great option, as it provides a very strong and durable bond. However, it can be messy to work with, so be sure to use it in a well-ventilated area and wear gloves. Another excellent choice is a heavy-duty mounting tape. Look for tapes that are rated to hold a significant amount of weight, especially if you plan on hanging multiple keys or heavier keychains. Make sure to clean both the cup and wall surfaces thoroughly with rubbing alcohol before applying the adhesive to ensure a strong bond. Follow the manufacturer’s instructions carefully for best results. Remember to allow the adhesive to cure completely before hanging your keys.
What if I don’t have any old cups to repurpose?
No problem at all! While repurposing old cups is a great way to be eco-friendly, you can easily find inexpensive cups at thrift stores, dollar stores, or even garage sales. These are excellent places to source unique and interesting cups for your DIY project. You can often find sets of mismatched teacups or mugs for a fraction of the price of buying new ones. Alternatively, you can purchase new cups specifically for this project. Look for plain, inexpensive cups that you can easily customize with paint, decorations, or decoupage. Even sturdy paper cups can be used for a more temporary or lightweight key holder. Just be sure to reinforce them with extra layers of paper or cardboard for added durability.
How do I ensure the cups are securely attached to the wall and won’t fall down?
The key to a secure and long-lasting DIY cup key holder is proper preparation and the use of a strong adhesive. First, thoroughly clean both the back of the cup and the wall surface with rubbing alcohol to remove any dirt, grease, or residue. This will ensure a better bond for the adhesive. Apply a generous amount of adhesive to the back of the cup, making sure to cover the entire surface that will be in contact with the wall. Press the cup firmly against the wall and hold it in place for the recommended time specified by the adhesive manufacturer. For added security, you can use painter’s tape to hold the cup in place while the adhesive cures. Allow the adhesive to cure completely before hanging any keys on the holder. If you’re concerned about the weight of your keys, consider using a combination of adhesive and screws. Drill small holes through the back of the cup and into the wall, and then secure the cup with screws. Be sure to use anchors if you’re drilling into drywall.
Can I use this DIY cup key holder for other items besides keys?
Absolutely! The versatility of this DIY project is one of its greatest strengths. While it’s primarily designed as a key holder, you can easily adapt it to hold other small items as well. Consider using it to store small office supplies like paperclips, rubber bands, or pushpins. It can also be used to hold jewelry, such as earrings, rings, or necklaces. In the bathroom, it can be used to store cotton balls, Q-tips, or makeup brushes. The possibilities are endless! Just be mindful of the weight and size of the items you’re storing to ensure the cups remain securely attached to the wall. You can also adjust the size and type of cups you use to better accommodate different items. For example, larger mugs can be used to store larger items, while smaller teacups are perfect for holding small jewelry.
How do I clean the DIY cup key holder?
Cleaning your DIY cup key holder is simple and straightforward. For regular dusting, simply wipe the cups with a soft, dry cloth. If there are any stubborn stains or dirt, you can use a damp cloth with a mild soap solution. Be sure to avoid using abrasive cleaners or scouring pads, as these can damage the surface of the cups. If you’ve used paint or other decorative embellishments, be extra careful when cleaning to avoid removing or damaging them. For cups that are particularly dirty, you can remove them from the wall (if possible) and wash them in the sink with warm, soapy water. Be sure to dry them thoroughly before reattaching them to the wall. Regularly cleaning your DIY cup key holder will help to keep it looking its best and ensure that it remains a functional and stylish addition to your home.

Leave a Comment