

DIY Concrete Candle Holders: Ever feel like your home decor is missing that certain *je ne sais quoi*? Like it needs a touch of rustic charm blended with modern elegance? I know I have! That’s why I’m so excited to share this incredibly satisfying and surprisingly simple DIY project with you: creating your own concrete candle holders.
Concrete, once relegated to sidewalks and skyscrapers, has found its way into our homes as a chic and versatile material. Think about it – from minimalist planters to industrial-style countertops, concrete adds an undeniable edge. While its modern resurgence is relatively recent, the use of concrete-like materials dates back to ancient civilizations, with the Romans famously using it to construct architectural marvels that still stand today. Now, we’re bringing that same durable and timeless material into our homes in a fun, accessible way.
But why DIY concrete candle holders, you ask? Well, beyond the sheer satisfaction of crafting something beautiful with your own hands, these candle holders offer a unique opportunity to personalize your space. Store-bought options can be generic and lack character. With this DIY project, you can customize the size, shape, and finish to perfectly complement your existing decor. Plus, let’s be honest, who doesn’t love the warm, inviting glow of candlelight? These holders will not only enhance the ambiance of any room but also serve as a conversation starter. So, grab your supplies, and let’s get crafting! I promise, you’ll be amazed at how easy and rewarding it is to create these stunning pieces.
DIY Concrete Candle Holders: A Step-by-Step Guide
Hey there, fellow DIY enthusiasts! I’m super excited to share this project with you – creating your own stylish concrete candle holders. They’re surprisingly easy to make, add a touch of modern industrial chic to any space, and are a fantastic way to personalize your home decor. Plus, they make awesome gifts! Let’s dive in!
Materials You’ll Need
Before we get started, let’s gather all the necessary materials. Trust me, having everything ready beforehand will make the process much smoother.
* Cement Mix: I recommend using a rapid-setting cement mix. It dries faster, which means you can enjoy your candle holders sooner! Look for a mix specifically designed for small projects.
* Fine Sand: Adding sand to the cement mix helps with the texture and prevents cracking. Play sand works great!
* Water: Just plain old tap water will do.
* Molds: This is where you can get creative! I’ve used everything from plastic containers (yogurt cups, small bowls) to silicone molds designed for baking. The key is to choose molds that are heat-resistant and easy to demold. You’ll need two sizes – one for the outer mold and a smaller one for creating the candle cavity.
* Cooking Spray or Mold Release Agent: This is crucial for easy demolding. Trust me, you don’t want to skip this step!
* Mixing Bowl: A sturdy plastic or metal bowl is perfect.
* Mixing Spoon or Trowel: Something to thoroughly mix the cement.
* Measuring Cups and Spoons: For accurate measurements of the cement, sand, and water.
* Sandpaper (Various Grits): For smoothing out any rough edges after demolding. I like to have a range from coarse (80 grit) to fine (220 grit).
* Sealer (Optional): A concrete sealer will protect your candle holders from stains and moisture. I recommend a water-based sealer.
* Candles: Tea lights, votives, or small pillar candles – whatever you prefer!
* Safety Glasses: Protect your eyes from cement dust.
* Gloves: Cement can be harsh on your skin, so gloves are a must.
* Dust Mask: To avoid inhaling cement dust.
* Weight (Rocks, Gravel, or Sand): To keep the inner mold from floating.
Preparing Your Molds
This step is all about ensuring a clean and easy release of your concrete creations.
1. Choose Your Molds: Select the outer and inner molds you want to use. Remember, the difference in size between the two molds will determine the thickness of the concrete walls of your candle holder.
2. Apply Mold Release: Generously spray the inside of both the outer and inner molds with cooking spray or mold release agent. Make sure to coat every nook and cranny. This will prevent the concrete from sticking and make demolding a breeze. I usually do two coats just to be safe.
3. Prepare the Inner Mold: If you’re using a lightweight inner mold (like a plastic cup), you’ll need to weigh it down to prevent it from floating when you pour the concrete. Fill the inner mold with rocks, gravel, or sand. This will keep it submerged and create a consistent cavity for your candle.
Mixing the Concrete
Now for the fun part – mixing the concrete! This is where you’ll transform dry ingredients into a pourable mixture.
1. Combine Dry Ingredients: In your mixing bowl, combine the cement mix and fine sand. The ratio will depend on the specific cement mix you’re using, so be sure to follow the manufacturer’s instructions. A common ratio is 3 parts cement mix to 1 part sand. Mix the dry ingredients thoroughly until they are evenly distributed.
2. Add Water Gradually: Slowly add water to the dry mixture, mixing continuously. The goal is to achieve a thick, pancake batter-like consistency. Add water a little at a time to avoid making the mixture too runny.
3. Mix Thoroughly: Continue mixing until the concrete is smooth and free of lumps. This may take a few minutes of vigorous stirring. You want a consistency that will hold its shape but still be pourable.
4. Check the Consistency: To test the consistency, scoop up some of the concrete with your spoon or trowel and let it drip back into the bowl. It should flow smoothly but not be too watery. If it’s too thick, add a little more water. If it’s too thin, add a little more cement mix.
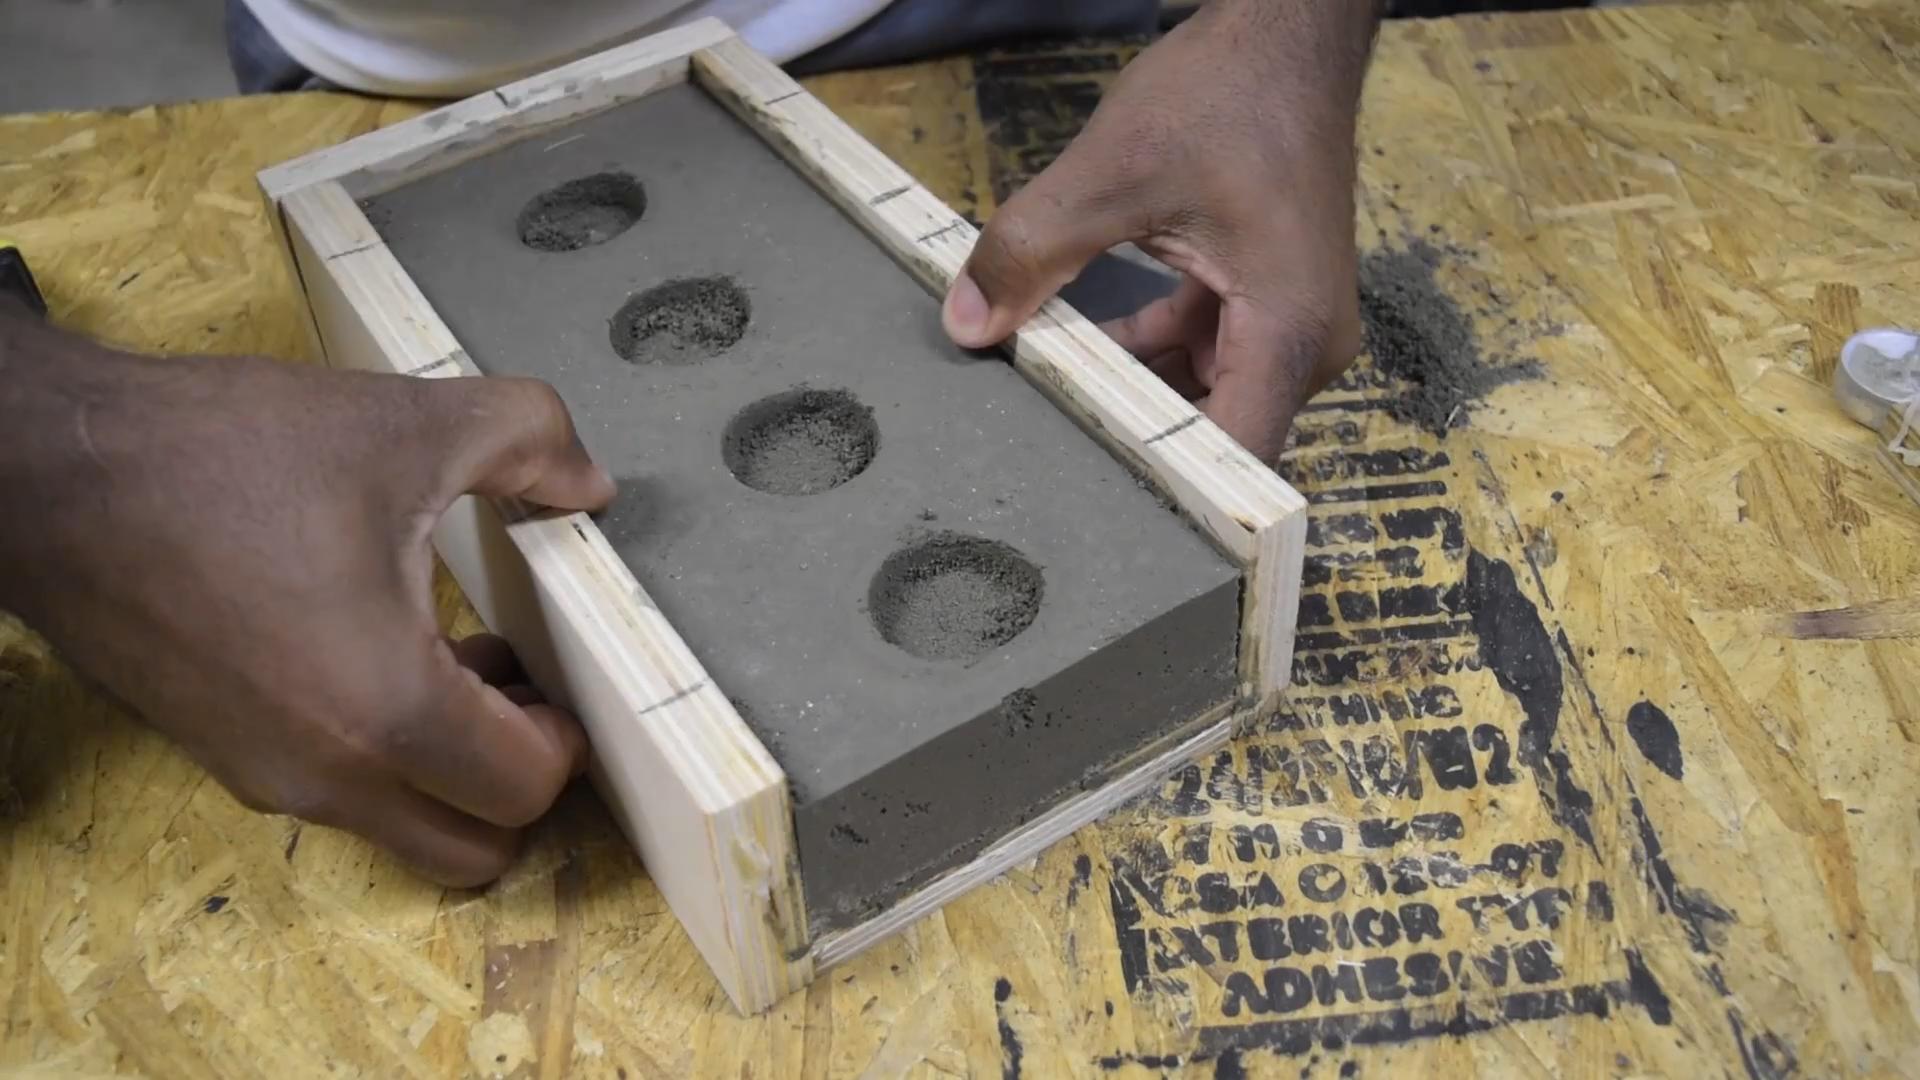
Pouring the Concrete
This is where your candle holder starts to take shape!
1. Pour into Outer Mold: Carefully pour the concrete mixture into the outer mold, filling it about halfway.
2. Tap to Release Air Bubbles: Gently tap the sides of the mold to release any trapped air bubbles. This will help create a smoother, more even surface. You can also use a toothpick or skewer to poke around in the concrete and release any stubborn bubbles.
3. Insert Inner Mold: Carefully center the inner mold into the wet concrete. Gently press it down until it’s submerged to the desired depth. Remember, the depth of the inner mold will determine the depth of the candle cavity.
4. Add Weight to Inner Mold: If you haven’t already, make sure the inner mold is weighted down with rocks, gravel, or sand to prevent it from floating.
5. Fill Remaining Space: Pour the remaining concrete mixture into the outer mold, filling the space between the inner and outer molds.
6. Tap Again: Tap the sides of the mold again to release any remaining air bubbles.
7. Smooth the Surface: Use your mixing spoon or trowel to smooth the top surface of the concrete. You can create a perfectly smooth surface or leave it slightly textured for a more rustic look.
Curing and Demolding
Patience is key here! Allowing the concrete to cure properly will result in a stronger, more durable candle holder.
1. Curing Time: Allow the concrete to cure for at least 24-48 hours, or according to the instructions on your cement mix. The longer it cures, the stronger it will be. Place the molds in a cool, dry place away from direct sunlight.
2. Demolding: Once the concrete is fully cured, it’s time to demold! Gently flex the outer mold to loosen the concrete. If it’s stuck, you can try tapping the mold lightly with a rubber mallet.
3. Remove Inner Mold: Carefully remove the inner mold. You may need to use a small tool, like a screwdriver or putty knife, to gently pry it loose.
4. Inspect Your Candle Holder: Once you’ve removed both molds, inspect your candle holder for any imperfections.
Finishing Touches
Now it’s time to refine your candle holder and give it a polished look.
1. Sanding: Use sandpaper to smooth out any rough edges or imperfections. Start with a coarser grit (80 grit) to remove any large bumps or ridges, then gradually move to finer grits (120 grit, 180 grit, 220 grit) to achieve a smooth finish.
2. Cleaning: Wipe down the candle holder with a damp cloth to remove any dust from sanding.
3. Sealing (Optional): If you want to protect your candle holder from stains and moisture, apply a concrete sealer according to the manufacturer’s instructions. This is especially important if you plan to use your candle holder outdoors.
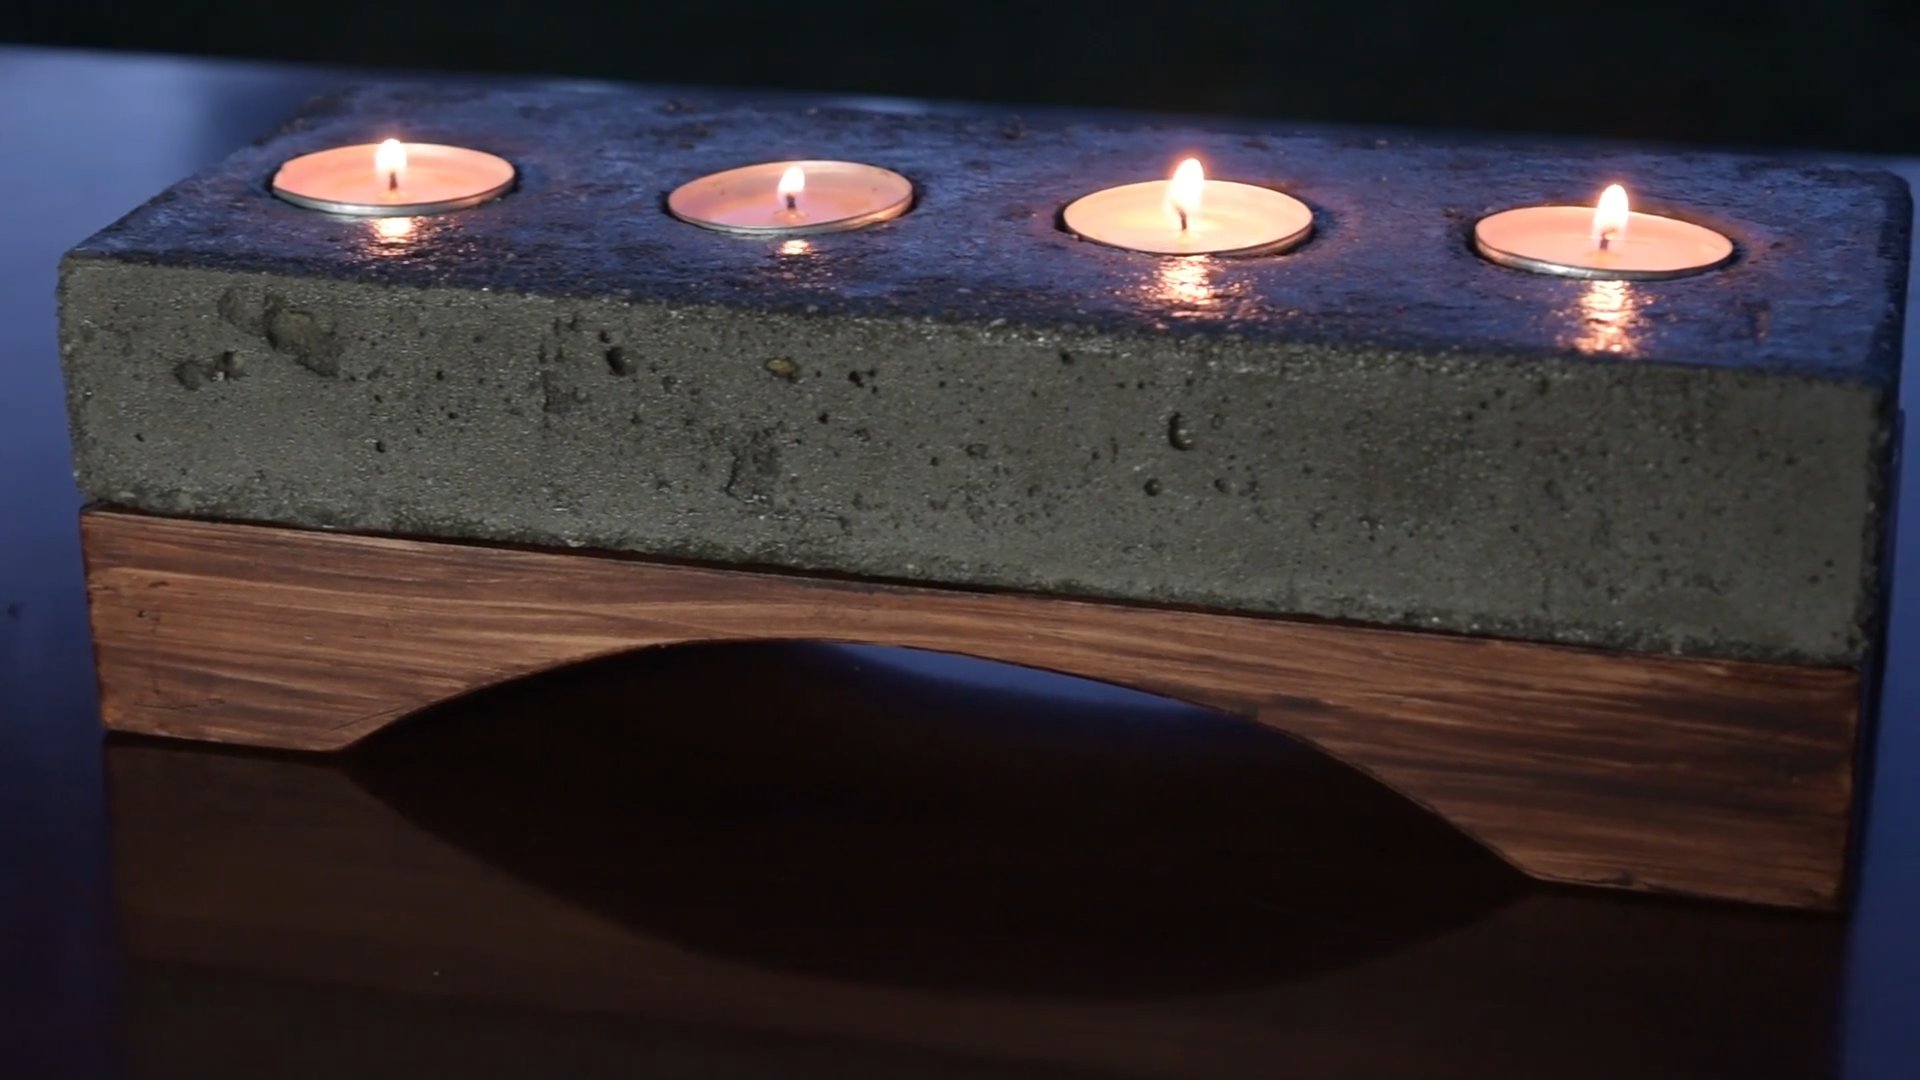
4. Adding Details (Optional): Get creative! You can paint your candle holder, add decorative stones or shells, or even embed small objects into the concrete before it cures.
5. Enjoy! Place your favorite candle in your new concrete candle holder and enjoy the warm, inviting glow.
Tips and Tricks
Here are a few extra tips to help you achieve the best results:
* Experiment with Molds: Don’t be afraid to experiment with different molds to create unique shapes and sizes.
* Add Pigment: You can add concrete pigment to the mix to create colored candle holders.
* Create a Marbled Effect: Mix different colors of concrete together for a marbled effect.
* Use Different Textures: Add small pebbles or shells to the concrete mix for a textured finish.
* Practice Makes Perfect: Don’t be discouraged if your first attempt isn’t perfect. Keep practicing, and you’ll get better with each try!
I hope you enjoyed this tutorial! I can’t wait to see what you create. Happy crafting!
Conclusion
So, there you have it! Crafting your own DIY concrete candle holders is not just a fun weekend project; it’s a gateway to adding a touch of modern, industrial chic to your home decor without breaking the bank. We’ve walked you through the process, highlighting the simplicity and affordability of transforming basic materials into stunning statement pieces.
Why is this a must-try? Because it’s more than just making a candle holder. It’s about unleashing your creativity, personalizing your space, and experiencing the satisfaction of creating something beautiful with your own two hands. Store-bought candle holders, while convenient, often lack the unique character and personal touch that a handmade item brings. With these DIY concrete candle holders, you have complete control over the size, shape, color, and overall aesthetic, ensuring they perfectly complement your existing decor.
But the fun doesn’t stop there! Feel free to experiment with different variations to truly make these candle holders your own. Consider adding pigments to the concrete mix for a pop of color. Earthy tones like terracotta or ochre can create a warm and inviting ambiance, while bolder hues like teal or cobalt blue can add a vibrant splash of personality. You could also embed small decorative items like sea glass, pebbles, or even metallic flakes into the concrete for added texture and visual interest.
Another exciting variation is to play with different molds. While we’ve focused on simple cylindrical shapes, you can use virtually any container as a mold – think old yogurt containers, cardboard tubes, or even silicone molds for more intricate designs. Just remember to choose molds that are sturdy enough to withstand the weight of the wet concrete and easy to remove once the concrete has cured.
For a rustic touch, consider leaving the concrete unsealed and allowing it to develop a natural patina over time. Alternatively, you can seal the concrete with a clear sealant to protect it from stains and moisture. You can also add felt pads to the bottom of your candle holders to prevent them from scratching your furniture.
The possibilities are truly endless! This project is a blank canvas for your imagination. Don’t be afraid to experiment, get creative, and have fun with it.
We are confident that you’ll love the process and the results. These DIY concrete candle holders are not only beautiful and functional but also make thoughtful and personalized gifts for friends and family. Imagine the joy of giving someone a handmade item that you poured your heart and soul into!
So, what are you waiting for? Gather your materials, roll up your sleeves, and get ready to create some stunning DIY concrete candle holders. We can’t wait to see what you come up with!
We encourage you to try this DIY trick and share your experience with us. Post photos of your finished candle holders on social media using #DIYConcreteCandleHolders and tag us so we can admire your creations. We’re always inspired by the creativity of our readers, and we love seeing how you put your own unique spin on our projects. Let’s build a community of DIY enthusiasts and inspire each other to create beautiful things!
Frequently Asked Questions (FAQ)
What type of concrete should I use for my DIY candle holders?
We recommend using a rapid-setting concrete mix for this project. Rapid-setting concrete cures faster, allowing you to demold your candle holders sooner. Look for a concrete mix that is specifically designed for small projects and has a smooth consistency. You can find these mixes at most hardware stores. Avoid using concrete mixes that are too coarse, as they may not produce a smooth finish. Also, consider using a concrete mix that is specifically formulated for decorative purposes, as these mixes often contain additives that enhance their appearance and durability.
How long does it take for the concrete to dry completely?
The drying time for concrete depends on several factors, including the type of concrete mix used, the ambient temperature, and the humidity level. Generally, rapid-setting concrete will be firm enough to demold within 24-48 hours. However, it’s essential to allow the concrete to cure completely before using the candle holders. Curing involves keeping the concrete moist for several days to allow it to reach its full strength and durability. We recommend curing your concrete candle holders for at least 3-5 days. You can do this by covering them with a damp cloth or plastic wrap and misting them with water periodically.
Can I use any type of mold for this project?
While you can use a variety of molds for this project, it’s important to choose molds that are sturdy enough to withstand the weight of the wet concrete and easy to remove once the concrete has cured. Plastic containers, cardboard tubes, and silicone molds are all good options. Avoid using molds that are too flimsy or have intricate details, as these may be difficult to remove without damaging the concrete. Before pouring the concrete into the mold, be sure to coat the inside of the mold with a release agent, such as cooking spray or petroleum jelly, to prevent the concrete from sticking.
How can I add color to my concrete candle holders?
Adding color to your concrete candle holders is a great way to personalize them and match them to your existing decor. You can add color by mixing pigments into the concrete mix before pouring it into the mold. Concrete pigments are available in a wide range of colors and can be found at most hardware stores. Start by adding a small amount of pigment and gradually increase the amount until you achieve the desired color. Be sure to mix the pigment thoroughly into the concrete mix to ensure an even color distribution. You can also experiment with different techniques, such as layering different colors or creating a marbled effect.
How do I seal my concrete candle holders?
Sealing your concrete candle holders is important to protect them from stains and moisture. You can seal them with a clear concrete sealant, which is available at most hardware stores. Before sealing the candle holders, be sure to clean them thoroughly and allow them to dry completely. Apply the sealant according to the manufacturer’s instructions. You may need to apply multiple coats of sealant to achieve adequate protection. Sealing the concrete will also enhance its appearance and make it easier to clean.
What if my concrete candle holder cracks?
Cracking can sometimes occur in concrete, especially if it dries too quickly or is exposed to extreme temperature changes. If your concrete candle holder develops a small crack, you can often repair it with a concrete patching compound. Clean the crack thoroughly and apply the patching compound according to the manufacturer’s instructions. For larger cracks, you may need to use a more specialized concrete repair product. To prevent cracking, be sure to cure your concrete candle holders properly and avoid exposing them to extreme temperature changes.
Can I add essential oils to the concrete mix for a scented candle holder?
While adding essential oils to the concrete mix might seem like a good idea for a scented candle holder, it’s generally not recommended. The alkaline nature of concrete can degrade essential oils, diminishing their scent and potentially affecting the concrete’s integrity. Instead, consider adding a few drops of essential oil to the melted wax of your candle once it’s lit, or using a separate diffuser near your candle holder. This will allow you to enjoy the fragrance without compromising the candle holder itself.
How do I make sure the candle sits securely in the holder?
To ensure the candle sits securely, create a well or indentation in the concrete while it’s still wet. You can do this by pressing a smaller object, like a bottle cap or a small piece of PVC pipe, into the center of the concrete after it’s been poured into the mold. Remove the object before the concrete hardens completely. This will create a recess that will hold the candle securely in place. Alternatively, you can use candle adhesive or wax to secure the candle to the holder.
Are these concrete candle holders heat resistant?
Concrete is generally heat resistant, but it’s still important to take precautions when using candles in concrete holders. Avoid placing the candle holders on flammable surfaces and never leave a burning candle unattended. If the candle holder becomes excessively hot, extinguish the candle and allow the holder to cool down before handling it. Using a candle with a glass or metal container can also help to protect the concrete from direct heat.


Leave a Comment