

DIY Carpet Stain Remover: Let’s face it, accidents happen! You’re enjoying a cozy evening at home, maybe a glass of red wine in hand, and suddenly… disaster strikes! A spill on your beloved carpet can feel like a mini-crisis, but don’t panic. Before you reach for those expensive, chemical-laden commercial cleaners, I’m here to share a little secret: you can create a powerful and effective DIY carpet stain remover right in your own kitchen.
For generations, resourceful homeowners have relied on simple, natural ingredients to tackle household messes. Think about it – our grandmothers didn’t have access to the vast array of cleaning products we see today. They used what they had on hand, often with remarkable results. This tradition of resourcefulness is something I truly admire, and it’s the inspiration behind this guide.
Why bother with a DIY solution? Well, store-bought stain removers can be harsh on your carpet fibers, potentially causing discoloration or damage over time. Plus, they often contain chemicals that aren’t exactly friendly to your health or the environment. My DIY recipe is not only gentle and effective, but it’s also budget-friendly and uses ingredients you likely already have in your pantry. So, ditch the expensive chemicals and let’s get started on creating a safe and powerful solution to keep your carpets looking their best!
DIY Carpet Stain Remover: Banish Stains Like a Pro!
Okay, let’s face it: carpets are magnets for spills, splatters, and all sorts of mysterious marks. Instead of panicking and reaching for those expensive, chemical-laden cleaners, I’m going to share my go-to DIY carpet stain remover recipe that’s not only effective but also uses ingredients you probably already have in your pantry! Trust me, this stuff is magic.
What You’ll Need: Your Stain-Fighting Arsenal
Before we dive in, let’s gather our supplies. This is a simple recipe, so you won’t need anything fancy.
* **White Vinegar:** The unsung hero of natural cleaning! It’s acidic, which helps break down stains and deodorize.
* **Baking Soda:** Another powerhouse! Baking soda absorbs odors and helps lift stains from carpet fibers.
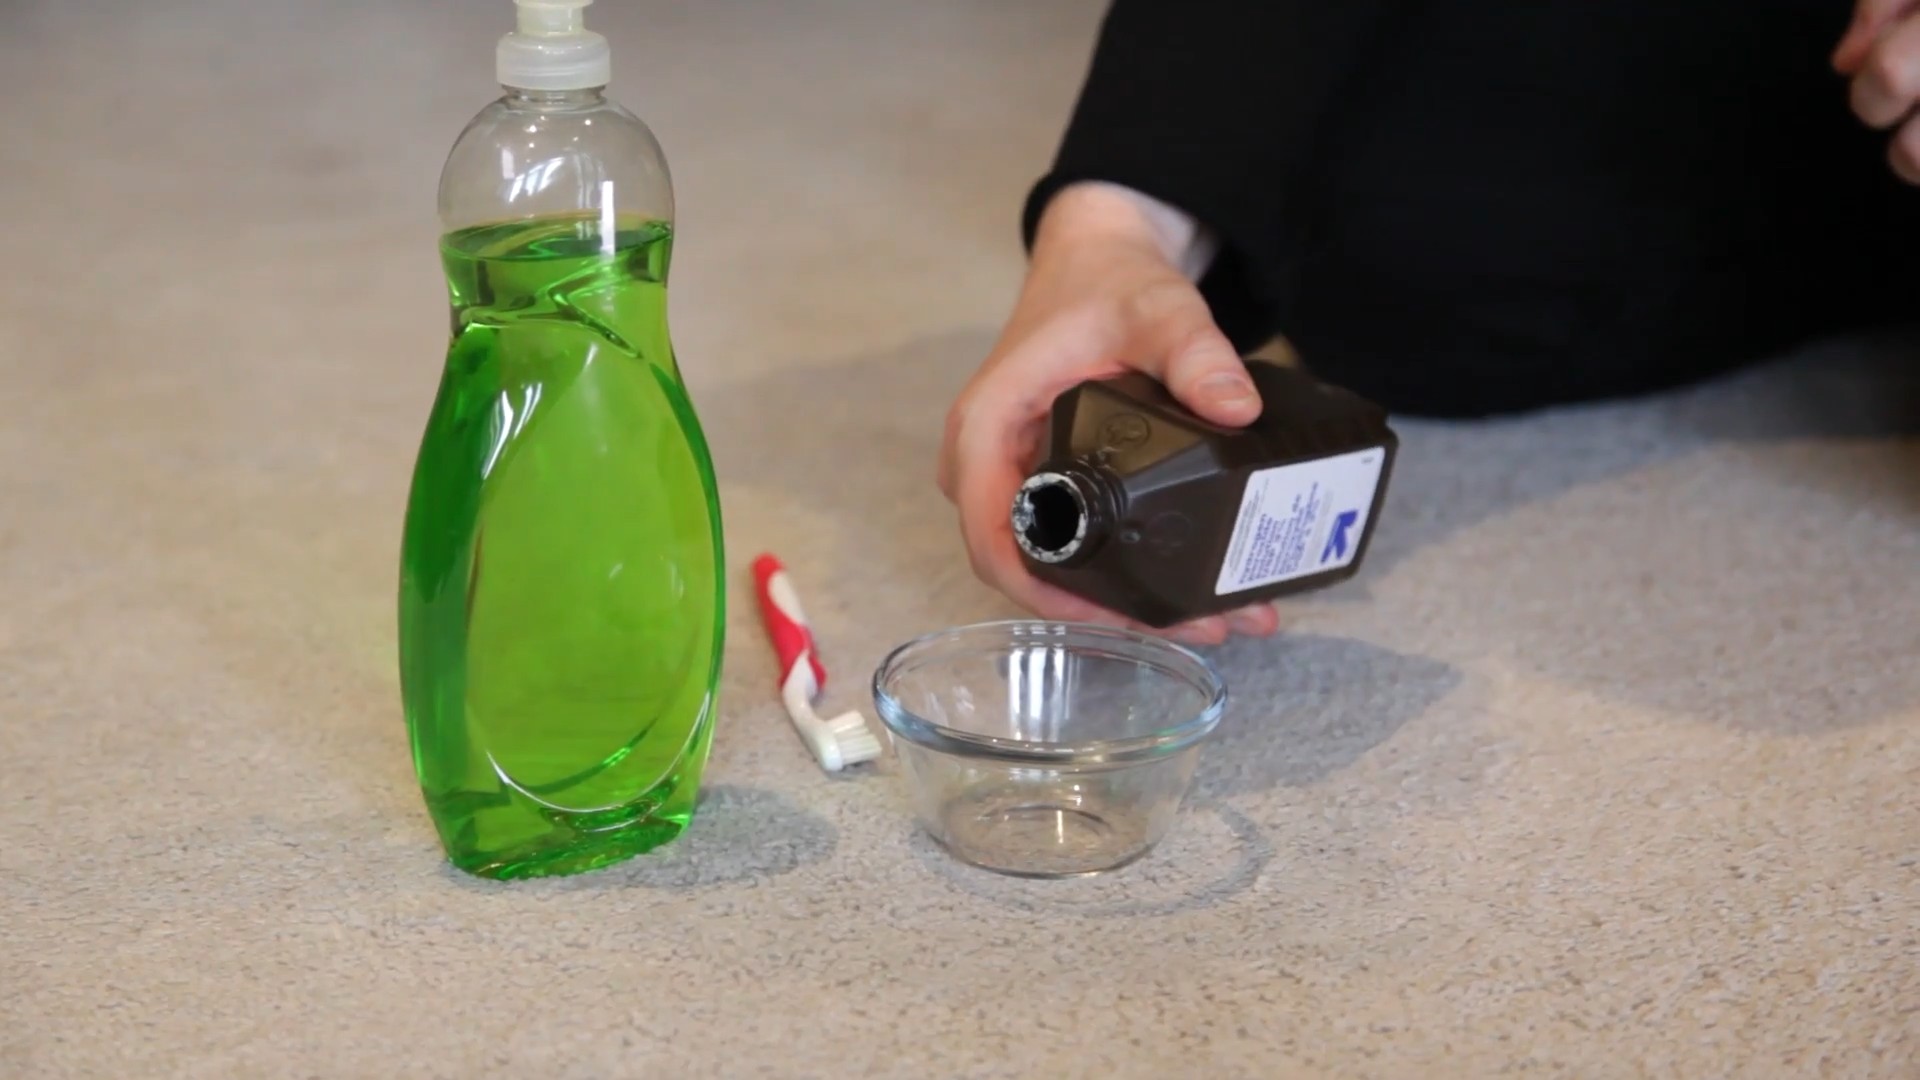
* **Dish Soap (Clear, Non-Bleach):** A gentle surfactant that helps loosen the stain. Make sure it’s clear to avoid adding color to your carpet.
* **Warm Water:** The perfect solvent to mix everything together.
* **Spray Bottle:** For easy application.
* **Clean White Cloths or Paper Towels:** Essential for blotting and absorbing the stain. Avoid colored cloths, as the dye could transfer to your carpet.
* **Vacuum Cleaner:** To finish the job and fluff up those fibers.
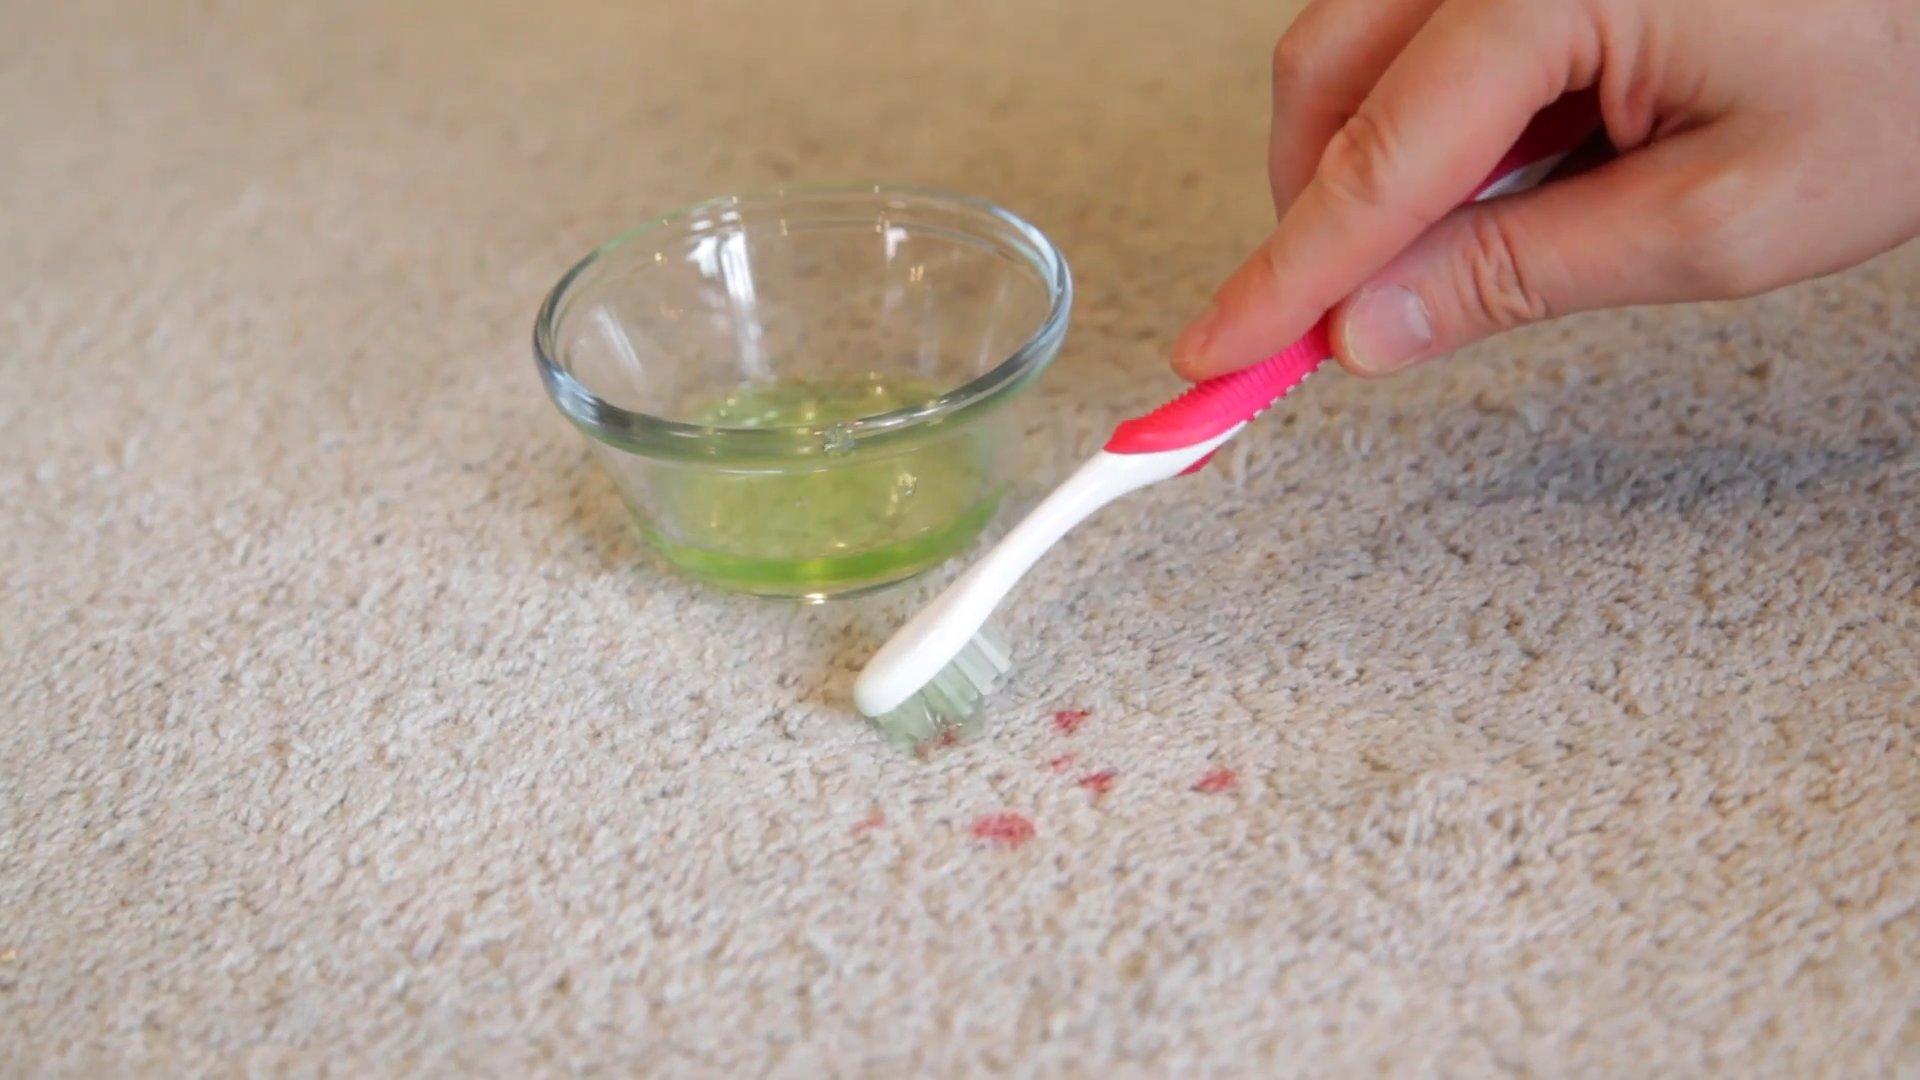
* **Spoon or Scrub Brush (Soft Bristles):** For gently working the solution into the stain.
* **Optional: Essential Oil (Lemon, Lavender, or Tea Tree):** A few drops can add a pleasant scent and boost cleaning power.
The Magic Potion: Mixing Your Stain Remover
Now for the fun part! We’re going to create our stain-busting solution.
1. **Combine Ingredients:** In your spray bottle, mix together:
* 1/2 cup white vinegar
* 1/4 cup baking soda
* 1 teaspoon clear dish soap
* 1 cup warm water
* (Optional) 5-10 drops of your favorite essential oil
2. **Mix Gently:** Close the spray bottle tightly and gently swirl the mixture to combine. Be careful, as the baking soda and vinegar will react and create some fizz. Don’t shake it vigorously!
3. **Let it Settle:** Allow the mixture to settle for a minute or two until the fizzing subsides.
Attack the Stain: Step-by-Step Stain Removal
Alright, it’s time to put our stain remover to the test! Remember to always test a small, inconspicuous area of your carpet first to ensure colorfastness.
1. **Test Patch:** Spray a small amount of the solution onto a hidden area of your carpet (like under a piece of furniture or in a closet). Wait a few minutes and blot with a clean white cloth. Check for any discoloration or damage to the carpet fibers. If everything looks good, proceed to the next step.
2. **Blot the Stain (Don’t Rub!):** If the stain is fresh, immediately blot up as much of the liquid as possible with a clean white cloth or paper towels. Work from the outside of the stain inward to prevent it from spreading. Apply firm pressure to absorb the liquid.
3. **Spray the Solution:** Generously spray the stain with your DIY carpet stain remover. Make sure the area is thoroughly saturated, but not soaking wet.
4. **Wait and Let it Work:** Allow the solution to sit on the stain for 5-10 minutes. This gives the vinegar and baking soda time to break down the stain and lift it from the carpet fibers. For tougher stains, you can let it sit for up to 30 minutes.
5. **Gently Scrub (If Needed):** If the stain is particularly stubborn, gently scrub the area with a soft-bristled brush or spoon. Use a circular motion and avoid scrubbing too hard, as this can damage the carpet fibers.
6. **Blot Again:** After the solution has had time to work, blot the area again with a clean white cloth or paper towels. Continue blotting until you’ve absorbed as much of the liquid as possible.
7. **Rinse (Optional):** If you feel like there’s still residue from the stain remover, you can rinse the area with a small amount of clean, warm water. Blot the area thoroughly with a clean white cloth to remove the excess water.
8. **Dry the Area:** To help the carpet dry quickly, you can use a fan or open a window to increase ventilation. You can also place a clean, dry towel over the area and weigh it down with a heavy object to absorb the remaining moisture.
9. **Vacuum:** Once the area is completely dry, vacuum the carpet to fluff up the fibers and restore its texture.
Tackling Specific Stains: A Few Extra Tips
While this DIY stain remover works wonders on most stains, here are a few extra tips for tackling specific messes:
* **Red Wine:** For red wine stains, sprinkle a generous amount of baking soda onto the stain immediately after it occurs. Let it sit for several hours or overnight to absorb the wine. Then, vacuum up the baking soda. Follow with the DIY stain remover if needed.
* **Coffee:** Coffee stains can be tricky. Try blotting the stain with club soda before applying the DIY stain remover. The carbonation can help lift the stain.
* **Pet Stains:** Pet stains require a little extra attention. After cleaning with the DIY stain remover, sprinkle the area with baking soda and let it sit overnight to absorb any lingering odors. Vacuum in the morning. You can also add a few drops of tea tree essential oil to the stain remover, as it has antibacterial and antifungal properties.
* **Grease Stains:** For grease stains, sprinkle cornstarch onto the stain to absorb the grease. Let it sit for 30 minutes, then vacuum it up. Follow with the DIY stain remover.
Preventing Future Stains: A Proactive Approach
The best way to deal with carpet stains is to prevent them from happening in the first place! Here are a few tips to keep your carpets looking their best:
* **Act Fast:** The sooner you address a spill, the easier it will be to remove. Don’t let stains sit and set.
* **Use Rugs and Mats:** Place rugs and mats in high-traffic areas to protect your carpets from dirt and spills.
* **Regular Vacuuming:** Vacuum your carpets regularly (at least once a week) to remove dirt and debris that can grind into the fibers and cause stains.
* **Professional Cleaning:** Consider having your carpets professionally cleaned once or twice a year to remove deep-down dirt and stains.
Important Considerations: Safety First!
While this DIY stain remover is generally safe, it’s always a good idea to take a few precautions:
* **Test in an Inconspicuous Area:** As mentioned before, always test the solution in a hidden area of your carpet before applying it to the stain.
* **Avoid Over-Saturating:** Don’t soak your carpet with the solution. Too much moisture can damage the carpet fibers and lead to mold growth.
* **Ventilate the Area:** Make sure the area is well-ventilated while you’re cleaning to avoid inhaling any fumes.
* **Keep Out of Reach of Children and Pets:** Store the stain remover in a safe place, out of reach of children and pets.
* **Consult a Professional:** For very delicate or expensive carpets, it’s always best to consult a professional carpet cleaner.
Why This Works: The Science Behind the Magic
So, what makes this DIY stain remover so effective? It’s all about the chemistry!
* **White Vinegar:** The acetic acid in white vinegar helps to break down stains and dissolve mineral deposits. It also has deodorizing properties.
* **Baking Soda:** Baking soda is a mild alkali that helps to absorb odors and lift stains from carpet fibers. It also acts as a gentle abrasive.
* **Dish Soap:** Dish soap is a surfactant, which means it helps to reduce the surface tension of water, allowing it to penetrate the stain more effectively. It also helps to emulsify grease and oil.
* **Warm Water:** Warm water helps to dissolve the ingredients and loosen the stain.
By combining these ingredients, you create a powerful cleaning solution that can tackle a wide range of carpet stains.
Troubleshooting: What to Do If It Doesn’t Work
Sometimes, even the best stain remover can’t completely eliminate a stain. If you’ve tried the DIY stain remover and the stain is still visible, here are a few things you can try:
* **Repeat the Process:** Sometimes, it takes more than one application to remove a stubborn stain. Repeat the steps above, allowing the solution to sit on the stain for a longer period of time.
* **Try a Different Solution:** If the DIY stain remover isn’t working, you can try a commercial carpet stain remover. Be sure to follow the instructions on the label carefully.
* **Call a Professional:** If all else fails, it’s time to call in the professionals. A professional carpet cleaner has the tools and expertise to
Conclusion
So, there you have it! This DIY carpet stain remover isn’t just another cleaning hack; it’s a game-changer for anyone who wants to keep their carpets looking fresh and new without resorting to harsh chemicals or expensive professional services. We’ve all been there – that sinking feeling when a spill happens, knowing the potential for a stubborn, unsightly stain. But with this simple, effective solution, you can tackle those accidents head-on and restore your carpet’s beauty in no time.
What makes this DIY carpet stain remover a must-try? First and foremost, it’s incredibly cost-effective. You likely already have the ingredients in your pantry or cleaning cabinet: white vinegar, baking soda, and dish soap. Compared to the price of commercial stain removers, which often contain questionable chemicals, this homemade version is a budget-friendly and eco-conscious alternative.
Secondly, it’s remarkably effective on a wide range of common carpet stains, from coffee and wine to pet accidents and muddy footprints. The combination of baking soda’s absorbent properties, vinegar’s stain-lifting power, and dish soap’s grease-cutting ability creates a potent cleaning force that can penetrate deep into carpet fibers and break down even the most stubborn stains.
But the benefits don’t stop there. This DIY solution is also gentle on your carpets. Unlike some harsh chemical cleaners that can fade colors or damage fibers, this homemade version is safe for most carpet types. However, as with any cleaning product, it’s always a good idea to test it on an inconspicuous area first to ensure colorfastness.
Looking for variations? Consider adding a few drops of your favorite essential oil, like lavender or lemon, for a fresh, clean scent. If you’re dealing with a particularly tough stain, you can create a paste of baking soda and water and apply it to the stain before using the vinegar and dish soap solution. For older, set-in stains, you might need to repeat the process a few times for optimal results. Another variation is to use club soda instead of water in the spray bottle for an extra boost of fizzing action that can help lift the stain.
This DIY carpet stain remover is more than just a recipe; it’s a solution to a common household problem. It’s a way to save money, protect your carpets, and avoid harsh chemicals. It’s a simple, effective, and eco-friendly way to keep your home looking its best.
We wholeheartedly encourage you to give this DIY carpet stain remover a try. You’ll be amazed at how easy it is to make and how well it works. And once you’ve experienced the satisfaction of removing a stubborn stain with your own homemade solution, we’d love to hear about it! Share your experiences, tips, and variations in the comments below. Let’s build a community of DIY cleaning enthusiasts who are passionate about keeping their homes clean and healthy. So go ahead, conquer those carpet stains and enjoy the feeling of a fresh, clean home!
Frequently Asked Questions (FAQ)
What types of stains does this DIY carpet stain remover work best on?
This DIY carpet stain remover is effective on a wide range of common household stains, including:
* Coffee and tea spills
* Red wine stains
* Pet accidents (urine, vomit, feces)
* Mud and dirt
* Food stains (sauce, gravy, etc.)
* Grease and oil stains
* Ink stains (depending on the type of ink)
However, the effectiveness may vary depending on the age and severity of the stain, as well as the type of carpet fiber. For particularly stubborn or old stains, you may need to repeat the process or try a different stain removal method.
Is this DIY carpet stain remover safe for all types of carpets?
While this DIY carpet stain remover is generally safe for most carpet types, it’s always a good idea to test it on an inconspicuous area first to ensure colorfastness. Apply a small amount of the solution to a hidden area of the carpet, such as under a piece of furniture or in a closet, and let it sit for a few minutes. Then, blot it with a clean, white cloth to see if any color transfers. If there’s no color transfer, it’s likely safe to use on the rest of your carpet.
Avoid using this solution on delicate or antique carpets without consulting a professional cleaner first. Also, be cautious when using it on wool carpets, as vinegar can sometimes damage wool fibers.
How much of each ingredient should I use?
The recommended proportions are:
* 1/2 cup of white vinegar
* 1 tablespoon of dish soap (clear, non-bleach formula)
* 2 tablespoons of baking soda
* 2 cups of warm water
These proportions can be adjusted slightly depending on the size and severity of the stain. For larger stains, you may need to double or triple the recipe.
Can I use a different type of vinegar?
White vinegar is the preferred type of vinegar for this DIY carpet stain remover because it’s clear and doesn’t contain any dyes that could potentially stain your carpet. While other types of vinegar, such as apple cider vinegar, may also work, they could potentially leave a slight discoloration, especially on light-colored carpets. If you choose to use a different type of vinegar, be sure to test it on an inconspicuous area first.
How long should I let the solution sit on the stain?
After applying the solution to the stain, let it sit for 5-10 minutes to allow the ingredients to penetrate the carpet fibers and break down the stain. For older or more stubborn stains, you may need to let it sit for up to 30 minutes. However, avoid letting the solution dry completely on the carpet, as this could make it more difficult to remove.
How do I remove the solution from the carpet after it has sat?
After letting the solution sit on the stain, blot it up with a clean, dry cloth. Avoid rubbing the stain, as this could spread it or damage the carpet fibers. Continue blotting until you’ve removed as much of the solution as possible. You can also use a wet/dry vacuum to extract the remaining solution.
Once you’ve removed the solution, rinse the area with clean water and blot it dry with a clean cloth. This will help remove any residue from the cleaning solution.
How often can I use this DIY carpet stain remover?
You can use this DIY carpet stain remover as needed to treat stains. However, avoid over-cleaning your carpets, as this can damage the fibers and shorten their lifespan. It’s generally recommended to deep clean your carpets every 6-12 months, depending on the amount of traffic and wear they receive.
What if the stain doesn’t come out completely after the first try?
If the stain doesn’t come out completely after the first try, repeat the process. You may need to apply the solution multiple times and let it sit for a longer period of time. For particularly stubborn stains, you can also try using a carpet cleaning machine or hiring a professional carpet cleaner.
Can I use this solution on upholstery?
This DIY carpet stain remover can also be used on some types of upholstery, but it’s important to test it on an inconspicuous area first to ensure colorfastness. Follow the same steps as you would for carpet cleaning: apply the solution to the stain, let it sit for a few minutes, blot it up with a clean cloth, and rinse with clean water.
How should I store the leftover solution?
Store any leftover solution in a sealed container in a cool, dark place. The solution should be good for several weeks. However, it’s best to make a fresh batch each time you need it to ensure optimal effectiveness.

Leave a Comment