

DIY cap cleaning: Let’s face it, that favorite baseball cap of yours has seen better days, hasn’t it? We’ve all been there – sweat stains, dust, maybe even a rogue coffee spill. Before you resign it to the back of the closet or, worse, the trash, hold on! This isn’t just about cleaning a hat; it’s about preserving a piece of your personal history. Baseball caps, initially designed for baseball players in the mid-19th century, have evolved into a global fashion statement, representing everything from sports teams to personal style.
But with that constant wear comes the inevitable grime. And while tossing it in the washing machine might seem like the easiest solution, it can often lead to a misshapen, faded disaster. That’s where our DIY cap cleaning tricks come in! I’m going to show you simple, effective, and safe methods to restore your beloved cap to its former glory.
Why do you need these tricks? Because a clean cap isn’t just about aesthetics; it’s about hygiene and extending the life of your favorite accessory. Plus, let’s be honest, a fresh, clean cap just looks and feels better. So, grab your dirty cap, and let’s dive into some easy DIY cap cleaning solutions that will have it looking brand new in no time!
DIY Cap Cleaning: Revive Your Favorite Headwear!
Okay, let’s face it, we all have that one baseball cap (or several!) that we absolutely adore. It’s been with us through thick and thin, shielding us from the sun, hiding bad hair days, and just generally being awesome. But, let’s be honest, it’s probably also seen better days. Sweat stains, dirt, maybe even a little bit of mystery grime – it happens! Don’t despair! You don’t have to toss your beloved cap. I’m going to walk you through a few methods to get it looking (almost) brand new again.
Assessing the Damage and Choosing Your Weapon (Cleaning Method)
Before we dive in, let’s take a good look at your cap. What kind of material is it? Is it structured or unstructured? Are there any delicate embellishments? Answering these questions will help you choose the best cleaning method.
* **Material Matters:** Cotton, polyester, and blends are generally more durable and can handle more aggressive cleaning. Wool, leather, and suede require a gentler touch.
* **Structure Check:** Structured caps have a stiff buckram inside the front panels to maintain their shape. Unstructured caps are more floppy. Structured caps need extra care to prevent warping.
* **Embellishment Alert:** Be extra cautious with embroidered logos, patches, or other decorations. These can be damaged by harsh chemicals or excessive scrubbing.
Based on your assessment, here are a few cleaning methods we’ll cover:
* **Spot Cleaning:** Perfect for minor stains and general grime.
* **Hand Washing:** A gentle and effective method for most caps.
* **Dishwasher Method (Use with Caution!):** A controversial but sometimes effective method for durable, structured caps. I’ll give you all the warnings and precautions!
* **Washing Machine (Even More Caution!):** Only for the bravest (and those with very durable caps!). I’ll explain why this is risky and how to minimize the damage.
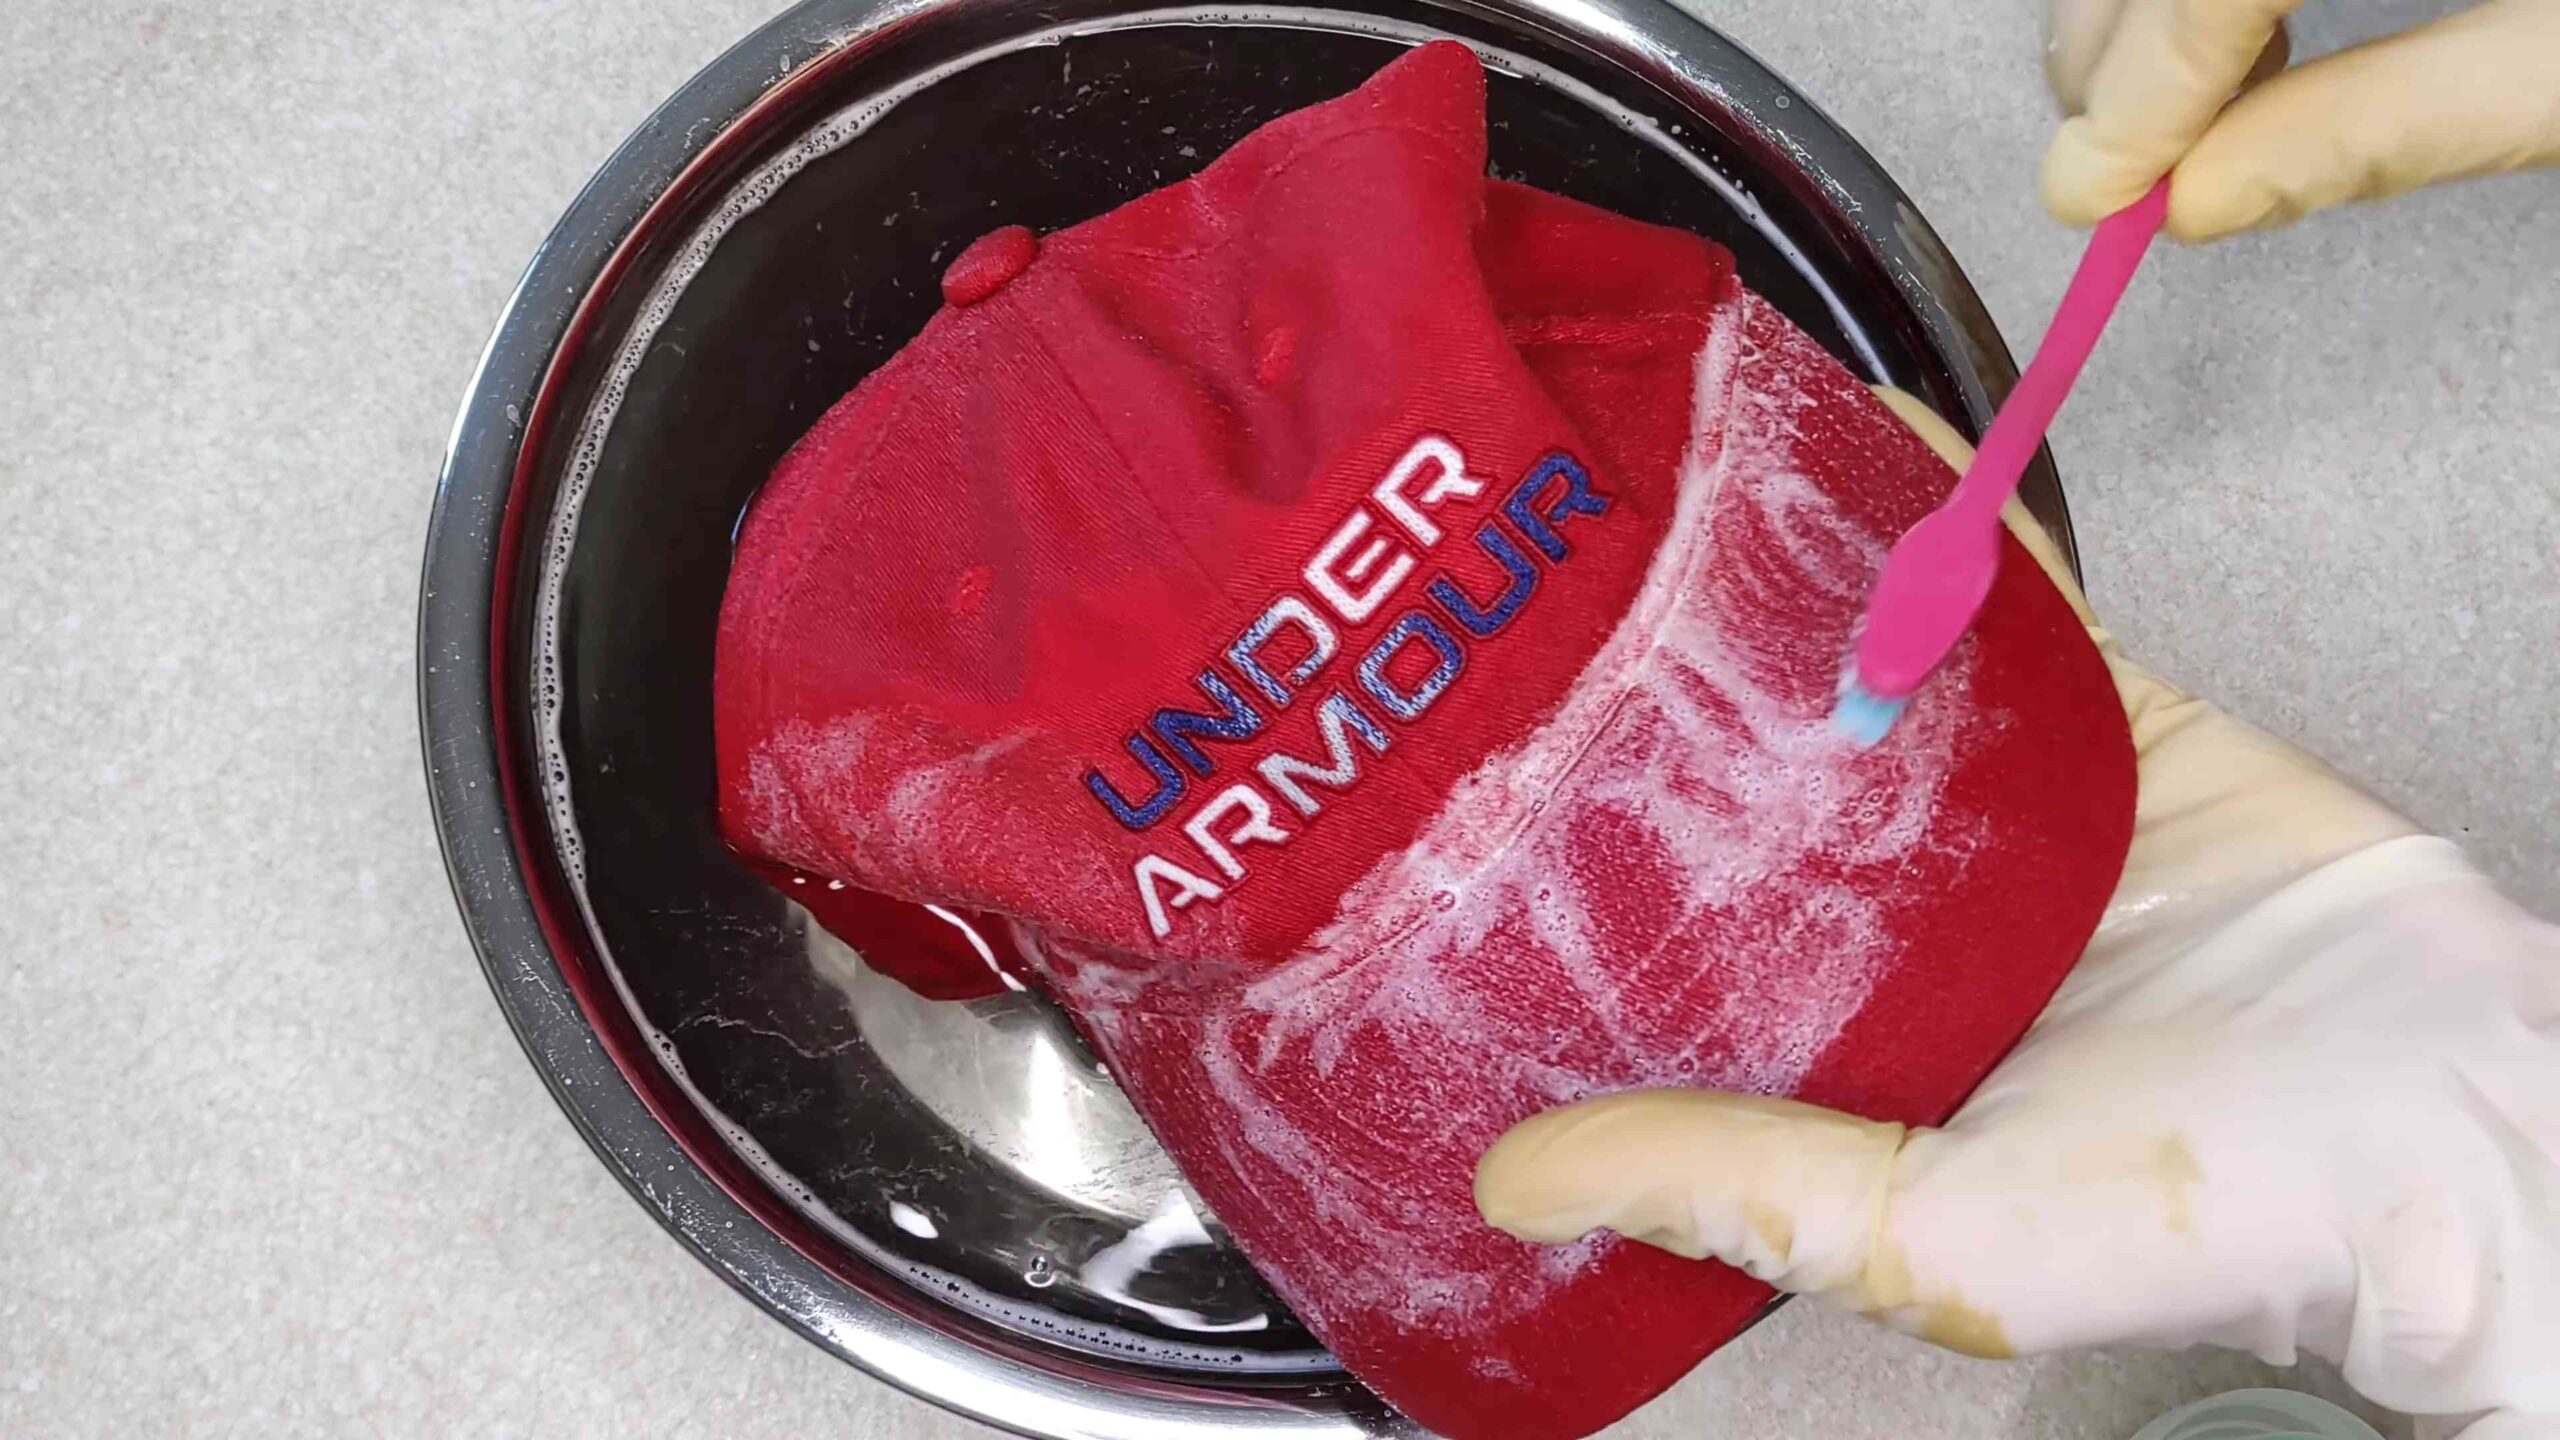
Spot Cleaning: The Quick Fix
This is my go-to method for tackling small stains or just refreshing a cap that’s not *too* dirty.
**What You’ll Need:**
* Soft-bristled brush (an old toothbrush works great!)
* Mild detergent (dish soap or laundry detergent)
* Clean cloth or sponge
* Water
**Step-by-Step Instructions:**
1. **Prepare Your Solution:** Mix a small amount of mild detergent with water in a bowl. You don’t need a lot – just enough to create a slightly soapy solution.
2. **Test It Out:** Before applying the solution to the entire cap, test it on an inconspicuous area (like the inside of the sweatband) to make sure it doesn’t cause any discoloration.
3. **Apply and Scrub:** Dip your brush or cloth into the soapy solution and gently scrub the stained areas. Use small, circular motions.
4. **Rinse and Repeat:** Rinse the area with clean water to remove the soap. If the stain persists, repeat steps 3 and 4.
5. **Blot and Dry:** Use a clean cloth to blot the area dry. Avoid rubbing, as this can damage the fabric. Let the cap air dry completely, away from direct sunlight or heat.
Hand Washing: The Gentle Approach
This is my preferred method for most of my caps. It’s gentle, effective, and gives you the most control.
**What You’ll Need:**
* Basin or sink
* Mild detergent (baby shampoo works wonders!)
* Soft-bristled brush
* Clean cloth or towel
* Cap shaper (optional, but highly recommended for structured caps)
**Step-by-Step Instructions:**
1. **Fill the Basin:** Fill your basin or sink with lukewarm water.
2. **Add Detergent:** Add a small amount of mild detergent to the water and mix well.
3. **Submerge the Cap:** Gently submerge the cap in the soapy water.
4. **Agitate and Soak:** Gently agitate the cap in the water to loosen dirt and grime. Let it soak for about 15-30 minutes.
5. **Scrub Gently:** Use a soft-bristled brush to gently scrub the cap, paying particular attention to the sweatband and any stained areas.
6. **Rinse Thoroughly:** Rinse the cap thoroughly with clean, lukewarm water until all the soap is gone.
7. **Shape and Dry:** This is crucial! If you have a structured cap, use a cap shaper to help it maintain its shape while drying. If you don’t have a shaper, you can stuff the cap with clean towels or plastic bags.
8. **Air Dry:** Let the cap air dry completely, away from direct sunlight or heat. This can take several hours or even a day, depending on the material and humidity.
The Dishwasher Method: Proceed with Extreme Caution!
Okay, I’m going to be upfront: this method is risky. It can warp the shape of your cap, fade the colors, and even damage the fabric. However, if you have a durable, structured cap that’s really dirty, and you’re willing to take the risk, here’s how to do it (as safely as possible!).
Important Warnings:
* **Only for Durable, Structured Caps:** Do *not* use this method on delicate materials like wool, leather, or suede.
* **Remove Any Embellishments:** If your cap has any removable embellishments, take them off before washing.
* **Use a Cap Cage:** A cap cage is essential to help the cap maintain its shape in the dishwasher.
* **No Heat!** Disable the heated drying cycle. Heat is the enemy!
* **Use a Mild Detergent:** Avoid harsh detergents or bleach.
**What You’ll Need:**
* Dishwasher
* Cap cage
* Mild dish detergent
* Clean towels
**Step-by-Step Instructions:**
1. **Prepare the Cap:** Place the cap inside the cap cage.
2. **Load the Dishwasher:** Place the cap cage on the top rack of the dishwasher. Make sure it’s not touching any heating elements.
3. **Add Detergent:** Add a small amount of mild dish detergent to the dishwasher’s detergent dispenser.
4. **Run a Gentle Cycle:** Run the dishwasher on a gentle cycle with cold water and *no* heated drying.
5. **Remove and Inspect:** Once the cycle is complete, carefully remove the cap from the dishwasher and inspect it for any damage.
6. **Shape and Dry:** If the cap is still in good shape, remove it from the cage and reshape it as needed. Stuff it with clean towels to help it maintain its shape.
7. **Air Dry:** Let the cap air dry completely, away from direct sunlight or heat.
The Washing Machine: The Riskiest Option
I really, really don’t recommend this method unless you’re absolutely desperate and your cap is incredibly durable. The washing machine can be very harsh on caps, and it’s likely to damage them.
Major Warnings:
* **Extreme Risk of Damage:** Be prepared for the possibility that your cap will be ruined.
* **Only for Very Durable Caps:** This is only suitable for caps made of sturdy materials like cotton or polyester.
* **Use a Laundry Bag:** Place the cap inside a mesh laundry bag to protect it from abrasion.
* **Wash with Similar Colors:** Wash the cap with other items of similar colors to prevent color bleeding.
* **Cold Water Only:** Use cold water to minimize fading and shrinking.
* **Gentle Cycle:** Use the gentlest cycle possible.
* **No Dryer!** Never, ever put your cap in the dryer.
**What You’ll Need:**
* Washing machine
* Mesh laundry bag
* Mild laundry detergent
* Clean towels
**Step-by-Step Instructions:**
1. **Prepare the Cap:** Place the cap inside the mesh laundry bag.
2. **Load the Washing Machine:** Load the washing machine with the laundry bag and other items of similar colors.
3. **Add Detergent:** Add a small amount of mild laundry detergent to the washing machine.
4. **Run a Gentle Cycle:** Run the washing machine on a gentle cycle with cold water.
5. **Remove and Inspect:** Once the cycle is complete, carefully remove the cap from the laundry bag and inspect it for any damage.
6. **Shape and Dry:** Reshape the cap as needed. Stuff it with clean towels to help it maintain its shape.
7. **Air Dry:** Let the cap air dry completely, away from direct sunlight or heat.
Dealing with Specific Stains
Sometimes, you’re dealing with more than just general grime. Here’s how to tackle some common cap stains:
* **Sweat Stains:** These are the most common culprits. For stubborn sweat stains, try using a paste of baking soda and water. Apply the paste to the stain, let it sit

Conclusion
So, there you have it! This simple, yet incredibly effective, DIY cap cleaning method is a game-changer for anyone who values a fresh, clean look. Forget about tossing out your favorite caps due to unsightly sweat stains, dirt, or lingering odors. This method is not only cost-effective, saving you money on replacements, but it’s also gentle on your caps, preserving their shape and color far better than harsh washing machine cycles or abrasive scrubbing.
Why is this a must-try? Because it’s easy, accessible, and delivers remarkable results. You likely already have all the necessary ingredients in your home – a mild detergent, some warm water, and a soft brush. The process is straightforward, minimizing the risk of damage to your beloved headwear. Plus, it’s a fantastic way to extend the lifespan of your caps, reducing waste and contributing to a more sustainable lifestyle.
But the beauty of this DIY cap cleaning technique lies in its adaptability. Feel free to experiment with variations to suit your specific needs and preferences. For instance, if you’re dealing with particularly stubborn stains, consider pre-treating them with a paste of baking soda and water before the main cleaning process. For delicate caps, like those made of wool or vintage materials, opt for a gentler detergent specifically designed for delicate fabrics and use a very soft brush or even a microfiber cloth.
If you want to add a refreshing scent, a few drops of your favorite essential oil (like lavender or tea tree) to the rinsing water can work wonders. Just be sure to test the oil on an inconspicuous area of the cap first to ensure it doesn’t cause any discoloration. Another variation is to use a cap washing cage for added protection during the drying process, especially for structured caps that you want to maintain their shape.
We are confident that once you try this DIY cap cleaning method, you’ll be amazed by the results. It’s a simple, effective, and satisfying way to keep your caps looking their best. Don’t let dirty caps cramp your style any longer!
We wholeheartedly encourage you to give this DIY trick a try. And most importantly, we want to hear about your experience! Share your before-and-after photos, your tips and tricks, and any variations you’ve discovered in the comments below. Let’s build a community of cap-cleaning enthusiasts and help everyone keep their headwear looking fresh and fabulous! Your feedback will not only help others but also inspire us to continue sharing valuable DIY solutions. So, grab your dirty caps, gather your supplies, and get cleaning! You’ll be glad you did.
Frequently Asked Questions (FAQ)
1. What type of detergent should I use for DIY cap cleaning?
The best type of detergent for cleaning your caps is a mild, pH-neutral laundry detergent. Avoid using harsh chemicals, bleach, or detergents with strong fragrances, as these can damage the fabric and cause discoloration. Baby shampoo is also a great alternative due to its gentle formula. When in doubt, test the detergent on a small, inconspicuous area of the cap first to ensure it doesn’t cause any adverse reactions.
2. Can I use this method on all types of caps?
While this method is generally safe for most types of caps, it’s essential to consider the material and construction of your cap before proceeding. For delicate materials like wool, silk, or vintage fabrics, use a gentler detergent and a very soft brush or microfiber cloth. Avoid using this method on caps with cardboard brims, as the cardboard can warp or disintegrate when wet. Always check the care label on your cap for specific cleaning instructions. If you’re unsure, it’s best to err on the side of caution and spot clean the cap or consult a professional cleaner.
3. How do I dry my cap after cleaning?
Proper drying is crucial to prevent your cap from shrinking, warping, or developing mildew. Avoid using a dryer, as the high heat can damage the fabric and cause the cap to lose its shape. Instead, air dry your cap in a well-ventilated area away from direct sunlight. Stuff the cap with clean towels or a balled-up plastic bag to help it maintain its shape while drying. You can also use a cap washing cage to provide additional support. Rotate the cap periodically to ensure even drying. It may take several hours or even a day for the cap to dry completely, depending on the material and humidity.
4. How often should I clean my caps?
The frequency of cleaning depends on how often you wear your caps and the activities you engage in while wearing them. If you wear your caps daily or sweat heavily, you may need to clean them more frequently, perhaps once a week or every other week. For caps that are worn less often, cleaning them every few months may suffice. It’s also a good idea to spot clean your caps as needed to remove any visible dirt or stains. Regular cleaning will help prevent the buildup of sweat, dirt, and odors, keeping your caps looking and smelling fresh.
5. What if I have stubborn stains on my cap?
For stubborn stains, pre-treating the affected area can significantly improve the cleaning results. Create a paste of baking soda and water and apply it to the stain. Let it sit for 30 minutes to an hour before gently scrubbing with a soft brush. You can also try using a stain remover specifically designed for fabrics, but be sure to test it on an inconspicuous area first to ensure it doesn’t cause any discoloration. For grease stains, try applying cornstarch or talcum powder to absorb the oil before cleaning. If the stain persists after cleaning, you may need to repeat the process or consult a professional cleaner.
6. Can I use a washing machine to clean my caps?
While it’s technically possible to wash some caps in a washing machine, it’s generally not recommended, as the machine’s agitation can damage the fabric and cause the cap to lose its shape. If you choose to use a washing machine, place the cap in a garment bag or pillowcase to protect it from damage. Use a gentle cycle with cold water and a mild detergent. Avoid using the dryer, as the high heat can cause the cap to shrink or warp. Air dry the cap as described above. However, for best results and to prolong the life of your caps, hand washing is always the preferred method.
7. How do I prevent my caps from getting dirty in the first place?
Prevention is always better than cure! To minimize the need for frequent cleaning, consider wearing a sweatband under your cap to absorb sweat and prevent it from staining the fabric. Avoid wearing your caps in excessively dirty or dusty environments. Store your caps in a clean, dry place away from direct sunlight. You can also use a cap rack or storage box to protect them from dust and damage. Regularly wiping down your caps with a damp cloth can also help remove surface dirt and prevent it from accumulating.

Leave a Comment