

DIY Bottle Cap Laundry Basket: Who knew something so simple could be so stylish and sustainable? I’m so excited to share this incredibly fun and surprisingly practical DIY project with you! We’re diving headfirst into turning those often-discarded bottle caps into a vibrant and unique laundry basket.
Upcycling, in general, has a rich history, deeply rooted in cultures around the world where resourcefulness was a necessity. Think of the patchwork quilts of early America or the ingenious ways communities in developing countries repurpose materials. This bottle cap laundry basket taps into that same spirit of creativity and sustainability, giving new life to something that would otherwise end up in a landfill.
Let’s be honest, laundry is a chore, but having a laundry basket that’s a conversation starter? That’s a game-changer! Plus, in a world increasingly aware of its environmental impact, this DIY bottle cap laundry basket is a fantastic way to reduce waste and express your unique style. It’s not just about having a place to toss your dirty clothes; it’s about making a statement, embracing sustainability, and adding a pop of color and personality to your home. So, grab your glue gun and let’s get crafting! I promise, you’ll be amazed at what you can create.
DIY Bottle Cap Laundry Basket: A Quirky and Eco-Friendly Project
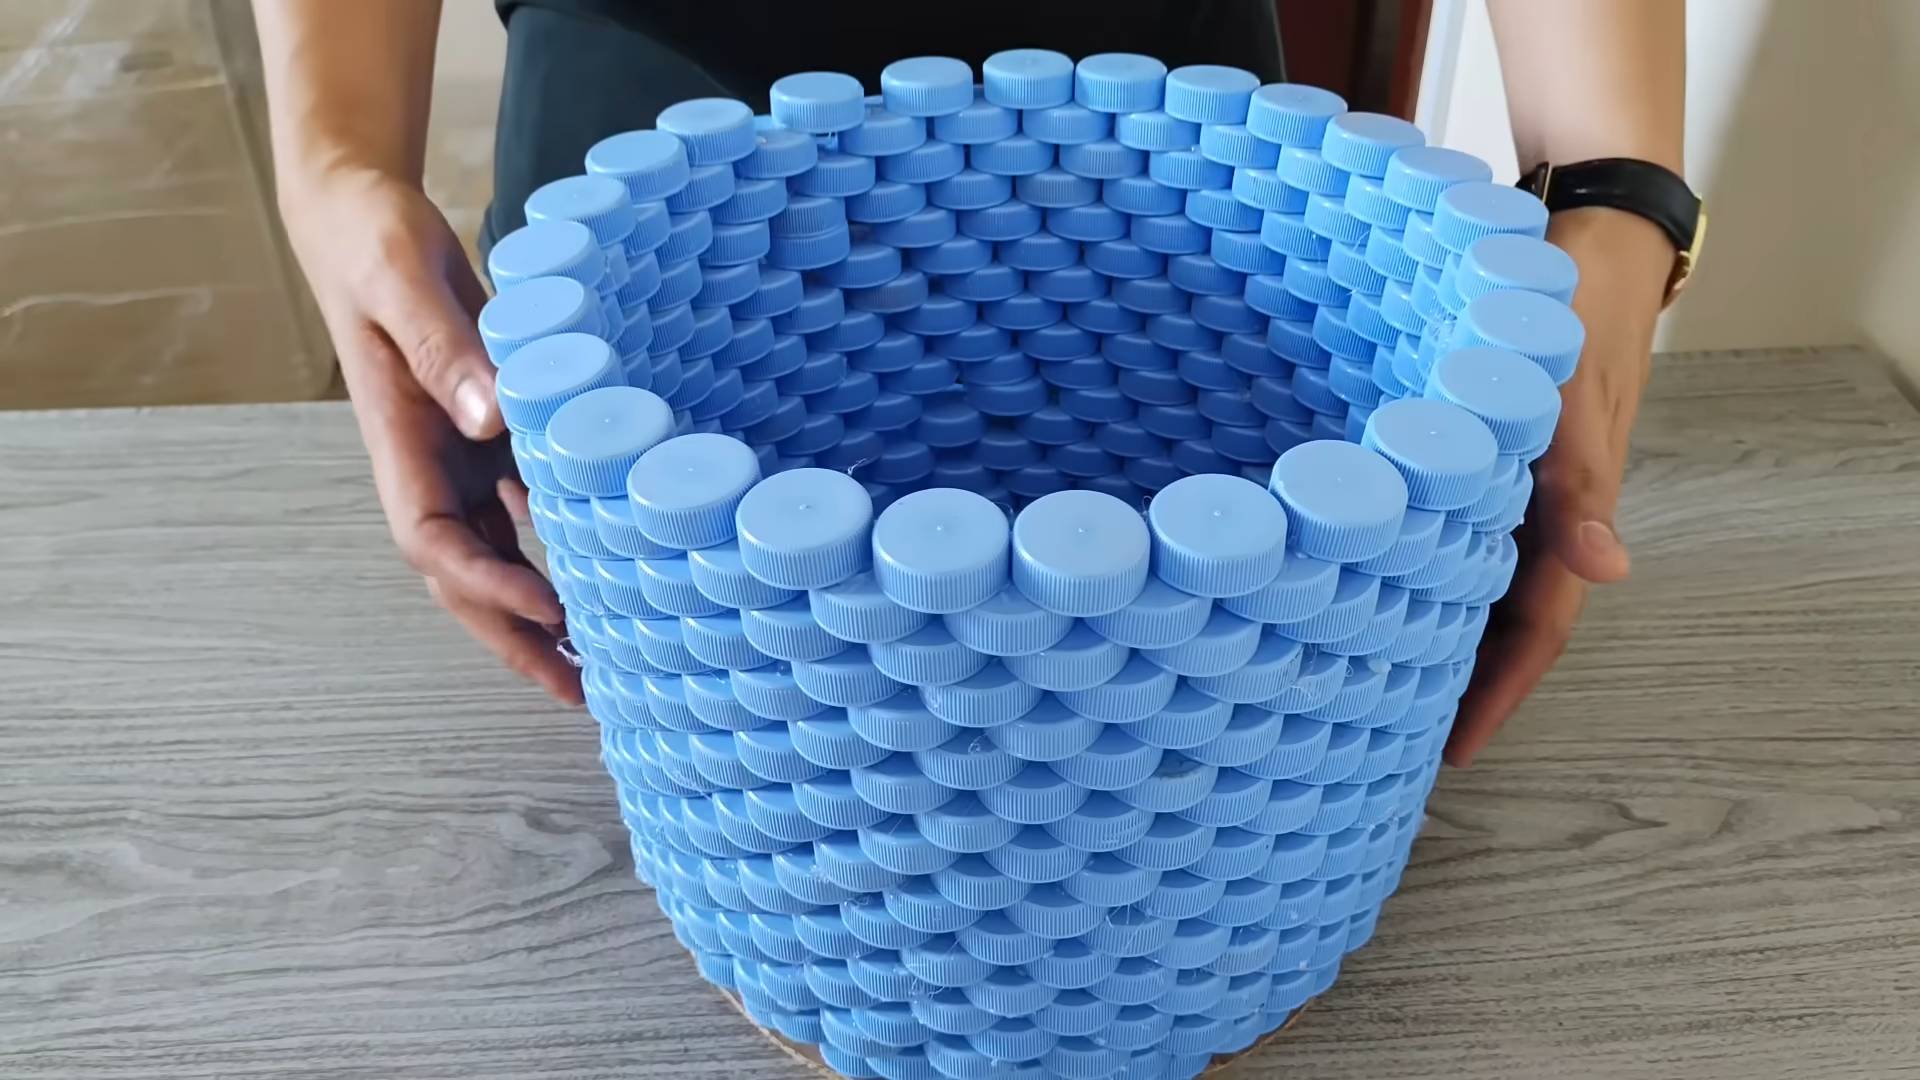
Hey there, fellow DIY enthusiasts! I’m super excited to share this project with you – a laundry basket made entirely from bottle caps! It’s a fantastic way to recycle those caps you’ve been collecting (or should start collecting!), add a unique touch to your home, and, let’s be honest, impress your friends. This project requires patience and a good amount of bottle caps, but the end result is totally worth it. Let’s dive in!
Materials You’ll Need:
* Tons of Bottle Caps: Seriously, you’ll need a lot. Start saving now! Aim for at least 2000-3000 depending on the size of your desired basket. The more, the merrier (and the bigger the basket!).
* Heavy-Duty Glue: I recommend a strong epoxy or construction adhesive. Make sure it’s suitable for bonding metal to metal or metal to plastic (depending on your cap type). Read the label carefully!
* Plywood or Sturdy Cardboard (for the base): This will provide a solid foundation for your basket. The size will depend on how big you want your laundry basket to be.
* Measuring Tape or Ruler: Essential for accurate measurements.
* Pencil or Marker: For marking measurements on the base.
* Scissors or Utility Knife: For cutting the base material.
* Clamps (optional but recommended): These will help hold the bottle caps in place while the glue dries.
* Gloves: To protect your hands from the glue.
* Ventilation: Work in a well-ventilated area, especially when using strong adhesives.
* Sandpaper (optional): If you’re using plywood, you might want to sand the edges for a smoother finish.
* Finishing Spray (optional): A clear coat spray can help protect the bottle caps and give your basket a polished look.
Planning and Preparation:
Before we get our hands dirty, let’s do some planning. This will save you time and frustration later.
* Determine the Size: Decide how big you want your laundry basket to be. Consider the space you have available and the amount of laundry you typically accumulate.
* Calculate the Base Size: Based on your desired basket size, determine the diameter (if you want a round basket) or the length and width (if you want a square or rectangular basket) of the base.
* Bottle Cap Arrangement: Think about the pattern you want to create with the bottle caps. Will you arrange them randomly, by color, or in a specific design? This will influence how you glue them together.
* Clean the Bottle Caps: This is crucial! Make sure your bottle caps are clean and free of any residue. Wash them with soap and water, and let them dry completely.
Step-by-Step Instructions:
Okay, let’s get started!
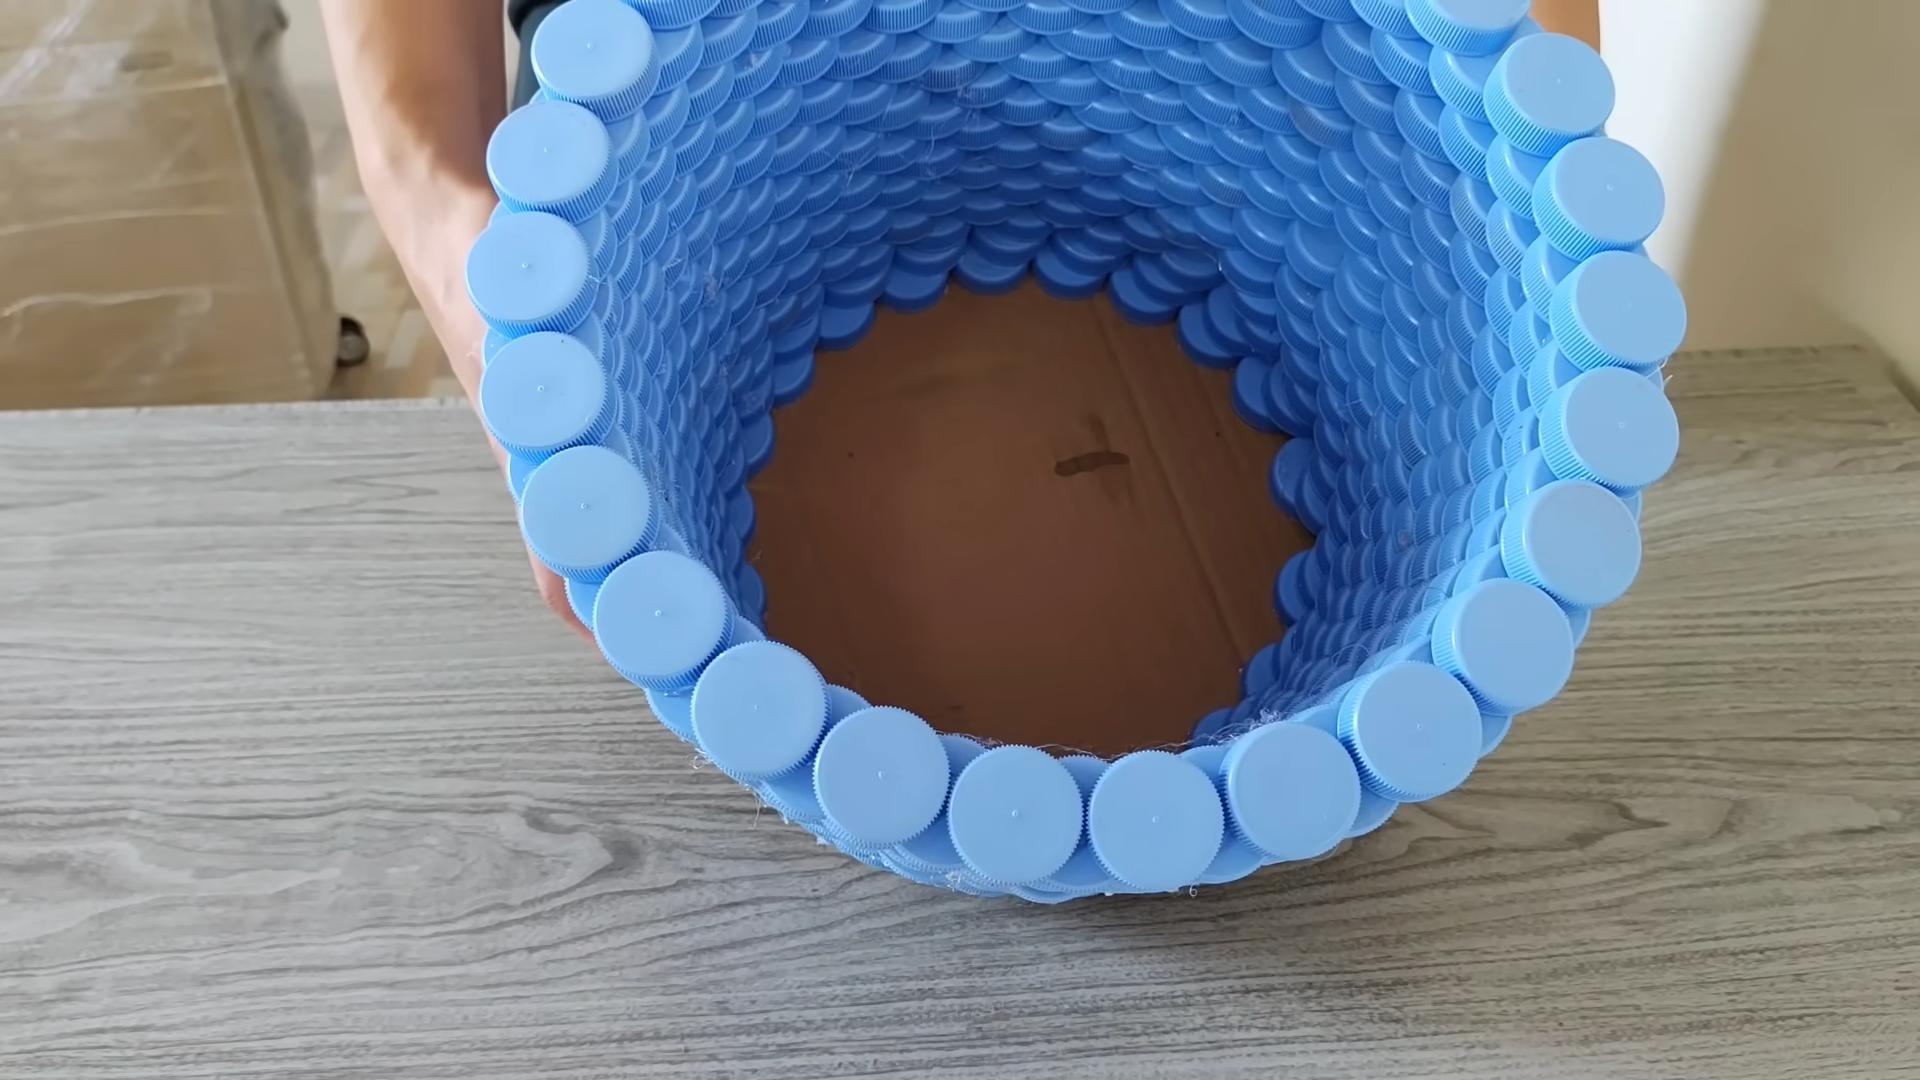
1. Preparing the Base:
1. Measure and Cut: Using your measuring tape and pencil, mark the dimensions of your base on the plywood or cardboard.
2. Cut the Base: Carefully cut out the base using scissors or a utility knife. If you’re using plywood, you might want to use a saw for a cleaner cut.
3. Sand the Edges (optional): If you’re using plywood, sand the edges to remove any splinters or rough spots.
2. Building the First Layer:
This is where the magic begins! The first layer is the most important, as it will determine the shape and stability of your basket.
1. Apply Glue to the Base: Apply a generous amount of glue to a small section of the base, starting from the edge.
2. Attach the Bottle Caps: Carefully place the bottle caps onto the glued area, pressing them firmly into place. Make sure they are aligned according to your chosen pattern. I found that arranging them with the open side facing up created a nice, textured look.
3. Repeat: Continue applying glue and attaching bottle caps, working your way around the entire perimeter of the base.
4. Secure with Clamps (optional): If you have clamps, use them to hold the bottle caps in place while the glue dries. This will ensure a strong bond.
5. Let it Dry: Allow the glue to dry completely according to the manufacturer’s instructions. This could take several hours or even overnight. Patience is key!
3. Building Subsequent Layers:
Now that you have a solid foundation, you can start building up the sides of your basket.
1. Apply Glue to the First Layer: Apply a generous amount of glue to the top of the first layer of bottle caps.
2. Attach the Second Layer: Carefully place the second layer of bottle caps onto the glued area, staggering them slightly to create a more stable structure. Think of it like bricklaying.
3. Repeat: Continue applying glue and attaching bottle caps, working your way around the entire basket.
4. Maintain the Shape: As you build up the layers, pay attention to the shape of your basket. You can adjust the angle of the bottle caps to create a slightly flared or tapered shape.
5. Secure with Clamps (optional): Use clamps to hold the bottle caps in place while the glue dries.
6. Let it Dry: Allow the glue to dry completely before adding another layer.
4. Adding Height and Strength:
Keep building up the layers until you reach your desired height.
1. Continue Gluing and Attaching: Repeat the process of applying glue and attaching bottle caps, layer by layer.
2. Reinforce Weak Spots: If you notice any weak spots or areas that seem unstable, add extra glue and bottle caps to reinforce them.
3. Consider a Rim: For added strength and a more finished look, you can create a rim around the top of the basket using a row of bottle caps glued side-by-side.
4. Let it Dry Completely: Allow the entire basket to dry completely before using it. This could take a day or two, depending on the type of glue you used.
5. Finishing Touches (Optional):
These steps are optional, but they can help protect your basket and give it a more polished look.
1. Apply Finishing Spray: Apply a clear coat finishing spray to the entire basket. This will help protect the bottle caps from scratches and moisture.
2. Add Handles (Optional): You can add handles to your basket for easier carrying. You can use rope, fabric, or even more bottle caps! Attach them securely with glue or screws.
3. Line the Basket (Optional): If you want to protect your clothes from any sharp edges, you can line the basket with fabric.
Tips and Tricks:
* Color Coordination: Sort your bottle caps by color before you start gluing. This will make it easier to create a specific pattern or design.
* Glue Application: Don’t apply too much glue at once, as it can dry out before you have a chance to attach the bottle caps. Work in small sections.
* Patience is Key: This project takes time and patience. Don’t rush it! Take breaks when you need to, and enjoy the process.
* Experiment with Patterns: Don’t be afraid to experiment with different patterns and designs. The possibilities are endless!
* Safety First: Always wear gloves and work in a well-ventilated area when using strong adhesives.
Alternative Ideas:
* Use Different Types of Caps: Mix and match bottle caps with other types of caps, such as jar lids or plastic bottle caps.
* Create Different Shapes: Experiment with different shapes for your basket, such as oval, triangular, or even freeform.
* Add Embellishments: Decorate your basket with paint, beads, or other embellishments.
I hope you enjoyed this tutorial! Remember, this is just a guide. Feel free to get creative and adapt the instructions to suit your own preferences and materials. Happy crafting! I can’t wait to see what you create!
Conclusion
So, there you have it! Transforming humble bottle caps into a sturdy and surprisingly stylish laundry basket is more than just a fun craft project; it’s a testament to the power of upcycling and a fantastic way to reduce waste. We’ve walked you through the process, from collecting and cleaning your bottle caps to assembling the panels and constructing the basket itself. The initial effort might seem daunting, especially when faced with the sheer number of bottle caps required, but the end result is a unique, durable, and conversation-starting piece that you can proudly display in your home.
Why is this DIY bottle cap laundry basket a must-try? Firstly, it’s incredibly eco-friendly. You’re diverting hundreds, even thousands, of bottle caps from landfills, giving them a new lease on life. Secondly, it’s a budget-friendly alternative to purchasing a new laundry basket. While you might need to invest in some glue or wire, the primary material is essentially free! Thirdly, it’s a fantastic creative outlet. You can personalize your basket with different color combinations, patterns, and even add decorative elements to truly make it your own.
Consider these variations to further customize your project:
* Color Coordination: Sort your bottle caps by color and create intricate patterns or gradients on the sides of your basket. Think about using specific color schemes to match your bathroom or laundry room decor.
* Size Matters: Adjust the dimensions of your panels to create a smaller basket for delicates or a larger one for bulky items. You can even create a set of nesting baskets for different laundry needs.
* Handle Options: Experiment with different handle materials. Instead of rope, try using sturdy fabric straps, repurposed belts, or even woven bottle cap strips for a truly unique look.
* Lid It Up: Add a lid to your basket to conceal laundry and keep dust out. You can create a lid using the same bottle cap panel construction method or repurpose an existing lid from another container.
* Reinforcement is Key: For added durability, consider reinforcing the inside of the basket with a layer of fabric or plastic mesh. This will prevent stretching and ensure that your basket can handle heavy loads.
We understand that undertaking a project like this requires time and dedication, but the satisfaction of creating something beautiful and functional from recycled materials is truly rewarding. Don’t be afraid to experiment, get creative, and put your own personal touch on your DIY bottle cap laundry basket.
We are confident that you will love the result. We encourage you to embark on this creative journey. Once you’ve completed your masterpiece, we’d love to see it! Share your photos and experiences with us on social media using #BottleCapBasketDIY. Let’s inspire others to embrace upcycling and create beautiful things from everyday materials. We can’t wait to see what you create!
Frequently Asked Questions (FAQ)
How many bottle caps do I need to make a laundry basket?
The exact number of bottle caps required will depend on the size of your desired laundry basket. However, a standard-sized laundry basket typically requires anywhere from 500 to 1000 bottle caps. It’s always better to overestimate and have extra bottle caps on hand, as you can always use them for other craft projects. Start collecting early and ask friends and family to contribute to your stash.
What kind of glue is best for this project?
A strong, waterproof adhesive is essential for ensuring the durability of your bottle cap laundry basket. We recommend using a construction adhesive or a high-quality epoxy resin. These types of glues are designed to bond dissimilar materials and withstand stress. Hot glue can be used for temporary placement, but it’s not strong enough for the primary bonding of the bottle caps. Always follow the manufacturer’s instructions for proper application and curing time.
How do I clean the bottle caps before using them?
Cleaning the bottle caps is a crucial step in preparing them for your project. Start by soaking them in warm, soapy water for at least 30 minutes to loosen any dirt or grime. Then, scrub each bottle cap individually with a brush or sponge to remove any remaining residue. Rinse them thoroughly with clean water and allow them to dry completely before using them. For stubborn stains or sticky residue, you can use a mild abrasive cleaner or a solution of vinegar and water.
Is this laundry basket strong enough to hold heavy loads of laundry?
Yes, a properly constructed bottle cap laundry basket can be surprisingly strong and durable. The key is to use a strong adhesive and ensure that the bottle caps are securely bonded together. Reinforcing the inside of the basket with fabric or plastic mesh can further enhance its strength and prevent stretching. However, it’s important to avoid overloading the basket with excessively heavy items, as this could potentially weaken the structure over time.
Can I paint or decorate the bottle caps?
Absolutely! Painting or decorating the bottle caps is a great way to personalize your laundry basket and add a unique touch. You can use acrylic paints, spray paints, or even permanent markers to create different designs and patterns. Before painting, make sure the bottle caps are clean and dry. You may also want to apply a primer to help the paint adhere better. After painting, seal the bottle caps with a clear coat of varnish or sealant to protect the paint and prevent it from chipping or fading.
How long does it take to make a bottle cap laundry basket?
The time required to make a bottle cap laundry basket will vary depending on the size of the basket, the complexity of the design, and your level of experience. Collecting and cleaning the bottle caps can take several days or even weeks. Assembling the panels and constructing the basket itself can take anywhere from a few hours to a few days. It’s important to be patient and take your time to ensure that the project is done properly. Break the project down into smaller, manageable steps to avoid feeling overwhelmed.
What if I don’t have enough bottle caps?
If you don’t have enough bottle caps to complete your laundry basket, don’t despair! There are several ways to acquire more. Ask friends, family, and neighbors to save their bottle caps for you. Contact local bars, restaurants, and recycling centers to see if they have any bottle caps to spare. You can also purchase bottle caps online from craft supply stores or online marketplaces. Consider using a combination of different colored bottle caps to create a more visually interesting design.
How do I prevent the bottle caps from coming apart?
To prevent the bottle caps from coming apart, it’s crucial to use a strong adhesive and ensure that they are securely bonded together. Apply the glue generously to both the bottle caps and the surface you are attaching them to. Press the bottle caps firmly together and hold them in place until the glue has set. You can also use clamps or weights to apply pressure while the glue is drying. Reinforcing the inside of the basket with fabric or plastic mesh can further prevent the bottle caps from coming apart.
Can I use different types of bottle caps?
While it’s best to use bottle caps of a similar size and shape for a more uniform look, you can certainly incorporate different types of bottle caps into your project. Experiment with using bottle caps from different brands or even metal caps from glass bottles. Just be aware that different types of bottle caps may have different thicknesses and textures, which could affect the overall appearance and stability of your laundry basket.
Is this project suitable for children?
While the DIY bottle cap laundry basket project can be a fun and rewarding activity, it’s important to consider the safety aspects, especially if children are involved. The use of strong adhesives and sharp tools requires adult supervision. Children can help with tasks such as collecting and cleaning the bottle caps, but the actual assembly of the basket should be done by an adult. Always prioritize safety and take necessary precautions to prevent accidents.

Leave a Comment