

Coral Cactus Care Tips: Unlocking the Secrets to a Thriving Euphorbia Lactea Cristata!
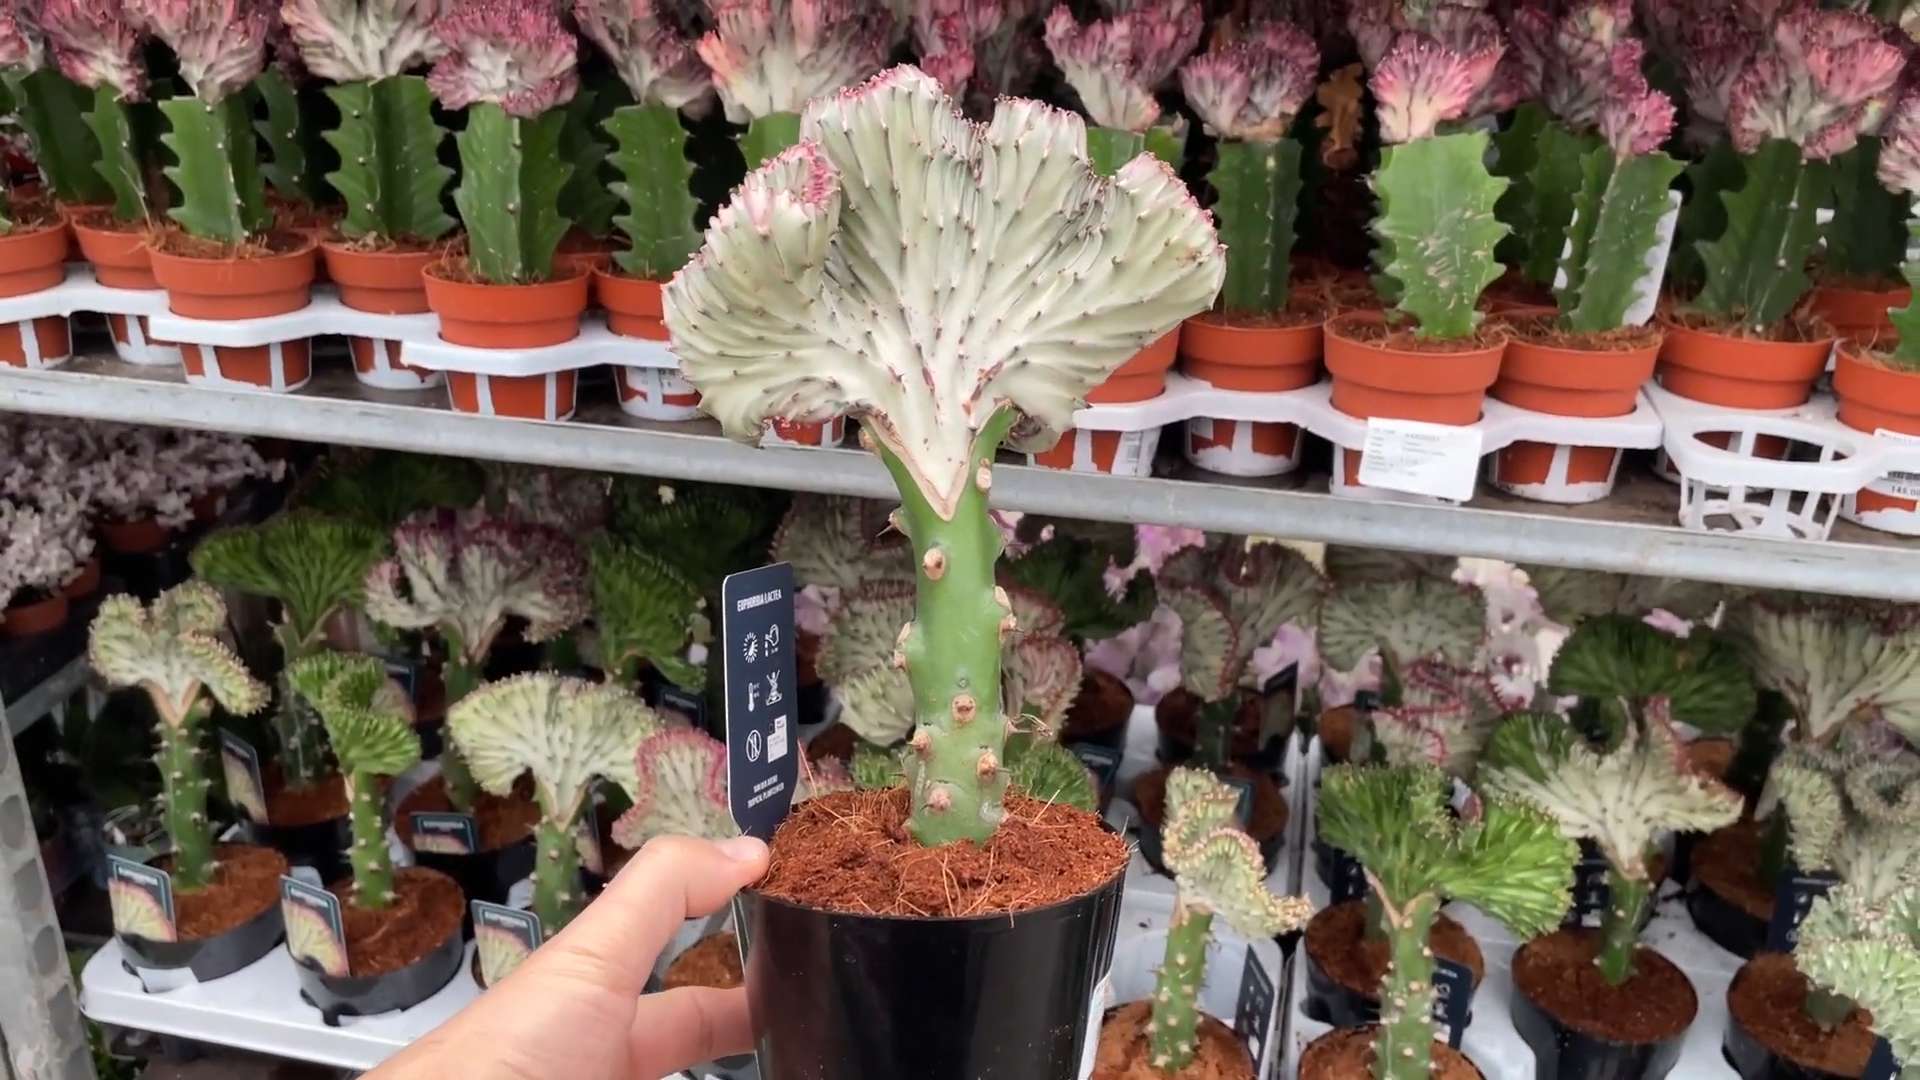
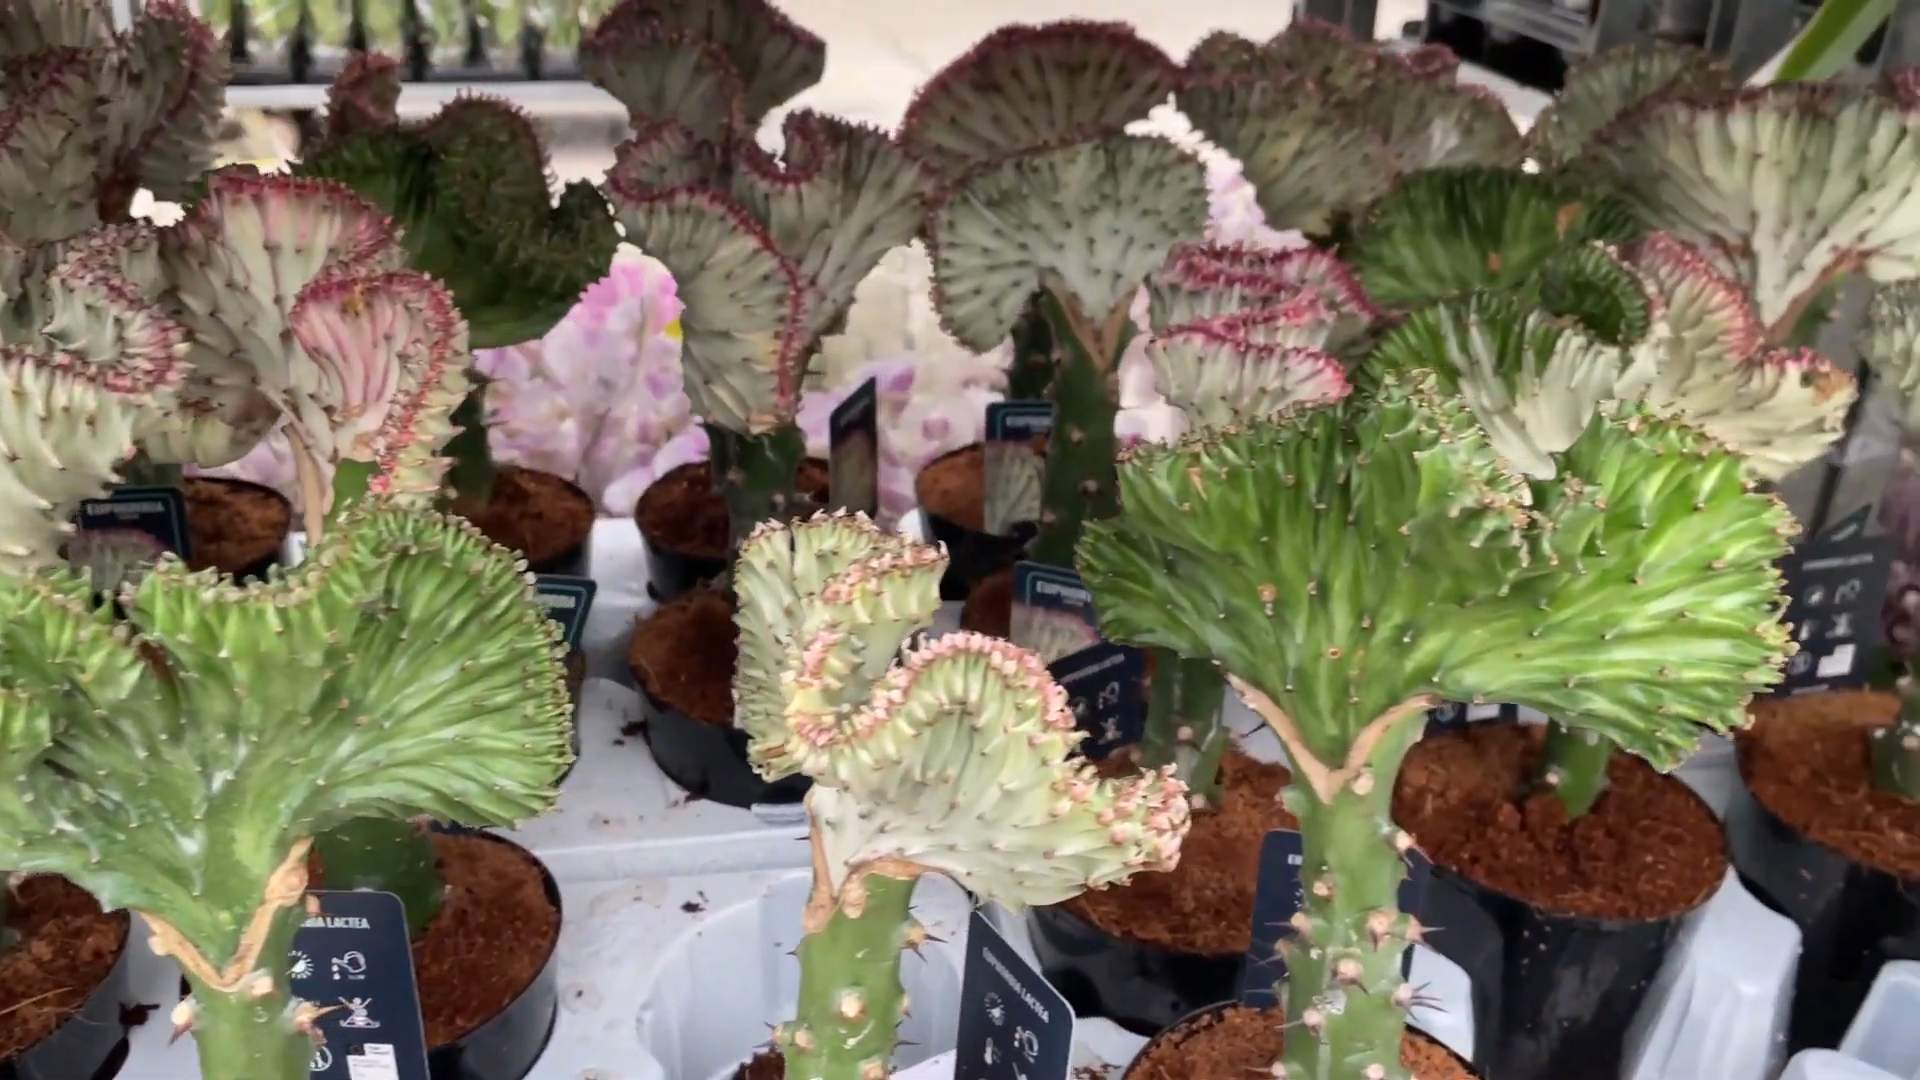
Ever seen a plant so bizarrely beautiful it stops you in your tracks? That’s the magic of the Coral Cactus, also known as Euphorbia lactea cristata! This fascinating succulent, resembling an underwater coral reef more than a desert dweller, is a showstopper in any home. But let’s be honest, its unique appearance can also make it seem a little intimidating to care for. Don’t worry, I’m here to tell you that with the right knowledge, you can absolutely master coral cactus care tips and enjoy its quirky charm for years to come.
While not a true cactus, this grafted wonder has a history rooted in horticultural ingenuity. The crested fan, the “coral” part, is grafted onto a hardier Euphorbia base, creating a symbiotic relationship that’s both visually stunning and surprisingly resilient. For centuries, plant enthusiasts have been captivated by these unusual forms, seeking to cultivate and showcase their unique beauty.
Why do you need these DIY care tips? Because a happy Coral Cactus is a vibrant Coral Cactus! Too much water, not enough light, or the wrong soil can quickly lead to problems. I’m going to share my tried-and-true methods for ensuring your Coral Cactus thrives, from proper watering techniques to the ideal sunlight exposure. Get ready to transform your thumb from brown to green and watch your Coral Cactus flourish!
DIY: Reviving a Sad Coral Cactus (Euphorbia Lactea Cristata)
Okay, let’s face it. Coral cacti are gorgeous, but they can be a little… dramatic. If your once-vibrant coral cactus is looking a little worse for wear, don’t despair! I’m here to guide you through a DIY revival process that will hopefully bring it back to its former glory. I’ve nursed a few of these beauties back from the brink, and I’m sharing all my secrets.
Understanding the Problem: Why is My Coral Cactus Sad?
Before we dive into the fix, let’s diagnose the issue. Coral cacti are grafted plants, meaning a crested Euphorbia lactea (the “coral” part) is attached to a Euphorbia neriifolia (the base). This makes them a little more sensitive than your average succulent. Here are the most common culprits behind a drooping or discolored coral cactus:
* Overwatering: This is the number one killer! Coral cacti are succulents and hate sitting in soggy soil.
* Underwatering: While they don’t like being wet, they also don’t want to be bone dry for extended periods.
* Insufficient Light: They need bright, indirect light to thrive. Too little light can cause them to etiolate (stretch out) and lose their vibrant color.
* Poor Soil: Regular potting soil retains too much moisture. They need well-draining soil.
* Graft Issues: Sometimes, the graft union can weaken over time, leading to problems.
* Pests: Mealybugs and scale can sometimes infest coral cacti.
Phase 1: Assessment and Preparation
This is where we play detective! Let’s figure out what’s going wrong.
1. Inspect the Plant: Carefully examine your coral cactus. Look for:
* Discoloration: Yellowing, browning, or black spots.
* Soft Spots: Especially at the base or around the graft.
* Wrinkling: A little wrinkling is normal during dry periods, but excessive wrinkling indicates underwatering.
* Pests: Tiny white, cottony masses (mealybugs) or small, brown, shell-like bumps (scale).
* Root Rot: This is harder to see without repotting, but a foul smell coming from the soil is a strong indicator.
2. Check the Soil: Is it bone dry, or is it still damp several days after watering?
3. Assess the Light: Is your cactus getting enough bright, indirect light? Remember, direct sunlight can scorch it.
4. Gather Your Supplies: Based on your assessment, you’ll likely need:
* Well-draining succulent soil: You can buy a pre-made mix or make your own (see recipe below).
* A new pot (if repotting): Choose a pot with drainage holes that’s only slightly larger than the current one.
* Gardening gloves: These cacti have spines, so protect your hands!
* Rubbing alcohol (isopropyl alcohol): For treating pests.
* Cotton swabs: For applying rubbing alcohol.
* A sharp, clean knife or pruning shears: For removing any dead or damaged parts (sterilize with rubbing alcohol before use).
* Rooting hormone (optional): If you need to take cuttings.
* Fungicide (optional): If you suspect root rot.
Phase 2: Addressing the Issues
Now that we know what we’re dealing with, let’s get to work!
Dealing with Overwatering/Root Rot
This is the most common problem, so let’s tackle it first.
1. Remove the Cactus from the Pot: Gently tip the pot and carefully ease the cactus out. Be careful of the spines!
2. Inspect the Roots: Gently remove as much of the old soil as possible. Healthy roots should be firm and light-colored. Mushy, brown, or black roots indicate root rot.
3. Trim Away the Rot: Using your sterilized knife or pruning shears, carefully cut away any rotted roots. Don’t be afraid to be aggressive – you need to remove all the infected tissue.
4. Treat with Fungicide (Optional): If the root rot was severe, you can dip the remaining roots in a fungicide solution according to the product instructions.
5. Let the Roots Dry: Allow the roots to air dry for a day or two. This will help prevent further rot. Place the cactus in a shaded, well-ventilated area.
6. Repot in Fresh Soil: Use a well-draining succulent mix. Don’t pack the soil too tightly.
7. Hold Off on Watering: Wait at least a week before watering. This will give the roots time to heal and prevent further rot.
Addressing Underwatering
If your cactus is just a little wrinkly and the soil is bone dry, underwatering is likely the culprit.
1. Water Thoroughly: Water the cactus until water drains out of the drainage holes.
2. Let the Soil Dry Out: Allow the soil to dry out completely between waterings.
3. Adjust Your Watering Schedule: Water more frequently during the growing season (spring and summer) and less frequently during the dormant season (fall and winter).
Improving Light Conditions
If your cactus is etiolated (stretched out) or losing its color, it needs more light.
1. Move to a Brighter Location: Place the cactus in a location that receives bright, indirect light. An east-facing window is often ideal.
2. Supplement with Artificial Light (If Necessary): If you don’t have enough natural light, you can supplement with a grow light.
3. Rotate the Plant Regularly: This will ensure that all sides of the cactus receive equal light.
Dealing with Pests
Mealybugs and scale can suck the sap from your cactus, weakening it.
1. Isolate the Plant: To prevent the pests from spreading to other plants, isolate the infested cactus.
2. Treat with Rubbing Alcohol: Dip a cotton swab in rubbing alcohol and dab it directly onto the pests. This will kill them.
3. Repeat Treatment: Repeat the treatment every few days until all the pests are gone.
4. Consider Insecticidal Soap (If Necessary): If the infestation is severe, you may need to use insecticidal soap. Follow the product instructions carefully.
Addressing Graft Issues
Sometimes, the graft union can weaken over time, leading to problems. This is a more complex issue, and there’s no guaranteed fix. However, you can try the following:
1. Provide Optimal Care: Ensure the cactus is getting the right amount of light, water, and nutrients.
2. Avoid Stress: Protect the cactus from extreme temperatures and sudden changes in environment.
3. Consider Grafting (Advanced): If the graft union is severely weakened, you may need to re-graft the coral cactus onto a new base. This is an advanced technique that requires specialized knowledge and tools. I would recommend researching this thoroughly before attempting it.
Phase 3: Repotting Your Coral Cactus
Whether you’re dealing with root rot or just want to refresh the soil, repotting is an important part of coral cactus care.
1. Choose the Right Pot: Select a pot that’s only slightly larger than the current one. Make sure it has drainage holes. Terracotta pots are a good choice because they allow the soil to dry out quickly.
2. Prepare the Soil: Use a well-draining succulent mix. You can buy a pre-made mix or make your own. Here’s my favorite recipe:
* 1 part potting soil
* 1 part perlite
* 1 part coarse sand
3. Remove the Cactus from the Old Pot: Gently tip the pot and carefully ease the cactus out. Be careful of the spines!
4. Inspect the Roots: Gently remove as much of the old soil as possible. Trim away any dead or damaged roots.
5. Place the Cactus in the New Pot: Center the cactus in the new pot and fill in around it with the succulent mix. Don’t pack the soil too tightly.
6. Water Sparingly: Water the cactus lightly after repotting. Wait at least a week before watering thoroughly.
Phase 4: Ongoing Care and Maintenance
Once you’ve revived your coral cactus, it’s important to provide ongoing care to keep it healthy and happy.
* Watering: Water thoroughly when the soil is dry to the touch. Allow the soil to dry out completely between waterings. Water less frequently during the dormant season (fall and winter).
* Light: Provide bright, indirect light. Avoid
Conclusion
So, there you have it! Mastering coral cactus care isn’t about complicated routines or expensive products. It’s about understanding the plant’s unique needs and providing the right environment. This DIY trick, focusing on creating the perfect well-draining soil mix, is a game-changer for ensuring your coral cactus thrives. It addresses the most common issue – root rot – head-on, giving your plant the best possible chance to flourish.
Why is this DIY approach a must-try? Because it’s cost-effective, customizable, and, most importantly, it works! Pre-packaged cactus mixes can be inconsistent, and often retain too much moisture. By creating your own blend, you have complete control over the ingredients and can tailor it specifically to your local climate and watering habits. Think of it as giving your coral cactus a bespoke suit, perfectly fitted to its needs.
Beyond the basic recipe, feel free to experiment! For example, if you live in a particularly humid environment, consider adding even more perlite or pumice to your mix for enhanced drainage. Alternatively, if you find your cactus drying out too quickly, a small amount of coco coir can help retain a bit more moisture. You could also incorporate a slow-release fertilizer into your soil mix to provide a steady stream of nutrients. Just remember to start with small adjustments and observe how your plant responds.
Don’t be intimidated by the “DIY” aspect. It’s much simpler than it sounds, and the rewards are well worth the effort. Imagine the satisfaction of watching your coral cactus grow and thrive, knowing that you played a direct role in its health and happiness.
We wholeheartedly encourage you to try this DIY soil mix for your coral cactus. It’s a simple yet powerful way to improve its health and longevity. And once you’ve given it a go, we’d love to hear about your experience! Share your results, any variations you tried, and any tips you discovered in the comments below. Let’s build a community of coral cactus enthusiasts, sharing our knowledge and helping each other grow these fascinating plants. Your insights could be invaluable to someone else just starting their coral cactus journey. Happy growing!
Frequently Asked Questions (FAQ)
What exactly is a coral cactus, and why does it need special care?
The coral cactus, also known as *Euphorbia lactea cristata*, isn’t actually a cactus! It’s a grafted succulent, typically consisting of a *Euphorbia neriifolia* base and a crested *Euphorbia lactea* top. This grafting creates the unique, coral-like appearance. Because it’s a grafted plant, it’s more susceptible to issues than a single-rooted plant. The two parts have slightly different needs, and the graft point itself can be a point of weakness. The *Euphorbia* family is generally sensitive to overwatering, making well-draining soil crucial. Standard potting soil retains too much moisture, leading to root rot, which is the most common killer of coral cacti. Therefore, special care, particularly regarding soil composition and watering practices, is essential for its survival and thriving.
What are the signs of root rot in a coral cactus?
Recognizing root rot early is crucial for saving your coral cactus. Common signs include:
* **Soft, mushy stems:** This is often the first and most obvious sign. The base of the plant will feel soft and squishy to the touch.
* **Yellowing or browning:** The vibrant green color of the coral cactus will start to fade, turning yellow or brown.
* **Drooping or wilting:** Even with adequate watering (or rather, what you *think* is adequate), the plant will appear droopy and wilted.
* **Foul odor:** A distinct, unpleasant smell emanating from the soil or the base of the plant is a strong indicator of root rot.
* **Stunted growth:** If your coral cactus has stopped growing or is growing very slowly, it could be a sign of underlying root problems.
* **Detachment:** In advanced stages, the grafted top may start to detach from the base.
If you notice any of these signs, immediately inspect the roots. Healthy roots are firm and light-colored. Rotted roots will be dark brown or black and mushy.
Can I use regular potting soil for my coral cactus if I’m careful with watering?
While careful watering can help, using regular potting soil for a coral cactus is generally not recommended. Regular potting soil is designed to retain moisture, which is the opposite of what a coral cactus needs. Even with infrequent watering, the soil can stay damp for too long, creating a breeding ground for root rot. The DIY soil mix we recommend provides the necessary drainage and aeration to prevent this issue. Think of it this way: you can try to drive a car on a muddy road, but it’s much easier and more efficient to use a vehicle designed for off-road conditions. The DIY soil mix is the “off-road vehicle” for your coral cactus.
What are the best ingredients for a DIY coral cactus soil mix, and where can I find them?
The ideal DIY soil mix for a coral cactus typically consists of the following ingredients:
* **Potting soil:** Provides some nutrients and structure. Use a high-quality potting soil that’s not too heavy.
* **Perlite:** Improves drainage and aeration. It’s a lightweight, volcanic glass that helps prevent soil compaction.
* **Pumice:** Similar to perlite, but heavier and provides better support for the plant. It also helps with drainage and aeration.
* **Coarse sand:** Adds drainage and helps prevent the soil from becoming too compacted. Avoid using fine sand, as it can clog the soil pores.
These ingredients can usually be found at your local garden center, hardware store, or online retailers. Look for horticultural-grade perlite and pumice, as these are specifically designed for plant use.
How often should I water my coral cactus after repotting it with the DIY soil mix?
Watering frequency depends on several factors, including the size of the pot, the climate, and the time of year. As a general rule, allow the soil to dry out completely between waterings. You can check the soil moisture by inserting your finger into the soil. If the top inch or two feels dry, it’s time to water. When you do water, water thoroughly until water drains out of the drainage holes. Then, allow the excess water to drain away completely. During the dormant season (winter), you’ll need to water even less frequently. Overwatering is a much bigger threat than underwatering for coral cacti.
My coral cactus is grafted. Does the graft union require any special attention?
Yes, the graft union is a vulnerable point and requires careful attention. Avoid getting water on the graft union, as this can promote rot. Also, be careful not to damage the graft union when handling the plant. If you notice any signs of separation or weakness at the graft union, seek advice from a gardening expert. Sometimes, providing support to the top portion can help stabilize the graft.
Can I use fertilizer on my coral cactus? If so, what kind and how often?
Yes, you can use fertilizer on your coral cactus, but it’s important to use a fertilizer specifically formulated for cacti and succulents. These fertilizers are typically lower in nitrogen and higher in phosphorus and potassium, which are essential for healthy growth and flowering. Fertilize sparingly, typically during the growing season (spring and summer). Follow the instructions on the fertilizer label carefully. Over-fertilizing can be just as harmful as under-fertilizing. A diluted liquid fertilizer applied once a month during the growing season is usually sufficient.
What kind of light does a coral cactus need?
Coral cacti thrive in bright, indirect light. Avoid placing them in direct sunlight, especially during the hottest part of the day, as this can scorch the stems. A south- or east-facing window is usually ideal. If you don’t have access to bright, indirect light, you can supplement with a grow light.
How do I propagate a coral cactus?
Propagating a coral cactus is challenging due to its grafted nature. You can’t propagate it from cuttings of the crested top. However, you can propagate the base plant (*Euphorbia neriifolia*) from cuttings. Allow the cut end to callous over for a few days before planting it in well-draining soil. Keep the soil slightly moist until roots develop. However, remember that you’ll only be propagating the base plant, not the crested top. Grafting is the only way to reproduce the coral cactus in its entirety, which is a more advanced technique.
My coral cactus is leaning. What should I do?
Leaning can be caused by several factors, including insufficient light or uneven watering. Rotate the plant regularly to ensure that all sides receive equal light. If the leaning is severe, you may need to provide support with a stake or trellis. Also, check the soil moisture to ensure that the plant is not being overwatered or underwatered. If the leaning is due to root rot, you’ll need to repot the plant in fresh, well-draining soil after removing any rotted roots.

Leave a Comment