

Coffee fridge deodorizer: Say goodbye to funky fridge smells with this incredibly simple and effective DIY solution! Are you tired of opening your refrigerator and being greeted by a less-than-pleasant odor? We’ve all been there – the lingering scent of last week’s leftovers, the pungent aroma of strong cheeses, or just a general “fridge funk” that seems impossible to eliminate. But fear not, because I’m about to share a game-changing trick that will leave your fridge smelling fresh and clean, naturally.
The practice of using coffee grounds for odor absorption isn’t new. In fact, many cultures have long recognized coffee’s ability to neutralize smells. From using it to clear the air after cooking strong spices to placing bowls of coffee grounds in rooms to combat mustiness, this natural deodorizer has been a trusted remedy for generations. But why does it work so well? Coffee grounds contain nitrogen, which helps to absorb and neutralize odors, rather than just masking them.
In today’s world, where we’re increasingly conscious of the chemicals we bring into our homes, a natural solution like a coffee fridge deodorizer is more appealing than ever. Store-bought air fresheners can be expensive and often contain harsh chemicals that can be harmful to our health and the environment. This DIY trick is not only eco-friendly and cost-effective, but it’s also incredibly easy to make. Plus, it repurposes used coffee grounds, reducing waste and giving them a new lease on life. So, let’s dive in and discover how to create your own coffee fridge deodorizer and banish those unwanted fridge smells for good!
DIY Coffee Fridge Deodorizer: Say Goodbye to Stinky Smells!
Okay, let’s face it, sometimes our refrigerators can become a breeding ground for unpleasant odors. Leftovers gone bad, forgotten veggies, or even just the general mix of food smells can create a funky atmosphere. But don’t worry, I’ve got a super simple and effective DIY solution for you: a coffee fridge deodorizer! And the best part? It uses something you probably already have in your kitchen – coffee grounds!
This isn’t just about masking the smell; coffee actually absorbs odors, leaving your fridge smelling fresh and clean. Plus, it’s a natural and eco-friendly alternative to chemical-laden air fresheners. So, let’s get started!
What You’ll Need
Before we dive in, let’s gather our supplies. This is a pretty low-key project, so you won’t need much:
* Used coffee grounds (completely dry)
* A small, breathable container (a jar, a small bowl, or even a repurposed yogurt container will work)
* Cheesecloth or breathable fabric (optional, but recommended)
* Rubber band or string (if using cheesecloth)
Preparing the Coffee Grounds
The key to an effective coffee deodorizer is using completely dry coffee grounds. Moisture can lead to mold growth, which is definitely not what we want in our fridge!
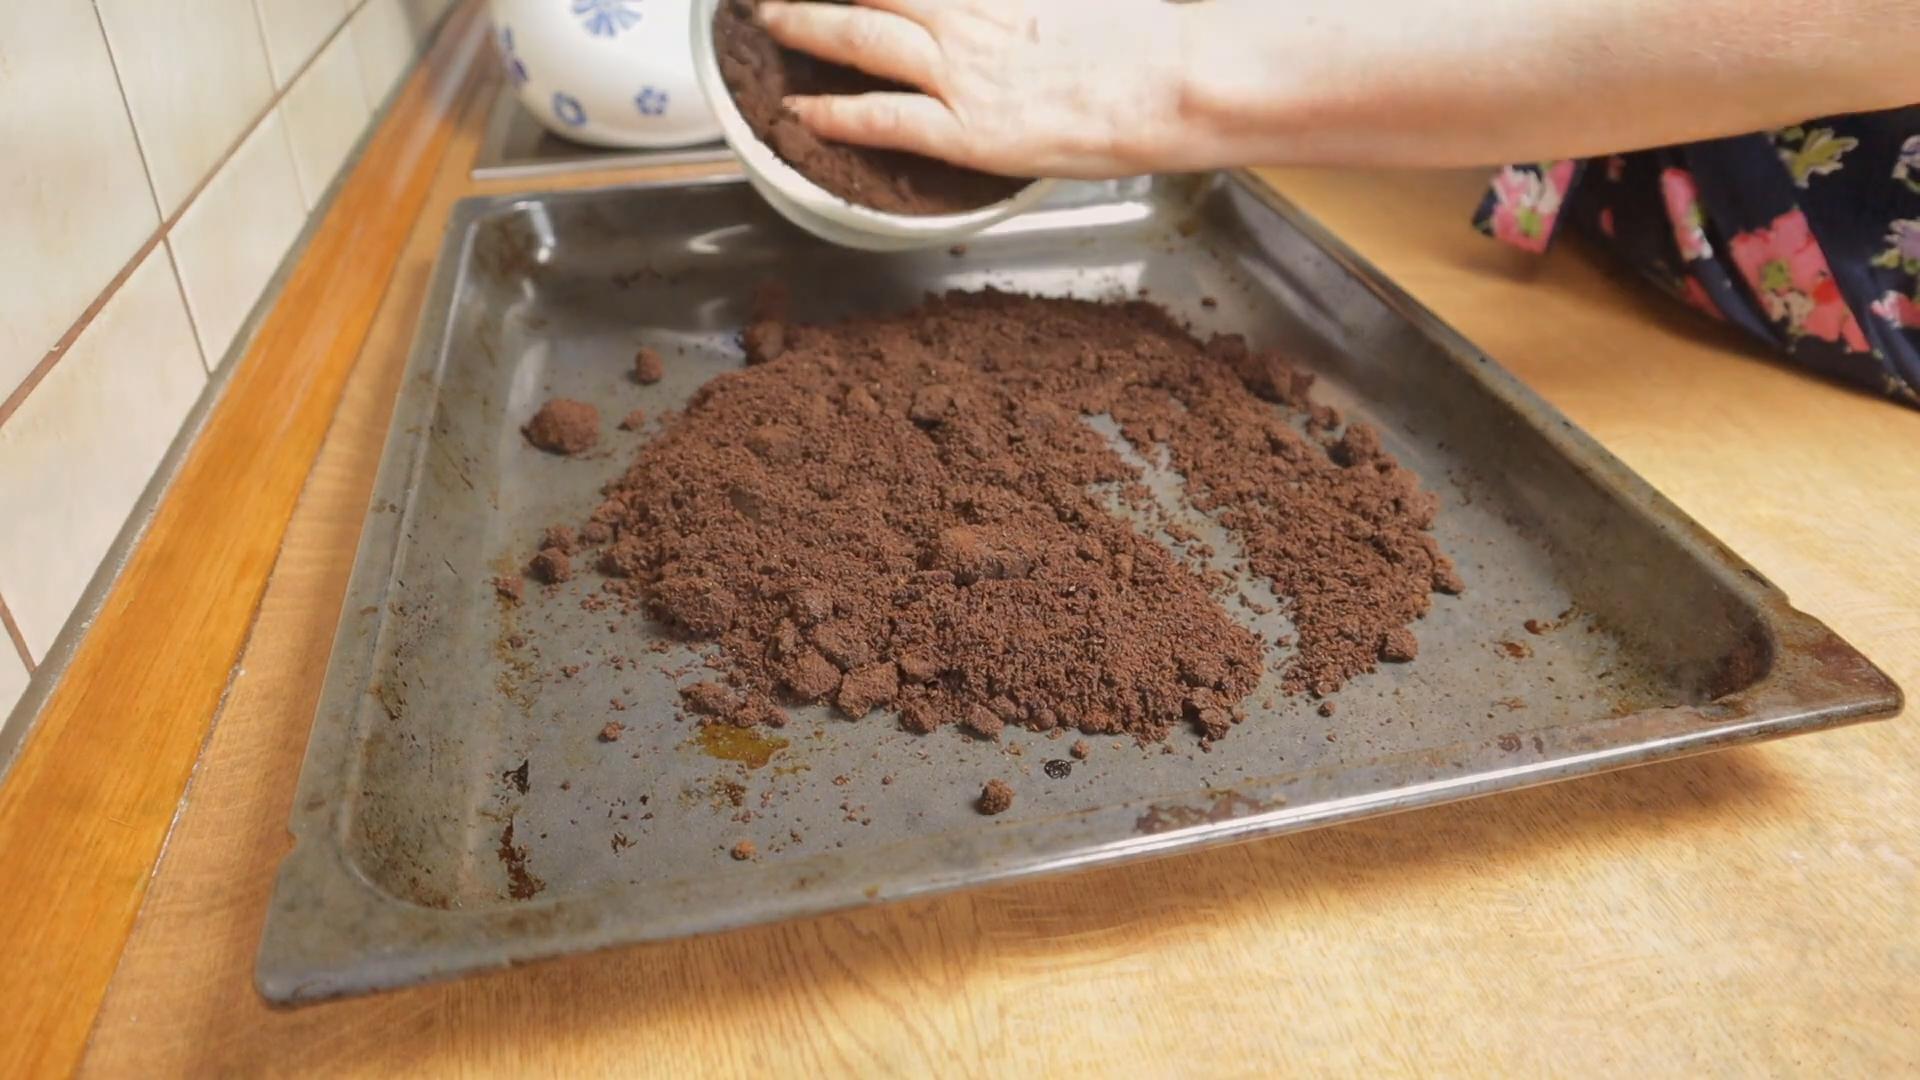
1. Collect Your Grounds: After you brew your coffee, don’t toss those grounds! Instead, scoop them out of your coffee maker or French press.
2. Spread Them Out: Spread the used coffee grounds in a thin layer on a baking sheet lined with parchment paper. This will help them dry evenly.
3. Dry Them Thoroughly: There are a few ways to dry your coffee grounds:
* Oven Method: Preheat your oven to the lowest possible setting (usually around 170-200°F or 75-95°C). Place the baking sheet with the coffee grounds in the oven and bake for about 1-3 hours, or until completely dry. Keep a close eye on them to prevent burning. Stir them occasionally to ensure even drying.
* Air Drying Method: If you have more time, you can air dry the coffee grounds. Simply leave the baking sheet in a well-ventilated area for several days, stirring occasionally. This method takes longer but is more energy-efficient.
* Dehydrator Method: If you own a food dehydrator, you can use it to dry the coffee grounds. Follow the manufacturer’s instructions for drying herbs or other small items.
4. Check for Dryness: The coffee grounds should be completely dry to the touch and crumble easily. If they feel damp at all, continue drying them.
Assembling Your Deodorizer
Now that our coffee grounds are nice and dry, let’s put together our deodorizer!
1. Choose Your Container: Select a small container that will fit comfortably in your fridge without taking up too much space. A small glass jar, a plastic container with holes poked in the lid, or even a small bowl will work.
2. Add the Coffee Grounds: Fill your chosen container with the dried coffee grounds. Don’t pack them too tightly; you want air to be able to circulate through them.
3. Cover with Cheesecloth (Optional): If you’re using a bowl or a container without a lid, I highly recommend covering it with cheesecloth or another breathable fabric. This will prevent any stray coffee grounds from spilling into your fridge and making a mess.
4. Secure the Cheesecloth: If you’re using cheesecloth, secure it around the rim of the container with a rubber band or string. Make sure it’s tight enough to hold the coffee grounds in place but loose enough to allow air to circulate.
Placing and Maintaining Your Deodorizer
Now for the easiest part: putting your coffee deodorizer to work!
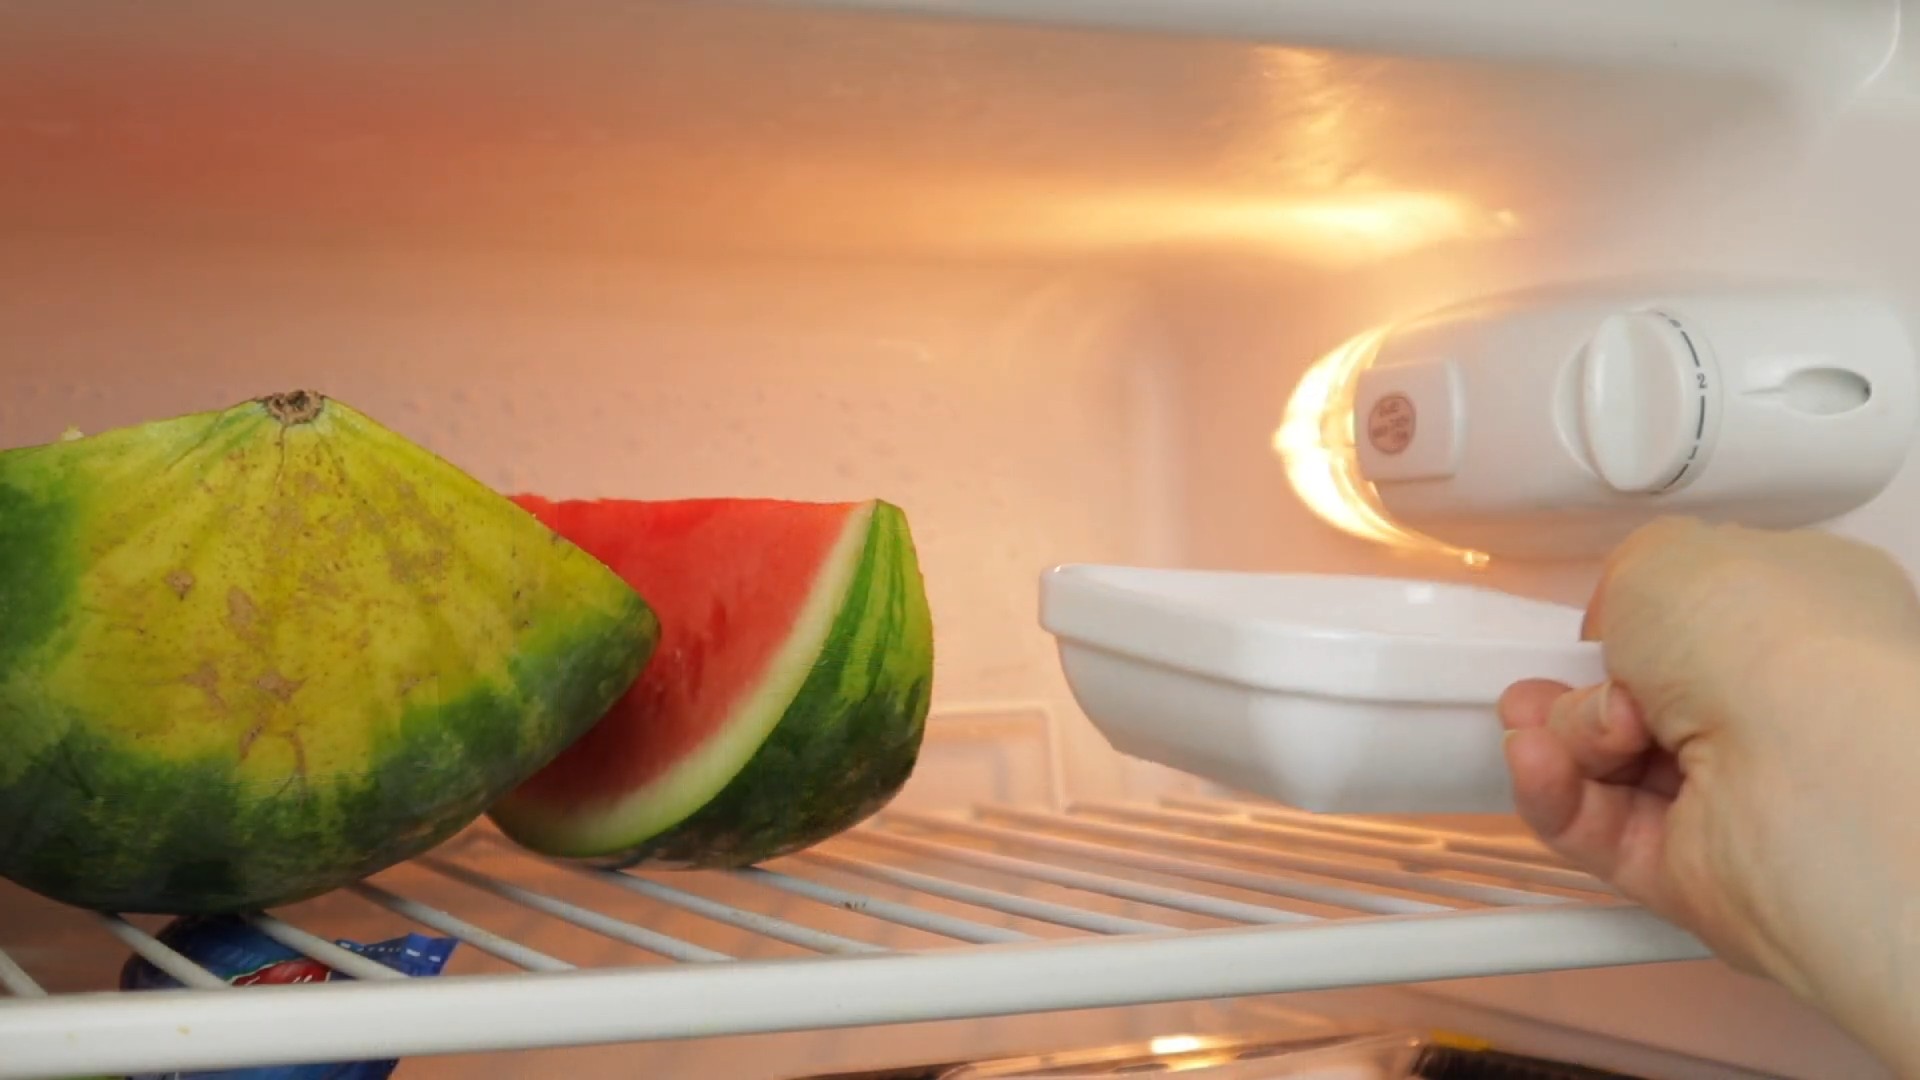
1. Find a Spot in Your Fridge: Place the coffee deodorizer in a central location in your fridge, away from any direct contact with food. I usually put mine on a shelf near the back.
2. Monitor and Replace: The coffee grounds will gradually absorb odors over time. I recommend replacing them every 2-4 weeks, or sooner if you notice the odors returning.
3. Reactivate (Optional): You can try to reactivate the coffee grounds by placing them back in the oven at a low temperature for a short period. This can help to release some of the absorbed odors and extend their lifespan. However, this isn’t always effective, so it’s best to replace them regularly.
4. Repurpose Used Grounds: Don’t throw away the used coffee grounds! They can be added to your compost pile, used as a natural fertilizer for your plants, or even used as a gentle exfoliant for your skin.
Troubleshooting and Tips
Here are a few extra tips and tricks to help you get the most out of your coffee fridge deodorizer:
* Strong Odors: If your fridge has a particularly strong odor, you might want to use two or more coffee deodorizers.
* Different Containers: Experiment with different containers to find what works best for you. Some people prefer open bowls, while others prefer containers with lids.
* Activated Charcoal: For extra odor-absorbing power, you can mix a small amount of activated charcoal with the coffee grounds.
* Regular Cleaning: Remember that a coffee deodorizer is not a substitute for regular fridge cleaning. Be sure to clean your fridge regularly to prevent odors from building up in the first place. Wipe up spills immediately, and discard any expired or spoiled food.
* Baking Soda: You can also use baking soda as a fridge deodorizer. Place an open box of baking soda in your fridge to absorb odors. Replace it every 3 months.
* Vinegar: Another natural deodorizer is vinegar. Place a bowl of white vinegar in your fridge overnight to absorb odors.
* Lemon: Cut a lemon in half and place it in your fridge to freshen the air. Replace the lemon every few days.
* Essential Oils: Add a few drops of your favorite essential oil to the coffee grounds for a pleasant scent. Lavender, lemon, and tea tree oil are all good choices. Be careful not to use too much essential oil, as it can be overpowering.
* Preventative Measures: To prevent odors from building up in your fridge, store food properly in airtight containers. This will help to keep odors from escaping and contaminating other foods.
* Check the Temperature: Make sure your fridge is set to the correct temperature (between 35-40°F or 2-4°C). This will help to prevent food from spoiling and causing odors.
* Clean the Drip Tray: Don’t forget to clean the drip tray in your fridge regularly. This can be a breeding ground for bacteria and odors.
* Consider a Fridge Filter: If you have a newer fridge, it may have a built-in air filter. Replace the filter regularly according to the manufacturer’s instructions.
Why This Works: The Science Behind It
You might be wondering, “Why does coffee actually work as a deodorizer?” Well, it’s all about the porous nature of coffee grounds.
* Porous Structure: Coffee grounds have a large surface area due to their porous structure. This allows them to effectively trap and absorb odor molecules.
* Nitrogen Compounds: Coffee contains nitrogen compounds that react with and neutralize odor molecules.
* Absorption vs. Masking: Unlike air fresheners that simply mask odors with fragrance, coffee grounds actually absorb and neutralize the odors, providing a more effective and long-lasting solution.
Beyond the Fridge: Other Uses for Coffee Grounds
The odor-absorbing power of coffee grounds isn’t limited to just your fridge! Here are a few other ways you can use them around your home:
* Shoe Deodorizer: Place dried coffee grounds in a sock or pouch and put it in your shoes overnight to absorb odors.
* Garbage Disposal Freshener: Grind a small amount of coffee grounds in your garbage disposal to freshen it up and remove odors.
* Car Deodorizer: Place a container of dried coffee grounds in your car to absorb odors.
* Pet Odor Remover: Sprinkle dried coffee grounds on your carpets and let them sit for a few minutes before vacuuming to remove pet odors.
* Hand Deodorizer: Rub your hands with coffee grounds after handling garlic, onions, or fish to remove the lingering odors.
So there you have it! A simple, effective, and eco-friendly way to keep your fridge smelling fresh and clean. Give it a try, and let me know what you think! Happy deodorizing!
Conclusion
So, there you have it! This simple, yet incredibly effective, DIY coffee fridge deodorizer is a game-changer for anyone battling lingering odors in their refrigerator. Forget those expensive, chemical-laden air fresheners that only mask the problem. This method tackles the root cause, absorbing unwanted smells and leaving your fridge smelling fresh and clean.
Why is this a must-try? Because it’s cost-effective, eco-friendly, and incredibly easy to make. You’re likely already throwing away used coffee grounds, so you’re essentially repurposing waste into a powerful deodorizing agent. Plus, you’re avoiding the harsh chemicals found in many commercial products, making it a safer option for your family and the environment.
But the benefits don’t stop there. This DIY trick is incredibly versatile. While we’ve focused on using used coffee grounds, you can experiment with different types of coffee to subtly influence the aroma in your fridge. For example, a dark roast might impart a slightly richer, more robust scent, while a lighter roast could offer a brighter, more delicate fragrance. You could even add a few drops of essential oils, like lemon or grapefruit, to the coffee grounds for an extra boost of freshness. Just be sure to use food-grade essential oils and add them sparingly.
Another variation to consider is the container you use. While a simple bowl or jar works perfectly well, you could also use a breathable cloth bag, like a muslin bag, for a more discreet and aesthetically pleasing option. This is especially useful if you want to place the deodorizer in a visible area of your fridge.
Don’t just take our word for it – give this DIY coffee fridge deodorizer a try! We’re confident that you’ll be amazed by the results. It’s a small change that can make a big difference in the overall freshness of your kitchen.
We encourage you to experiment with different variations and find what works best for you. And most importantly, we want to hear about your experience! Share your tips, tricks, and results in the comments below. Let’s create a community of fridge-freshness enthusiasts! Tell us what kind of coffee you used, what container you chose, and how long it took to notice a difference. Your feedback will help others discover the magic of this simple, yet powerful, DIY solution. So, ditch the store-bought deodorizers and embrace the natural power of coffee! You won’t regret it.
Frequently Asked Questions
How long does the coffee fridge deodorizer last?
The lifespan of your DIY coffee fridge deodorizer depends on a few factors, including the size of your fridge, the types of odors present, and the humidity levels. Generally, you can expect it to last anywhere from two weeks to a month. You’ll know it’s time to replace the coffee grounds when you start to notice the odors returning or when the coffee grounds appear dry and less fragrant. A good rule of thumb is to replace them every three weeks for optimal freshness. Remember to compost the used coffee grounds afterwards!
Can I use fresh coffee grounds instead of used ones?
While you can technically use fresh coffee grounds, it’s generally recommended to use used grounds for a few reasons. First, using used grounds is a great way to repurpose waste and reduce your environmental impact. Second, fresh coffee grounds can be quite potent and may impart a strong coffee aroma to your fridge, which might not be desirable for everyone. Finally, used coffee grounds are slightly less acidic than fresh grounds, which can help prevent any potential damage to delicate surfaces in your fridge. If you do choose to use fresh grounds, use a smaller amount and monitor the aroma closely.
Will the coffee grounds stain my refrigerator shelves?
This is a valid concern, especially if you’re using a porous container or if the coffee grounds are particularly wet. To minimize the risk of staining, always ensure that the coffee grounds are relatively dry before placing them in your fridge. You can spread them out on a baking sheet and let them air dry for a few hours before using them. Additionally, choose a container that is non-porous and has a wide base to prevent tipping. If you’re using a cloth bag, consider placing a small dish underneath it to catch any potential drips. Regularly check the area around the deodorizer for any signs of staining and clean them up immediately.
What if I don’t drink coffee? Can I still make this deodorizer?
Absolutely! While this article focuses on using coffee grounds, there are other natural deodorizers you can use in your fridge. Baking soda is a classic choice and works similarly to coffee grounds by absorbing odors. You can simply place an open box of baking soda in your fridge and replace it every month. Another option is activated charcoal, which is highly porous and effective at trapping odors. You can find activated charcoal in powder or briquette form at most health food stores. Simply place a small amount in a breathable container and replace it every few months.
My fridge smells really bad. Will this coffee deodorizer be strong enough?
For particularly stubborn odors, you might need to take a multi-pronged approach. Start by thoroughly cleaning your fridge, removing any spoiled food and wiping down all surfaces with a solution of baking soda and water. Then, place multiple coffee deodorizers in different areas of your fridge. You can also try adding a few drops of essential oils, like lemon or tea tree oil, to the coffee grounds for an extra boost of odor-fighting power. In extreme cases, you might need to leave the coffee deodorizers in your fridge for several days or even weeks to completely eliminate the odors. Persistence is key!
Can I use this coffee fridge deodorizer in other areas of my home?
Yes, you can! The same principles that make coffee grounds effective at deodorizing your fridge also apply to other areas of your home. You can place a bowl of coffee grounds in your closet, pantry, or even your car to absorb unwanted odors. Just be sure to choose a container that is appropriate for the location and that won’t spill easily. For example, a small cloth bag filled with coffee grounds would be ideal for a closet or car, while a sturdy bowl would be better suited for a pantry.
Is there any risk of mold growth with the coffee grounds?
Mold growth is a possibility if the coffee grounds are too wet or if the humidity levels in your fridge are too high. To prevent mold growth, make sure the coffee grounds are relatively dry before placing them in your fridge. You can also add a desiccant packet, like the ones found in vitamin bottles, to the container to absorb excess moisture. Regularly check the coffee grounds for any signs of mold growth and replace them immediately if you notice any. Proper ventilation in your fridge can also help prevent mold growth.
What other uses are there for used coffee grounds?
Used coffee grounds are a versatile resource with many uses beyond deodorizing. They can be used as a natural fertilizer for your garden, as a gentle exfoliant for your skin, and even as a natural dye for fabrics. They can also be used to deter pests like slugs and snails from your garden. So, don’t throw away those used coffee grounds – get creative and find new ways to repurpose them!

Leave a Comment