

Grow Chili Peppers Easily, even if you think you don’t have a green thumb! Have you ever dreamed of adding a fiery kick to your meals with peppers you’ve grown yourself? Imagine the satisfaction of harvesting vibrant, spicy chilies right from your own backyard or balcony. This isn’t just a pipe dream; it’s an achievable reality with a few simple tricks and DIY hacks.
Chili peppers have a rich history, dating back thousands of years in South America, where they were not only a food source but also held cultural and medicinal significance. From ancient civilizations to modern-day cuisine, these fiery fruits have captivated palates and added zest to dishes worldwide.
But why should you bother learning how to grow chili peppers easily? Well, store-bought peppers can be expensive and sometimes lack the intense flavor you crave. Plus, growing your own allows you to control the entire process, ensuring you’re using organic methods and avoiding harmful pesticides. More importantly, it’s incredibly rewarding! I’m going to share some of my favorite DIY tricks and hacks that will help you cultivate a thriving chili pepper garden, no matter your experience level. Get ready to spice up your life, one chili pepper at a time!
“`html
Grow Chili Peppers Easily: My Foolproof DIY Guide
Okay, chili pepper lovers, gather ’round! I’m going to share my tried-and-true method for growing a bumper crop of chili peppers, even if you think you have a “brown thumb.” This isn’t rocket science, but a few key steps will make all the difference between a sad, pepper-less plant and a fiery harvest. Let’s get started!
Choosing Your Chili Pepper Variety
Before we even think about soil, let’s talk peppers! The world of chili peppers is vast and exciting. Consider these factors when choosing your variety:
* Heat Level: This is the big one! Do you want a mild jalapeño, a medium-spicy serrano, or a scorching habanero? Scoville Heat Units (SHU) measure a pepper’s heat. Research different varieties and their SHU ratings to find your perfect match.
* Plant Size: Some chili pepper plants stay compact, perfect for containers, while others grow quite large. Think about the space you have available.
* Growing Season: Different varieties mature at different rates. If you have a short growing season, choose a faster-maturing pepper.
* Use: How do you plan to use your peppers? Fresh in salsa? Dried for chili powder? Pickling? Some varieties are better suited for certain uses than others.
Some popular and relatively easy-to-grow varieties include:
* Jalapeño
* Serrano
* Anaheim
* Cayenne
* Poblano
Starting Your Chili Pepper Seeds
Starting from seed gives you the most control over your plants, but it requires a little patience. I usually start my seeds indoors about 6-8 weeks before the last expected frost.
1. Gather Your Supplies:
* Chili pepper seeds
* Seed starting tray with a humidity dome
* Seed starting mix (a light, sterile mix is crucial)
* Spray bottle filled with water
* Heat mat (optional, but highly recommended)
* Grow light (optional, but helpful)
* Small pots (2-3 inches in diameter) for transplanting
2. Sow the Seeds:
* Moisten the seed starting mix thoroughly. It should be damp, not soggy.
* Fill the seed starting tray cells with the moistened mix.
* Plant 2-3 seeds per cell, about ¼ inch deep.
* Gently cover the seeds with more mix.
* Mist the surface with water.
3. Create the Ideal Environment:
* Place the seed starting tray on a heat mat. Chili pepper seeds germinate best in warm soil (around 80-85°F).
* Cover the tray with the humidity dome. This helps retain moisture.
* If you’re using a grow light, position it a few inches above the tray.
4. Maintain Moisture and Warmth:
* Check the soil moisture daily. Mist with water as needed to keep it consistently damp.
* Monitor the temperature. The heat mat should keep the soil warm.
5. Wait for Germination:
* Chili pepper seeds can take anywhere from 7 to 21 days to germinate, depending on the variety and conditions. Be patient!
6. Provide Light:
* Once the seedlings emerge, remove the humidity dome.
* If you’re using a grow light, keep it on for 14-16 hours per day.
* If you’re relying on natural sunlight, place the tray in a sunny window. Rotate the tray regularly to prevent the seedlings from leaning towards the light.
7. Thin the Seedlings:
* Once the seedlings have their first set of true leaves (the leaves that appear after the initial seed leaves), thin them to one seedling per cell. Choose the strongest, healthiest-looking seedling and snip off the others at the soil line. Don’t pull them out, as this can disturb the roots of the remaining seedling.
Transplanting Your Chili Pepper Seedlings
Once your seedlings have grown a bit and the weather outside is warm enough, it’s time to transplant them into larger pots or directly into your garden.
1. Harden Off the Seedlings:
* This is a crucial step! “Hardening off” gradually acclimates the seedlings to outdoor conditions.
* Start by placing the seedlings outdoors in a sheltered location (e.g., a shady porch) for an hour or two each day.
* Gradually increase the amount of time they spend outdoors each day, and slowly expose them to more sunlight.
* After about a week, they should be ready to be transplanted.
2. Choose Your Planting Location:
* Chili peppers need at least 6-8 hours of direct sunlight per day.
* Choose a location with well-draining soil.
* If you’re planting in containers, use a pot that is at least 12 inches in diameter.
3. Prepare the Soil:
* Amend the soil with compost or other organic matter to improve drainage and fertility.
* Chili peppers prefer slightly acidic soil (pH 6.0-6.8).
4. Transplant the Seedlings:
* Gently remove the seedlings from their cells.
* Dig a hole that is slightly larger than the root ball.
* Place the seedling in the hole and backfill with soil.
* Water thoroughly.
5. Space the Plants:
* Space the plants according to the variety’s mature size. Generally, allow 18-24 inches between plants.
Caring for Your Chili Pepper Plants
Now that your plants are in the ground, it’s time to provide them with the care they need to thrive.
1. Watering:
* Water deeply and regularly, especially during hot, dry weather.
* Allow the soil to dry out slightly between waterings.
* Avoid overwatering, as this can lead to root rot.
2. Fertilizing:
* Fertilize every 2-3 weeks with a balanced fertilizer.
* You can also use a fertilizer specifically formulated for tomatoes and peppers.
* Avoid over-fertilizing, as this can lead to excessive foliage growth and fewer peppers.
3. Mulching:
* Apply a layer of mulch around the plants to help retain moisture, suppress weeds, and regulate soil temperature.
* Organic mulches, such as straw or wood chips, are a good choice.
4. Pruning:
* Pruning is not essential, but it can help improve air circulation and encourage bushier growth.
* Remove any yellowing or dead leaves.
* You can also pinch off the tips of the branches to encourage more branching.
5. Pest and Disease Control:
* Keep an eye out for pests such as aphids, whiteflies, and spider mites.
* Treat infestations with insecticidal soap or neem oil.
* Prevent fungal diseases by providing good air circulation and avoiding overwatering.
* Remove any infected leaves or plants immediately.
6. Support:
* Taller chili pepper varieties may need support to prevent them from falling over.
* Use stakes or cages to support the plants.
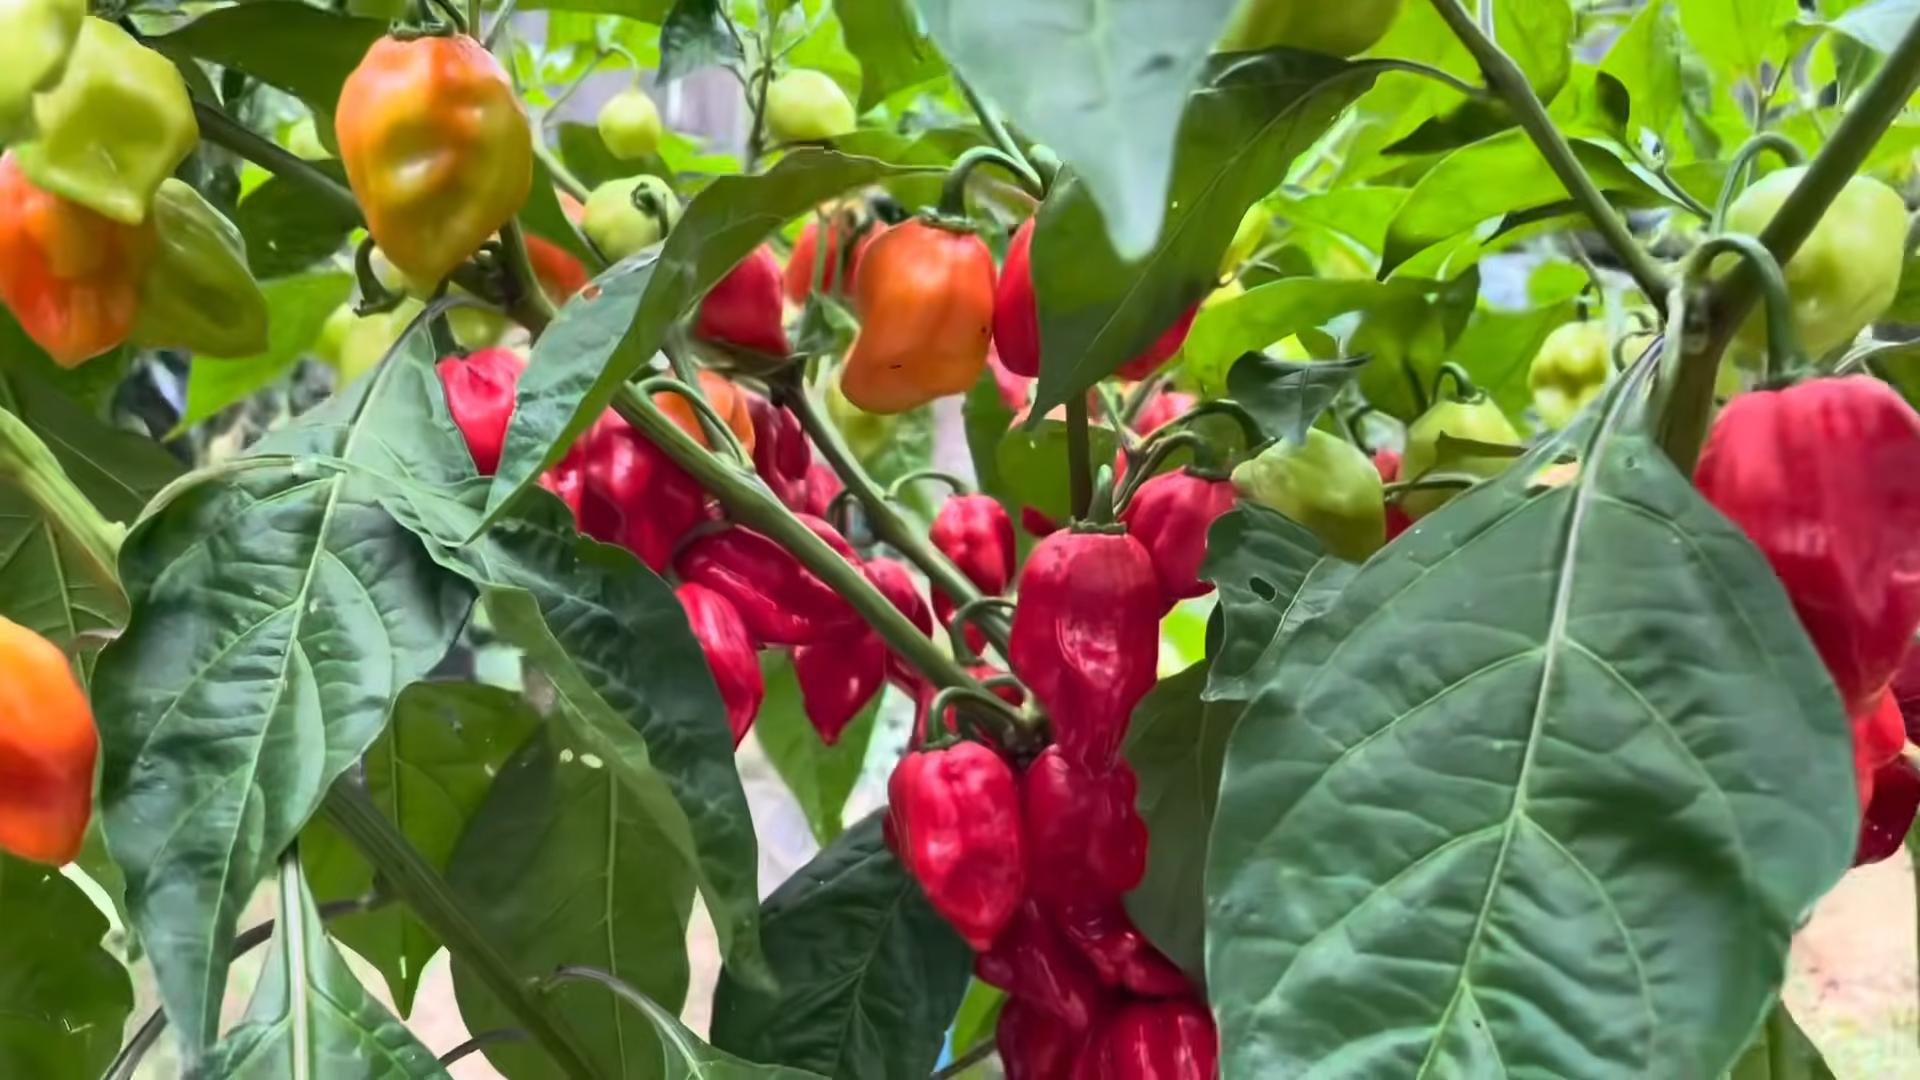
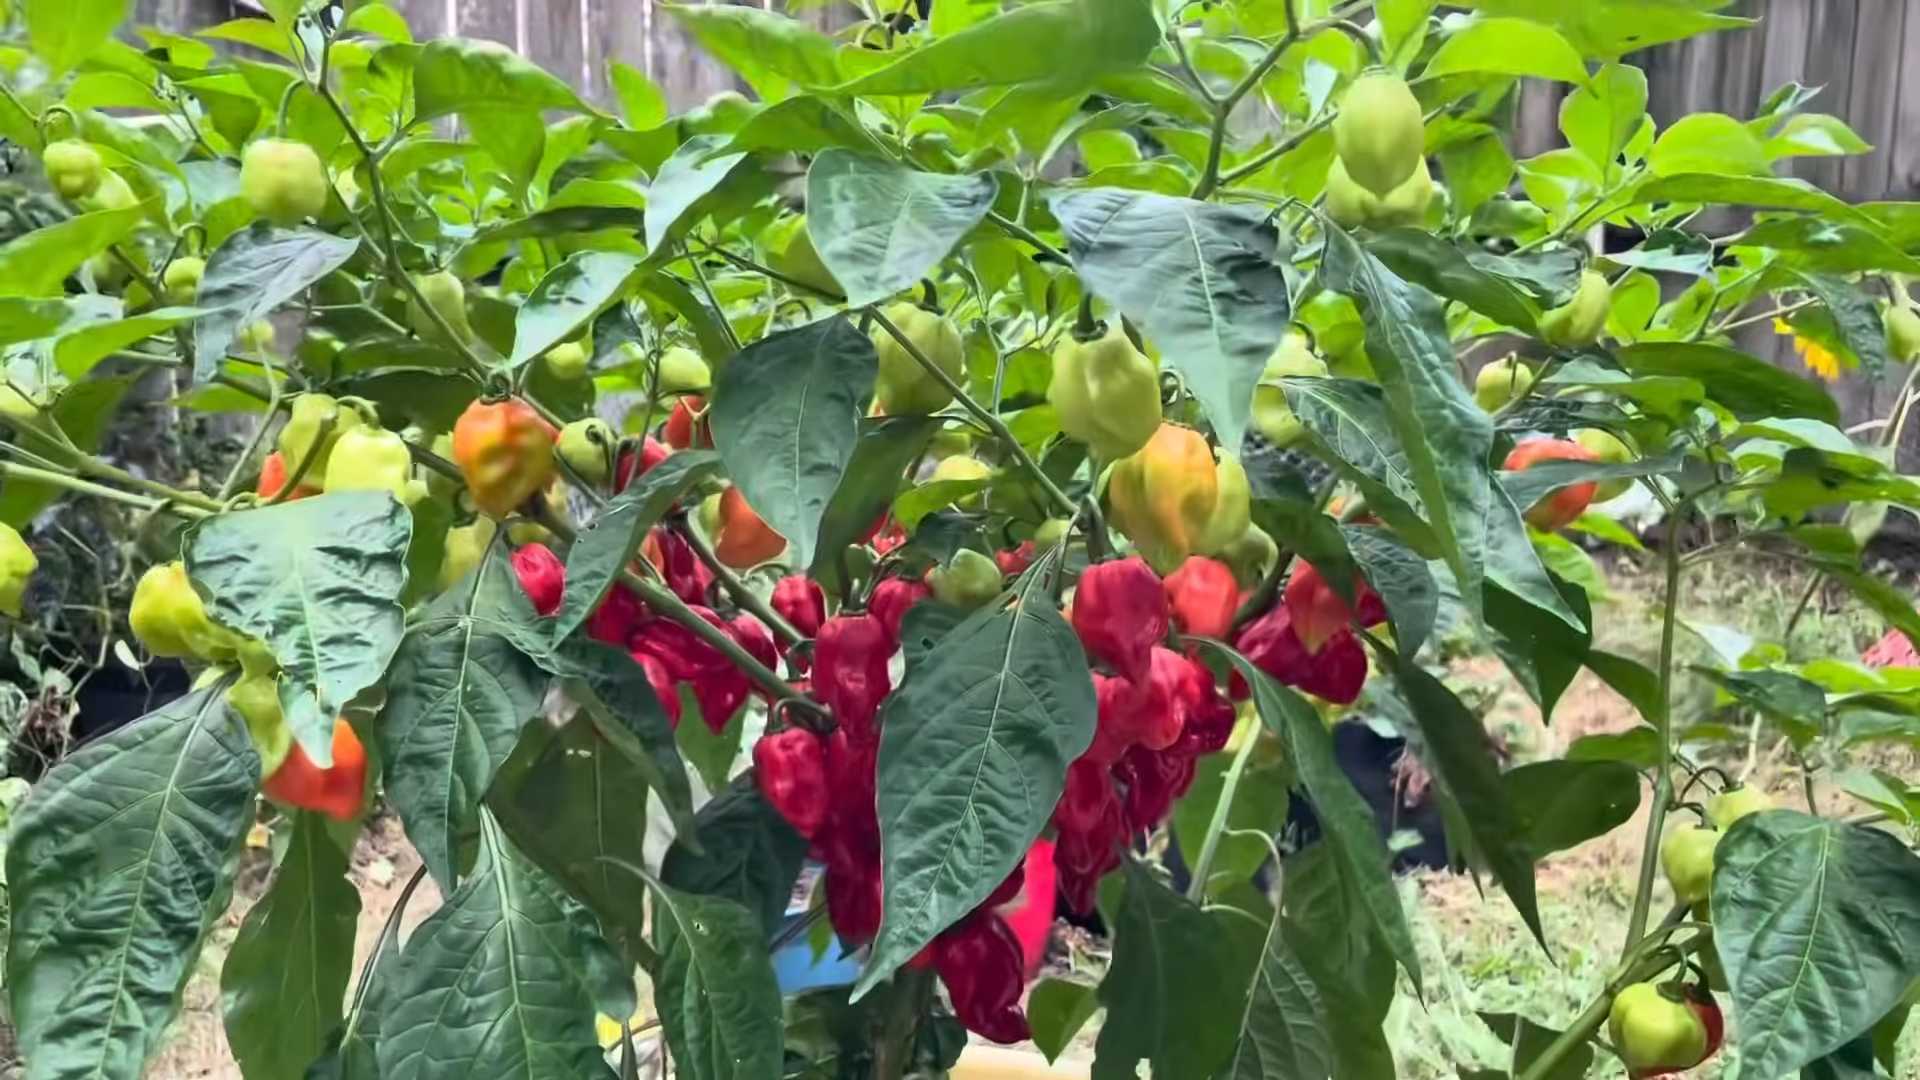
Harvesting Your Chili Peppers
The moment you’ve been waiting for! Harvesting your own chili peppers is incredibly rewarding.
1. When to Harvest:
* The timing of the harvest depends on the variety and your personal preference.
* Generally, chili peppers are ready to harvest when they have reached their mature size and color.
* Some peppers will change color as they ripen, while others will remain green.
* You can harvest peppers at any stage of ripeness, but they will be hotter and more flavorful when fully ripe.
2. How to Harvest:
* Use scissors or pruning shears to cut the peppers from the plant.
* Leave a small piece of stem attached to the pepper.
* Avoid pulling the peppers off the plant, as this can damage the branches.
3. Storing Your Chili Peppers:
* Fresh chili peppers can be stored in the refrigerator for up to a week.
* You can also dry, freeze, or pickle chili peppers for longer storage.
Troubleshooting Common Problems
Even with the best care, you might encounter some problems along the way. Here are a few common issues and how to address them:
* Blossom End Rot: This is caused by a calcium deficiency. Ensure consistent watering and consider adding calcium to the soil.
* Aphids: These tiny pests suck sap from
Conclusion
So, there you have it! Growing chili peppers easily doesn’t have to be a daunting task reserved for seasoned gardeners. With this simple, yet effective DIY trick, you can transform your backyard, balcony, or even a sunny windowsill into a thriving chili pepper paradise. We’ve demystified the process, breaking down the barriers that often discourage beginners and providing you with a clear, actionable path to success.
The beauty of this method lies in its simplicity and adaptability. It’s not about complex equipment or expensive fertilizers; it’s about understanding the basic needs of your chili pepper plants and providing them with the optimal environment to flourish. Think of it as giving your plants a little boost, a head start that sets them up for a season of abundant harvests.
But why is this DIY trick a must-try? Because it works! It’s a proven method that has yielded impressive results for countless home gardeners. It addresses the critical early stages of growth, ensuring strong root development and vigorous plant health. This translates to more peppers, bolder flavors, and a greater sense of satisfaction from your gardening efforts.
Beyond the core technique, there’s plenty of room for experimentation and personalization. Consider exploring different varieties of chili peppers, from the mild and fruity to the scorching hot. Each variety has its unique flavor profile and heat level, offering a diverse culinary experience. You can also experiment with different soil mixtures, adjusting the nutrient balance to suit your specific plants.
For those looking to take their chili pepper cultivation to the next level, consider companion planting. Basil, for example, is known to repel pests and improve the flavor of chili peppers. Marigolds are another excellent choice, attracting beneficial insects that prey on aphids and other harmful pests.
Another variation involves using different types of containers. While standard pots work well, you can also explore raised beds, self-watering containers, or even repurposed materials like old tires or buckets. The key is to ensure adequate drainage and sufficient space for the roots to grow.
Remember, gardening is a journey of learning and discovery. Don’t be afraid to make mistakes and experiment with different techniques. The most important thing is to have fun and enjoy the process.
We are confident that this DIY trick will empower you to grow chili peppers easily and successfully. But don’t just take our word for it. We encourage you to try it out for yourself and witness the results firsthand. Share your experiences with us! We’d love to hear about your successes, challenges, and any variations you’ve discovered. Post photos of your chili pepper plants, share your favorite recipes, and connect with other gardening enthusiasts. Let’s create a community of passionate chili pepper growers!
So, grab your seeds, prepare your soil, and get ready to embark on a rewarding gardening adventure. With a little effort and this simple DIY trick, you’ll be harvesting a bountiful crop of delicious chili peppers in no time. Happy growing!
Frequently Asked Questions (FAQ)
What kind of soil is best for growing chili peppers?
Chili peppers thrive in well-draining soil that is rich in organic matter. A good starting point is a mix of equal parts potting soil, compost, and perlite or vermiculite. The compost provides essential nutrients, while the perlite or vermiculite improves drainage and aeration. Avoid using heavy clay soils, as they can become waterlogged and suffocate the roots. You can also amend your soil with aged manure or bone meal to provide additional nutrients. Consider testing your soil’s pH level; chili peppers prefer a slightly acidic to neutral pH of around 6.0 to 7.0.
How often should I water my chili pepper plants?
Watering frequency depends on several factors, including the climate, soil type, and size of the container. As a general rule, water your chili pepper plants when the top inch of soil feels dry to the touch. Avoid overwatering, as this can lead to root rot. During hot, dry weather, you may need to water daily. In cooler, more humid conditions, you may only need to water every few days. When watering, water deeply, ensuring that the entire root ball is saturated. Avoid splashing water on the leaves, as this can promote fungal diseases. Using a soaker hose or drip irrigation system can help deliver water directly to the roots, minimizing water waste and reducing the risk of foliar diseases.
How much sunlight do chili pepper plants need?
Chili pepper plants are sun-loving plants and require at least 6-8 hours of direct sunlight per day to thrive. Insufficient sunlight can lead to stunted growth, reduced flowering, and smaller, less flavorful peppers. If you are growing chili peppers indoors, place them near a sunny window or use grow lights to supplement natural light. Rotate your plants regularly to ensure that all sides receive adequate sunlight. If you live in a particularly hot climate, you may need to provide some afternoon shade to prevent the plants from overheating.
What are some common pests and diseases that affect chili pepper plants?
Chili pepper plants are susceptible to a variety of pests and diseases, including aphids, spider mites, whiteflies, and fungal diseases like powdery mildew and blossom end rot. Regularly inspect your plants for signs of infestation or disease. Aphids, spider mites, and whiteflies can be controlled with insecticidal soap or neem oil. Fungal diseases can be prevented by ensuring good air circulation, avoiding overhead watering, and applying a fungicide if necessary. Blossom end rot is caused by a calcium deficiency and can be prevented by adding calcium to the soil or using a calcium-rich fertilizer.
How do I know when my chili peppers are ripe?
The color of the chili pepper is the best indicator of ripeness. Most chili peppers start out green and then change color as they ripen, typically to red, yellow, orange, or brown, depending on the variety. The pepper should also feel firm and slightly waxy to the touch. The time it takes for a chili pepper to ripen varies depending on the variety and growing conditions. Some varieties may ripen in as little as 60 days, while others may take up to 100 days or more. It’s always best to research the specific variety you are growing to determine the expected ripening time and color.
Can I grow chili peppers indoors?
Yes, you can absolutely grow chili peppers indoors, especially if you live in a climate with short growing seasons or harsh winters. To grow chili peppers indoors successfully, you’ll need to provide them with adequate sunlight (or grow lights), well-draining soil, and regular watering. Choose a pot that is at least 8-10 inches in diameter to allow for sufficient root growth. Consider using a self-watering container to help maintain consistent moisture levels. Pollinating the flowers can be a challenge indoors, so you may need to hand-pollinate them using a small brush or cotton swab.
How can I increase the heat level of my chili peppers?
Several factors can influence the heat level of chili peppers, including genetics, growing conditions, and stress. To increase the heat level, ensure that your plants receive plenty of sunlight and water them regularly, but avoid overwatering. Stressing the plants slightly by withholding water for short periods can also increase the heat level. Some gardeners believe that adding Epsom salts to the soil can also boost the heat. However, the most important factor is the variety of chili pepper you are growing. Some varieties, like habaneros and ghost peppers, are naturally much hotter than others.
How do I store chili peppers after harvesting?
There are several ways to store chili peppers after harvesting, depending on how you plan to use them. Fresh chili peppers can be stored in the refrigerator for up to a week. For longer storage, you can dry them, freeze them, or pickle them. To dry chili peppers, you can hang them in a well-ventilated area or use a dehydrator. Dried chili peppers can be stored in an airtight container for several months. To freeze chili peppers, simply wash them, remove the stems, and place them in a freezer bag. Frozen chili peppers can be stored for up to a year. Pickling chili peppers is another great way to preserve them and add flavor. There are many different pickling recipes available online.

Leave a Comment