

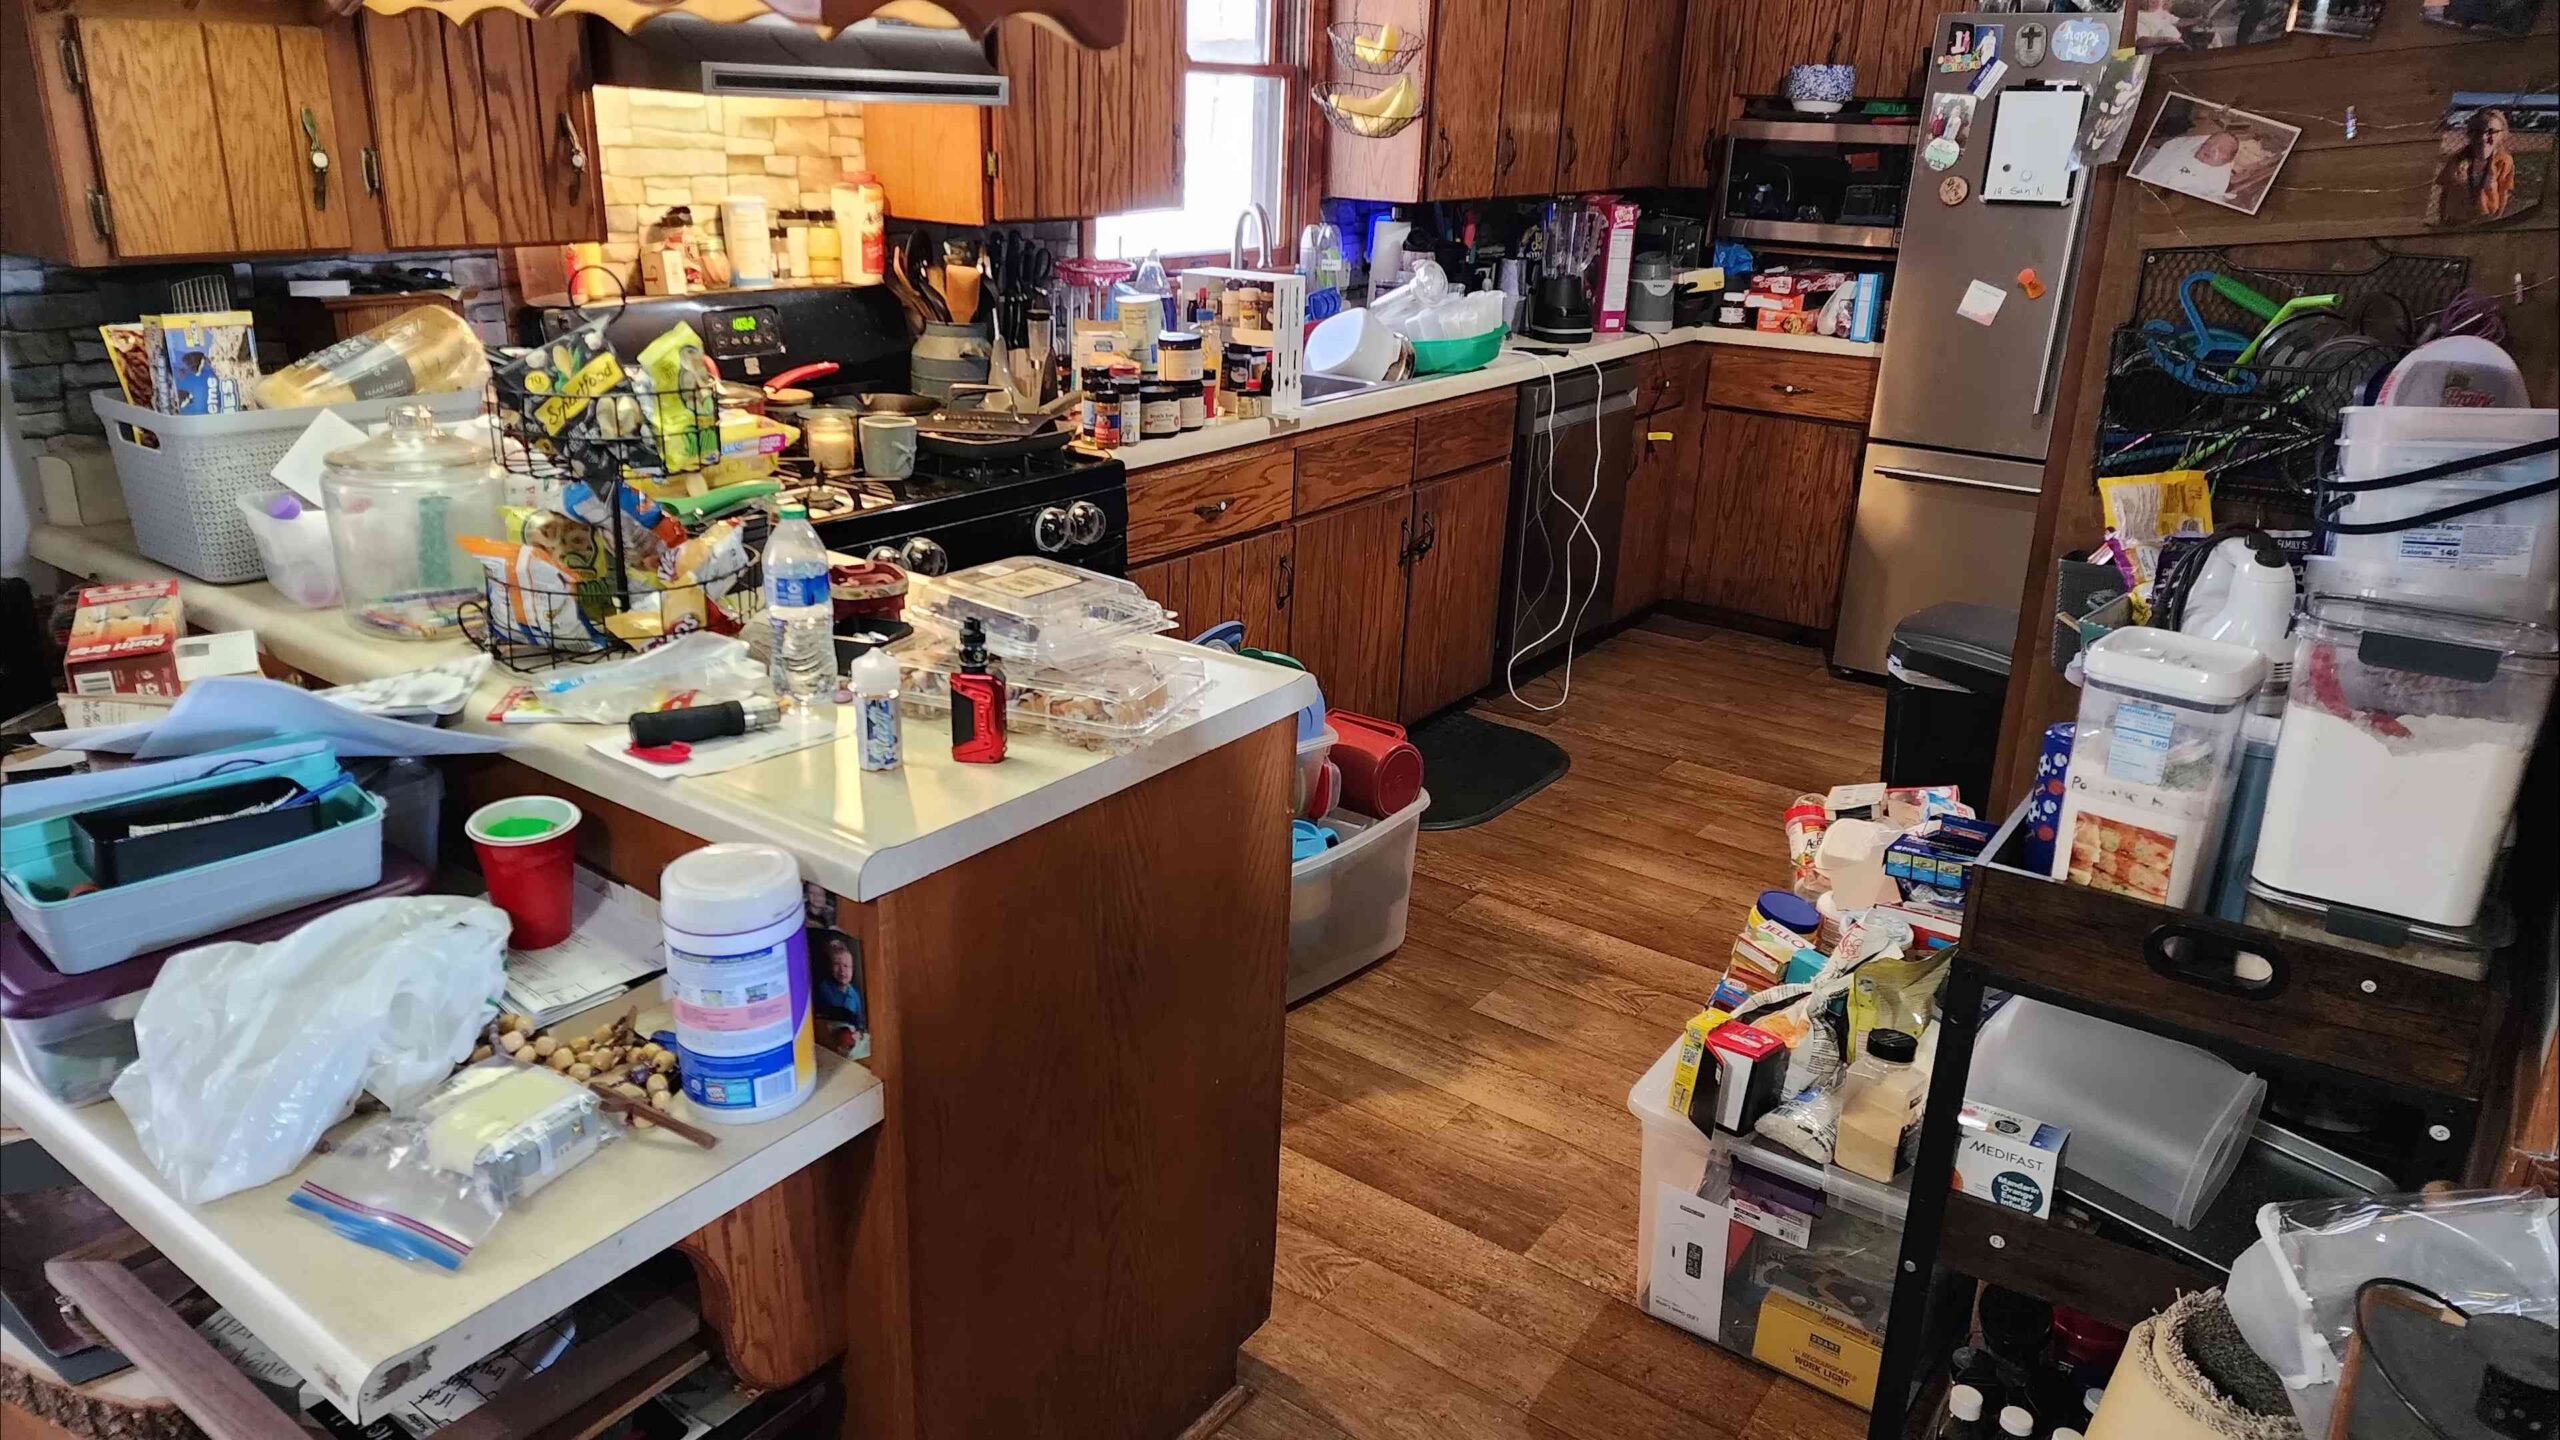
Hoarding cleanup tips DIY – tackling a cluttered home can feel overwhelming, I know! It’s like staring at a mountain you’re not sure you can climb. But trust me, with the right approach and a little DIY spirit, you can conquer that mountain and reclaim your space.
For centuries, cultures around the world have valued the importance of a clean and organized living environment. From the ancient practice of Feng Shui, which emphasizes the flow of energy in a space, to the minimalist philosophies of modern design, the desire for order and simplicity is deeply ingrained in us. But sometimes, life throws us curveballs, and things can get out of hand. That’s where these hoarding cleanup tips DIY come in handy.
Why is this DIY approach so crucial? Because professional cleaning services can be expensive, and sometimes, the emotional attachment to belongings makes it difficult to let go. These tips empower you to take control of the process, declutter at your own pace, and create a home that feels comfortable, safe, and truly yours. I’m here to guide you through practical strategies, from sorting and organizing to safely disposing of unwanted items. Let’s transform your space and your life, one step at a time!
“`html
DIY Hoarding Cleanup: A Step-by-Step Guide to Reclaiming Your Space
Okay, so you’re tackling a hoarding situation. I get it. It’s overwhelming, but trust me, you can do this! It’s going to take time, patience, and a solid plan, but the feeling of reclaiming your space is absolutely worth it. This guide is designed to break down the process into manageable steps, so let’s get started.
Phase 1: Preparation and Planning
Before you even think about touching a single item, preparation is key. This phase is all about setting yourself up for success.
- Assess the Situation: Take a good, hard look at the space. What are the biggest challenges? Are there any safety hazards like blocked exits, mold, or pests? Knowing what you’re up against is the first step.
- Set Realistic Goals: Don’t expect to clear everything out in a weekend. Start small. Maybe focus on one room or even just a corner of a room. Setting achievable goals will keep you motivated.
- Gather Supplies: You’ll need a lot of stuff! Think:
- Heavy-duty trash bags (lots of them!)
- Boxes for sorting and donating
- Cleaning supplies (disinfectant, all-purpose cleaner, window cleaner, etc.)
- Protective gear (gloves, masks, eye protection)
- A sturdy step stool or ladder
- A notebook and pen for taking notes and tracking progress
- A camera for taking before-and-after photos (trust me, you’ll want these!)
- Create a Sorting System: This is crucial. You need a way to categorize items as you go. I recommend using these categories:
- Trash: Anything broken, unusable, or contaminated.
- Donate: Items in good condition that you no longer need.
- Keep: Items you use regularly and truly value.
- Relocate: Items that belong in a different area of the house.
- Maybe: Items you’re unsure about. We’ll revisit these later.
- Enlist Support (Optional but Recommended): This is a tough job, both physically and emotionally. If possible, ask a trusted friend, family member, or professional organizer for help. Having someone to support you and offer a fresh perspective can make a huge difference.
Phase 2: The Decluttering Process
Now for the main event! Remember to take it slow, be patient with yourself, and celebrate small victories.
- Start with the Easiest Area: Don’t jump into the most overwhelming part of the house. Begin with a smaller, less emotionally charged area to build momentum. A clear countertop or a small closet can be a great starting point.
- Work in Small Sections: Focus on one small area at a time, like a shelf, a drawer, or a square foot of floor space. This prevents you from getting overwhelmed.
- Touch Each Item Once: This is the golden rule of decluttering. Pick up an item and immediately decide what to do with it: trash, donate, keep, relocate, or maybe. Don’t put it down without making a decision.
- Be Ruthless with Trash: Seriously, if it’s broken, stained, or unusable, toss it. Don’t hold onto things “just in case.”
- Be Honest About Donations: Only donate items that are in good, usable condition. Would you give it to a friend? If not, it’s probably trash.
- The “Keep” Pile: Be selective about what you keep. Ask yourself:
- Do I use this regularly?
- Do I love this item?
- Does this item serve a purpose?
- If I lost this item, would I replace it?
If the answer to any of these questions is no, consider letting it go.
- The “Relocate” Pile: As you declutter, you’ll inevitably find items that belong in other parts of the house. Put these in a designated box or bag and relocate them later.
- The “Maybe” Pile: This is where things get tricky. If you’re unsure about an item, put it in the “maybe” pile. Set a deadline (e.g., one month) to revisit these items. If you haven’t used or thought about them by then, donate or trash them.
- Take Breaks: Decluttering can be emotionally draining. Take frequent breaks to avoid burnout. Step away from the space, get some fresh air, and do something you enjoy.
- Document Your Progress: Take before-and-after photos of each area you declutter. This will help you see how far you’ve come and keep you motivated.
Phase 3: Cleaning and Organizing
Once you’ve decluttered, it’s time to clean and organize the space. This will make a huge difference in how you feel about your home.
- Deep Clean: Now that the clutter is gone, give the space a thorough cleaning. Dust, vacuum, mop, and wipe down all surfaces. Pay attention to areas that were previously hidden by clutter.
- Organize What’s Left: Find a place for everything you’ve decided to keep. Use storage containers, shelves, and organizers to maximize space and keep things tidy.
- Vertical Storage: Utilize vertical space by installing shelves or using tall storage containers. This is especially helpful in small spaces.
- Label Everything: Label storage containers so you know what’s inside without having to rummage through them.
- Create Zones: Designate specific areas for different activities. For example, create a reading nook, a workspace, or a crafting area.
- Keep Surfaces Clear: Aim to keep countertops and other surfaces as clear as possible. This will make the space feel more open and inviting.
- Maintain Your Progress: The key to preventing future hoarding is to maintain your progress. Set aside a few minutes each day to declutter and organize.
Phase 4: Dealing with Sentimental Items
This is often the hardest part of decluttering. Sentimental items hold emotional value, making it difficult to let go.
- Acknowledge Your Feelings: It’s okay to feel sad, anxious, or guilty about getting rid of sentimental items. Acknowledge these feelings and allow yourself to process them.
- Ask Yourself Why You’re Holding On: Are you holding onto the item because you truly value it, or because you feel obligated to? Are you afraid of forgetting the memory associated with the item?
- Take a Photo: If you’re struggling to let go of an item, take a photo of it. This allows you to preserve the memory without keeping the physical object.
- Create a Memory Box: Choose a few of your most cherished sentimental items and store them in a memory box. This allows you to keep the items that are most important to you without cluttering your home.
- Repurpose Items: Consider repurposing sentimental items into something new. For example, you could turn old t-shirts into a quilt or use old jewelry to create a piece of art.
- Share Items with Others: If you have sentimental items that you no longer need, consider sharing them with family members or friends who might appreciate them.
- Let Go of Guilt: Don’t feel guilty about getting rid of sentimental items. You’re not throwing away the memories associated with them. You’re simply creating space for new memories.
Phase 5: Preventing Future Hoarding
Once you’ve decluttered and organized your home, it’s important to take steps to prevent future hoarding.
- Identify the Root Cause: Hoarding is often a symptom of an underlying issue, such as anxiety, depression, or trauma. If you suspect that you have a hoarding disorder, seek professional help.
- Develop Healthy Coping Mechanisms: Find healthy ways to cope with stress and anxiety, such as exercise, meditation, or spending time with loved ones.
- Practice Mindful Consumption: Be mindful of what you’re buying and bringing into your home. Ask yourself if you really need the item and if you have a place to store it.
- Implement the One-In, One-Out Rule: For every new item you bring into your home, get rid of one old item. This will help you keep clutter under control.
- Regularly Declutter: Set aside time each week or month to declutter your home. This will prevent clutter from building up.
- Seek Professional Help: If

Conclusion
So, there you have it! Transforming your overwhelming hoarding situation into a manageable and even enjoyable cleanup project is entirely within your reach with these DIY hoarding cleanup tips. We’ve explored practical strategies, from the initial assessment and sorting process to the crucial steps of decluttering, cleaning, and organizing. The beauty of this DIY approach lies in its adaptability. You’re not bound by rigid rules or expensive professional services. You’re empowered to tailor the process to your specific needs, pace, and emotional capacity.
Why is this DIY approach a must-try? Because it’s about more than just clearing clutter; it’s about reclaiming your space, your peace of mind, and your life. It’s about creating a home that supports your well-being and reflects your values. It’s about fostering a sense of control and accomplishment that can ripple through other areas of your life.
Consider these variations to personalize your hoarding cleanup even further:
* **Themed Decluttering Days:** Instead of tackling everything at once, dedicate specific days to specific categories. For example, “Clothing Cleanup Saturday” or “Book Purge Wednesday.” This can make the task feel less daunting.
* **The “One In, One Out” Rule:** For every new item you bring into your home, commit to getting rid of one similar item. This helps prevent future clutter buildup.
* **The “Five-Minute Blitz”:** When you’re feeling overwhelmed or short on time, set a timer for five minutes and focus on decluttering one small area. You’ll be surprised how much you can accomplish in just a few minutes.
* **Enlist a Buddy:** Cleaning with a friend or family member can provide moral support, accountability, and an extra pair of hands. Just be sure to choose someone who is understanding and non-judgmental.
* **Document Your Progress:** Take before-and-after photos to track your progress and stay motivated. Seeing the tangible results of your efforts can be incredibly rewarding.Remember, progress, not perfection, is the goal. Don’t get discouraged if you have setbacks or if the process takes longer than you anticipated. Be patient with yourself, celebrate your small victories, and keep moving forward.
We wholeheartedly encourage you to embrace these DIY hoarding cleanup tips and embark on your journey to a clutter-free and more fulfilling life. We’re confident that you’ll discover a newfound sense of freedom and control as you transform your space.
Now, we want to hear from you! Have you tried any of these DIY techniques? What challenges did you face, and what successes did you achieve? Share your experiences, tips, and insights in the comments below. Your story could inspire and empower others to take the first step towards reclaiming their homes and their lives. Let’s create a supportive community where we can learn from each other and celebrate our progress together. Your feedback is invaluable, and we’re eager to hear your unique perspective on DIY hoarding cleanup.
Frequently Asked Questions (FAQ)
What is considered hoarding, and how do I know if I have a problem?
Hoarding is characterized by persistent difficulty discarding or parting with possessions, regardless of their actual value. This difficulty leads to the accumulation of possessions that clutter and congest living spaces, substantially compromising their intended use. It’s more than just being messy; it significantly impacts daily life, relationships, and even safety.
Signs that you might have a hoarding problem include:
* Difficulty throwing things away, even if they are broken, useless, or unwanted.
* Accumulation of a large number of items that clutter living spaces.
* Inability to use rooms for their intended purpose (e.g., a bedroom filled with boxes, a kitchen counter covered in piles).
* Distress or anxiety when thinking about discarding items.
* Social isolation due to embarrassment about the state of your home.
* Significant functional impairment in daily life.
* Health and safety concerns due to clutter (e.g., fire hazards, tripping hazards, pest infestations).If you recognize several of these signs in yourself or a loved one, it’s essential to seek professional help from a therapist or mental health professional specializing in hoarding disorder.
Where do I start when the clutter feels overwhelming?
The key is to break down the task into smaller, more manageable steps. Start with one small area, such as a single drawer, a corner of a room, or a small shelf. Don’t try to tackle the entire house at once.
Here’s a step-by-step approach:
1. **Assess the Situation:** Take a walk through your home and identify the areas that need the most attention. Prioritize areas that pose safety hazards or significantly impact your daily life.
2. **Gather Supplies:** Gather essential supplies such as trash bags, recycling bins, boxes for donations, cleaning supplies, and protective gear (gloves, masks).
3. **Sort and Categorize:** Go through the items in your chosen area one by one. Create categories such as “Trash,” “Recycle,” “Donate,” “Keep,” and “Relocate.” Be honest with yourself about the value and usefulness of each item.
4. **Declutter Ruthlessly:** Be prepared to part with items that you no longer need, use, or love. Ask yourself questions like: “Have I used this in the past year?” “Does this item bring me joy?” “Do I have duplicates of this item?”
5. **Clean and Organize:** Once you’ve decluttered, thoroughly clean the area. Then, organize the remaining items in a way that is functional and aesthetically pleasing.
6. **Repeat:** Continue this process, one small area at a time, until you’ve addressed the entire house.What if I have sentimental attachments to many of my possessions?
Sentimental attachments can make decluttering incredibly challenging. Here are some strategies for dealing with sentimental items:
* **Acknowledge Your Feelings:** Recognize that it’s okay to feel emotional about parting with sentimental items. Don’t beat yourself up for having these feelings.
* **Ask Yourself Why:** Explore the reasons why you’re attached to a particular item. What memories or emotions does it evoke?
* **Take Photos:** If you’re struggling to let go of an item, take a photo of it. This allows you to preserve the memory without keeping the physical object.
* **Create a Memory Box:** Designate a special box or container for your most cherished sentimental items. This allows you to keep a curated collection of memories without cluttering your entire home.
* **Limit the Number of Sentimental Items:** Set a limit on the number of sentimental items you’ll keep. This forces you to prioritize the most meaningful items and let go of the rest.
* **Reframe Your Thinking:** Remind yourself that memories are not tied to physical objects. You can still cherish your memories even if you don’t keep every item associated with them.How do I prevent future clutter buildup?
Preventing future clutter buildup is crucial for maintaining a clutter-free home. Here are some strategies to implement:
* **The “One In, One Out” Rule:** For every new item you bring into your home, commit to getting rid of one similar item.
* **Regular Decluttering Sessions:** Schedule regular decluttering sessions, such as once a month or once a quarter, to prevent clutter from accumulating.
* **Avoid Impulse Purchases:** Before buying something new, ask yourself if you truly need it and if you have space for it.
* **Be Mindful of Freebies:** Resist the temptation to take free items that you don’t need or want.
* **Deal with Mail Immediately:** Sort through your mail as soon as you receive it and discard junk mail immediately.
* **Put Things Away Immediately:** Make it a habit to put things away as soon as you’re finished using them.
* **Embrace Minimalism:** Consider adopting a minimalist lifestyle, which emphasizes owning fewer possessions and focusing on experiences rather than material things.When should I seek professional help for hoarding?
If your hoarding behavior is significantly impacting your daily life, relationships, or safety, it’s essential to seek professional help. Signs that you might need professional assistance include:
* Inability to declutter on your own, despite your best efforts.
* Significant distress or anxiety when thinking about discarding items.
* Social isolation due to embarrassment about the state of your home.
* Health and safety concerns due to clutter (e.g., fire hazards, tripping hazards, pest infestations).
* Relationship problems due to hoarding behavior.
* Functional impairment in daily life (e.g., difficulty cooking, cleaning, or sleeping).A therapist or mental health professional specializing in hoarding disorder can provide you with the support and guidance you need to overcome your hoarding challenges. Cognitive Behavioral Therapy (CBT) is a common and effective treatment approach for hoarding disorder. They can also help you develop coping mechanisms and strategies for preventing future clutter buildup.
Leave a Comment