

Growing tomatoes DIY doesn’t have to be intimidating! Imagine biting into a sun-warmed, juicy tomato, bursting with flavor, that you nurtured from a tiny seed right in your own backyard. That’s the magic of home gardening, and trust me, it’s more achievable than you think. For centuries, cultures around the globe have cultivated tomatoes, from their origins in South America where they were initially considered ornamental, to their current status as a culinary staple worldwide.
But let’s be honest, sometimes growing tomatoes DIY can feel like a battle against pests, diseases, and unpredictable weather. That’s where these clever DIY tricks and hacks come in! I’m going to share some simple, cost-effective solutions that will help you overcome common challenges and maximize your tomato harvest. Whether you’re a seasoned gardener or just starting out, these tips will empower you to create a thriving tomato patch and enjoy the delicious fruits (literally!) of your labor. Get ready to roll up your sleeves and transform your garden into a tomato paradise!

DIY Tomato Growing: From Seed to Sauce (and Everything In Between!)
Okay, tomato lovers, gather ’round! I’m going to walk you through my tried-and-true method for growing the juiciest, most flavorful tomatoes you’ve ever tasted. Forget those bland grocery store imposters – we’re talking homegrown goodness that will elevate your salads, sauces, and sandwiches to a whole new level. This isn’t just about planting a seed; it’s about nurturing a plant and reaping the rewards of your hard work. So, let’s get our hands dirty!
Phase 1: Starting Seeds Indoors (The Early Bird Gets the Tomato!)
Starting your tomato seeds indoors gives them a head start, especially if you live in a region with a shorter growing season. This allows you to get those precious plants established before the last frost hits.
What You’ll Need:
* Tomato seeds (choose your favorite varieties!)
* Seed starting trays or small pots (I prefer trays with individual cells)
* Seed starting mix (this is crucial – don’t use regular potting soil)
* Spray bottle with water
* Heat mat (optional, but highly recommended)
* Grow light (essential for strong seedlings)
* Humidity dome (optional, but helpful for germination)
* Small labels and a permanent marker
Step-by-Step Instructions:
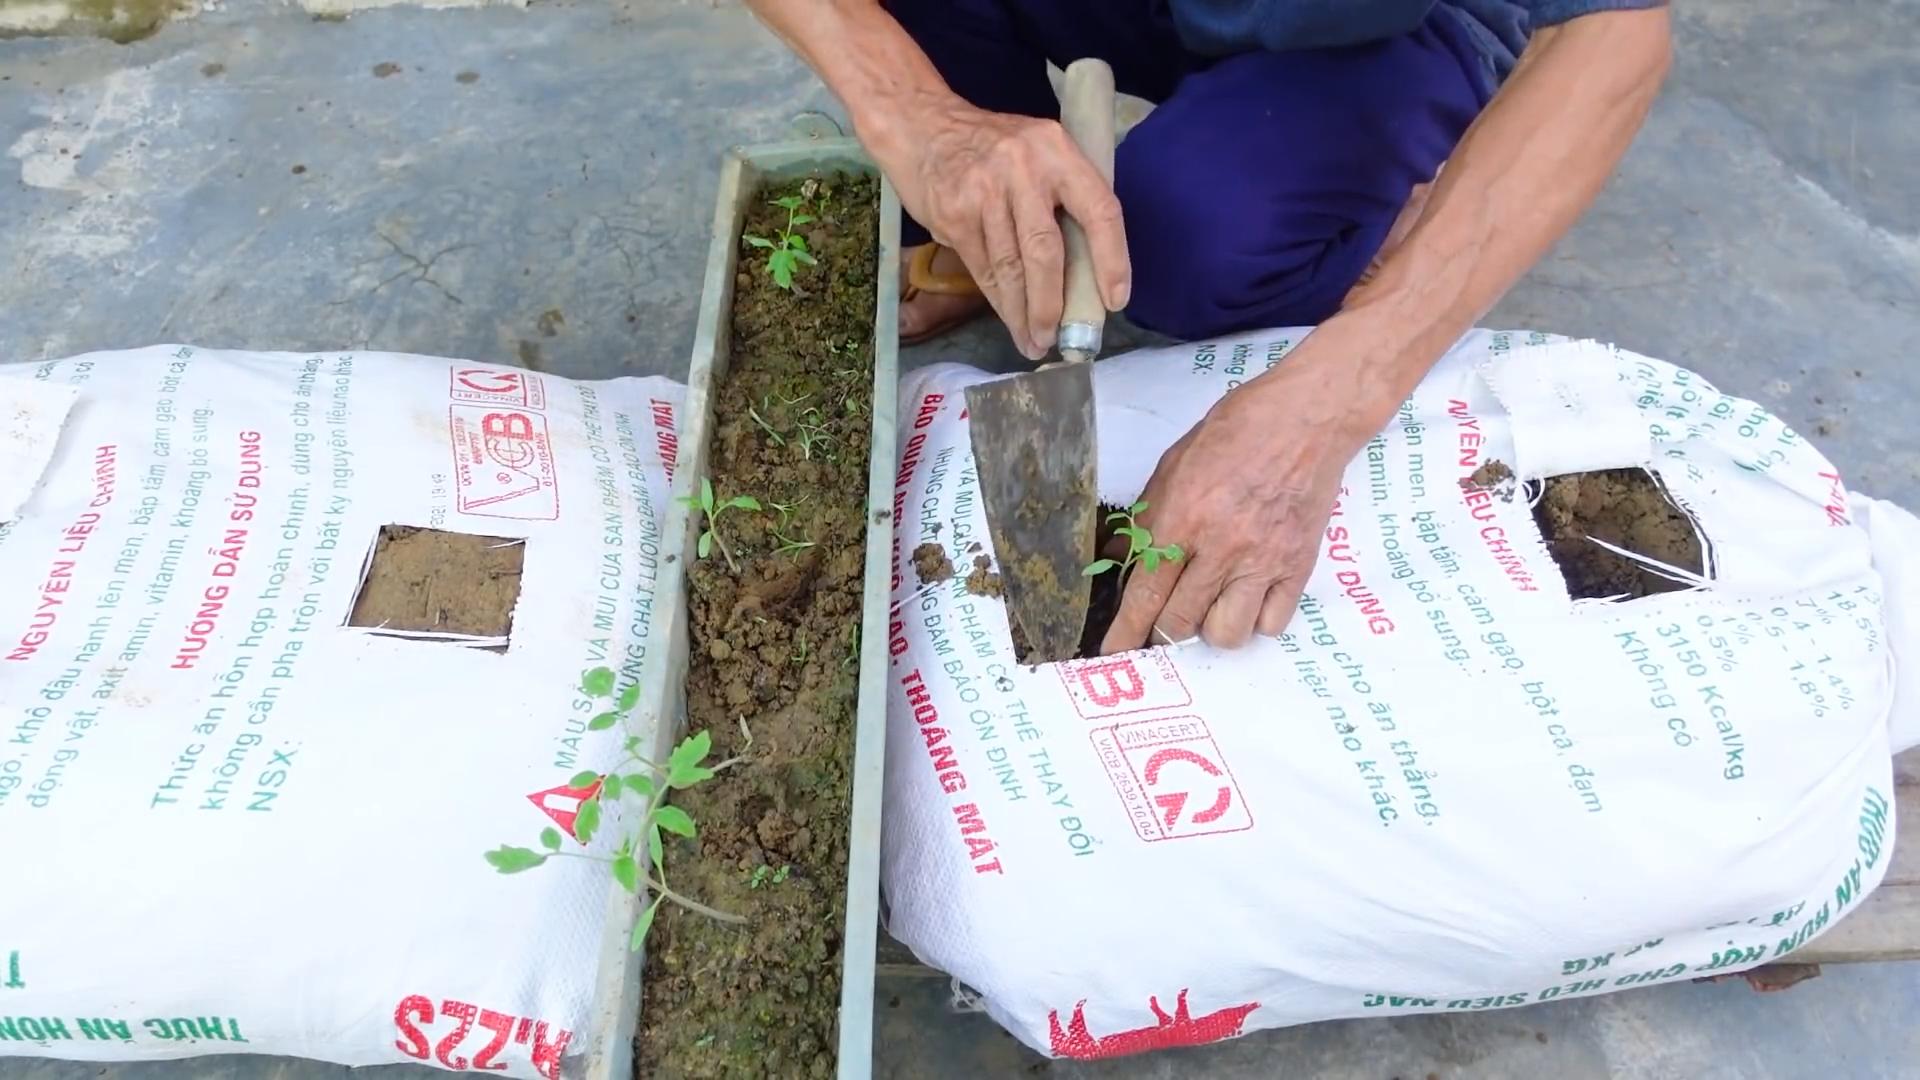
1. Prepare Your Seed Starting Trays: Fill each cell of your seed starting tray with the seed starting mix. Gently tap the tray to settle the mix, but don’t pack it down too tightly. You want it to be light and airy for the delicate roots.
2. Sow the Seeds: Make a small indentation (about ¼ inch deep) in the center of each cell. Drop 2-3 tomato seeds into each indentation. This increases your chances of at least one seed germinating.
3. Cover the Seeds: Gently cover the seeds with a thin layer of seed starting mix. Lightly pat it down.
4. Water Thoroughly: Use your spray bottle to thoroughly moisten the seed starting mix. You want it to be damp, but not soggy. Avoid pouring water directly onto the cells, as this can displace the seeds.
5. Create a Humid Environment: Place the humidity dome over the seed starting tray. This will help to retain moisture and create a warm, humid environment that’s ideal for germination. If you don’t have a humidity dome, you can cover the tray with plastic wrap.
6. Provide Bottom Heat (Optional but Recommended): Place the seed starting tray on a heat mat. This will help to maintain a consistent soil temperature, which is crucial for germination. Aim for a soil temperature of around 75-85°F (24-29°C).
7. Position Under Grow Lights: Place the seed starting tray under grow lights. Position the lights a few inches above the tray. Keep the lights on for 14-16 hours per day. This will provide the seedlings with the light they need to grow strong and healthy.
8. Monitor Moisture Levels: Check the moisture levels of the seed starting mix daily. If the mix starts to dry out, lightly mist it with your spray bottle.
9. Remove the Humidity Dome: Once the seeds have germinated (usually within 5-10 days), remove the humidity dome. This will help to prevent fungal diseases.
10. Thin the Seedlings: Once the seedlings have developed their first true leaves (the leaves that appear after the initial seed leaves), thin them out by snipping off the weaker seedlings at the soil line. Leave only the strongest seedling in each cell. This will give the remaining seedling plenty of room to grow.
11. Continue Growing Under Lights: Continue growing the seedlings under the grow lights until they are ready to be transplanted outdoors.
Phase 2: Hardening Off Your Seedlings (Preparing for the Great Outdoors)
Hardening off is the process of gradually acclimating your seedlings to outdoor conditions. This is essential to prevent shock and ensure that your plants thrive when you transplant them into your garden.
What You’ll Need:
* Your tomato seedlings
* A sheltered outdoor location (e.g., a porch or patio)
Step-by-Step Instructions:
1. Day 1-2: Place the seedlings outdoors in a sheltered location for 1-2 hours per day. Make sure they are protected from direct sunlight and strong winds.
2. Day 3-4: Gradually increase the amount of time the seedlings spend outdoors by 1-2 hours per day.
3. Day 5-6: Expose the seedlings to direct sunlight for a few hours per day.
4. Day 7: Leave the seedlings outdoors overnight, provided the temperature is above 50°F (10°C).
5. Transplant: After a week of hardening off, your seedlings are ready to be transplanted into your garden.
Phase 3: Transplanting and Planting (Getting Them in the Ground)
Now for the exciting part – getting those little guys into their permanent homes! Proper planting is key to a successful tomato harvest.
What You’ll Need:
* Your hardened-off tomato seedlings
* Garden gloves
* Trowel or shovel
* Tomato cages or stakes
* Compost or well-rotted manure
* Slow-release fertilizer (optional)
* Watering can or hose
* Mulch (straw, wood chips, or shredded leaves)
Step-by-Step Instructions:
1. Choose a Sunny Location: Tomatoes need at least 6-8 hours of direct sunlight per day. Choose a location in your garden that receives plenty of sun.
2. Prepare the Soil: Tomatoes prefer well-drained soil that is rich in organic matter. Amend the soil with compost or well-rotted manure before planting. This will improve drainage, fertility, and water retention.
3. Dig the Planting Holes: Dig holes that are slightly larger than the root balls of your tomato seedlings. Space the holes 2-3 feet apart, depending on the variety of tomato you are growing. Indeterminate varieties (those that continue to grow throughout the season) will need more space than determinate varieties (those that grow to a certain size and then stop).
4. Add Fertilizer (Optional): If you are using a slow-release fertilizer, add it to the bottom of the planting holes. This will provide the plants with a steady supply of nutrients throughout the growing season.
5. Remove Seedlings from Containers: Gently remove the tomato seedlings from their containers. If the roots are tightly bound, gently loosen them with your fingers.
6. Plant Deeply: Plant the tomato seedlings deeply, burying the stem up to the first set of leaves. Tomatoes can develop roots along their stems, so planting them deeply will encourage a stronger root system.
7. Backfill the Holes: Backfill the holes with soil, gently firming it around the plants.
8. Water Thoroughly: Water the plants thoroughly after planting. This will help to settle the soil and encourage root growth.
9. Install Tomato Cages or Stakes: Install tomato cages or stakes around the plants to provide support as they grow. This will help to prevent the plants from falling over and will also improve air circulation.
10. Mulch Around the Plants: Mulch around the plants with straw, wood chips, or shredded leaves. This will help to retain moisture, suppress weeds, and regulate soil temperature.
Phase 4: Ongoing Care (Keeping Them Happy and Healthy)
The work doesn’t stop after planting! Regular care is essential for a bountiful tomato harvest.
What You’ll Need:
* Watering can or hose
* Fertilizer (optional)
* Pruning shears
* Insecticidal soap or other pest control measures (if needed)
Step-by-Step Instructions:
1. Water Regularly: Tomatoes need consistent moisture, especially during hot, dry weather. Water deeply and regularly, aiming to keep the soil consistently moist but not soggy. Water at the base of the plants to avoid wetting the foliage, which can lead to fungal diseases.
2. Fertilize (Optional): If you are not using a slow-release fertilizer, you may need to fertilize your tomato plants periodically throughout the growing season. Use a fertilizer that is specifically formulated for tomatoes. Follow the instructions on the fertilizer label.
3. Prune (For Indeterminate Varieties): Indeterminate tomato varieties benefit from pruning. Prune off the suckers (the small shoots that grow between the main stem and the branches) to encourage the plant to focus its energy on producing fruit.
4. Monitor for Pests and Diseases: Regularly inspect your tomato plants for pests and diseases. Common tomato pests include aphids, whiteflies, and tomato hornworms. Common tomato diseases include early blight, late blight, and blossom end rot. Treat pests and diseases promptly to prevent them from spreading.
Conclusion
So, there you have it! Mastering the art of growing tomatoes DIY isn’t just about saving money; it’s about connecting with nature, understanding the life cycle of your food, and enjoying the unparalleled satisfaction of biting into a sun-ripened tomato you nurtured from a tiny seed. This simple trick, focusing on [mention the specific trick from the article, e.g., “creating a self-watering container” or “using eggshells as fertilizer”], is a game-changer for both novice and experienced gardeners. It addresses common challenges like inconsistent watering, nutrient deficiencies, and even pest control, all while minimizing your environmental impact.
But the beauty of DIY lies in its adaptability. Feel free to experiment! Try different types of containers, from repurposed buckets to stylish terracotta pots. Explore various soil amendments, like adding compost tea or worm castings, to boost your tomato plants’ health and productivity. Consider companion planting – basil, marigolds, and carrots are excellent choices for deterring pests and enhancing flavor. You can even tailor the nutrient solution to suit specific tomato varieties, like heirlooms or cherry tomatoes, for optimal results.
Don’t be afraid to get your hands dirty and embrace the learning process. Gardening is a journey, not a destination. There will be successes and setbacks, but each experience will bring you closer to becoming a more skilled and confident gardener.
We’re confident that this DIY trick will significantly improve your tomato-growing experience. Imagine the pride of serving a fresh tomato salad made entirely from your own homegrown produce! Think of the delicious sauces, salsas, and sandwiches you can create with an abundance of juicy, flavorful tomatoes.
Now it’s your turn! Give this DIY trick a try and witness the difference it makes in your tomato garden. We’re eager to hear about your experiences. Share your photos, tips, and challenges in the comments below. Let’s build a community of passionate tomato growers and learn from each other’s successes and failures. Together, we can unlock the secrets to bountiful tomato harvests and enjoy the simple pleasures of homegrown goodness. Happy gardening!
Frequently Asked Questions (FAQ)
What are the benefits of growing tomatoes DIY?
Growing tomatoes DIY offers a multitude of benefits. Firstly, it’s significantly more cost-effective than purchasing tomatoes from the grocery store, especially if you plan on consuming them regularly. Secondly, you have complete control over the growing process, ensuring that your tomatoes are free from harmful pesticides and chemicals. Thirdly, homegrown tomatoes taste significantly better than store-bought ones, as they are allowed to ripen fully on the vine. Finally, gardening is a therapeutic and rewarding activity that can reduce stress and improve your overall well-being.
What type of tomatoes are best for growing DIY?
The best type of tomatoes for growing DIY depends on your climate, space, and personal preferences. Determinate tomatoes, which grow to a fixed size and produce all their fruit at once, are ideal for smaller spaces and container gardening. Indeterminate tomatoes, which continue to grow and produce fruit throughout the season, require more space and support but offer a longer harvest period. Cherry tomatoes, Roma tomatoes, and beefsteak tomatoes are all popular choices for home gardeners. Consider your local climate and choose varieties that are known to thrive in your region. Also, think about how you plan to use your tomatoes – for salads, sauces, or sandwiches – and select varieties accordingly.
How often should I water my tomato plants when growing tomatoes DIY?
Watering frequency depends on several factors, including the weather, soil type, and the size of your plants. Generally, tomato plants need about 1-2 inches of water per week. Check the soil moisture regularly by sticking your finger about an inch deep into the soil. If the soil feels dry, it’s time to water. Water deeply and thoroughly, ensuring that the water reaches the roots. Avoid watering the foliage, as this can promote fungal diseases. Using a self-watering container or a drip irrigation system can help to maintain consistent moisture levels and reduce the risk of overwatering or underwatering. Mulching around the base of the plants can also help to retain moisture in the soil.
What kind of fertilizer should I use for growing tomatoes DIY?
Tomato plants are heavy feeders and require regular fertilization to produce abundant fruit. A balanced fertilizer with an NPK ratio of 5-10-5 or 10-10-10 is a good starting point. You can also use organic fertilizers, such as compost tea, fish emulsion, or bone meal. Apply fertilizer according to the package instructions, typically every 2-3 weeks. During the flowering and fruiting stages, you may want to switch to a fertilizer with a higher phosphorus content to promote fruit development. Avoid over-fertilizing, as this can lead to excessive foliage growth and reduced fruit production.
How do I prevent pests and diseases when growing tomatoes DIY?
Preventing pests and diseases is crucial for a successful tomato harvest. Start by choosing disease-resistant varieties. Practice good garden hygiene by removing weeds and debris that can harbor pests and diseases. Water your plants at the base to avoid wetting the foliage. Ensure good air circulation by spacing your plants properly. Regularly inspect your plants for signs of pests or diseases, such as aphids, whiteflies, or leaf spots. If you detect any problems, take action immediately. Use organic pest control methods, such as insecticidal soap or neem oil, to control pests. For diseases, consider using copper fungicide or other organic treatments. Companion planting, such as planting basil or marigolds near your tomatoes, can also help to deter pests.
What are some common problems when growing tomatoes DIY and how can I fix them?
Some common problems when growing tomatoes DIY include blossom end rot, sunscald, and cracking. Blossom end rot, characterized by a dark, leathery spot on the bottom of the tomato, is caused by calcium deficiency. To prevent blossom end rot, ensure that your soil is well-drained and that you are providing adequate calcium. Sunscald, which occurs when tomatoes are exposed to excessive sunlight, can be prevented by providing shade during the hottest part of the day. Cracking, which is caused by rapid changes in moisture levels, can be minimized by watering consistently and mulching around the base of the plants.
How do I know when my tomatoes are ripe when growing tomatoes DIY?
The best way to determine if a tomato is ripe is to look at its color and feel its texture. Ripe tomatoes will have a deep, uniform color and will be slightly soft to the touch. The exact color will depend on the variety of tomato. Gently squeeze the tomato; it should give slightly but not be mushy. The tomato should also detach easily from the vine with a gentle twist. Avoid picking tomatoes that are still green or hard, as they will not ripen properly off the vine.
Can I grow tomatoes DIY indoors?
Yes, you can grow tomatoes DIY indoors, but it requires some extra effort. You’ll need a sunny location, preferably a south-facing window, or a grow light to provide adequate light. Choose compact or dwarf varieties that are well-suited for container gardening. Use a well-draining potting mix and fertilize regularly. Hand-pollinate the flowers by gently shaking the plants or using a small brush to transfer pollen from one flower to another. Monitor your plants for pests and diseases and take action as needed.
How can I save seeds from my homegrown tomatoes for future growing tomatoes DIY?
Saving seeds from your homegrown tomatoes is a great way to preserve your favorite varieties and save money. Choose ripe, healthy tomatoes from disease-free plants. Squeeze the seeds and pulp into a jar and add a small amount of water. Let the mixture ferment for 3-4 days, stirring occasionally. This process will help to remove the gelatinous coating around the seeds. After fermentation, rinse the seeds thoroughly and spread them out on a paper towel to dry completely. Store the dried seeds in an airtight container in a cool, dark place. Be aware that hybrid tomatoes may not produce true-to-type seeds, so it’s best to save seeds from heirloom or open-pollinated varieties.
Leave a Comment