

Kitchen cleaning hacks – who doesn’t need a few of those up their sleeve? Let’s be honest, the kitchen is the heart of the home, but it can also quickly become a battlefield of splatters, spills, and sticky situations. I know I’ve definitely been there! But what if I told you that conquering kitchen chaos doesn’t require hours of scrubbing or a cabinet full of harsh chemicals?
For generations, resourceful cooks and homemakers have passed down clever tips and tricks to keep their kitchens sparkling. Think of your grandmother’s secret weapon for removing stubborn stains or that old wives’ tale about using lemon to deodorize the fridge. These aren’t just random ideas; they’re time-tested solutions rooted in practicality and a desire to maintain a clean and healthy cooking space.
In today’s busy world, time is precious. Nobody wants to spend their entire weekend scrubbing burnt food off the stovetop. That’s where these DIY kitchen cleaning hacks come in! They’re designed to save you time, money, and effort, allowing you to enjoy your kitchen without the stress of constant cleaning. I’m excited to share some of my favorite and most effective DIY tricks that will transform your kitchen cleaning routine from a chore into a breeze. Get ready to discover simple, affordable, and eco-friendly ways to keep your kitchen looking its best!

DIY Kitchen Cleaning Hacks That Will Save You Time and Money!
Okay, let’s face it, cleaning the kitchen is nobody’s favorite chore. But a clean kitchen is a happy kitchen (and a healthier one!). I’m going to share some of my favorite DIY cleaning hacks that will make your life so much easier and your kitchen sparkle. Get ready to ditch those harsh chemicals and embrace some natural, effective solutions!
Cleaning the Oven Like a Pro (Without the Fumes!)
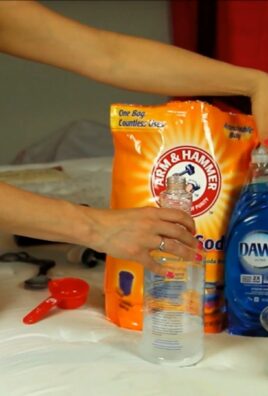
Commercial oven cleaners are notorious for their strong, unpleasant fumes. This method uses just baking soda and vinegar, and it works wonders!
What You’ll Need:
* Baking soda
* Water
* White vinegar
* Spray bottle
* Spatula or scraper
* Paper towels or sponge
* Rubber gloves (optional, but recommended)
Step-by-Step Instructions:
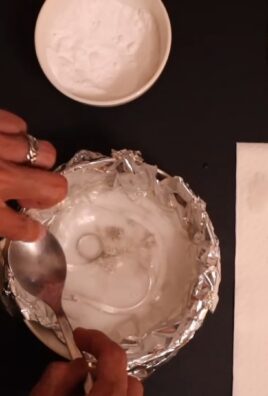
1. Empty the Oven: Remove oven racks, baking stones, and anything else inside. You’ll want a completely empty oven for this process.
2. Make the Baking Soda Paste: In a bowl, mix ½ cup of baking soda with enough water to form a spreadable paste. The consistency should be similar to pancake batter.
3. Coat the Oven: Using your hands (with gloves!), a spatula, or a brush, spread the baking soda paste all over the interior surfaces of your oven. Avoid the heating elements! Be generous, especially on stubborn stains.
4. Let it Sit (Overnight is Best!): This is the key! Let the baking soda paste sit for at least 12 hours, or even better, overnight. The longer it sits, the more it will loosen the baked-on grime.
5. Wipe Away the Paste: After the waiting period, use a damp sponge or paper towels to wipe away as much of the dried baking soda paste as possible. You might need to use a spatula or scraper to remove tougher bits. Don’t worry if you can’t get it all off just yet.
6. Vinegar Time! Pour some white vinegar into a spray bottle. Spray the remaining baking soda residue with vinegar. The vinegar will react with the baking soda, causing it to fizz.
7. Final Wipe Down: Once the fizzing subsides, wipe down the oven again with a clean, damp sponge or paper towels. Rinse the sponge frequently.
8. Replace the Racks: Once the oven is completely clean and dry, replace the oven racks.
9. Optional: Run the oven on low heat (around 200°F or 93°C) for about 15-20 minutes to completely dry it out.
Degreasing Your Stovetop with Ease
A greasy stovetop is a common kitchen woe. Here’s how to tackle it without harsh chemicals.
What You’ll Need:
* Baking soda
* Dish soap
* White vinegar
* Spray bottle
* Microfiber cloth or sponge
* Warm water
Step-by-Step Instructions:
1. Remove Loose Debris: Use a dry paper towel or cloth to wipe away any loose food particles or debris from the stovetop.
2. Baking Soda Sprinkle: Sprinkle a generous amount of baking soda over the entire stovetop surface, especially on greasy areas.
3. Dish Soap Boost: Add a few drops of dish soap to the baking soda. The dish soap will help to cut through the grease.
4. Vinegar Power: Fill a spray bottle with white vinegar and spray it over the baking soda and dish soap mixture. It will fizz!
5. Let it Sit: Allow the mixture to sit for about 5-10 minutes. This will give the baking soda and vinegar time to loosen the grease and grime.
6. Scrub-a-dub-dub: Use a damp microfiber cloth or sponge to scrub the stovetop. Apply a bit of pressure to remove stubborn grease stains.
7. Rinse and Wipe: Rinse the stovetop with warm water to remove the baking soda and vinegar residue. Use a clean, damp microfiber cloth to wipe the stovetop dry.
8. Shine Time: For an extra shine, you can use a glass cleaner on the stovetop surface.
Cleaning Your Microwave in Minutes (Seriously!)
This is one of my absolute favorite hacks. It’s so quick and easy!
What You’ll Need:
* Microwave-safe bowl
* Water
* White vinegar or lemon juice
Step-by-Step Instructions:
1. Fill the Bowl: Fill a microwave-safe bowl with 1 cup of water.
2. Add the Acid: Add 2 tablespoons of white vinegar or lemon juice to the water. The acid helps to loosen the grime.
3. Microwave Magic: Place the bowl in the microwave and microwave on high for 3-5 minutes, or until the water boils and the microwave is filled with steam.
4. Let it Sit (Don’t Open the Door!): Let the bowl sit in the microwave for another 5 minutes with the door closed. This allows the steam to further loosen the grime.
5. Wipe it Clean: Carefully remove the bowl (it will be hot!). Use a clean sponge or paper towel to wipe down the interior of the microwave. The grime should wipe away easily.
6. Enjoy Your Sparkling Microwave!
Freshening Up Your Dishwasher
A clean dishwasher means cleaner dishes! Here’s how to keep yours fresh and functioning optimally.
What You’ll Need:
* White vinegar
* Baking soda
Step-by-Step Instructions:
1. Vinegar Wash: Remove any dishes from the dishwasher. Place a dishwasher-safe cup or bowl filled with 1 cup of white vinegar on the top rack of the dishwasher.
2. Run a Hot Cycle: Run the dishwasher on a hot cycle without any detergent. The vinegar will help to dissolve grease, soap scum, and food particles.
3. Baking Soda Boost: Once the cycle is complete, sprinkle 1 cup of baking soda on the bottom of the dishwasher.
4. Short Hot Cycle: Run another short, hot cycle. The baking soda will help to deodorize the dishwasher.
5. Clean the Filter: Don’t forget to clean the dishwasher filter regularly! Remove the filter (usually located at the bottom of the dishwasher) and rinse it under running water to remove any food particles.
Cleaning Your Kitchen Sink Like a Boss
Your kitchen sink sees a lot of action, so it’s important to keep it clean and sanitized.
What You’ll Need:
* Baking soda
* White vinegar
* Lemon halves
* Salt (optional)
* Dish soap
* Scrub brush or sponge
Step-by-Step Instructions:
1. Rinse the Sink: Rinse the sink with warm water to remove any loose debris.
2. Baking Soda Scrub: Sprinkle a generous amount of baking soda over the entire sink surface.
3. Vinegar Fizz: Pour white vinegar over the baking soda. It will fizz!
4. Scrub-a-dub-dub (Again!): Use a scrub brush or sponge to scrub the sink thoroughly. Pay attention to the drain and any areas with stains.
5. Lemon Power: Cut a lemon in half. Sprinkle salt (optional, but it adds extra scrubbing power) on the cut side of the lemon. Use the lemon half to scrub the sink again. The lemon juice will help to disinfect and deodorize the sink.
6. Rinse and Dry: Rinse the sink thoroughly with warm water. Use a clean cloth to dry the sink.
7. Drain Deodorizer: To keep your drain smelling fresh, pour a mixture of ½ cup baking soda followed by ½ cup white vinegar down the drain. Let it fizz for about 30 minutes, then flush with hot water.
Cleaning Cutting Boards: Wood and Plastic
Cutting boards can harbor bacteria, so it’s crucial to keep them clean.
What You’ll Need:
* White vinegar
* Hydrogen peroxide
* Lemon juice
* Salt (for wood cutting boards)
* Dish soap
* Clean cloths or paper towels
Cleaning Plastic Cutting Boards:
1. Wash with Soap and Water: Wash the cutting board with hot, soapy water.
2. Disinfect with Vinegar: Spray the cutting board with white vinegar. Let it sit for a few minutes.
3. Hydrogen Peroxide Power: Spray the cutting board with hydrogen peroxide. Let it sit for a few minutes.
4. Rinse and Dry: Rinse the cutting board thoroughly with hot water and let it air dry or dry it with a clean cloth.
Cleaning Wood Cutting Boards:
1.

Conclusion
So, there you have it! These simple yet effective kitchen cleaning hacks are game-changers for anyone looking to maintain a sparkling clean and hygienic cooking space without spending hours scrubbing or breaking the bank on expensive cleaning products. We’ve covered everything from tackling stubborn grease stains to banishing unpleasant odors, all using readily available household items.
The beauty of these DIY solutions lies in their simplicity and adaptability. They’re not just about cleaning; they’re about reclaiming your time and creating a more enjoyable cooking environment. Imagine spending less time scrubbing and more time experimenting with new recipes or simply relaxing with loved ones. That’s the power of these kitchen cleaning hacks.
But why are these hacks a must-try? Because they work! They’re a testament to the fact that effective cleaning doesn’t require harsh chemicals or complicated procedures. They’re gentle on your surfaces, your wallet, and the environment. Plus, they’re incredibly satisfying to implement. There’s nothing quite like seeing a grimy stovetop transform into a gleaming surface with just a little elbow grease and the right DIY solution.
Don’t be afraid to experiment and adapt these hacks to suit your specific needs and preferences. For instance, if you’re dealing with particularly stubborn stains, you might try letting the baking soda paste sit for a longer period. Or, if you prefer a more fragrant cleaning solution, add a few drops of your favorite essential oil to the vinegar and water mixture. Lavender, lemon, and tea tree oil are all excellent choices for their antibacterial and deodorizing properties.
Consider these variations:
* For stainless steel appliances: Instead of using a harsh cleaner, try wiping them down with a microfiber cloth dampened with a mixture of white vinegar and water. This will remove fingerprints and smudges without scratching the surface.
* For wooden cutting boards: Sanitize them by rubbing them with half a lemon and sprinkling them with coarse salt. Let it sit for a few minutes, then scrub and rinse thoroughly.
* For your microwave: Steam clean it by heating a bowl of water with a few slices of lemon or lime for a few minutes. The steam will loosen any stuck-on food, making it easy to wipe clean.
* For your dishwasher: Run an empty cycle with a cup of white vinegar in the top rack to remove buildup and freshen the interior.
We truly believe that these kitchen cleaning hacks will revolutionize your cleaning routine. They’re not just about making your kitchen look good; they’re about creating a healthier and more enjoyable space for you and your family.
So, what are you waiting for? Give these DIY tricks a try and see the difference for yourself. We’re confident that you’ll be amazed by the results. And most importantly, we want to hear about your experience! Share your before-and-after photos, your favorite variations, and any other tips or tricks you’ve discovered along the way. Let’s create a community of clean kitchen enthusiasts who are passionate about sharing their knowledge and helping others achieve a sparkling clean cooking space. Head over to our social media pages and use the hashtag #DIYKitchenClean to share your success stories. We can’t wait to see what you come up with!
Frequently Asked Questions (FAQ)
Q: Are these kitchen cleaning hacks safe for all kitchen surfaces?
A: Generally, yes, these hacks are safe for most common kitchen surfaces. However, it’s always a good idea to test any new cleaning solution in an inconspicuous area first, especially on delicate surfaces like marble or granite. For example, while vinegar is a great all-purpose cleaner, its acidity can etch certain types of stone. Baking soda, while generally mild, can be abrasive on some surfaces if used too vigorously. Always use a soft cloth or sponge and avoid excessive scrubbing. If you’re unsure about a particular surface, consult the manufacturer’s instructions or a professional cleaning service.
Q: How often should I use these kitchen cleaning hacks?
A: The frequency depends on your cooking habits and how often you use your kitchen. For high-traffic areas like the stovetop and countertops, daily or every-other-day cleaning is recommended to prevent buildup. Deeper cleaning tasks, such as cleaning the oven or refrigerator, can be done on a weekly or monthly basis. The key is to stay consistent with your cleaning routine to prevent dirt and grime from accumulating. A little bit of maintenance each day can save you a lot of time and effort in the long run.
Q: Can I use these hacks to clean my oven?
A: Yes, absolutely! A baking soda paste is an excellent natural oven cleaner. Mix baking soda with water to form a thick paste, spread it all over the interior of your oven (avoiding the heating elements), and let it sit overnight. The next day, wipe away the paste with a damp cloth. For stubborn baked-on food, you can add a little vinegar to the baking soda paste. This will create a fizzing action that helps to loosen the grime. Remember to always unplug your oven before cleaning it.
Q: What if I don’t have vinegar or baking soda? Are there any alternatives?
A: While vinegar and baking soda are staples in many DIY cleaning recipes, there are alternatives you can use. Lemon juice is a great substitute for vinegar due to its acidity and pleasant scent. It’s particularly effective for cleaning cutting boards and removing stains. For baking soda, you can try using cream of tartar, which has similar abrasive properties. However, keep in mind that these alternatives may not be as effective as vinegar and baking soda for all cleaning tasks.
Q: How do I get rid of stubborn grease stains on my stovetop?
A: Stubborn grease stains can be a challenge, but a combination of baking soda and dish soap can work wonders. Sprinkle baking soda over the grease stain, then add a few drops of dish soap. Scrub the area with a damp sponge or cloth, and let it sit for a few minutes before wiping it clean. For really tough stains, you can create a paste of baking soda, dish soap, and a little water, and let it sit for a longer period before scrubbing.
Q: Are these cleaning solutions safe for pets and children?
A: Yes, these DIY cleaning solutions are generally safer for pets and children than harsh chemical cleaners. However, it’s still important to exercise caution and keep them out of reach while you’re cleaning. Vinegar, baking soda, and lemon juice are all non-toxic, but they can still cause irritation if ingested or come into contact with sensitive skin. Always rinse surfaces thoroughly after cleaning to remove any residue.
Q: How do I prevent my kitchen from getting dirty in the first place?
A: Prevention is key to maintaining a clean kitchen. Wipe up spills immediately, wash dishes after each meal, and regularly sweep or vacuum the floor. Use a splatter screen when cooking to prevent grease from splattering on your stovetop and surrounding areas. Store food properly to prevent spills and leaks in your refrigerator. By incorporating these simple habits into your daily routine, you can significantly reduce the amount of time and effort required to keep your kitchen clean.

Leave a Comment