

Growing onions in plastic bottles might sound like something out of a science fiction movie, but trust me, it’s a surprisingly effective and rewarding way to cultivate these kitchen staples right in your own home! Are you tired of buying onions that seem to sprout in your pantry before you even get a chance to use them? Or perhaps you’re dreaming of fresh, homegrown flavor but lack the sprawling garden space to make it a reality? Well, get ready to ditch those grocery store onions and embrace a clever DIY solution that’s both eco-friendly and incredibly satisfying.
Onions have been a culinary cornerstone for millennia, with evidence of their cultivation dating back to ancient Egypt and beyond. They’ve been prized not only for their distinctive flavor but also for their medicinal properties and symbolic significance in various cultures. Today, we’re taking that rich history and adapting it to the modern, space-conscious gardener.
This DIY trick is a game-changer because it allows you to maximize your yield in a minimal amount of space. Imagine transforming those discarded plastic bottles into mini onion farms, neatly arranged on your balcony, windowsill, or even a sunny corner of your kitchen! Not only will you have a constant supply of fresh onions at your fingertips, but you’ll also be contributing to a more sustainable lifestyle by repurposing materials that would otherwise end up in a landfill. So, let’s dive in and discover the secrets to successfully growing onions in plastic bottles – it’s easier than you think, and the results are simply delicious!
Growing Onions in Plastic Bottles: A DIY Guide
Hey there, fellow gardening enthusiasts! Ever thought about turning those empty plastic bottles into mini onion farms? It’s a fantastic way to recycle, save space, and enjoy fresh, homegrown onions right at your fingertips. I’ve been doing this for a while now, and I’m excited to share my tried-and-true method with you. Let’s dive in!
What You’ll Need
Before we get started, let’s gather our supplies. This is a pretty low-cost project, which is always a win in my book!
* Plastic Bottles: The size depends on the type of onion you want to grow. Larger bottles (2-liter soda bottles or even gallon-sized water jugs) are great for bulb onions, while smaller bottles work well for green onions or scallions. Make sure they’re clean!
* Potting Soil: A good quality potting mix is essential for healthy onion growth. Avoid using garden soil directly, as it can be too dense and may contain pests or diseases.
* Onion Sets or Seeds: You can use onion sets (small, immature onions) for a quicker harvest, or start from seeds if you’re feeling patient. I personally prefer sets for ease and speed.
* Scissors or a Utility Knife: For cutting the plastic bottles. Be careful!
* Drill or Nail: To create drainage holes.
* Watering Can or Spray Bottle: For watering your onions.
* Optional: Liquid Fertilizer: A balanced liquid fertilizer can give your onions a boost.
* Optional: Gloves: To keep your hands clean.
Preparing the Plastic Bottles
This is where we transform those discarded bottles into onion-growing containers. It’s a simple process, but a little bit of prep work goes a long way.
1. Clean the Bottles: Wash the plastic bottles thoroughly with soap and water to remove any residue. Rinse them well and let them dry completely. This helps prevent any mold or bacteria from affecting your onions.
2. Cut the Bottles: There are a couple of ways to cut the bottles, depending on the size and type of onion you want to grow.
* For Bulb Onions (Larger Bottles): Cut off the top third of the bottle. You can discard the top or save it to use as a mini-greenhouse cover later on. The remaining bottom portion will be your planting container.
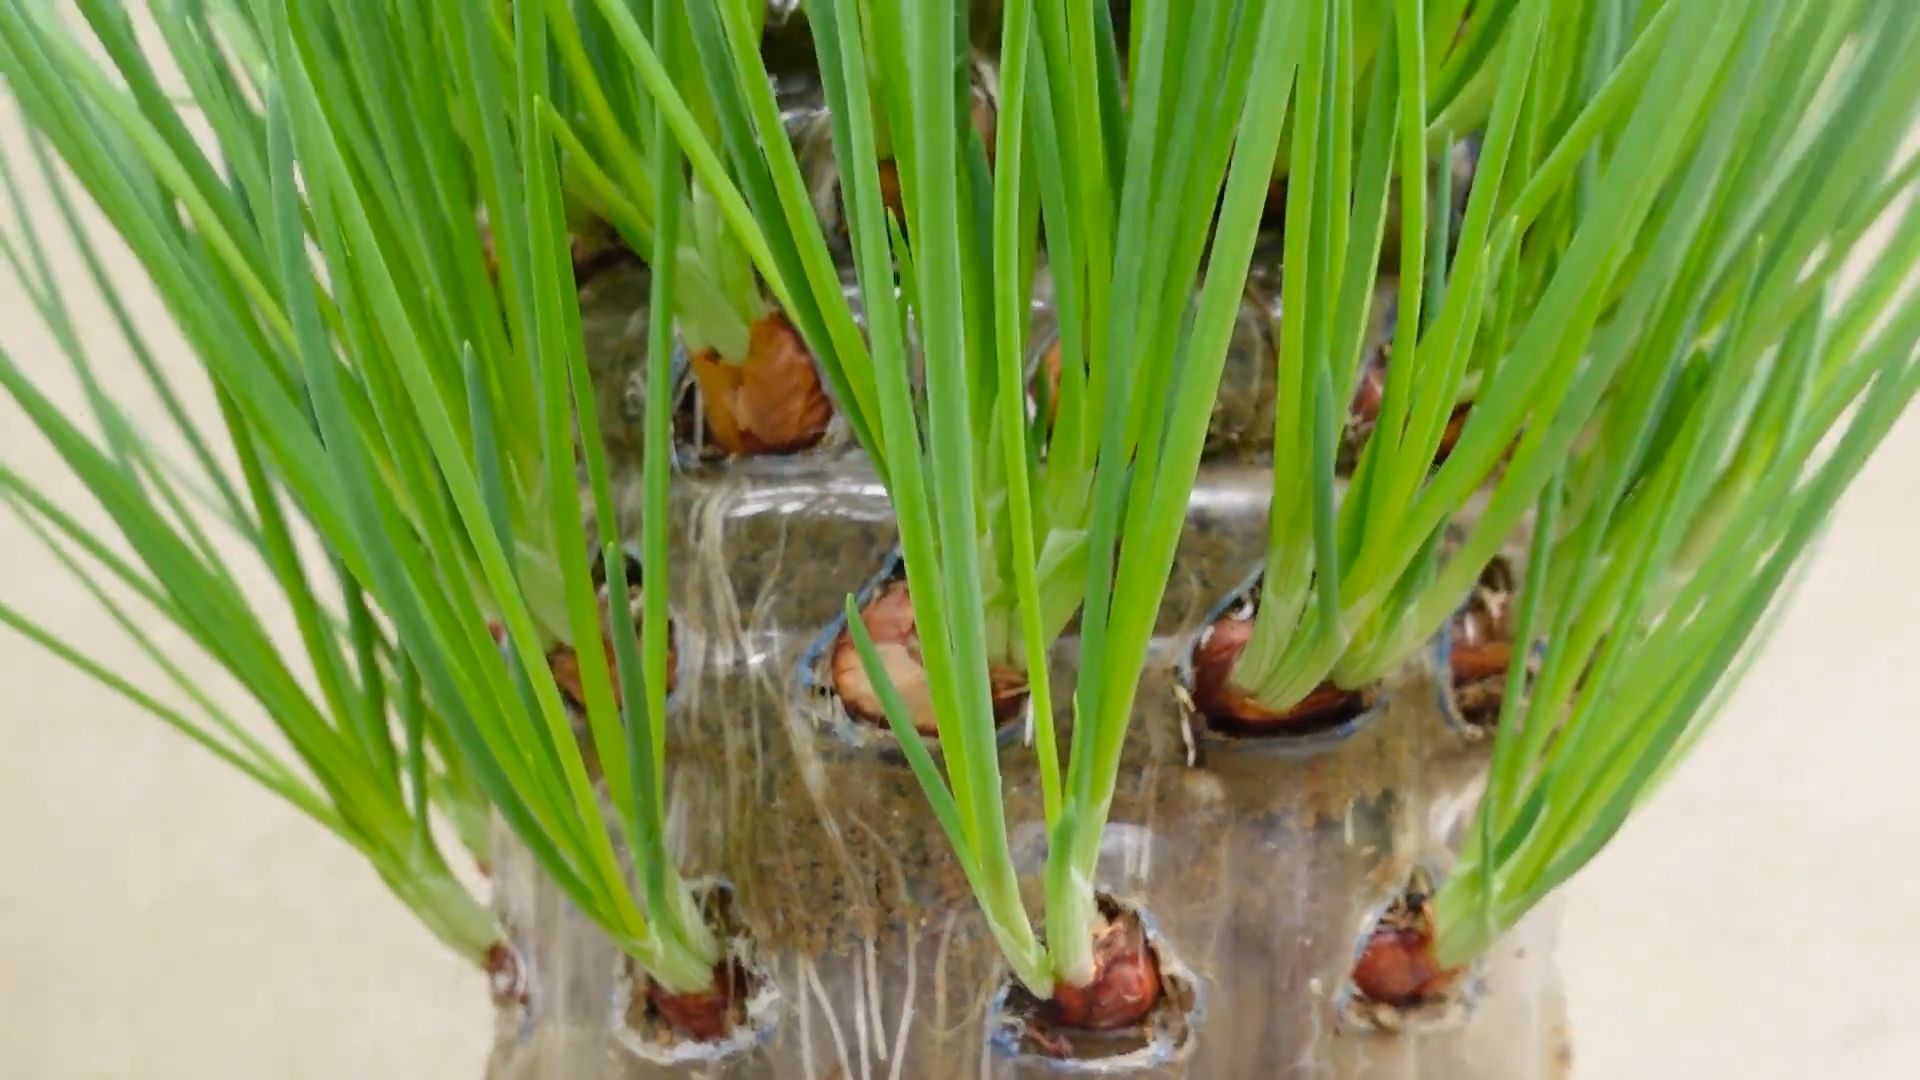
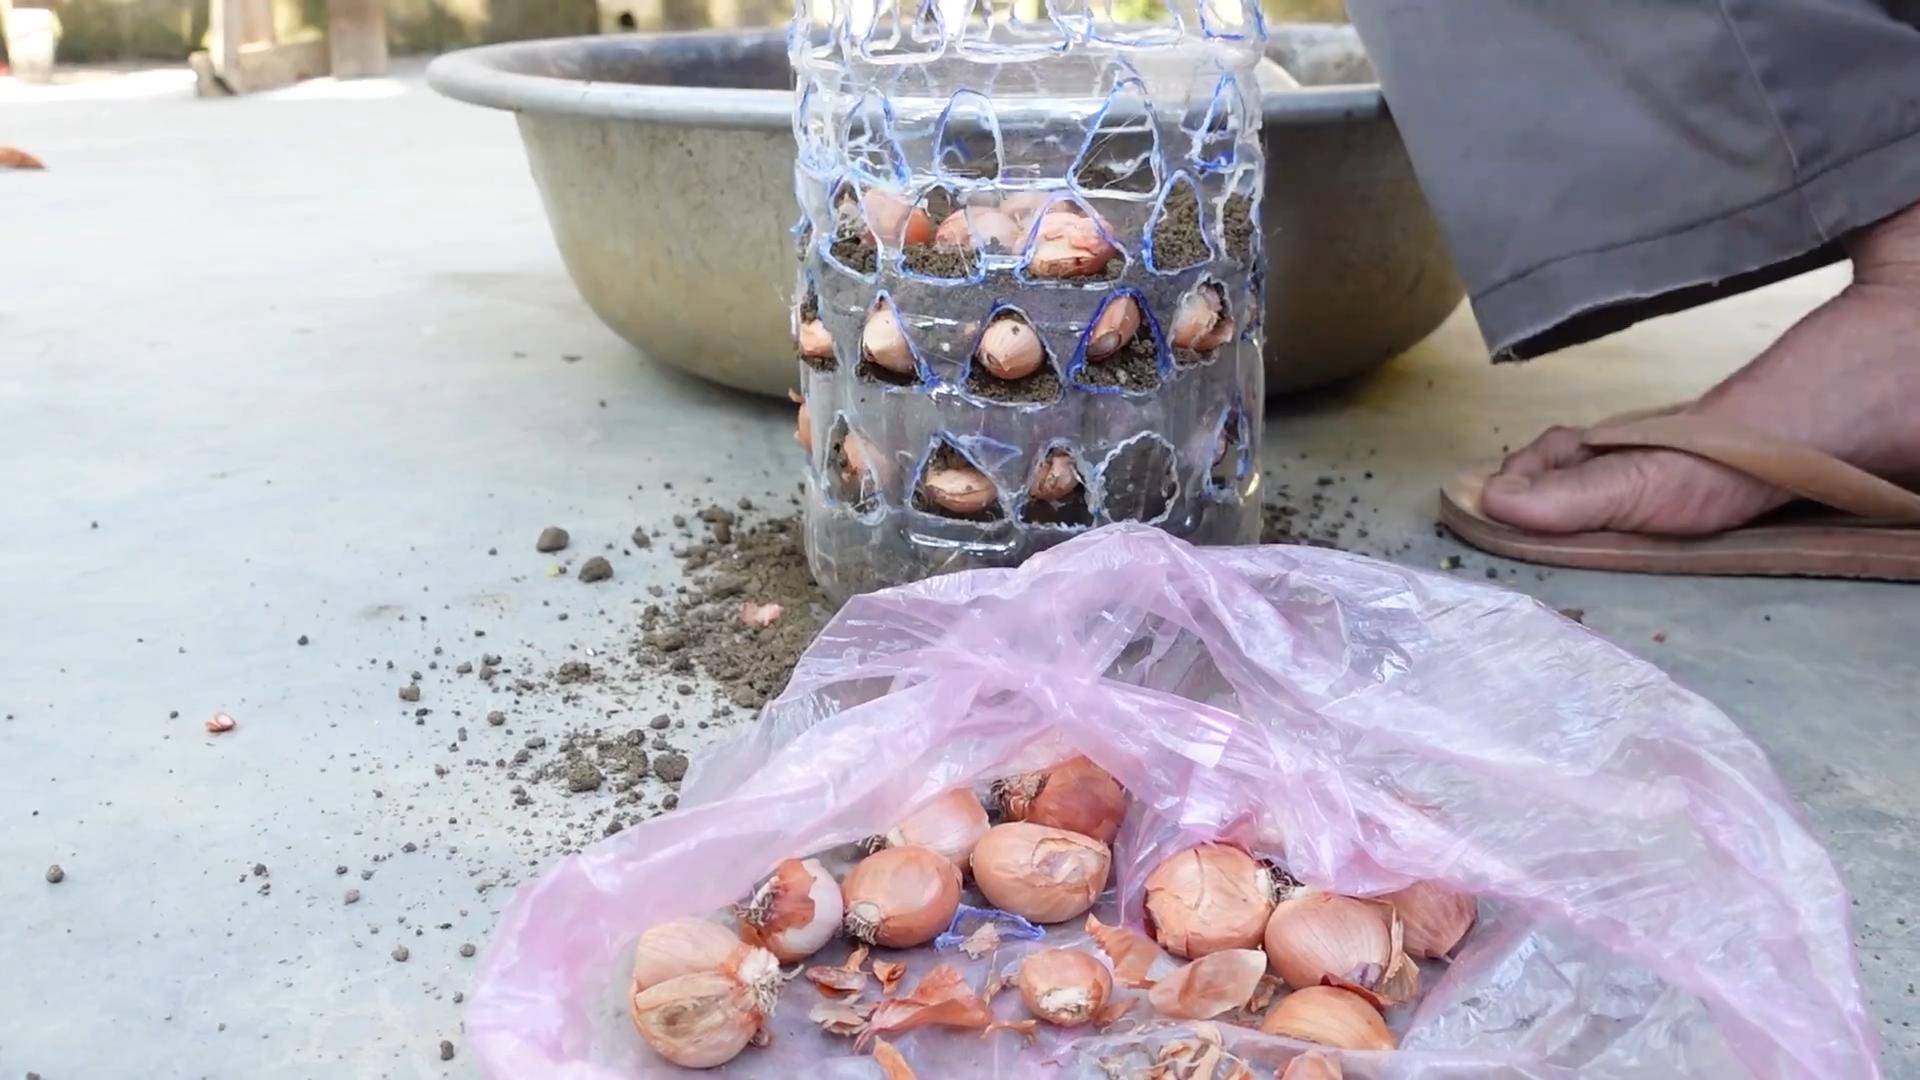
* For Green Onions/Scallions (Smaller Bottles): You can cut the bottle in half horizontally. Use the bottom half as the planting container. Alternatively, you can cut several rectangular openings along the sides of the bottle, leaving the top and bottom intact. This allows you to plant multiple green onions in one bottle.
3. Create Drainage Holes: This is crucial! Onions don’t like sitting in soggy soil. Use a drill or a nail to create several drainage holes in the bottom of the bottle. I usually make about 5-6 holes, depending on the size of the bottle.
4. Optional: Paint or Decorate: If you want to get fancy, you can paint the bottles or decorate them with markers. This is a fun way to personalize your mini-onion garden. Just make sure to use non-toxic paint.
Planting Your Onions
Now for the fun part – planting! This is where your onion dreams start to take root (literally!).
1. Fill with Potting Soil: Fill the prepared plastic bottle with potting soil, leaving about an inch of space at the top. Gently pat down the soil to remove any air pockets.
2. Plant the Onion Sets or Seeds:
* Onion Sets: Make small holes in the soil, about 1-2 inches deep, and space them about 2-3 inches apart. Place an onion set in each hole, with the pointy end facing up. Cover the sets with soil, leaving the very tip exposed.
* Onion Seeds: Sprinkle the seeds evenly over the surface of the soil. Cover them with a thin layer of soil (about ¼ inch). Gently water the soil to help the seeds settle.
3. Water Thoroughly: After planting, water the soil thoroughly until water drains out of the drainage holes. This helps to settle the soil and provide moisture for the onions to start growing.
Caring for Your Onions
Proper care is essential for healthy onion growth. Here’s what you need to do to keep your onions happy and thriving.
1. Sunlight: Onions need plenty of sunlight to grow well. Place your plastic bottle containers in a sunny location that receives at least 6-8 hours of direct sunlight per day. A south-facing window or a sunny balcony is ideal.
2. Watering: Water your onions regularly, but avoid overwatering. The soil should be consistently moist, but not soggy. Check the soil moisture by sticking your finger into the soil. If the top inch feels dry, it’s time to water. Water at the base of the plant to avoid wetting the foliage, which can lead to fungal diseases.
3. Fertilizing: Onions are heavy feeders, so they benefit from regular fertilization. Use a balanced liquid fertilizer (e.g., 10-10-10) diluted to half strength. Fertilize every 2-3 weeks during the growing season. Follow the instructions on the fertilizer label.
4. Weeding: Keep the soil around your onions free of weeds. Weeds compete with onions for nutrients and water. Hand-pull any weeds that appear.
5. Pest and Disease Control: Keep an eye out for pests and diseases. Common onion pests include onion thrips and onion maggots. Diseases include downy mildew and onion rot. If you notice any problems, treat them promptly with appropriate organic pesticides or fungicides. Prevention is key! Good air circulation and proper watering can help prevent many diseases.
Harvesting Your Onions
The moment you’ve been waiting for – harvesting your homegrown onions!
1. When to Harvest:
* Green Onions/Scallions: You can start harvesting green onions or scallions when they are about 6-8 inches tall. Simply snip off the green tops with scissors, leaving about an inch of the base intact. The onions will continue to grow, and you can harvest them multiple times.
* Bulb Onions: Bulb onions are ready to harvest when the tops start to turn yellow and fall over. This usually happens about 90-120 days after planting.
2. How to Harvest:
* Green Onions/Scallions: As mentioned above, simply snip off the green tops with scissors.
* Bulb Onions: Gently loosen the soil around the onion bulb with a trowel. Carefully pull the onion out of the soil, being careful not to damage the bulb.
3. Curing Bulb Onions: After harvesting bulb onions, you need to cure them to improve their storage life. Spread the onions out in a single layer in a warm, dry, well-ventilated place for about 2-3 weeks. The outer skins will dry and become papery.
4. Storing Onions: Store cured bulb onions in a cool, dry, and dark place. A mesh bag or a well-ventilated container is ideal. Green onions/scallions are best used fresh, but you can store them in the refrigerator for a few days.
Troubleshooting
Even with the best care, you might encounter some challenges. Here are a few common problems and how to address them:
* Yellowing Leaves: This could be a sign of overwatering, underwatering, nutrient deficiency, or pest infestation. Check the soil moisture, fertilize if necessary, and inspect for pests.
* Slow Growth: This could be due to insufficient sunlight, poor soil, or lack of fertilizer. Make sure your onions are getting enough sunlight, use a good quality potting mix, and fertilize regularly.
* Rotting Bulbs: This is usually caused by overwatering or poor drainage. Make sure your plastic bottles have adequate drainage holes and avoid overwatering.
Tips and Tricks
Here are a few extra tips to help you succeed with growing onions in plastic bottles:
* Rotate Your Crops: Don’t plant onions in the same plastic bottle year after year. Rotate your crops to prevent soilborne diseases.
* Companion Planting: Plant onions with companion plants like carrots, chamomile, and marigolds. These plants can help deter pests and improve onion growth.
* Use Different Varieties: Experiment with different varieties of onions to find the ones that grow best in your climate and conditions.
* Label Your Bottles: Label each bottle with the type of onion you’re growing and the planting date. This will help you keep track of your progress.
* Get Creative: Don’t be afraid to experiment with different bottle sizes, planting techniques, and growing conditions. Gardening is all about learning and having fun!
Growing onions
Conclusion
So, there you have it! Growing onions in plastic bottles isn’t just a quirky gardening experiment; it’s a genuinely effective way to maximize your space, recycle materials, and enjoy a continuous supply of fresh, flavorful onions. This method is particularly beneficial for urban gardeners, those with limited outdoor space, or anyone looking for a creative and sustainable gardening solution.
The beauty of this DIY trick lies in its simplicity and adaptability. You don’t need fancy equipment or a green thumb to get started. The process is straightforward, and the results are incredibly rewarding. Imagine the satisfaction of harvesting your own onions, knowing that you nurtured them from tiny seedlings within recycled plastic bottles.
Beyond the practical benefits, growing onions in plastic bottles offers a unique opportunity to connect with nature and appreciate the miracle of plant growth. It’s a fantastic educational project for children, teaching them about sustainability, resourcefulness, and the importance of food production.
Why is this a must-try? Because it’s a win-win situation! You’re reducing waste by repurposing plastic bottles, saving money on store-bought onions, and enjoying the freshest possible ingredients in your cooking. Plus, it’s a conversation starter! Your friends and neighbors will be amazed by your ingenuity and resourcefulness.
Looking for variations? Consider experimenting with different onion varieties. Shallots, scallions, and even garlic can be grown using this method. You can also try adding different types of soil amendments to see how they affect the growth and flavor of your onions. Some gardeners have had success adding compost tea or worm castings to the watering routine for an extra boost of nutrients. Another variation is to paint the plastic bottles a lighter color to reflect sunlight and prevent the soil from overheating in warmer climates. You can also create a vertical garden by stacking the bottles on top of each other, creating a visually appealing and space-saving display.
We wholeheartedly encourage you to give this DIY trick a try. It’s a fun, rewarding, and sustainable way to grow your own onions. Don’t be afraid to experiment and adapt the method to suit your specific needs and preferences.
Once you’ve tried growing onions in plastic bottles, we’d love to hear about your experience! Share your photos, tips, and challenges in the comments section below. Let’s create a community of resourceful gardeners who are passionate about sustainable food production. Your insights could inspire others to embrace this innovative gardening technique and reap the many benefits it offers. Happy gardening!
Frequently Asked Questions (FAQ)
What type of plastic bottles are best for growing onions?
Ideally, you should use sturdy, food-grade plastic bottles. Two-liter soda bottles or larger water bottles work well. Make sure the bottles are clean and free of any residue before using them. Avoid using bottles that have contained harsh chemicals or pesticides. The thicker the plastic, the more durable the bottle will be, especially if you plan to reuse them for multiple growing seasons. Clear or translucent bottles are preferable as they allow you to monitor the soil moisture levels and root development.
What type of soil should I use for growing onions in plastic bottles?
A well-draining potting mix is essential. Onions need soil that retains moisture but doesn’t become waterlogged. A mix of equal parts potting soil, compost, and perlite or vermiculite is a good starting point. The compost provides nutrients, while the perlite or vermiculite improves drainage and aeration. Avoid using garden soil, as it can be too heavy and compact, hindering root growth. You can also add a slow-release fertilizer to the soil mix to provide a steady supply of nutrients throughout the growing season.
How often should I water my onions grown in plastic bottles?
Watering frequency depends on the climate, the type of soil, and the size of the bottle. Generally, you should water your onions when the top inch of soil feels dry to the touch. Avoid overwatering, as this can lead to root rot. Ensure the bottles have drainage holes to allow excess water to escape. During hot, dry weather, you may need to water daily, while during cooler, wetter periods, you may only need to water every few days. Check the soil moisture regularly and adjust your watering schedule accordingly.
How much sunlight do onions need when grown in plastic bottles?
Onions need at least 6-8 hours of direct sunlight per day to thrive. Place your plastic bottle gardens in a sunny location, such as a south-facing balcony or windowsill. If you don’t have enough natural sunlight, you can supplement with grow lights. Rotate the bottles regularly to ensure that all sides of the plants receive equal sunlight. Insufficient sunlight can result in weak, leggy growth and reduced bulb size.
How do I fertilize onions grown in plastic bottles?
Onions are heavy feeders and benefit from regular fertilization. You can use a balanced liquid fertilizer diluted to half strength every 2-3 weeks. Alternatively, you can add a slow-release fertilizer to the soil mix at planting time. Avoid over-fertilizing, as this can burn the roots. Look for fertilizers that are specifically formulated for vegetables or onions. Compost tea or worm castings can also be used as a natural fertilizer.
How do I prevent pests and diseases when growing onions in plastic bottles?
Regularly inspect your plants for signs of pests or diseases. Common onion pests include thrips, onion maggots, and aphids. You can control these pests with insecticidal soap or neem oil. Diseases such as onion rot and downy mildew can be prevented by ensuring good air circulation and avoiding overwatering. Remove any infected leaves or plants immediately to prevent the spread of disease. Consider using organic pest control methods to minimize the use of harmful chemicals.
When is the best time to harvest onions grown in plastic bottles?
Onions are typically ready to harvest when the tops begin to turn yellow and fall over. This usually occurs about 90-120 days after planting. Gently pull the onions from the bottles and allow them to dry in a well-ventilated area for a few days before storing them. You can also harvest green onions (scallions) at any time by snipping off the green tops.
Can I reuse the plastic bottles for growing onions again?
Yes, you can reuse the plastic bottles for multiple growing seasons. However, it’s important to clean them thoroughly between uses to prevent the spread of diseases. Wash the bottles with soap and water, and then disinfect them with a solution of bleach and water (1 part bleach to 9 parts water). Rinse the bottles thoroughly before using them again. Inspect the bottles for any cracks or damage and replace them if necessary.
What are the benefits of growing onions in plastic bottles compared to traditional gardening?
Growing onions in plastic bottles offers several advantages:
* **Space-saving:** Ideal for small spaces like balconies or patios.
* **Recycling:** Repurposes plastic bottles, reducing waste.
* **Portability:** Easy to move the plants to different locations.
* **Pest control:** Easier to monitor and control pests.
* **Soil control:** Allows you to use a specific soil mix tailored to onions.
* **Accessibility:** Makes gardening more accessible for people with mobility issues.
Can I grow other vegetables in plastic bottles using the same method?
Yes, many other vegetables can be grown in plastic bottles, including herbs, lettuce, spinach, tomatoes, peppers, and strawberries. The key is to choose vegetables that are suitable for container gardening and to provide them with the appropriate soil, water, and sunlight. Research the specific needs of each vegetable before planting them in plastic bottles.

Leave a Comment