

Grow Bell Peppers from Seed and unlock a world of vibrant colors and delicious flavors right in your own backyard! Have you ever imagined biting into a crisp, juicy bell pepper that you nurtured from a tiny seed? It’s an incredibly rewarding experience, and trust me, it’s easier than you think! For centuries, bell peppers have been a staple in cuisines around the globe, adding a touch of sweetness and a burst of color to countless dishes. Originating in Central and South America, these versatile veggies have journeyed across continents, becoming a beloved ingredient in everything from stir-fries to salads.
But why should you bother learning how to grow bell peppers from seed yourself? Well, for starters, you’ll have access to a wider variety of pepper types than you’d typically find at the grocery store. Plus, you’ll know exactly what went into growing them – no mystery pesticides or questionable practices! In today’s world, where sustainability and healthy eating are more important than ever, taking control of your food source is a powerful step. I’m here to guide you through the entire process, from selecting the perfect seeds to harvesting your bountiful crop. Get ready to roll up your sleeves and discover the joy of growing your own bell peppers!
Growing Bell Peppers from Seed: A Comprehensive DIY Guide
Hey there, fellow gardening enthusiasts! I’m so excited to share my tried-and-true method for growing vibrant, delicious bell peppers from seed. It’s a rewarding process, and trust me, the taste of a homegrown pepper is unmatched. This guide will walk you through every step, from selecting your seeds to transplanting your seedlings. Let’s get started!
Choosing Your Bell Pepper Seeds
Before we dive into the nitty-gritty, let’s talk about seed selection. This is a crucial step, as it determines the type of peppers you’ll be enjoying later.
* Consider your climate: Some varieties thrive in warmer climates, while others are more cold-tolerant. Check the seed packet for information on the ideal growing conditions.
* Think about color and size: Bell peppers come in a rainbow of colors – red, yellow, orange, green, and even purple! Choose the colors you love and consider the size you prefer. Some varieties produce larger, blocky peppers, while others are smaller and more elongated.
* Read reviews: Online reviews can provide valuable insights into the germination rates and overall performance of different seed brands and varieties.
* Opt for organic seeds: If you’re committed to organic gardening, choose seeds that are certified organic.
Materials You’ll Need
Here’s a list of everything you’ll need to successfully grow bell peppers from seed:
* Bell pepper seeds (of course!)
* Seed starting trays or small pots
* Seed starting mix (a light, well-draining mix is essential)
* Watering can or spray bottle
* Heat mat (optional, but highly recommended)
* Grow lights (optional, but beneficial)
* Clear plastic dome or plastic wrap
* Small labels and a permanent marker
* Larger pots for transplanting (3-5 gallon size)
* Potting soil (for transplanting)
* Fertilizer (specifically formulated for peppers or tomatoes)
* Gardening gloves
* Trowel or small shovel
Phase 1: Starting Your Seeds Indoors
Bell peppers have a relatively long growing season, so starting them indoors is crucial, especially if you live in a cooler climate. I usually start my seeds about 8-10 weeks before the last expected frost.
1. Prepare your seed starting trays or pots: Fill each cell or pot with seed starting mix. Gently tap the tray or pot to settle the mix.
2. Sow the seeds: Make a small indentation (about ¼ inch deep) in the center of each cell or pot. Place 2-3 seeds in each indentation. This increases your chances of at least one seed germinating.
3. Cover the seeds: Gently cover the seeds with seed starting mix. Lightly pat the surface.
4. Water thoroughly: Use a watering can or spray bottle to thoroughly moisten the seed starting mix. Be careful not to overwater, as this can lead to damping off (a fungal disease that can kill seedlings).
5. Cover with a dome or plastic wrap: This helps to create a humid environment, which is essential for germination.
6. Place on a heat mat (optional): Bell pepper seeds germinate best in warm temperatures (around 75-85°F). A heat mat can significantly improve germination rates.
7. Provide light: Place the seed starting trays or pots under grow lights or in a sunny window. If using a window, rotate the trays or pots regularly to ensure even light exposure.
8. Monitor moisture levels: Check the seed starting mix daily and water as needed to keep it consistently moist but not soggy. Remove the dome or plastic wrap for a few hours each day to allow for air circulation.
9. Wait for germination: Bell pepper seeds typically germinate in 7-14 days. Be patient!
10. Remove from heat mat and dome: Once the seeds have germinated, remove the heat mat and dome or plastic wrap. This will help prevent damping off.
Phase 2: Caring for Your Seedlings
Once your seeds have germinated, it’s time to focus on nurturing your seedlings.
1. Provide adequate light: Continue to provide your seedlings with plenty of light. If using grow lights, keep them a few inches above the seedlings. If using a window, make sure the seedlings are getting at least 6 hours of direct sunlight per day.
2. Water regularly: Water your seedlings whenever the top inch of soil feels dry to the touch. Be careful not to overwater.
3. Thin the seedlings: Once the seedlings have developed their first set of true leaves (the leaves that look like miniature pepper leaves), thin them to one seedling per cell or pot. Choose the strongest, healthiest-looking seedling and snip off the others at the soil line. Don’t pull them out, as this can disturb the roots of the remaining seedling.
3. Fertilize lightly: Start fertilizing your seedlings with a diluted liquid fertilizer (specifically formulated for peppers or tomatoes) about once a week. Follow the instructions on the fertilizer label.
4. Harden off the seedlings: About a week or two before you plan to transplant your seedlings outdoors, you’ll need to “harden them off.” This process gradually acclimates the seedlings to outdoor conditions, such as sunlight, wind, and temperature fluctuations. Start by placing the seedlings outdoors in a sheltered location for a few hours each day. Gradually increase the amount of time they spend outdoors each day, and also gradually expose them to more sunlight and wind.
Phase 3: Transplanting Your Seedlings Outdoors
The moment we’ve been waiting for! Transplanting your seedlings outdoors is a significant step.
1. Choose a sunny location: Bell peppers need at least 6-8 hours of direct sunlight per day. Choose a location in your garden that receives plenty of sun.
2. Prepare the soil: Bell peppers prefer well-drained soil that is rich in organic matter. Amend your soil with compost or other organic matter before transplanting.
3. Transplant on a cloudy day: Avoid transplanting on a hot, sunny day, as this can stress the seedlings. A cloudy day is ideal.
4. Dig holes: Dig holes that are slightly larger than the root balls of your seedlings. Space the holes about 18-24 inches apart.
5. Remove the seedlings from their pots: Gently remove the seedlings from their pots. If the roots are tightly bound, gently loosen them with your fingers.
6. Place the seedlings in the holes: Place the seedlings in the holes, making sure that the top of the root ball is level with the surrounding soil.
7. Fill the holes with soil: Fill the holes with soil and gently pat the soil around the seedlings.
8. Water thoroughly: Water the seedlings thoroughly after transplanting.
9. Add mulch: Add a layer of mulch around the seedlings to help retain moisture and suppress weeds.
10. Provide support (optional): As your bell pepper plants grow, they may need support to prevent them from falling over. You can use stakes, cages, or trellises to provide support.
Phase 4: Ongoing Care
Your bell pepper plants are now in their permanent home! Here’s how to keep them thriving.
1. Water regularly: Water your bell pepper plants whenever the top inch of soil feels dry to the touch. Water deeply and thoroughly, and avoid getting water on the leaves, as this can promote fungal diseases.
2. Fertilize regularly: Continue to fertilize your bell pepper plants with a fertilizer specifically formulated for peppers or tomatoes. Follow the instructions on the fertilizer label. I usually fertilize every 2-3 weeks.
3. Pinch off suckers: Suckers are small shoots that grow from the base of the plant or from the joints between the main stem and the branches. Pinching off these suckers will encourage the plant to focus its energy on producing peppers.
4. Watch out for pests and diseases: Bell peppers can be susceptible to a variety of pests and diseases, such as aphids, flea beetles, and blossom end rot. Inspect your plants regularly for signs of pests or diseases, and take appropriate action if necessary.
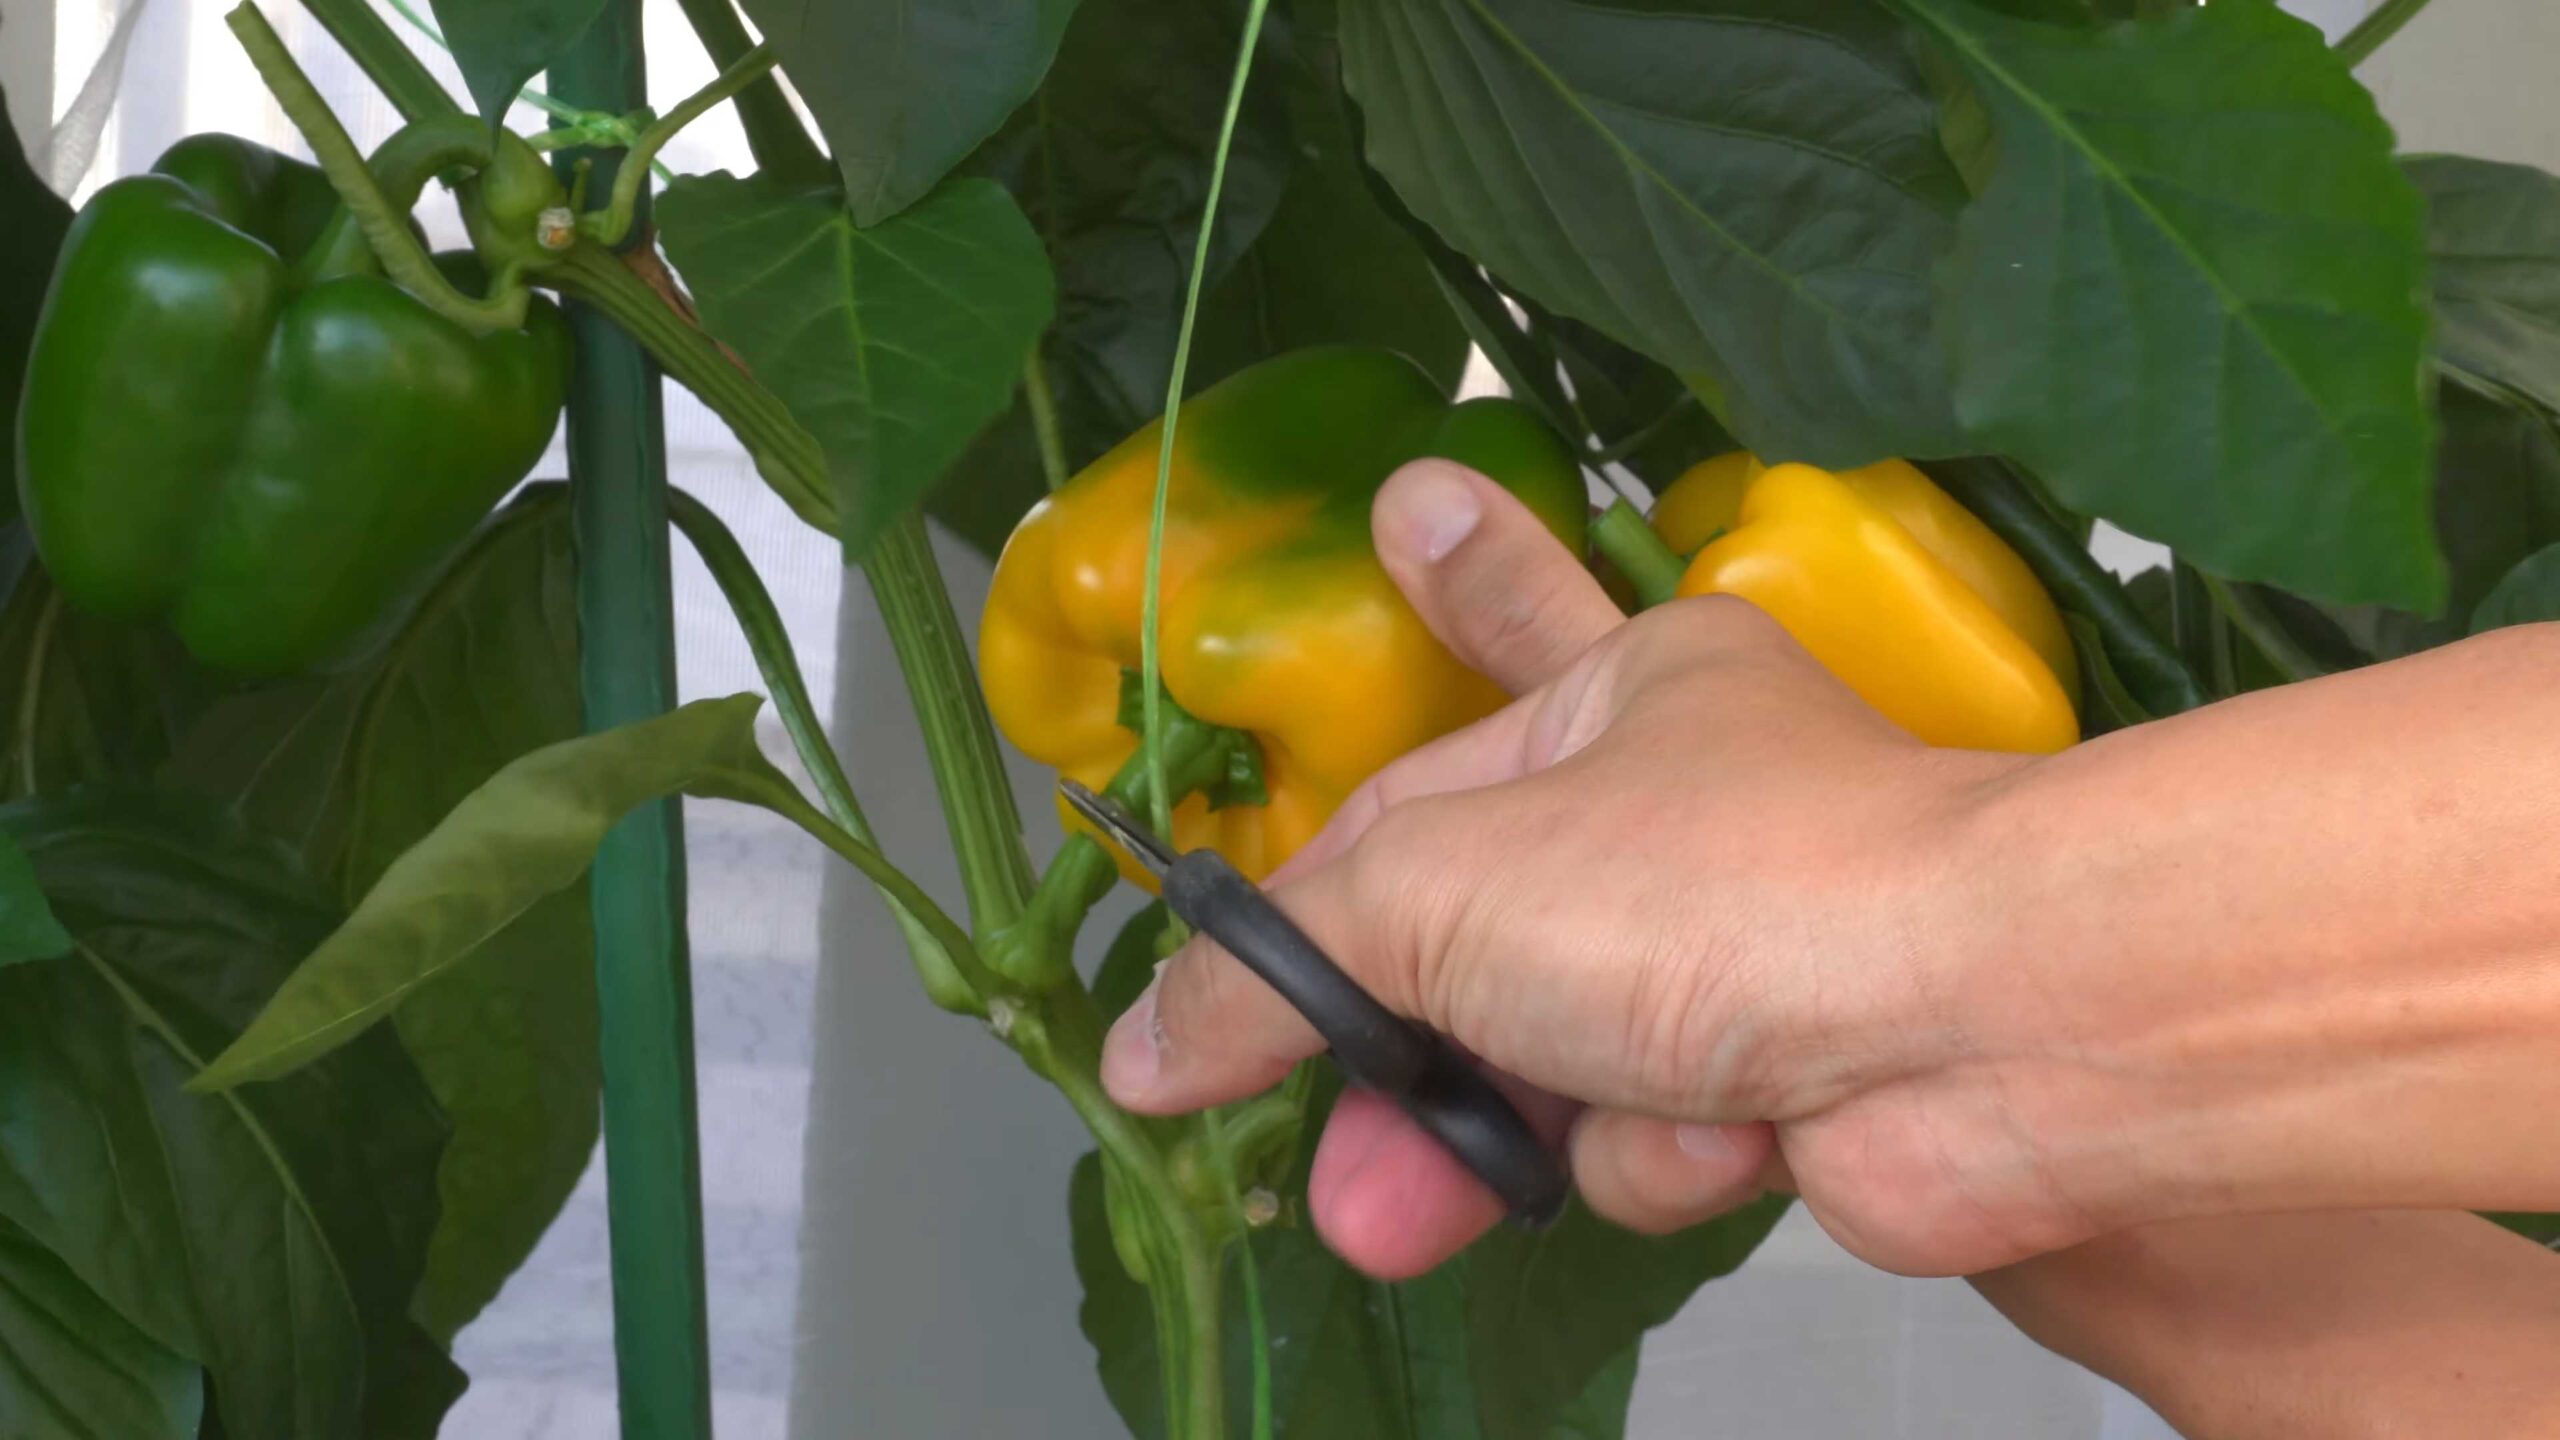
5. Harvest your peppers: Bell peppers are typically ready to harvest about 60-90 days after transplanting. The peppers will be firm and brightly colored. Use a sharp knife or scissors to cut the peppers from the plant.
Troubleshooting
Even with the best care, you might encounter some challenges. Here are a few common issues and how to address them:
* Blossom end rot: This is a condition that causes the bottom of the peppers to rot. It’s usually caused by a calcium deficiency. To prevent blossom end rot, make sure your soil is rich in calcium and water your plants regularly. You can also add calcium to the soil by adding crushed eggshells or bone meal.
* Aphids: These tiny insects can

Conclusion
So, there you have it! Growing bell peppers from seed might seem daunting at first, but with a little patience and the right approach, you can cultivate a thriving pepper patch right in your own home or garden. This DIY trick isn’t just about saving money; it’s about connecting with the food you eat, understanding the growing process, and experiencing the immense satisfaction of nurturing a plant from a tiny seed to a bountiful harvest.
Think about it: you’re not just buying bell peppers at the store; you’re creating them. You’re choosing the varieties you love most, ensuring they’re grown organically (if you wish), and enjoying the freshest, most flavorful peppers imaginable. The difference in taste between a store-bought pepper and one you’ve nurtured yourself is truly remarkable.
Beyond the basic method, there’s a world of variations to explore. Experiment with different bell pepper varieties – from the classic green to the vibrant yellow, orange, and red, or even the sweeter purple and chocolate varieties. Try starting your seeds in different types of containers, from peat pots to recycled egg cartons. Consider using a heat mat to accelerate germination, or a grow light to supplement natural sunlight.
For those looking for a spicier kick, why not try growing some hot peppers alongside your bell peppers? Just be sure to keep them separated to avoid cross-pollination if you’re saving seeds for future planting. You can also experiment with companion planting, placing herbs like basil or marigolds near your bell peppers to deter pests and attract beneficial insects.
Growing bell peppers from seed is a rewarding experience that offers numerous benefits. It’s a cost-effective way to enjoy fresh, flavorful peppers, a chance to connect with nature, and a fun and educational activity for the whole family.
Don’t be afraid to experiment and adapt the process to suit your own needs and preferences. Every garden is unique, and what works for one person may not work for another. The key is to be patient, observant, and willing to learn from your mistakes.
We wholeheartedly encourage you to give this DIY trick a try. Start small, perhaps with just a few seeds, and see how it goes. You might be surprised at how easy and enjoyable it is. And most importantly, we want to hear about your experience! Share your tips, tricks, and successes (and even your failures) in the comments below. Let’s create a community of bell pepper growers and learn from each other. Happy gardening!
Frequently Asked Questions (FAQ)
What is the best time to start bell pepper seeds indoors?
The ideal time to start your bell pepper seeds indoors is typically 6-8 weeks before the last expected frost in your area. This allows the seedlings to develop a strong root system and be ready for transplanting outdoors once the weather warms up. To determine your last frost date, consult your local weather service or gardening resources. Starting too early can result in leggy, weak seedlings, while starting too late may not give them enough time to mature before the growing season ends.
What kind of soil should I use for starting bell pepper seeds?
Use a high-quality seed starting mix that is lightweight, well-draining, and sterile. Avoid using garden soil, as it can be too heavy and may contain pathogens that can harm your seedlings. Seed starting mixes are specifically formulated to provide the ideal environment for germination and early growth. You can find these mixes at most garden centers or online retailers. Look for mixes that contain ingredients like peat moss, vermiculite, and perlite.
How often should I water my bell pepper seedlings?
Keep the soil consistently moist, but not waterlogged. Water when the top inch of soil feels dry to the touch. Overwatering can lead to root rot, while underwatering can stunt growth. Use a gentle watering can or spray bottle to avoid disturbing the delicate seedlings. Bottom watering is also a good option; simply place the seed starting tray in a shallow dish of water and allow the soil to absorb the moisture from below.
Do bell pepper seedlings need sunlight?
Yes, bell pepper seedlings need plenty of light to grow strong and healthy. If you don’t have a sunny windowsill that receives at least 6-8 hours of direct sunlight per day, you’ll need to supplement with artificial light. Fluorescent grow lights or LED grow lights are excellent options. Position the lights a few inches above the seedlings and adjust the height as they grow.
When can I transplant my bell pepper seedlings outdoors?
Transplant your bell pepper seedlings outdoors when the danger of frost has passed and the soil has warmed up to at least 60°F (15°C). Harden off the seedlings for a week or two before transplanting by gradually exposing them to outdoor conditions. Start by placing them in a sheltered location for a few hours each day, gradually increasing the amount of time they spend outdoors. This will help them acclimate to the sun, wind, and temperature changes.
What kind of fertilizer should I use for bell pepper plants?
Once your bell pepper plants are established outdoors, fertilize them regularly with a balanced fertilizer that is specifically formulated for vegetables. Follow the instructions on the fertilizer package for application rates and frequency. You can also use organic fertilizers like compost tea or fish emulsion. Avoid over-fertilizing, as this can lead to excessive foliage growth at the expense of fruit production.
How do I prevent pests and diseases from affecting my bell pepper plants?
Monitor your bell pepper plants regularly for signs of pests and diseases. Common pests include aphids, flea beetles, and spider mites. Diseases include blossom-end rot, fungal leaf spots, and viral infections. Use organic pest control methods like insecticidal soap or neem oil to control pests. Ensure good air circulation around your plants to prevent fungal diseases. Provide adequate water and nutrients to keep your plants healthy and resistant to disease.
Why are my bell pepper flowers falling off?
Bell pepper flowers can fall off for a variety of reasons, including temperature stress, lack of pollination, and nutrient deficiencies. Temperatures that are too hot or too cold can cause flower drop. Ensure your plants are getting adequate water and nutrients. You can also try hand-pollinating the flowers by gently shaking the plants or using a small paintbrush to transfer pollen from one flower to another.
How long does it take for bell peppers to mature?
Bell peppers typically take 60-90 days to mature from transplanting, depending on the variety. Green bell peppers can be harvested when they are firm and fully sized, even if they are still green. Colored bell peppers (red, yellow, orange) will take longer to mature and will develop their color as they ripen.
Can I save seeds from my bell peppers?
Yes, you can save seeds from your bell peppers, but keep in mind that they may not come true to type if the plants were cross-pollinated with other pepper varieties. To save seeds, allow the peppers to fully ripen on the plant. Remove the seeds from the pepper and dry them thoroughly on a paper towel. Store the dried seeds in an airtight container in a cool, dark place.
Leave a Comment