

Clean window tracks – those often-overlooked crevices – can be a real pain, right? I know I’ve definitely put off cleaning mine for way too long! But what if I told you that sparkling clean window tracks are not only achievable but also surprisingly easy to accomplish with a few simple DIY tricks?
Think about it: window tracks are the unsung heroes of our homes, guiding our windows smoothly open and closed, letting in that fresh air and sunshine. Yet, they often become repositories for dust, dirt, grime, and even the occasional insect graveyard. This buildup not only looks unsightly but can also hinder the proper functioning of your windows, making them harder to open and close and potentially leading to damage over time.
While the concept of window tracks may seem modern, the need to keep window mechanisms clean is as old as windows themselves! Historically, keeping these areas free of debris was crucial for proper ventilation and preventing drafts, especially in older homes. Today, the benefits remain the same: a cleaner home, smoother window operation, and even improved energy efficiency.
This DIY guide is your secret weapon for conquering those grimy window tracks. I’m going to share some simple, effective, and budget-friendly methods that will transform your window tracks from eyesores to sparkling clean features in no time. Get ready to say goodbye to stubborn dirt and hello to effortlessly gliding windows! Let’s dive into these clean window tracks hacks!
DIY Window Track Cleaning: A Sparkling Solution!
Okay, let’s be honest, cleaning window tracks is probably on everyone’s “least favorite chores” list. But, grimy window tracks not only look awful, they can also hinder your windows from opening and closing smoothly. Plus, all that dirt and debris can actually damage your window hardware over time. So, let’s tackle this head-on! I’m going to walk you through a super effective DIY method that uses common household items. Get ready to say goodbye to that stubborn grime!
What You’ll Need: The Arsenal of Clean
Before we dive in, let’s gather our supplies. This is a pretty low-cost project, which is always a win!
* Vacuum Cleaner with a Hose Attachment and Brush: This is our first line of defense against loose dirt and debris.
* Old Toothbrush or Small Scrub Brush: For getting into those tight corners and scrubbing away stubborn grime.
* Baking Soda: Our natural cleaning powerhouse! It’s abrasive enough to lift dirt but gentle enough not to scratch.
* White Vinegar: The baking soda’s best friend! The fizzing action helps loosen grime and disinfects.
* Dish Soap: For extra cleaning power and cutting through grease.
* Spray Bottle: To easily apply our cleaning solution.
* Paper Towels or Cleaning Rags: For wiping away the mess.
* Cotton Swabs: For those super hard-to-reach spots.
* Putty Knife or Flathead Screwdriver (Optional): Wrapped in a cloth, this can help dislodge stubborn debris.
* Safety Glasses (Optional): To protect your eyes from splashes.
* Gloves (Optional): To protect your hands.
Step-by-Step Cleaning Guide: From Grimy to Gleaming
Alright, let’s get down to business! Here’s how I tackle those dreaded window tracks:
1. Vacuum the Loose Debris:
* Attach the hose attachment to your vacuum cleaner.
* Use the brush attachment to gently loosen any stuck-on dirt.
* Thoroughly vacuum the entire window track, paying close attention to the corners and edges. Get as much of the loose dirt, dust, and dead bugs out as possible. This step is crucial because it prevents you from just smearing the dirt around when you start cleaning with liquids.
2. Baking Soda Application:
* Generously sprinkle baking soda all over the window tracks. Don’t be shy! You want a good layer of baking soda covering the grime.
* Focus on areas with heavy buildup. The baking soda will act as a gentle abrasive to help loosen the dirt.
3. Vinegar Activation: The Fizzing Fun Begins!
* Pour or spray white vinegar onto the baking soda. You’ll see it start to fizz – that’s exactly what we want! The chemical reaction between the baking soda and vinegar helps to break down the grime and dirt.
* Let the mixture fizz for about 5-10 minutes. This gives it time to really work its magic. The longer you let it sit, the easier the next steps will be.
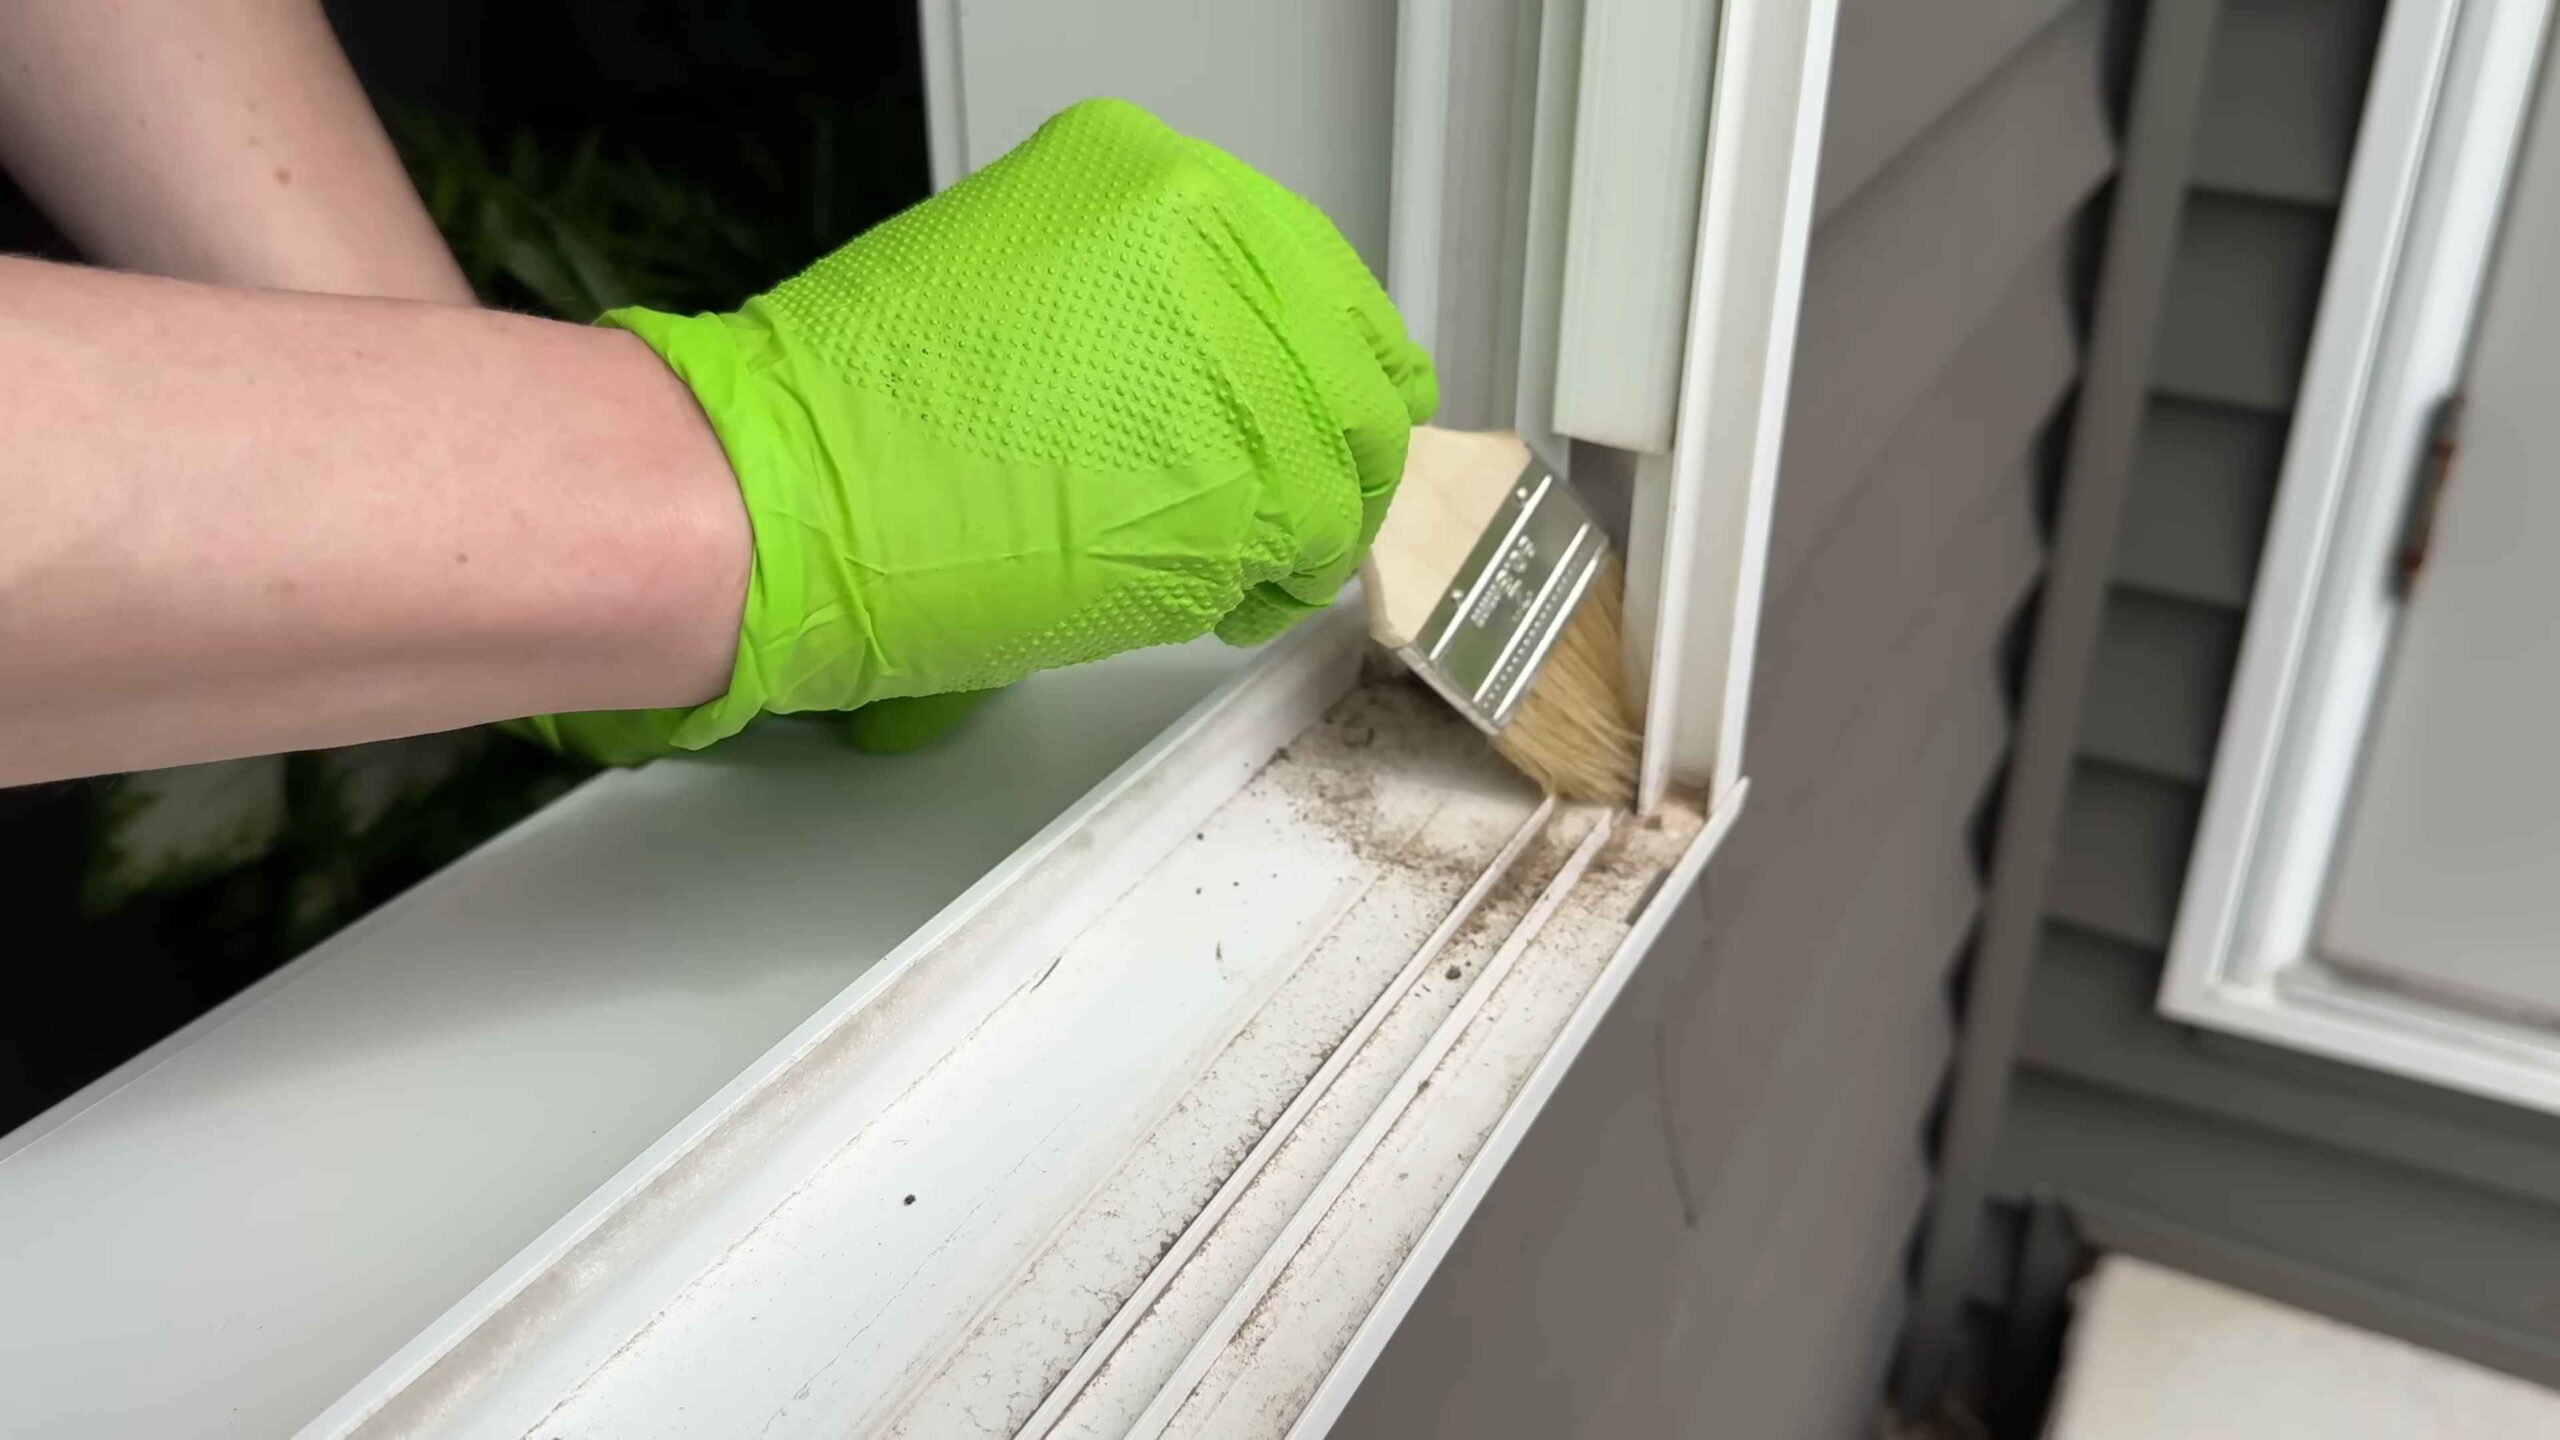
4. Scrub-a-Dub-Dub: Time to Get Scrubbing!
* Using your old toothbrush or small scrub brush, scrub the window tracks thoroughly. Pay attention to the corners, edges, and any areas with stubborn buildup.
* Apply some elbow grease! The fizzing action should have loosened most of the grime, but you might need to put in a little effort to get everything clean.
* If you encounter particularly stubborn spots, try using a putty knife or flathead screwdriver wrapped in a cloth to gently scrape away the debris. Be careful not to scratch the window track!
5. Dish Soap Boost (Optional):
* If your window tracks are particularly greasy or oily, add a few drops of dish soap to a small amount of water.
* Dip your scrub brush into the soapy water and continue scrubbing. The dish soap will help cut through the grease and leave your window tracks sparkling clean.
6. Wipe Away the Mess:
* Using paper towels or cleaning rags, wipe away the baking soda, vinegar, and dirt mixture.
* You might need to use several paper towels or rags to get everything completely clean.
* Rinse your rags frequently to avoid just spreading the dirt around.
7. The Cotton Swab Detail:
* For those super hard-to-reach spots, like the corners and crevices, use cotton swabs dipped in water or a little bit of vinegar.
* These are perfect for getting into those tiny spaces that your brush can’t reach.
8. Final Wipe Down:
* Once you’ve removed all the grime and cleaning solution, give the window tracks a final wipe down with a clean, damp cloth or paper towel.
* This will remove any remaining residue and leave your window tracks looking sparkling clean.
9. Dry It Up:
* Use a dry cloth or paper towel to dry the window tracks completely. This will help prevent rust and mildew from forming.
* Make sure to get into all the corners and crevices.
Dealing with Stubborn Stains and Mold: Level Up Your Cleaning Game
Sometimes, you might encounter particularly stubborn stains or even mold in your window tracks. Don’t worry, I’ve got you covered! Here are a few extra tips for dealing with these challenges:
* For Stubborn Stains:
* Make a paste of baking soda and water.
* Apply the paste to the stain and let it sit for 30 minutes to an hour.
* Scrub the stain with a toothbrush or scrub brush.
* Wipe away the paste with a damp cloth.
* For Mold:
* Mix equal parts white vinegar and water in a spray bottle.
* Spray the moldy areas with the solution.
* Let it sit for 10-15 minutes.
* Scrub the mold with a toothbrush or scrub brush.
* Wipe away the solution with a damp cloth.
* Important: If you’re dealing with a large amount of mold, it’s best to consult a professional mold remediation service.
* Safety First: When dealing with mold, wear gloves and a mask to protect yourself from spores.
Preventative Measures: Keeping Those Tracks Clean Longer
Now that your window tracks are sparkling clean, let’s talk about how to keep them that way! Here are a few preventative measures you can take:
* Regular Vacuuming: Vacuum your window tracks regularly, at least once a month, to remove loose dirt and debris. This will prevent buildup and make cleaning much easier in the long run.
* Wipe Up Spills Immediately: If you spill anything on your window tracks, wipe it up immediately to prevent staining and buildup.
* Consider Weather Stripping: Adding or replacing weather stripping around your windows can help prevent dirt and debris from entering the tracks in the first place.
* Regular Cleaning Schedule: Schedule a deep cleaning of your window tracks every few months to keep them in tip-top shape.
Alternative Cleaning Solutions: Exploring Your Options
While the baking soda and vinegar method is my go-to, there are other cleaning solutions you can use for your window tracks. Here are a few alternatives:
* Commercial Window Track Cleaners: There are many commercial window track cleaners available on the market. These are often formulated with strong cleaning agents that can quickly remove dirt and grime. Just be sure to follow the instructions on the label and wear gloves and eye protection.
* Steam Cleaner: A steam cleaner can be a great way to clean window tracks without using any harsh chemicals. The steam loosens the dirt and grime, making it easy to wipe away.
* Lemon Juice: Lemon juice is a natural cleaner and disinfectant. You can use it to clean your window tracks by spraying it on and letting it sit for a few minutes before wiping it away.
Troubleshooting Tips: Addressing Common Issues
Sometimes, even with the best cleaning methods, you might encounter some challenges. Here are a few troubleshooting tips to help you overcome common issues:
* If the Grime is Too Hardened:
* Try soaking the window tracks with a mixture of hot water and dish soap for a longer period of time.
* You can also use a heat gun (on a low setting) to gently warm the grime and loosen it up. Be careful not to overheat the window tracks or damage the surrounding materials.
* If the Window Tracks are Rusty:
* Apply a rust remover to the affected areas.
* Let it sit for the recommended time.
* Scrub the rust with a wire brush.
* Wipe away the rust remover and rinse the window tracks with water.
* Dry

Conclusion
So, there you have it! Cleaning window tracks doesn’t have to be a dreaded chore. By utilizing this simple, cost-effective DIY trick, you can transform grimy, dust-filled tracks into sparkling clean channels that allow your windows to glide effortlessly. Forget expensive cleaning solutions and specialized tools. This method relies on readily available household items, making it an accessible and practical solution for everyone.
Why is this DIY window track cleaning method a must-try? Because it’s efficient, economical, and environmentally friendly. It cuts through built-up dirt, grime, and even stubborn mold without harsh chemicals that can damage your window frames or pose a risk to your health. Plus, a clean window track not only improves the aesthetics of your home but also contributes to better window function, preventing sticking and potential damage to the window mechanism.
Looking for variations? Absolutely! For particularly stubborn grime, consider letting the baking soda paste sit for a longer period, even overnight. You can also add a few drops of your favorite essential oil to the vinegar solution for a pleasant scent. If you don’t have vinegar on hand, lemon juice is a fantastic natural alternative. For those hard-to-reach corners, a thin paintbrush or even a cotton swab can be incredibly helpful. And if you’re dealing with mold, a diluted bleach solution (always handle with care and proper ventilation) can be used as a final step after cleaning with the baking soda and vinegar. Remember to always test any cleaning solution on an inconspicuous area first to ensure it doesn’t damage the window frame.
We’re confident that this DIY window track cleaning trick will revolutionize your cleaning routine. It’s a game-changer that will leave your windows looking and functioning their best. Don’t just take our word for it – give it a try! We encourage you to embrace this simple yet effective method and experience the satisfaction of effortlessly clean window tracks.
Now, we want to hear from you! Share your experiences, tips, and variations in the comments below. Did you find this method helpful? Did you discover any other clever tricks for cleaning window tracks? Your feedback is invaluable and helps us create even better content for our community. Let’s work together to make window cleaning a breeze! We are sure that you will love this DIY window track cleaning method.
Frequently Asked Questions (FAQ)
Q: What if I don’t have baking soda? Can I use something else?
A: While baking soda is the star of this cleaning method due to its mild abrasive properties and ability to neutralize odors, you can try using a paste made from cream of tartar and water as a substitute. However, baking soda is generally more effective at lifting grime and dirt. If you only have baking powder, it might work in a pinch, but it’s not as potent as baking soda.
Q: My window tracks are really grimy and have mold. Will this method still work?
A: Yes, this method can still work, but it might require a bit more elbow grease and patience. For heavy grime, let the baking soda paste sit for a longer period, even overnight. For mold, after cleaning with the baking soda and vinegar, you can use a diluted bleach solution (1 part bleach to 10 parts water) as a final step. Always wear gloves and ensure proper ventilation when using bleach. Rinse thoroughly with water after applying the bleach solution. If the mold is extensive, you might need to repeat the process or consider using a specialized mold remover.
Q: Is vinegar safe to use on all types of window frames?
A: Vinegar is generally safe for most window frames, including vinyl, aluminum, and painted wood. However, it’s always a good idea to test it on an inconspicuous area first to ensure it doesn’t cause any discoloration or damage. Avoid using vinegar on natural stone surfaces like marble or granite, as it can etch the surface. If you have any concerns about your window frame material, consult the manufacturer’s recommendations.
Q: How often should I clean my window tracks?
A: The frequency of cleaning depends on your environment and how often you open your windows. Generally, cleaning your window tracks every 3-6 months is a good practice. If you live in a dusty area or frequently open your windows, you might need to clean them more often. Regular cleaning prevents the buildup of grime and makes the cleaning process easier.
Q: What’s the best way to prevent window tracks from getting dirty in the first place?
A: Prevention is key! Regularly vacuuming or brushing out loose dirt and debris from the window tracks can significantly reduce the buildup of grime. You can also use weather stripping to seal gaps around the windows and prevent dust and insects from entering. Consider using a window track brush specifically designed for cleaning these areas.
Q: I have sliding glass doors. Can I use this method on the tracks?
A: Absolutely! This method works equally well on sliding glass door tracks. The process is the same: apply the baking soda paste, spray with vinegar, scrub, and wipe clean. Sliding glass door tracks tend to accumulate more dirt and debris due to their larger size and exposure to the elements, so you might need to repeat the process for heavily soiled tracks.
Q: The vinegar smell is strong. How can I get rid of it?
A: The vinegar smell will dissipate quickly as it dries. You can also open windows and doors to ventilate the area. Adding a few drops of your favorite essential oil to the vinegar solution can help mask the smell. Lemon essential oil is a particularly good choice for cleaning, as it has a fresh scent and antibacterial properties.
Q: What kind of brush should I use to scrub the window tracks?
A: A stiff-bristled brush is ideal for scrubbing window tracks. An old toothbrush, a small scrub brush, or a window track brush specifically designed for this purpose will work well. Choose a brush that is small enough to fit into the narrow tracks and has durable bristles that can effectively remove grime.
Q: Can I use a power washer to clean window tracks?
A: While a power washer might seem like a quick and easy solution, it’s generally not recommended for cleaning window tracks. The high pressure can damage the window frames, seals, and even the glass. It can also force water into the walls, leading to mold growth. Stick to gentler methods like the baking soda and vinegar trick for safe and effective cleaning.
Q: What if the baking soda and vinegar mixture doesn’t bubble?
A: The bubbling action is a chemical reaction between the baking soda (a base) and the vinegar (an acid). If it doesn’t bubble, it could be due to a few reasons: the baking soda is old and has lost its potency, the vinegar is too diluted, or the surfaces are already relatively clean. Try using fresh baking soda and undiluted vinegar. You can also try applying more baking soda and vinegar to see if that triggers the reaction.
Leave a Comment