

No Cut Jean Hemming DIY: Are your favorite jeans a tad too long? Do you dread the thought of chopping them off and potentially ruining the original hem? I totally get it! There’s nothing worse than an uneven, amateur-looking hemline on a beloved pair of jeans. But fear not, fellow denim enthusiasts, because I’m about to share a game-changing secret: a no-cut jean hemming DIY that will save your jeans and your sanity!
Hemming jeans has been a necessity for generations, evolving from simple hand-stitching to sophisticated machine techniques. While tailors have traditionally held the key to perfect hems, this no cut jean hemming DIY empowers you to achieve professional-looking results right at home, without any sewing experience. Think of it as a modern twist on a classic problem!
Why is this DIY trick so essential? Well, let’s face it, alterations can be expensive and time-consuming. Plus, sometimes you just want to wear those jeans now! This method is perfect for those who are hesitant to cut their jeans, especially if they love the original, faded hem. It’s also a fantastic option for anyone who wants to maintain the option of letting the hem down later. So, ditch the scissors and embrace this simple, effective, and totally reversible solution. I promise, you’ll wonder why you didn’t try it sooner!
No-Cut Jean Hemming: The Ultimate DIY Guide
Hey there, fellow denim lovers! Are you tired of jeans that are just a tad too long? Do you dread the thought of cutting into your favorite pair, fearing a frayed disaster? Well, fear no more! I’m going to show you a super easy, no-cut method for hemming your jeans that will leave them looking professionally altered. This technique is perfect for preserving the original hem and avoiding that awkward, homemade look. Let’s get started!
What You’ll Need
Before we dive in, let’s gather our supplies. Don’t worry, you probably already have most of these lying around:
* Your jeans (obviously!)
* A sewing machine (a regular one will do just fine)
* Matching thread (or a slightly darker shade for a more subtle look)
* Pins (lots of them!)
* A ruler or measuring tape
* Scissors (for trimming excess fabric *inside* the hem, not the actual hem itself)
* An iron and ironing board
* Seam ripper (just in case!)
* Optional: Hemming tape (for extra security, especially with stretchy fabrics)
Understanding the Process
The basic idea behind this no-cut hemming method is to fold the excess fabric *inside* the jean leg and then stitch it in place. This creates a new, shorter hem without sacrificing the original, finished edge. It’s like magic, but with a sewing machine!
Step-by-Step Instructions
Okay, let’s get down to business! Follow these steps carefully, and you’ll have perfectly hemmed jeans in no time.
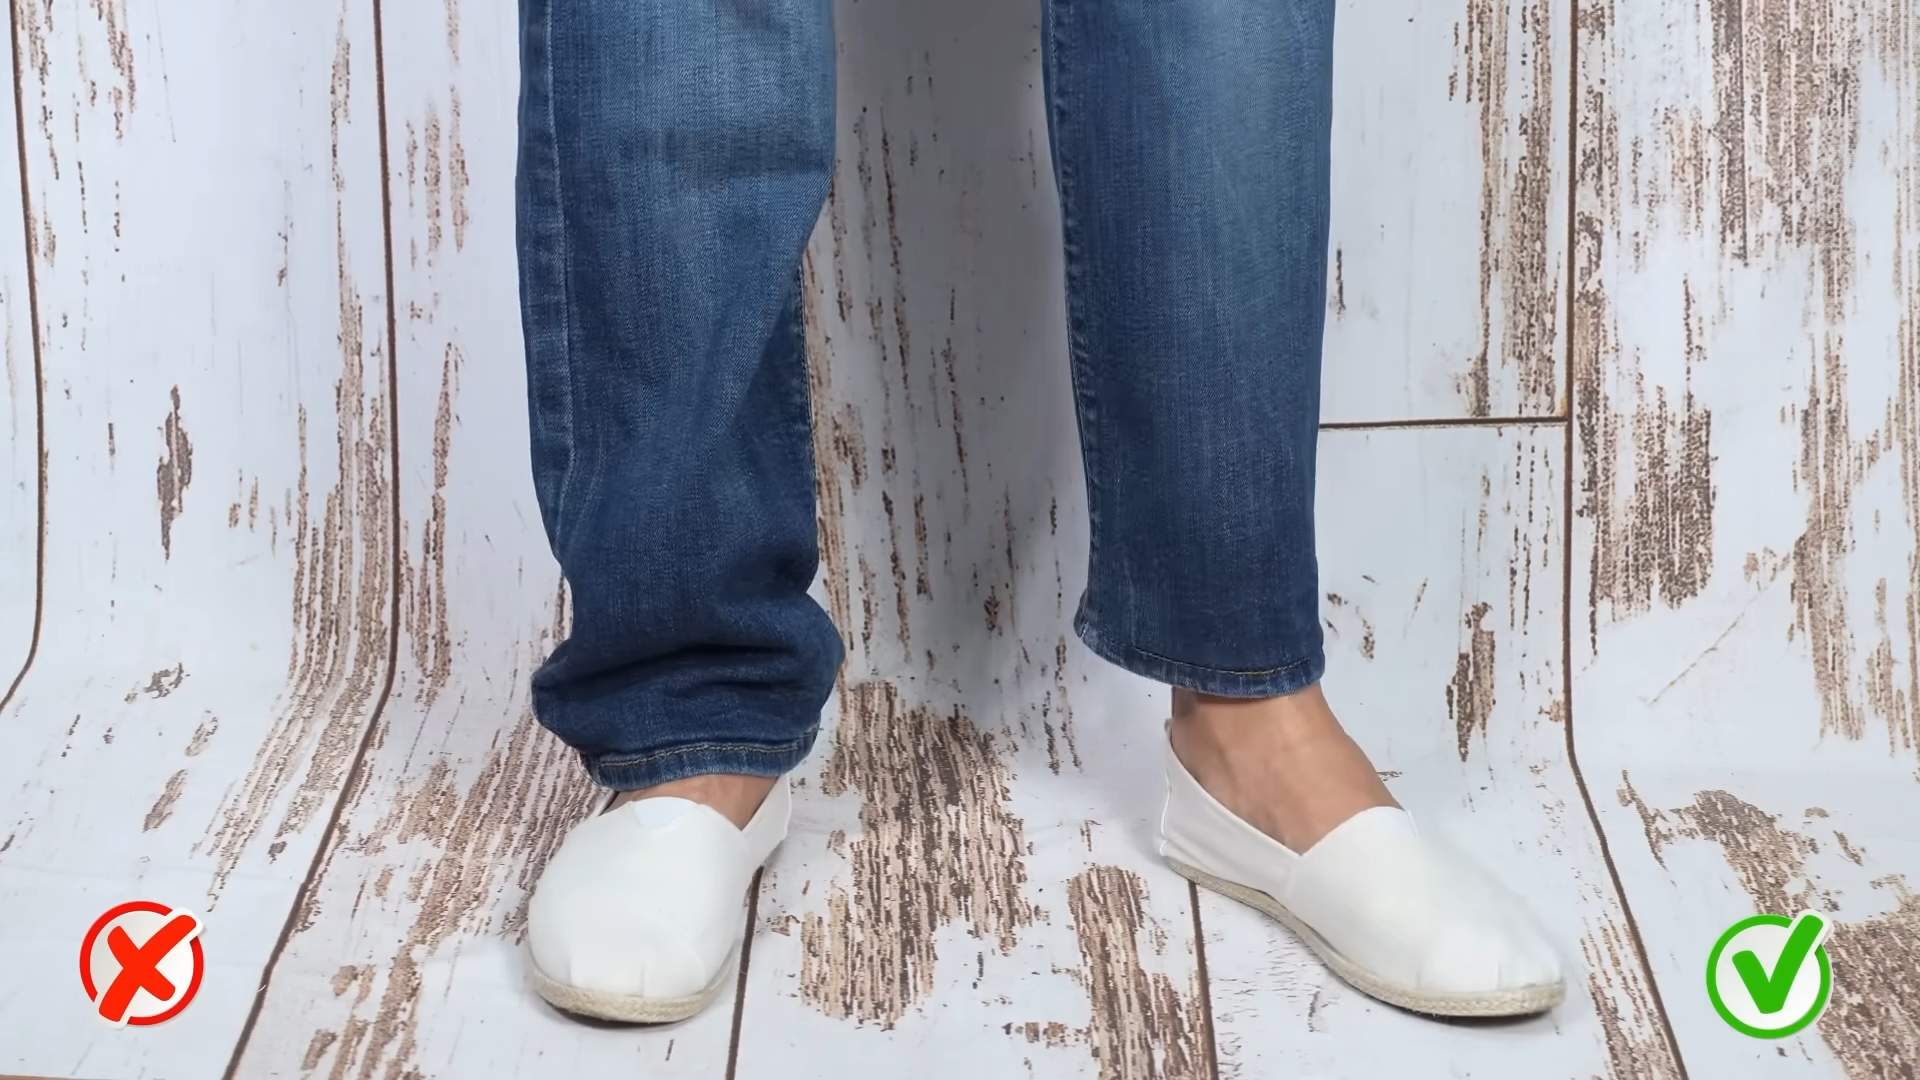
1. Try on Your Jeans with the Shoes You’ll Usually Wear: This is crucial! You want to hem your jeans to the correct length for your typical footwear. Have a friend help you pin the jeans to the desired length, or carefully fold the hem up and pin it yourself in front of a mirror.
2. Determine the Hem Allowance: Once you’ve pinned the jeans to the correct length, take them off carefully, trying not to disturb the pins. Lay the jeans on a flat surface. Measure the distance from the original hem to the pinned mark. This is your hem allowance – the amount of fabric you’ll be folding up inside the leg. Write this measurement down! Accuracy is key here.
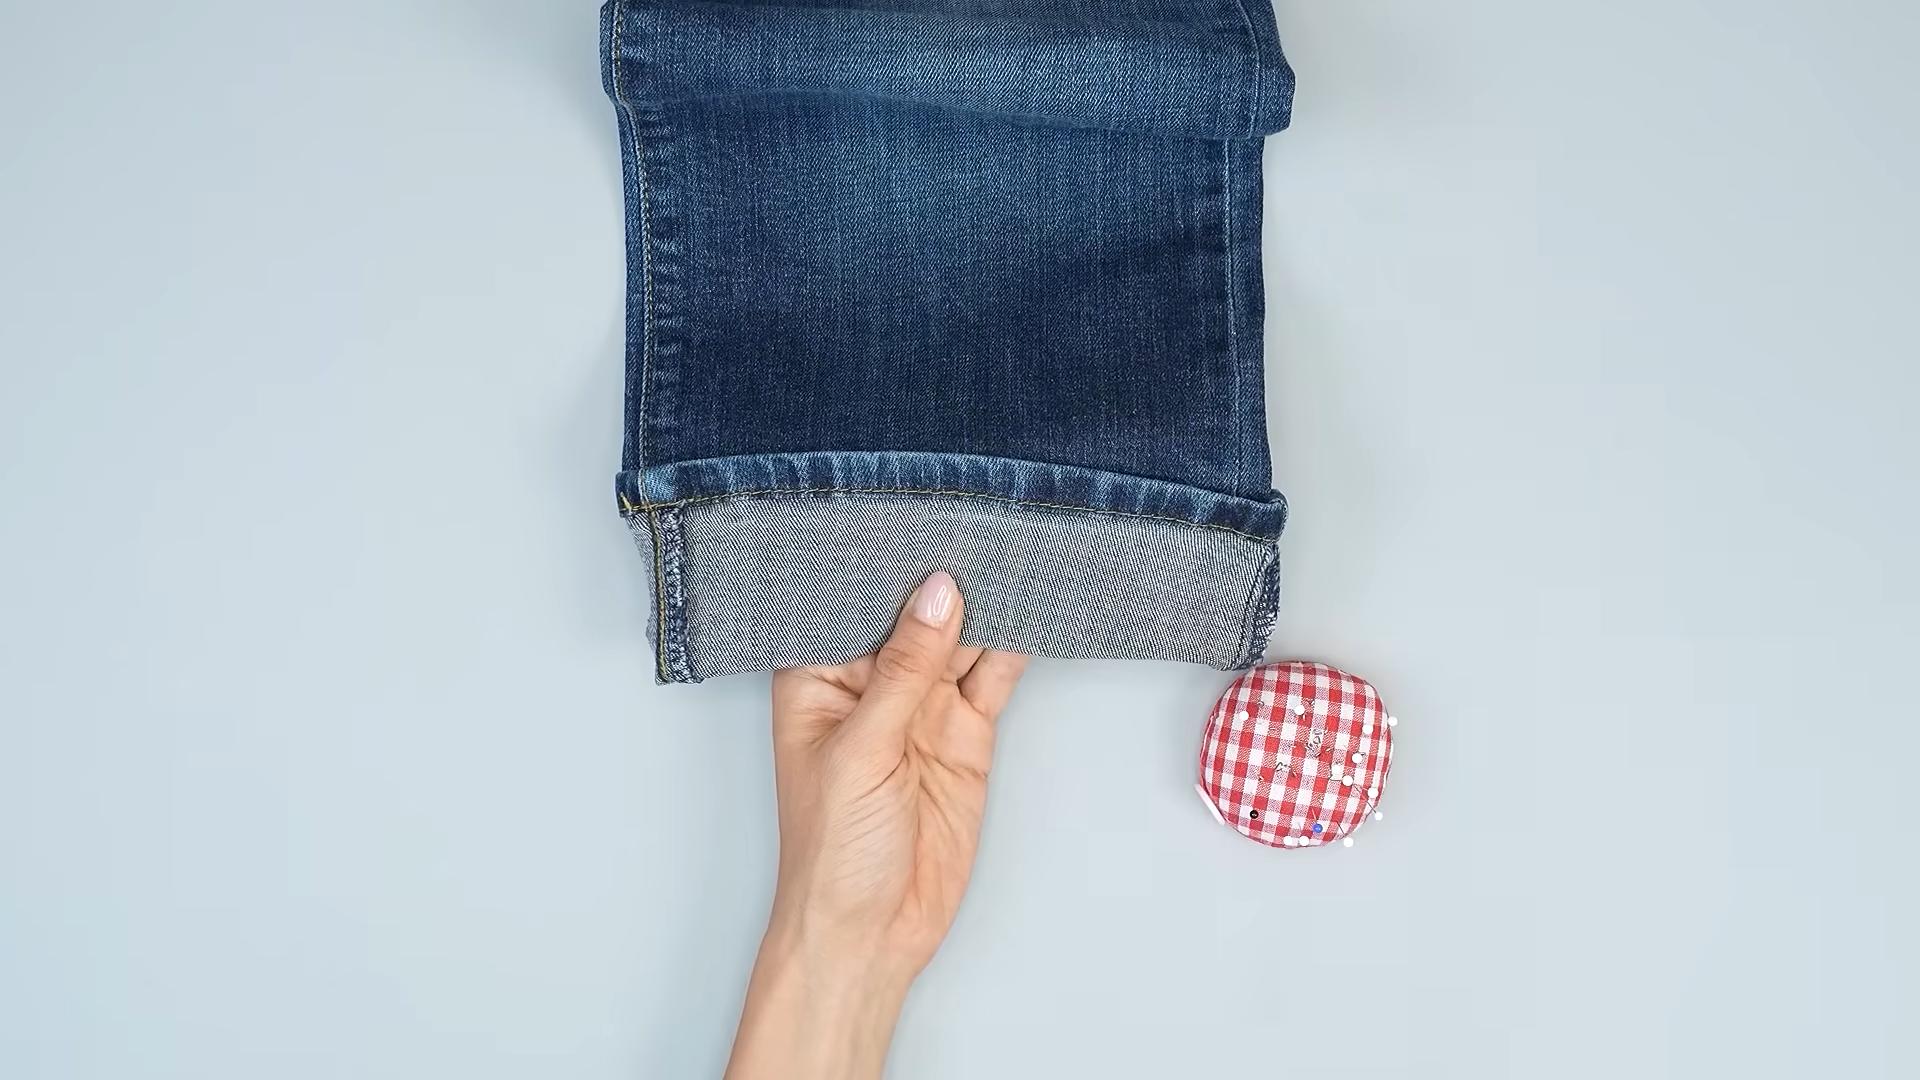
3. Prepare the Hem: Turn your jeans inside out. Using your hem allowance measurement, fold the excess fabric up towards the inside of the jean leg. The original hem should now be pointing upwards, towards the waistband.
4. Pin the Folded Hem: This is where the pins come in handy! Secure the folded hem in place by pinning it all the way around the leg. Place the pins perpendicular to the folded edge, about an inch or two apart. Make sure the fabric is smooth and even as you pin. This will prevent any puckering or bunching when you sew.
5. Iron the Folded Hem: Ironing is your best friend in sewing! Carefully iron the folded hem to create a crisp, clean crease. This will make it much easier to sew and will give your hem a more professional finish. Use a medium heat setting and a pressing cloth if necessary, especially for delicate fabrics.
6. Optional: Add Hemming Tape: For extra security, especially if you’re working with stretchy denim or a fabric that frays easily, you can add hemming tape. Place the hemming tape between the folded hem and the jean leg, close to the folded edge. Iron over the hemming tape to fuse it to the fabric. This will help hold the hem in place and prevent it from unraveling.
7. Set Up Your Sewing Machine: Thread your sewing machine with matching thread. Choose a stitch length that is appropriate for your fabric. A slightly shorter stitch length (around 2.5-3mm) is usually best for denim.
8. Sew the Hem: Now comes the sewing part! Starting at the inseam (the seam on the inside of the leg), carefully sew along the folded edge of the hem. Keep your stitching as close to the folded edge as possible, about 1/8 to 1/4 inch away. Sew slowly and steadily, removing the pins as you go. Be careful not to sew over the pins, as this can damage your sewing machine needle.
9. Overlap Your Stitches: When you reach the point where you started sewing (the inseam), overlap your stitches by about an inch to secure the seam. This will prevent the seam from unraveling.
10. Backstitch for Security: At the beginning and end of your seam, backstitch a few stitches to further secure the seam. This is a simple but important step that will help prevent your hem from coming undone.
11. Repeat for the Other Leg: Follow steps 3-10 for the other jean leg. Make sure to measure and pin the hem allowance accurately to ensure that both legs are the same length.
12. Trim Excess Fabric (Optional): If you have a lot of excess fabric inside the hem, you can carefully trim it down to reduce bulk. Leave about 1/2 inch of fabric beyond your stitching line. Be very careful not to cut the original hem or your stitching!
13. Iron the Hem Again: Give the hem a final press with the iron to set the stitches and create a smooth, professional finish.
14. Turn Your Jeans Right Side Out: Admire your handiwork! Your jeans should now be the perfect length, with the original hem intact.
Troubleshooting Tips
Even with the best instructions, sometimes things don’t go exactly as planned. Here are a few common problems and how to fix them:
* Puckering or Bunching: If your hem is puckering or bunching, it could be due to uneven pinning or stretching of the fabric. Try re-pinning the hem, making sure the fabric is smooth and even. You can also try using a walking foot on your sewing machine, which helps to feed the fabric evenly.
* Uneven Hem Length: If one leg is shorter than the other, it’s likely due to inaccurate measuring. Use your seam ripper to carefully remove the stitching from the shorter leg and re-hem it to the correct length.
* Thread Breaking: If your thread is breaking, it could be due to a dull needle, incorrect thread tension, or using the wrong type of thread for your fabric. Try replacing the needle, adjusting the thread tension, and using a stronger thread.
* Skipped Stitches: Skipped stitches can be caused by a dull needle, incorrect needle size, or incorrect thread tension. Try replacing the needle, using the correct needle size for your fabric, and adjusting the thread tension.
Advanced Techniques (Optional)
Once you’ve mastered the basic no-cut hemming method, you can try some advanced techniques to further customize your jeans:
* Blind Hem Stitch: If you want a completely invisible hem, you can use a blind hem stitch on your sewing machine. This stitch creates a nearly invisible hem on the outside of the jeans.
* Decorative Stitching: Add a touch of personality to your hem by using a decorative stitch on your sewing machine. Choose a stitch that complements the style of your jeans.
* Topstitching: Topstitching is a line of stitching that is visible on the outside of the jeans. You can add topstitching to your hem for a more durable and stylish finish. Use a heavier thread for topstitching.
Maintaining Your Hem
To keep your hem looking its best, follow these tips:
* Wash your jeans inside out: This will help prevent fading and wear on the hem.
* Use a gentle detergent: Harsh detergents can damage the fabric and stitching.
* Avoid using bleach: Bleach can weaken the fabric and cause it to fray.
* Hang your jeans to dry: Tumble drying can shrink the fabric and damage the hem.
* Iron your jeans as needed: Ironing will help keep the hem looking crisp and smooth.
Conclusion
And there you have it! A simple, no-cut method for hemming your jeans that will save you time, money, and the heartache of ruining your favorite pair. With a little practice, you’ll be hemming jeans like a pro in no time. Happy sewing!
Conclusion
So, there you have it! Mastering the no cut jean hemming DIY is not just a clever trick; it’s a game-changer for anyone who’s ever struggled with ill-fitting jeans. Think about it: no more sacrificing your favorite denim to the scissors, no more uneven hems that scream “DIY gone wrong,” and no more expensive trips to the tailor for a simple alteration. This method empowers you to take control of your wardrobe and achieve a perfectly customized fit, all from the comfort of your own home.
But why is this particular method such a must-try? It’s all about preserving the original hem. That coveted, perfectly worn-in edge that gives your jeans character and authenticity? It stays intact! This is especially crucial for jeans with unique washes, distressing, or even selvedge detailing. Cutting that hem off is like erasing a piece of denim history. With the no-cut method, you maintain that history while achieving the ideal length.
Beyond the preservation of the original hem, this DIY trick offers incredible versatility. Feel free to experiment with different folding techniques to achieve various looks. For a more subtle, almost invisible hem, try a smaller fold and secure it meticulously with fabric glue. If you’re going for a more casual, rolled-up vibe, a wider fold secured with a few strategic stitches can create a stylish and effortless look. Consider using a contrasting thread color for a pop of visual interest, or even adding decorative stitching along the folded edge for a truly personalized touch.
And don’t limit yourself to just jeans! This technique can also be applied to other types of pants, such as chinos or even some types of trousers, as long as the fabric isn’t too thick or stiff. The key is to assess the fabric and choose the appropriate adhesive or stitching method to ensure a secure and durable hem.
We understand that diving into a DIY project can sometimes feel daunting, but trust us, this one is surprisingly simple and rewarding. The initial attempt might require a little patience, but once you get the hang of it, you’ll be hemming your jeans like a pro in no time. Plus, the satisfaction of knowing you’ve saved money, preserved your jeans’ original character, and mastered a valuable skill is truly priceless.
So, what are you waiting for? Grab your favorite pair of jeans, gather your supplies, and give this no cut jean hemming DIY a try! We’re confident that you’ll be amazed by the results. And most importantly, we want to hear about your experience! Share your photos, tips, and any variations you’ve discovered in the comments below. Let’s create a community of denim-loving DIYers who are passionate about preserving and customizing their favorite jeans. Your insights could help others discover the joy and convenience of this fantastic technique. Let’s get hemming!
Frequently Asked Questions (FAQ)
What kind of jeans work best with this no-cut hemming method?
This method works best with jeans that have a relatively straight or slightly tapered leg. Jeans that are extremely flared or bootcut might be more challenging, as the excess fabric will need to be carefully managed and folded. Also, consider the fabric weight. Lighter to medium-weight denim is generally easier to work with than very thick or rigid denim. However, with the right tools and techniques, you can adapt the method to various denim types.
What if my jeans are too long by a significant amount? Will this method still work?
Yes, even if your jeans are significantly too long, this method can still work, but it might require a bit more effort and planning. You’ll need to create a larger fold, which could potentially add bulk to the hem. To minimize bulk, consider creating multiple smaller folds instead of one large fold. Secure each fold individually with fabric glue or stitching. Alternatively, you could consider a combination of techniques. For example, you could trim off a small amount of excess fabric (leaving enough for a clean fold) and then use the no-cut method to achieve the final desired length.
What type of fabric glue is recommended for this project?
When choosing fabric glue, look for a product that is specifically designed for textiles and is washable. A glue that dries clear and remains flexible after drying is also ideal. Some popular brands include Aleene’s Fabric Fusion, Beacon Fabri-Tac, and Dritz Liquid Stitch. Always test the glue on a small, inconspicuous area of the jeans first to ensure that it doesn’t discolor or damage the fabric. Follow the manufacturer’s instructions carefully for best results.
How do I prevent the hem from coming undone after washing?
To ensure a durable and long-lasting hem, it’s crucial to use a high-quality fabric glue or to reinforce the folded edge with stitching. If using glue, apply it generously and evenly along the entire folded edge. Allow the glue to dry completely according to the manufacturer’s instructions before wearing or washing the jeans. If stitching, use a sturdy thread and a close stitch pattern to secure the fold. When washing the jeans, turn them inside out and wash them on a gentle cycle with cold water. Avoid using harsh detergents or bleach, as these can weaken the glue or thread. Air drying is also recommended to prevent excessive wear and tear on the hem.
Can I use a sewing machine instead of hand stitching?
Absolutely! Using a sewing machine can make the process faster and more efficient, especially if you have a lot of jeans to hem. Use a denim needle and a sturdy thread. A straight stitch or a zigzag stitch will work well. Sew close to the folded edge to secure it in place. If you’re using a sewing machine, be sure to practice on a scrap piece of denim first to get the tension and stitch length just right.
What if I don’t have fabric glue or a sewing machine? Are there any alternative methods?
If you don’t have fabric glue or a sewing machine, you can still achieve a no-cut hem using fusible bonding tape. This tape is applied between the folded layers of fabric and then ironed to create a permanent bond. Follow the manufacturer’s instructions carefully to ensure a strong and durable hold. Another option is to use safety pins to temporarily secure the hem. This is a good solution for a quick fix, but it’s not a permanent solution and the pins may be visible.
How do I ensure that the hem is even on both legs?
Accuracy is key to achieving an even hem. Before you start folding and securing the hem, put on the jeans with the shoes you plan to wear with them. Stand in front of a mirror and have someone help you mark the desired length on both legs. You can use tailor’s chalk or safety pins to mark the spot. Once you’ve marked the length, carefully measure the distance from the original hem to the mark on each leg to ensure that they are the same. Then, fold and secure the hem according to your measurements.
Will this method work on jeans with a distressed or frayed hem?
Yes, this method can work on jeans with a distressed or frayed hem, but you’ll need to be extra careful to preserve the existing distressing. When folding the hem, try to keep the frayed edges intact and avoid folding them under. You can use a small amount of fabric glue to secure the frayed edges and prevent them from unraveling further. Alternatively, you can embrace the frayed look and allow the edges to peek out from under the folded hem for a more casual and edgy style.
How can I remove the hem if I decide I want to lengthen the jeans later?
The ease of removing the hem depends on the method you used to secure it. If you used fabric glue, you might be able to gently peel the hem apart, but be careful not to damage the fabric. You can also try using a solvent specifically designed to dissolve fabric glue, but always test it on a small, inconspicuous area first. If you used stitching, you can carefully remove the stitches with a seam ripper. If you used fusible bonding tape, you can try reheating the tape with an iron to loosen the bond and then gently peel the hem apart. In all cases, be patient and work slowly to avoid damaging the jeans.
Is this no cut jean hemming DIY method suitable for all skill levels?
Absolutely! This method is designed to be accessible to everyone, regardless of their sewing or crafting experience. The basic technique is very simple and requires minimal tools and skills. Even if you’ve never hemmed a pair of pants before, you can easily master this method with a little patience and practice. The more advanced variations, such as adding decorative stitching or using a sewing machine, might require a bit more skill, but they are still relatively easy to learn. The key is to start with the basics and gradually work your way up to more complex techniques as you gain confidence and experience.

Leave a Comment