

Mushroom Farming at Home: Ever dreamt of plucking fresh, delicious mushrooms right from your own kitchen? It sounds like something out of a fairytale, doesn’t it? But trust me, it’s more achievable than you think! For centuries, cultures around the globe, from ancient China to the Roman Empire, have revered mushrooms, not just for their unique flavor, but also for their medicinal properties. Now, you can join this time-honored tradition without needing acres of land or a degree in botany.
In this DIY guide, I’m going to share some simple, yet effective tricks to get you started with mushroom farming at home. Forget those expensive grocery store prices and often bland flavors! Imagine the satisfaction of serving up a gourmet meal featuring mushrooms you nurtured from spore to plate. Whether you’re a seasoned gardener or a complete newbie, this guide will equip you with the knowledge and confidence to cultivate your own thriving mushroom patch indoors. Plus, it’s a fantastic way to recycle kitchen scraps and reduce your carbon footprint. Let’s dive in and unlock the secrets to successful home-grown mushrooms!
Mushroom Farming at Home: A Beginner’s Guide
Hey there, fellow fungi enthusiasts! Ever dreamt of growing your own delicious mushrooms right in your home? Well, dream no more! I’m going to walk you through a simple and rewarding method for cultivating mushrooms indoors. It’s easier than you think, and the satisfaction of harvesting your own homegrown goodies is unbeatable. We’ll be focusing on oyster mushrooms, as they are relatively easy to grow and quite forgiving for beginners.
What You’ll Need: The Essential Supplies
Before we dive in, let’s gather our supplies. This is crucial for a smooth and successful mushroom-growing journey.
* Oyster Mushroom Spawn: This is the “seed” of your mushrooms. You can purchase it online or at a local gardening supply store. Make sure it’s fresh and from a reputable source.
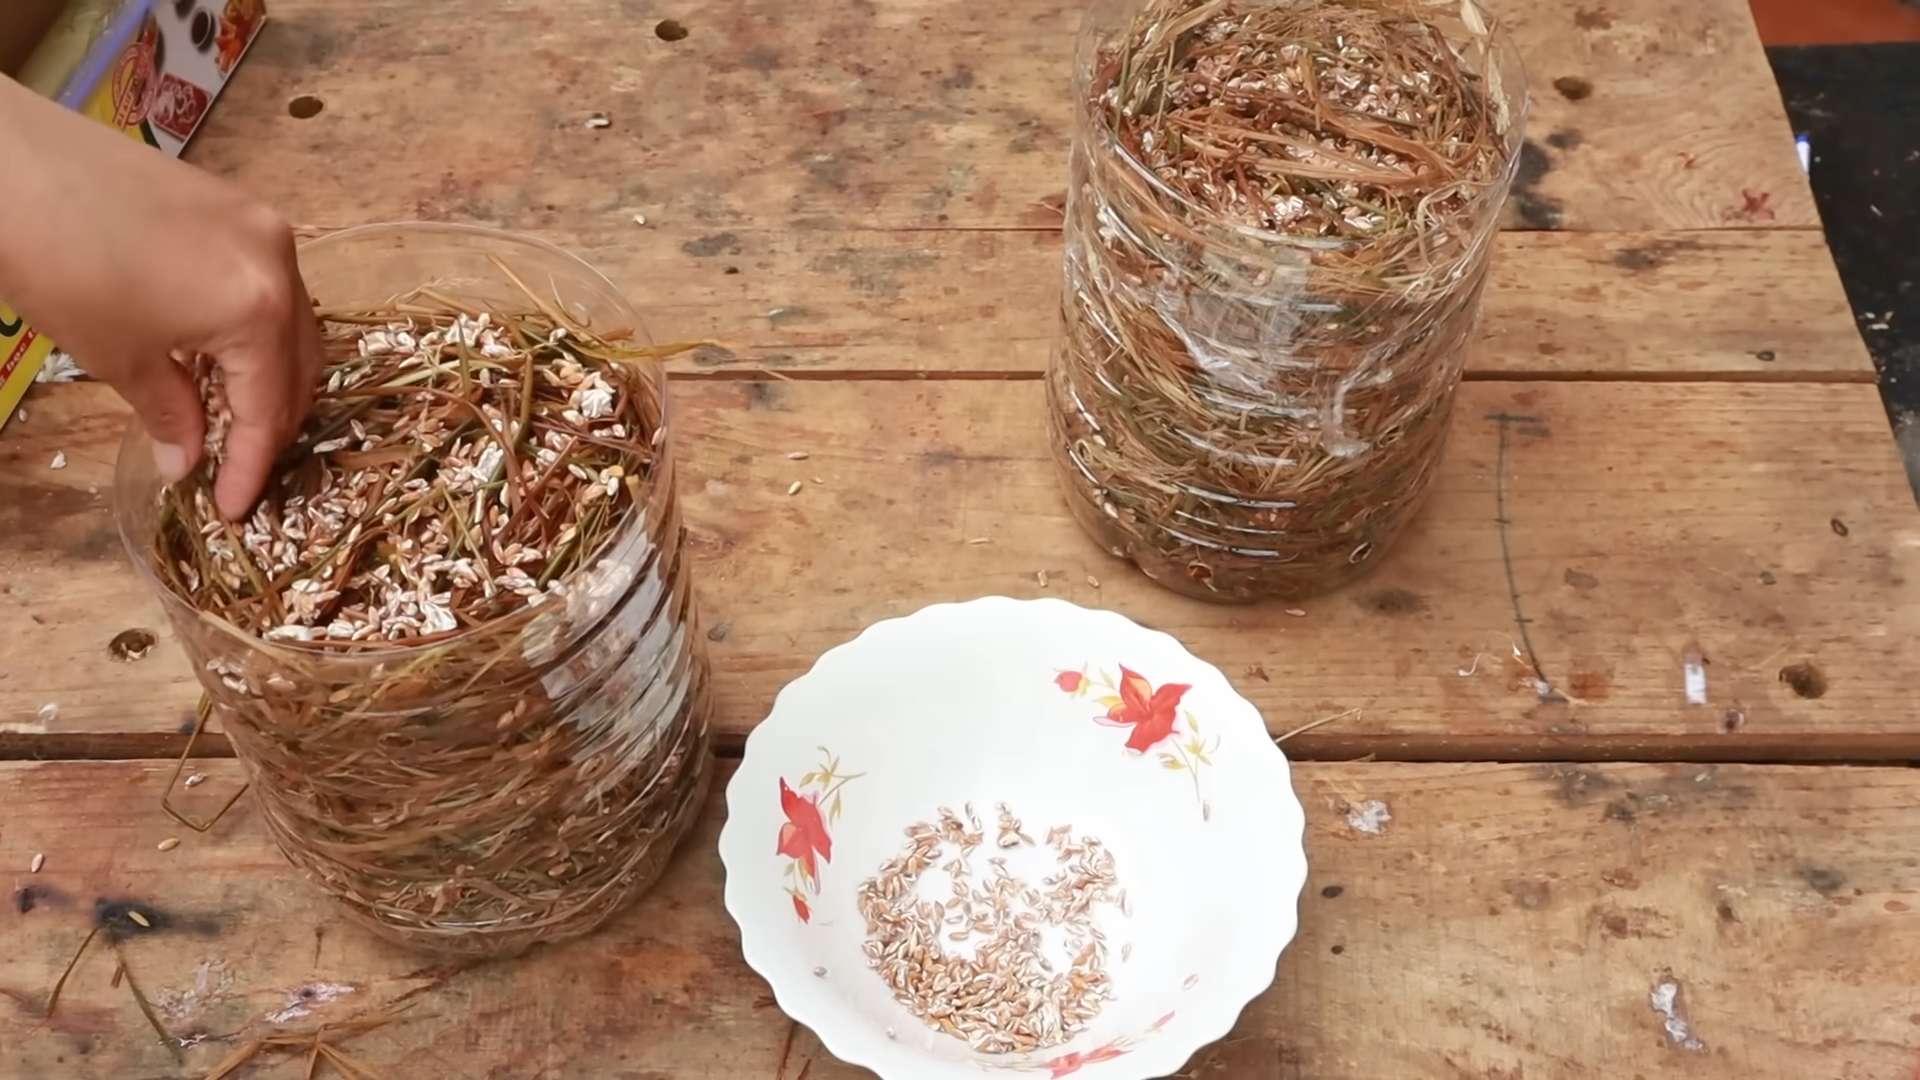
* Substrate: This is the material your mushrooms will grow on. Straw is a great option because it’s readily available and affordable. You can also use coffee grounds, but we’ll stick with straw for this guide.
* Large Container: A bucket, tub, or even a large plastic bag will work. Just make sure it’s clean and can hold the straw and spawn.
* Heat-Resistant Bags: These are for pasteurizing the straw. Oven bags or even large freezer bags will do the trick.
* Spray Bottle: For misting the mushrooms to maintain humidity.
* Rubbing Alcohol: For sterilizing your work area and tools.
* Gloves: To keep everything clean and prevent contamination.
* Thermometer: To monitor the temperature during pasteurization.
* Optional: A humidity tent or plastic wrap to help maintain humidity.
Preparing the Substrate: Pasteurization is Key!
This is arguably the most important step. Pasteurization kills off competing organisms that could hinder mushroom growth. We don’t want any unwanted guests crashing our mushroom party!
1. Chop the Straw: Cut the straw into smaller pieces, about 2-3 inches long. This will make it easier for the mushroom mycelium to colonize. I usually use scissors or garden shears for this.
2. Soak the Straw: Place the chopped straw in a large container and cover it with water. Let it soak for at least 24 hours. This hydrates the straw, making it a suitable environment for the mushrooms.
3. Bag the Straw: Divide the soaked straw into your heat-resistant bags. Don’t pack it too tightly; leave some room for steam to circulate.
4. Pasteurize the Straw: There are a couple of ways to pasteurize the straw.
* Hot Water Pasteurization: Place the bags of straw in a large pot or tub and cover them with hot water (around 160-180°F or 71-82°C). Use a thermometer to monitor the temperature. Maintain this temperature for about 1-2 hours. This method is great if you don’t have a large pot.
* Steam Pasteurization: Place the bags of straw in a steamer or on a rack above boiling water. Steam them for about 1-2 hours. This is my preferred method as it’s a bit more gentle on the straw.
5. Cool the Straw: After pasteurization, carefully remove the bags from the hot water or steamer and let them cool completely. This is crucial! You don’t want to introduce the spawn to hot straw. I usually let them cool overnight.
Inoculation: Planting the Mushroom Seeds
Now for the fun part – introducing the mushroom spawn to the prepared substrate!
1. Clean Your Work Area: Wipe down your work surface with rubbing alcohol. This helps prevent contamination.
2. Sanitize Your Hands: Put on your gloves and sanitize them with rubbing alcohol.
3. Mix the Spawn and Straw: Open a bag of cooled straw and a bag of mushroom spawn. Crumble the spawn into smaller pieces. Mix the spawn thoroughly with the straw. A good ratio is about 1 part spawn to 10 parts straw.
4. Pack the Mixture: Place the spawn-straw mixture into your large container. Pack it down lightly, but don’t compress it too much. You want to allow for air circulation.
5. Repeat: Repeat steps 3 and 4 until all the straw and spawn are used.
Incubation: The Waiting Game
This is where patience comes in. The mycelium needs time to colonize the straw.
1. Find a Suitable Location: Place the container in a dark, humid, and well-ventilated area. A basement, closet, or spare room works well. The ideal temperature is around 65-75°F (18-24°C).
2. Maintain Humidity: Mist the surface of the straw with water every day to keep it moist. You can also cover the container with a humidity tent or plastic wrap to help retain moisture. Just make sure to leave some air gaps for ventilation.
3. Wait for Colonization: Over the next few weeks, you’ll notice white, fuzzy growth spreading throughout the straw. This is the mushroom mycelium. It should take about 2-3 weeks for the straw to be fully colonized. The straw will turn almost completely white.
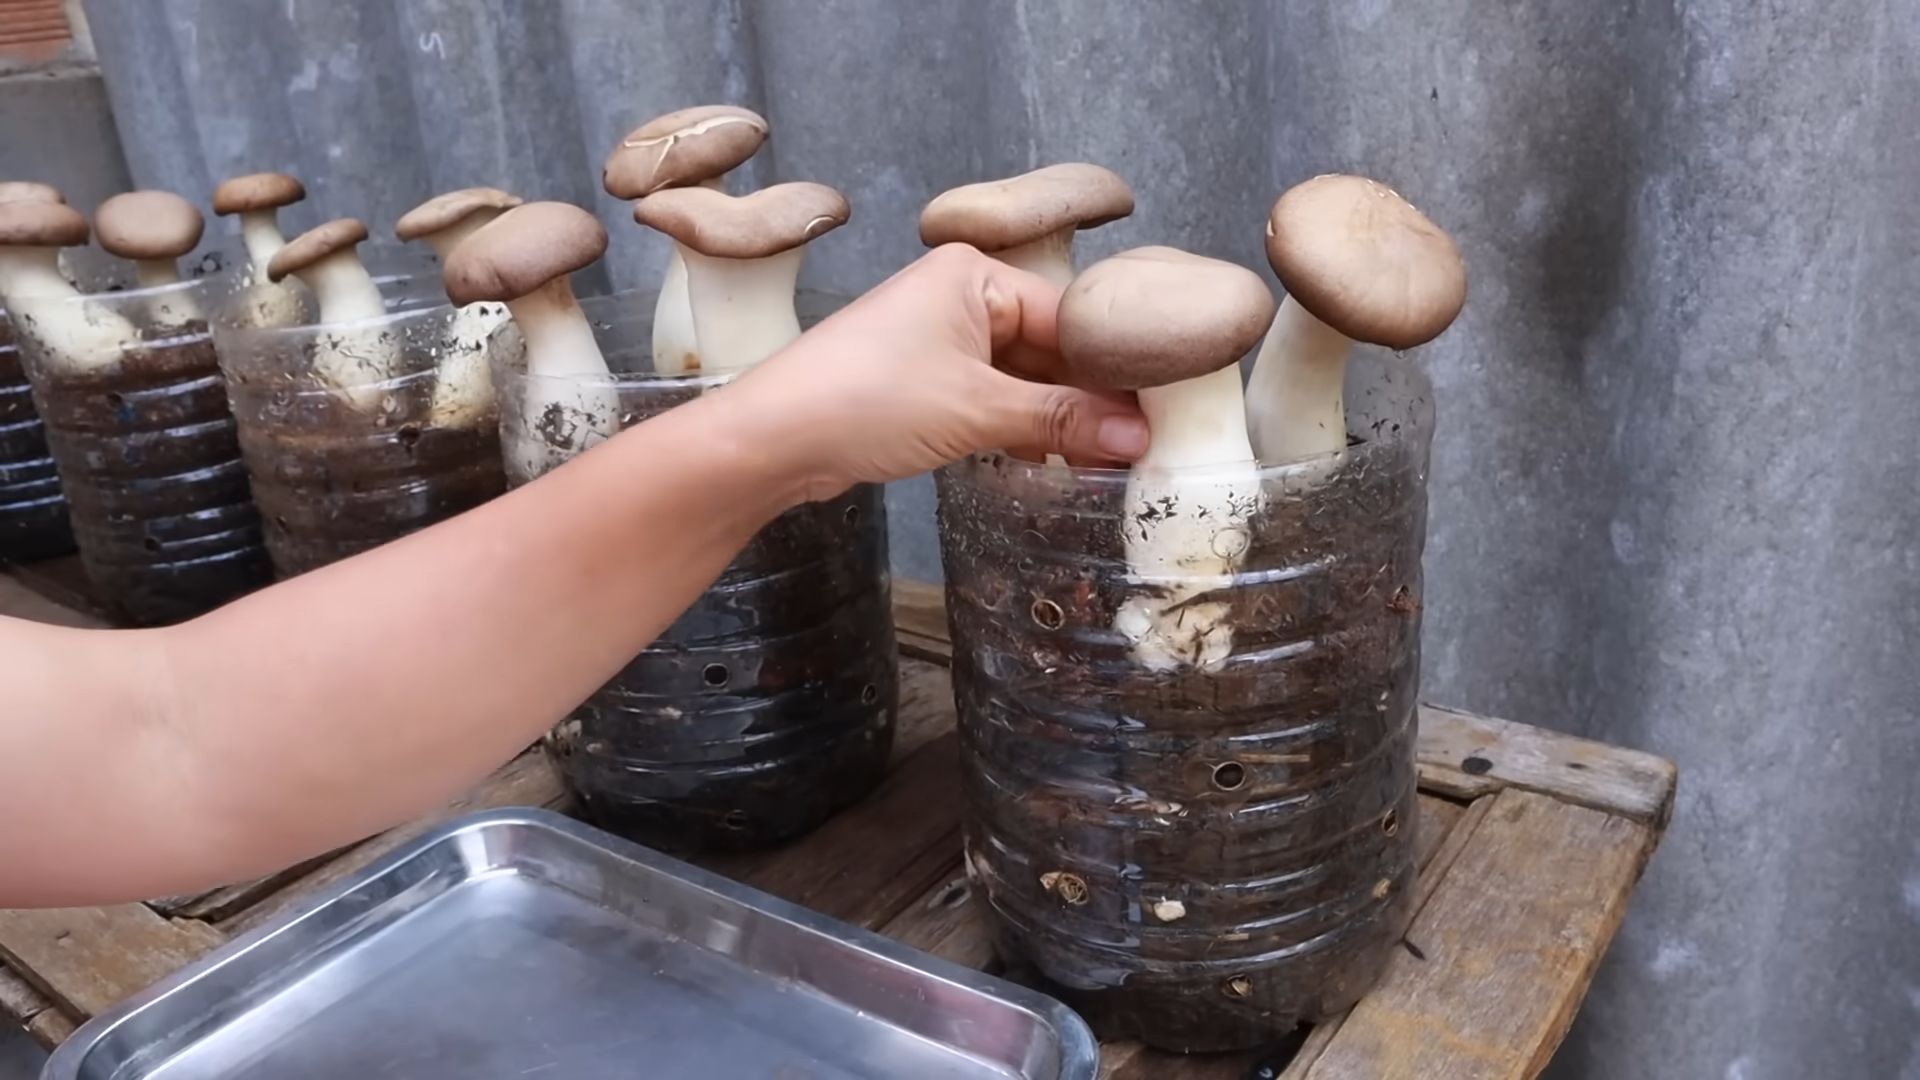
Fruiting: Time to Harvest!
The moment we’ve all been waiting for!
1. Introduce Light: Once the straw is fully colonized, it’s time to introduce light. Move the container to a location with indirect light. Direct sunlight can dry out the mushrooms.
2. Increase Humidity: Increase the humidity even further. Mist the container frequently, several times a day. You can also use a humidifier to maintain a high humidity level.
3. Ventilation: Ensure good ventilation. This helps prevent mold growth and encourages mushroom formation.
4. Watch for Pins: Tiny mushroom “pins” will start to form on the surface of the straw. These are the baby mushrooms!
5. Harvest the Mushrooms: The mushrooms will grow rapidly over the next few days. Harvest them when the caps are fully formed but before they start to release spores. To harvest, simply twist and pull the mushrooms from the straw.
Second Flush and Beyond: Keeping the Harvest Coming
After your first harvest, you can often get a second, and sometimes even a third, flush of mushrooms.
1. Soak the Substrate: After harvesting, soak the substrate in water for 24 hours. This rehydrates the straw and encourages another flush of mushrooms.
2. Repeat the Process: Drain the water and repeat the fruiting process.
3. Monitor and Adjust: Keep an eye on the substrate and adjust the humidity and ventilation as needed.
Troubleshooting: Common Issues and Solutions
Even with the best preparation, you might encounter some challenges. Here are a few common issues and how to address them:
* Contamination: If you see green, black, or other colored mold growing on the straw, it’s likely contaminated. Unfortunately, you’ll need to discard the contaminated substrate. To prevent contamination, make sure to pasteurize the straw properly and maintain a clean work environment.
* Slow Colonization: If the mycelium is growing slowly, it could be due to low temperature or low humidity. Make sure the temperature is within the ideal range and increase the humidity.
* No Pinning: If you’re not seeing any pins forming, it could be due to lack of light, low humidity, or poor ventilation. Introduce light, increase humidity, and ensure good ventilation.
* Dry Mushrooms: If the mushrooms are drying out, increase the humidity. Mist them frequently and consider using a humidity tent.
Choosing the Right Spawn: A Quick Guide
There are many different types of oyster mushroom spawn available, each with its own unique characteristics. Here’s a quick overview of some popular varieties:
* Pearl Oyster: This is the most common type of oyster mushroom. It’s easy to grow and has a mild, delicate flavor.
* Blue Oyster: This variety has a beautiful blue-gray color and a slightly stronger flavor than the pearl oyster.
* Pink Oyster: This eye-catching mushroom has a vibrant pink color and a slightly sweet flavor.
* Golden Oyster: This variety has a golden-yellow color and a nutty flavor.
When choosing spawn, consider your personal preferences and the growing conditions in your home. Some varieties are more tolerant of temperature fluctuations than others.
Substrate Alternatives: Exploring Other Options
While straw is a great substrate for oyster mushrooms, there are other options you can explore:
* Coffee Grounds: Used coffee grounds are a readily available and nutrient-rich substrate. Make sure to use fresh coffee grounds and mix them with a small amount of straw or other bulking agent.
* Hardwood Sawdust: Hardwood sawdust is another good option, but it needs to be supplemented with nutrients like wheat bran
Conclusion
So, there you have it! Cultivating your own mushrooms at home isn’t just a quirky hobby; it’s a rewarding experience that connects you to the natural world and provides a delicious, sustainable food source. We’ve walked you through the process, demystifying what might seem like a complex undertaking. From selecting the right mushroom species to creating the ideal growing environment, you now have the knowledge to embark on your own mushroom farming at home adventure.
Why is this a must-try? Because it’s empowering! Imagine the satisfaction of harvesting fresh, flavorful mushrooms that you nurtured from start to finish. Think about the cost savings compared to buying them at the grocery store, especially if you’re a frequent mushroom consumer. And consider the environmental benefits of reducing your carbon footprint by growing your own food locally.
But the benefits extend beyond the practical. Mushroom farming is a fascinating learning experience. You’ll gain a deeper understanding of fungal biology, ecological processes, and the interconnectedness of life. It’s a hands-on way to engage with science and nature, right in your own home.
Don’t be afraid to experiment! Once you’ve mastered the basics, explore different mushroom varieties. Oyster mushrooms are a great starting point, but you could also try shiitake, lion’s mane, or even wine cap mushrooms. Each species has its own unique flavor profile and growing requirements, offering endless opportunities for exploration.
Consider variations in your growing setup as well. While we’ve focused on indoor cultivation, you could also explore outdoor mushroom beds or logs, depending on your climate and space. You can also experiment with different substrates, such as straw, wood chips, or coffee grounds, to see what works best for your chosen mushroom species.
Perhaps you want to create a dedicated mushroom fruiting chamber in a spare closet, or maybe you’ll start small with a simple container on your kitchen counter. The beauty of mushroom farming at home is its adaptability. You can tailor the process to fit your lifestyle, resources, and preferences.
We encourage you to take the plunge and give it a try. Don’t be discouraged if your first attempt isn’t perfect. Mushroom farming is a learning process, and every mistake is an opportunity to improve. The most important thing is to start, experiment, and have fun!
And once you’ve harvested your first crop of homegrown mushrooms, we want to hear about it! Share your experiences, tips, and photos with us in the comments below. Let’s build a community of home mushroom farmers and learn from each other’s successes and challenges. Together, we can unlock the potential of this fascinating and rewarding hobby. So, grab your supplies, get your hands dirty, and start growing your own delicious mushrooms today! You’ll be amazed at what you can achieve.
Frequently Asked Questions (FAQ)
What are the easiest mushrooms to grow at home for beginners?
Oyster mushrooms are generally considered the easiest mushrooms to grow for beginners. They are fast-growing, relatively forgiving of environmental fluctuations, and can thrive on a variety of substrates, including straw, coffee grounds, and even cardboard. They also have a delicious, mild flavor that makes them versatile in cooking. Shiitake mushrooms are another popular choice, but they require a bit more patience as they take longer to fruit.
What kind of space do I need for mushroom farming at home?
The amount of space you need depends on the scale of your operation. For a small-scale hobby farm, a spare closet, basement corner, or even a shelf in your kitchen can suffice. The key is to provide a dark, humid environment with good ventilation. If you’re planning a larger-scale operation, you’ll need a dedicated room or greenhouse with climate control capabilities. Remember to consider the vertical space as well, as you can stack mushroom growing containers to maximize your yield.
What is the best substrate for growing mushrooms at home?
The best substrate depends on the type of mushroom you’re growing. Oyster mushrooms thrive on straw, coffee grounds, and cardboard. Shiitake mushrooms prefer hardwood logs or sawdust. Wine cap mushrooms do well in wood chips and compost. It’s important to research the specific substrate requirements of your chosen mushroom species and ensure that the substrate is properly sterilized or pasteurized to prevent contamination.
How do I maintain the right humidity for my mushroom growing environment?
Maintaining the right humidity is crucial for successful mushroom cultivation. You can use a humidifier, misting bottle, or humidity tent to increase the humidity in your growing environment. Regularly monitor the humidity levels with a hygrometer and adjust accordingly. Aim for a humidity level of 80-90% for most mushroom species. You can also create a humidity chamber by placing your mushroom growing containers inside a larger container with a layer of wet perlite or vermiculite at the bottom.
How long does it take to grow mushrooms at home?
The time it takes to grow mushrooms at home varies depending on the species and growing conditions. Oyster mushrooms can fruit in as little as 2-3 weeks, while shiitake mushrooms may take several months to fruit on logs. The incubation period, which is the time it takes for the mycelium to colonize the substrate, also varies depending on the species and temperature. Be patient and monitor your mushrooms regularly for signs of growth and fruiting.
How do I prevent contamination in my mushroom growing environment?
Contamination is a common challenge in mushroom farming, but it can be prevented with proper hygiene and sterilization techniques. Sterilize your substrate by pressure cooking or pasteurizing it in hot water. Clean your growing containers and tools with a disinfectant solution. Wear gloves and a mask when handling your mushrooms and substrate. Maintain good ventilation in your growing environment to prevent the buildup of mold and bacteria. Regularly inspect your mushrooms for signs of contamination, such as mold or discoloration, and remove any contaminated materials immediately.
What are some common problems I might encounter when growing mushrooms at home?
Some common problems include contamination, insufficient humidity, inadequate ventilation, and pests. Contamination can be prevented with proper sterilization and hygiene. Insufficient humidity can be addressed with a humidifier or misting bottle. Inadequate ventilation can be improved by opening windows or using a fan. Pests, such as fungus gnats, can be controlled with sticky traps or biological control agents. Research common mushroom pests and diseases and learn how to identify and treat them.
Can I use coffee grounds for mushroom farming at home?
Yes, coffee grounds are an excellent substrate for growing oyster mushrooms. They are rich in nutrients and readily available. However, it’s important to use fresh coffee grounds and sterilize them before use to prevent contamination. You can sterilize coffee grounds by microwaving them for a few minutes or pressure cooking them. Mix the sterilized coffee grounds with mushroom spawn and place them in a growing container. Keep the container in a dark, humid environment and monitor it regularly for signs of growth.
Are there any health benefits to growing and eating my own mushrooms?
Yes, mushrooms are a nutritious food source that offers a variety of health benefits. They are low in calories and fat and high in protein, fiber, and vitamins. Mushrooms also contain antioxidants and other compounds that may boost the immune system and protect against chronic diseases. Growing your own mushrooms ensures that you’re consuming fresh, high-quality produce that is free from pesticides and other harmful chemicals. Plus, the act of growing your own food can be therapeutic and stress-relieving.
Where can I find mushroom spawn for mushroom farming at home?
Mushroom spawn can be purchased from a variety of online retailers and local nurseries. Look for reputable suppliers that offer high-quality spawn of your chosen mushroom species. You can also find mushroom spawn at farmers’ markets and gardening supply stores. When purchasing spawn, make sure it is fresh and free from contamination. Store the spawn in the refrigerator until you’re ready to use it.
Leave a Comment