

Garbage Disposal Cleaning DIY: Your Sink’s Best Friend!
Let’s face it, we’ve all been there. That lingering, unpleasant odor wafting from your kitchen sink, hinting at the mysteries lurking within your garbage disposal. It’s not exactly the most glamorous part of homeownership, but keeping your disposal clean is crucial for a fresh-smelling kitchen and a smoothly functioning plumbing system. For centuries, people have sought ways to manage food waste, and while the modern garbage disposal is a relatively recent invention, the need to keep our drains clear and odor-free is timeless.
I know, I know, the thought of tackling that grime might not be your idea of a fun afternoon. But trust me, with these simple garbage disposal cleaning DIY tricks, you can banish those funky smells and prevent costly plumbing issues down the road. Think of it as a little spa day for your sink! This isn’t just about masking odors; it’s about preventing the buildup of bacteria and food particles that can clog your drain and even attract unwanted pests.
This article is your ultimate guide to easy and effective garbage disposal cleaning DIY methods. I’ll share my favorite hacks, using common household items, to keep your disposal sparkling and smelling fresh. So, ditch the expensive cleaners and get ready to give your garbage disposal the TLC it deserves!
DIY Deep Clean: Revive Your Smelly Garbage Disposal!
Okay, let’s face it. Our garbage disposals are workhorses, grinding away food scraps day in and day out. But all that hard work can lead to some seriously funky smells and a buildup of gunk. Don’t worry, though! You don’t need to call a plumber (yet!). I’m going to walk you through a simple, effective DIY cleaning process that will have your disposal smelling fresh and working like new.
What You’ll Need:
Before we dive in, gather your supplies. This is a pretty low-cost project, and you probably have most of these items already:
* Ice cubes (a tray or two)
* Coarse salt (rock salt works best, but table salt will do in a pinch)
* Lemon or lime wedges (about half a lemon or lime)
* Baking soda
* White vinegar
* Dish soap
* A pot of boiling water
* Tongs (optional, for grabbing lemon/lime pieces)
* Rubber gloves (optional, but recommended)
* A toothbrush or small scrub brush
Safety First!
Important: Before you do anything, make sure the garbage disposal switch is turned OFF. Seriously, double-check! You don’t want any accidental activations while you’re working inside. I also recommend wearing rubber gloves to protect your hands from bacteria and sharp bits.
Step-by-Step Cleaning Guide
Here’s the breakdown of how we’re going to tackle this cleaning mission:
* **Phase 1: The Ice and Salt Scrub:** This is our initial attack on the built-up grime.
* **Phase 2: Citrus Power:** We’ll use lemon or lime to freshen and further break down residue.
* **Phase 3: Baking Soda and Vinegar Fizz:** This dynamic duo will neutralize odors and loosen stubborn debris.
* **Phase 4: Boiling Water Flush:** A final rinse to clear everything out.
* **Phase 5: Dish Soap Sanitize:** A final touch to kill bacteria and leave a fresh scent.
Phase 1: The Ice and Salt Scrub
This step is all about using the abrasive power of ice and salt to dislodge food particles clinging to the disposal blades and walls.
1. **Fill the disposal with ice cubes:** Pack it pretty full, about halfway or even three-quarters of the way up.
2. **Add the salt:** Pour in a generous amount of coarse salt. I usually use about a cup, but you can eyeball it. The salt acts as an abrasive, helping the ice scrub away the gunk.
3. **Turn on the cold water:** Run a steady stream of cold water into the disposal. This helps the ice grind properly.
4. **Turn on the disposal:** With the cold water running, turn on the garbage disposal. Let it run until all the ice is completely crushed and flushed away. You’ll probably hear some satisfying grinding noises!
5. **Listen for any unusual sounds:** Pay attention to the sounds the disposal is making. If you hear any loud clanking or grinding that doesn’t sound normal, turn it off immediately and investigate. There might be a larger object stuck inside.
Phase 2: Citrus Power
Now, let’s bring in the fresh scent and cleaning power of citrus!
1. **Cut your lemon or lime into wedges:** You’ll want several wedges, about half a lemon or lime’s worth.
2. **Turn on the cold water:** Again, keep a steady stream of cold water running.
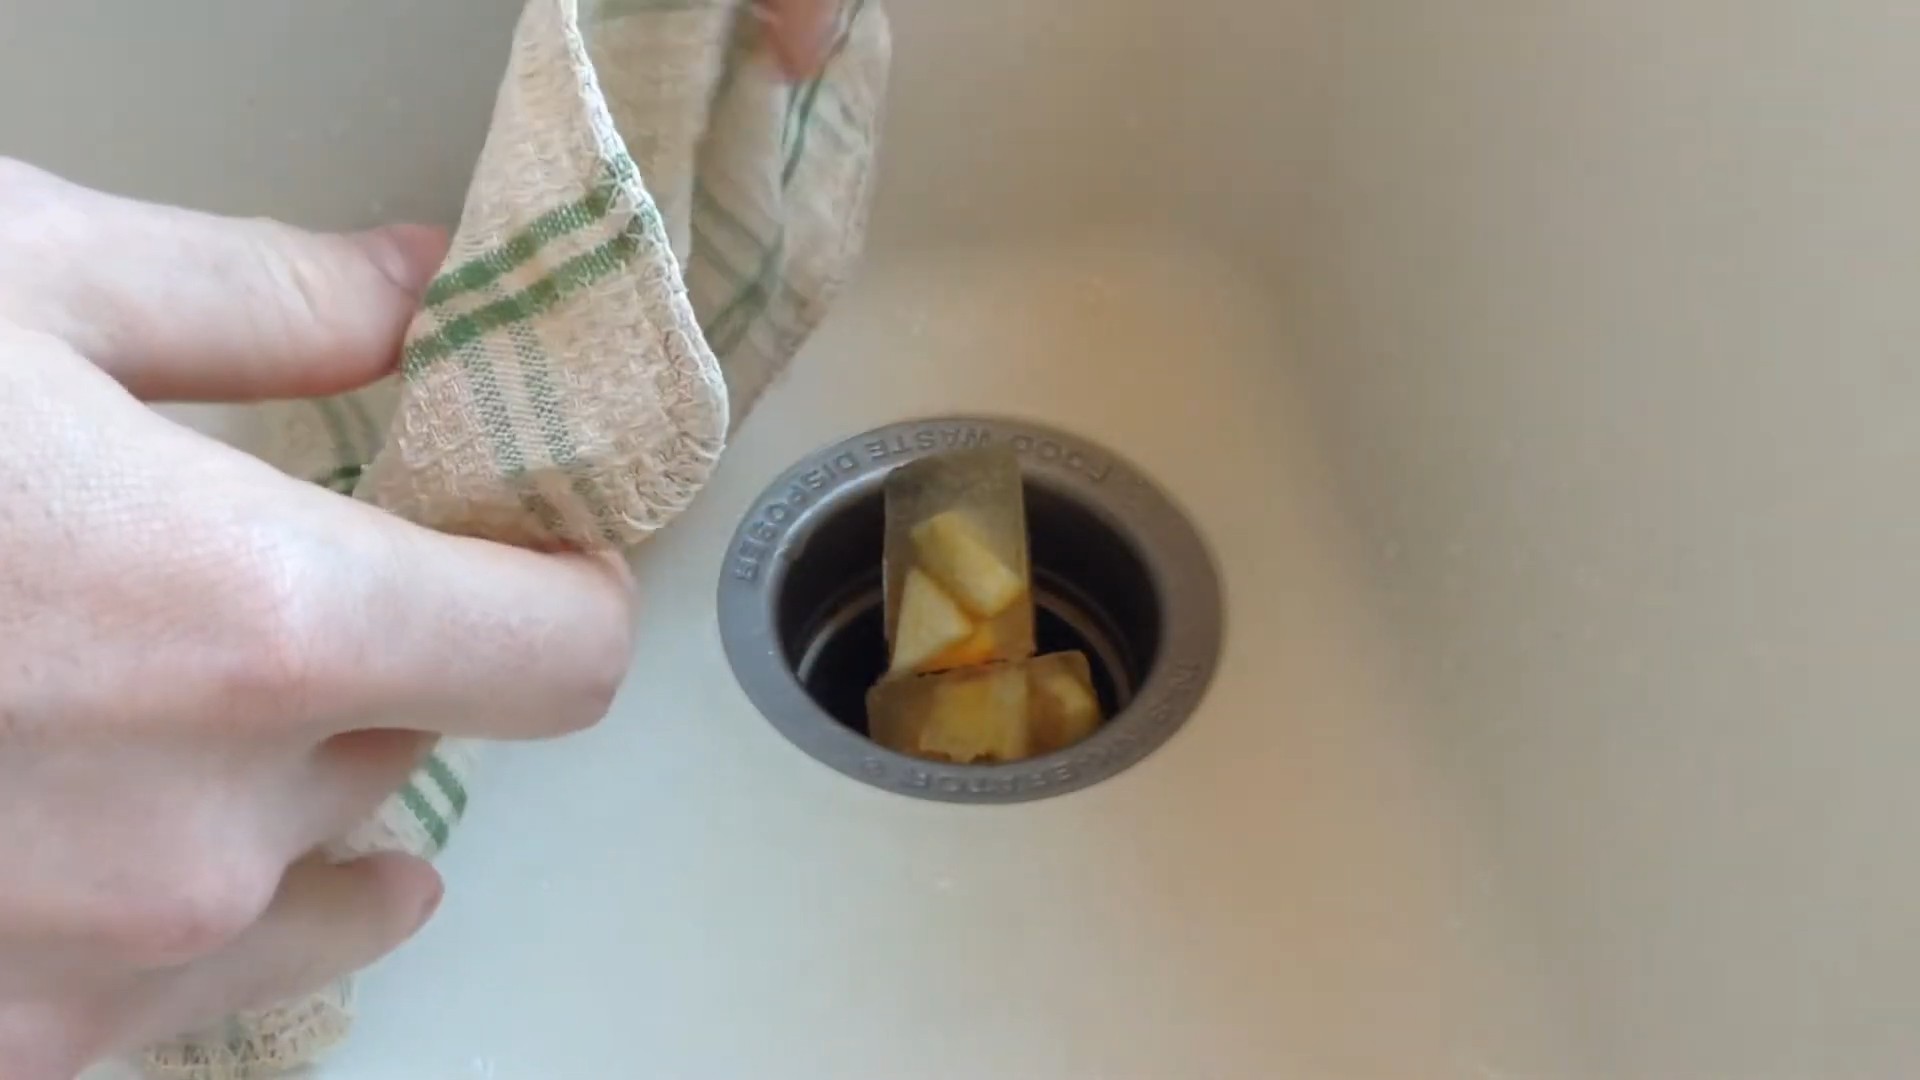
3. **Drop the citrus wedges into the disposal:** One at a time, drop the lemon or lime wedges into the running disposal.
4. **Let it grind:** Let the disposal grind up the citrus wedges completely. The natural oils in the citrus will help to break down grease and leave a fresh, clean scent.
5. **Check for any remaining pieces:** After the grinding is complete, check to make sure all the citrus pieces have been processed. If you see any larger chunks, use tongs to remove them (remember, disposal is OFF!).
Phase 3: Baking Soda and Vinegar Fizz
This is where the magic happens! The baking soda and vinegar reaction creates a fizzing action that helps to loosen stubborn debris and neutralize odors.
1. **Pour baking soda into the disposal:** Pour about one cup of baking soda down the drain and into the disposal.
2. **Pour vinegar into the disposal:** Immediately after the baking soda, pour in one cup of white vinegar.
3. **Stand back and listen:** You’ll hear a fizzing sound as the baking soda and vinegar react. Let this mixture sit for about 15-20 minutes. This allows the fizzing action to work its magic, breaking down grease and grime.
4. Don’t run the water yet! It’s important to let the mixture sit and do its job. Resist the urge to flush it away too soon.
Phase 4: Boiling Water Flush
Time to flush away all the loosened gunk!
1. **Boil a pot of water:** Bring a large pot of water to a rolling boil.
2. **Carefully pour the boiling water down the disposal:** Slowly and carefully pour the entire pot of boiling water down the drain and into the disposal. The hot water will help to flush away any remaining debris and grease.
3. Be careful of steam! Boiling water can create a lot of steam, so be cautious and avoid getting burned.
4. **Check for any lingering odors:** After the boiling water flush, take a sniff. If you still detect any unpleasant odors, you may need to repeat the baking soda and vinegar step.
Phase 5: Dish Soap Sanitize
For the final touch, we’ll use dish soap to sanitize the disposal and leave it smelling extra fresh.
1. **Squirt dish soap into the disposal:** Squirt a generous amount of dish soap (about a tablespoon or two) into the disposal.
2. **Turn on the cold water:** Run a steady stream of cold water into the disposal.
3. **Turn on the disposal:** Turn on the garbage disposal for about 15-20 seconds. This will create a soapy mixture that will clean and sanitize the disposal blades and walls.
4. **Rinse thoroughly:** After 20 seconds, turn off the disposal and continue running the cold water for another minute or so to rinse away all the soap.
5. Enjoy your fresh-smelling disposal! That’s it! Your garbage disposal should now be clean, fresh-smelling, and ready to tackle your next meal’s scraps.
Maintaining Your Clean Disposal
Now that you’ve put in the effort to clean your disposal, here are a few tips to keep it fresh and prevent future buildup:
* **Run cold water:** Always run cold water when using the disposal. Hot water can cause grease to solidify and clog the drain.
* **Grind food scraps in small batches:** Don’t overload the disposal with too much food at once. Grind scraps in small batches to prevent clogs.
* **Avoid grinding certain items:** Some items should never go down the garbage disposal, including:
* Grease and oil
* Coffee grounds (in large quantities)
* Eggshells (the membrane can wrap around the blades)
* Pasta and rice (they can expand and clog the drain)
* Bones
* Fruit pits
* Fibrous vegetables (like celery stalks)
* **Regularly flush with hot water:** Once a week, flush the disposal with hot water to help prevent grease buildup.
* **Repeat the cleaning process:** Depending on how often you use your disposal, you may need to repeat this cleaning process every few weeks or months to keep it fresh and functioning properly.
Troubleshooting
Sometimes, even after cleaning, you might encounter a few issues. Here are some common problems and how to address them:
* **Disposal is still smelly:** If the disposal still smells after cleaning, repeat the baking soda and vinegar step. You can also try using a stronger citrus scent, like grapefruit.
* **Disposal is clogged:** If the disposal is clogged, try using a plunger to dislodge the blockage. You can also try using a drain snake to remove any debris. If you’re still unable to clear the clog, you may need to call a plumber.
* **Disposal is making strange noises:** If the disposal is making strange noises, turn it off immediately and inspect it for any foreign objects. If you can’t find anything, you may need to call a plumber to have it inspected.
* Disposal won’t turn on:** Check the reset button on the bottom of the disposal. It’s usually a small red button. Press it to reset the motor. If that doesn’t work, check the circuit breaker to make sure it hasn’t tripped. If neither of those solutions works, you may need to call an electrician.
I hope this guide helps you keep your garbage disposal clean and fresh! It’s a simple task that can make a big difference in the overall
Conclusion
So, there you have it! A simple, effective, and budget-friendly way to tackle that smelly, sputtering garbage disposal. Forget expensive cleaners filled with harsh chemicals; this DIY garbage disposal cleaning method is not only better for your wallet but also kinder to the environment. We’ve walked you through the steps, highlighting the ease and accessibility of using ingredients you likely already have in your kitchen.
But why is this DIY trick a must-try? Beyond the obvious benefit of eliminating unpleasant odors, regular cleaning with this method can significantly extend the lifespan of your garbage disposal. Food particles and grease buildup can lead to clogs, corrosion, and ultimately, a costly repair or replacement. By incorporating this simple cleaning routine into your monthly (or even bi-weekly) schedule, you’re proactively preventing these issues and ensuring your disposal runs smoothly for years to come.
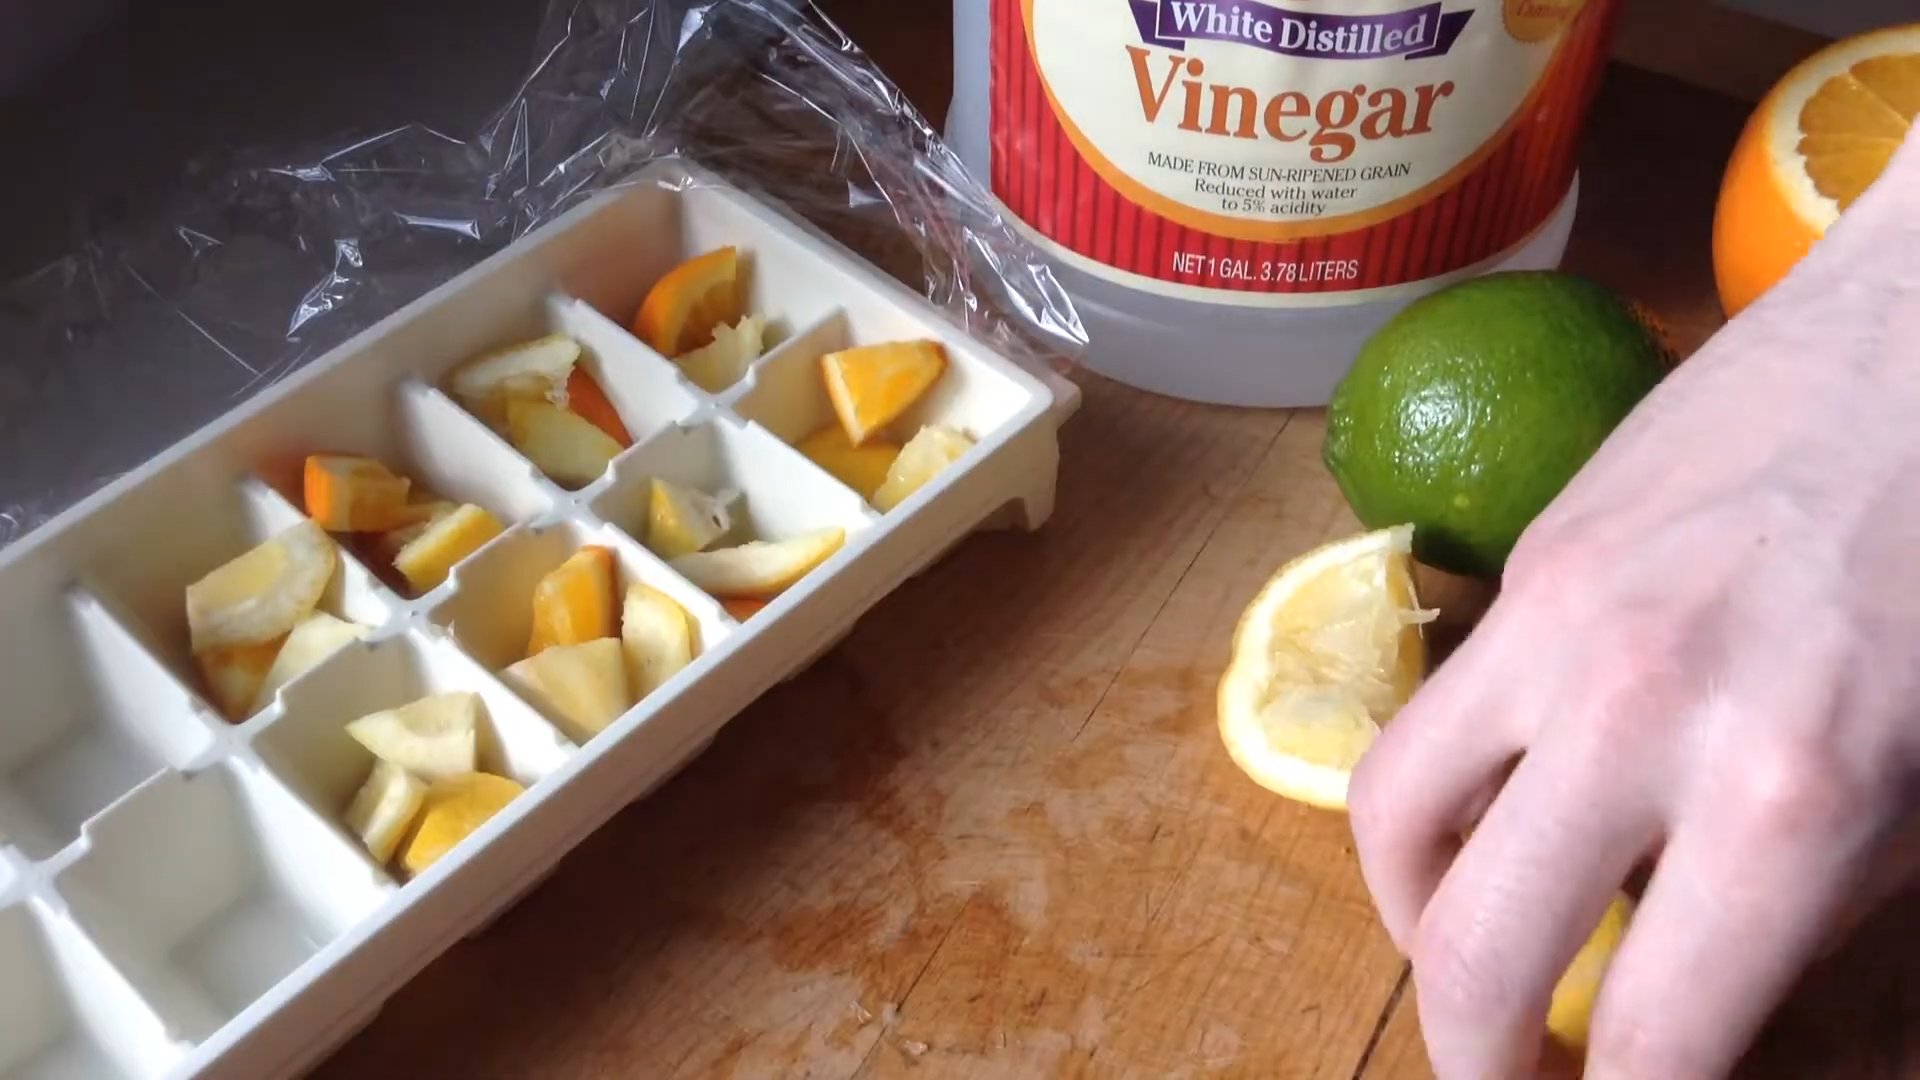
Furthermore, this method is incredibly versatile. Feel free to experiment with variations to suit your preferences and needs. For a more intense cleaning, consider adding a half cup of baking soda to the ice cubes before freezing. The baking soda will act as a gentle abrasive, scrubbing away stubborn grime. You can also infuse your ice cubes with citrus peels (lemon, lime, or orange) for an extra burst of freshness. Simply add the peels to the water before freezing. Another variation is to use vinegar ice cubes instead of plain water ice cubes. Vinegar is a natural disinfectant and deodorizer, making it an excellent addition to your cleaning routine. For a spicy twist, add a few slices of ginger to the ice cubes. Ginger has natural antibacterial properties and can help to freshen the disposal.
Don’t underestimate the power of preventative maintenance! A clean garbage disposal is a happy garbage disposal, and a happy garbage disposal means a happier, healthier kitchen.
We are confident that you’ll be amazed by the results of this simple DIY garbage disposal cleaning technique. It’s a game-changer for maintaining a fresh and functional kitchen. So, ditch the store-bought cleaners and give this method a try. You won’t regret it!
Now, we want to hear from you! Have you tried this DIY garbage disposal cleaning method? What variations did you use? Share your experiences, tips, and tricks in the comments below. Let’s build a community of clean and happy kitchens together! Your feedback is invaluable and helps others discover the benefits of this easy and effective cleaning solution. Let us know if you have any questions or suggestions. We are always looking for ways to improve and provide the best possible information.
Frequently Asked Questions (FAQ)
What exactly makes this DIY garbage disposal cleaning method so effective?
This method combines the power of several natural cleaning agents. The ice helps to dislodge food particles and debris that are stuck to the grinding chamber. The salt acts as a mild abrasive, scrubbing away grime and buildup. The lemon (or other citrus) provides a natural deodorizer and disinfectant, leaving your disposal smelling fresh and clean. The combination of these elements creates a powerful cleaning action that is both effective and safe for your disposal.
How often should I clean my garbage disposal using this DIY method?
We recommend cleaning your garbage disposal at least once a month. However, if you use your disposal frequently or notice unpleasant odors, you may want to clean it more often, perhaps every two weeks. Regular cleaning will help prevent clogs, eliminate odors, and extend the lifespan of your disposal.
Can I use any type of salt for this DIY cleaning method?
While any type of salt will work, coarse salt, such as rock salt or sea salt, is generally preferred. The larger granules provide a more abrasive scrubbing action, which helps to dislodge stubborn debris. However, if you only have table salt on hand, that will work as well. Just be sure to use the recommended amount.
Is it safe to use ice in my garbage disposal? I’ve heard conflicting information.
Yes, it is generally safe to use ice in your garbage disposal. The ice helps to harden any grease or food particles that are stuck to the grinding chamber, making them easier to grind up and flush away. However, it’s important to use ice cubes and not large blocks of ice, as these could potentially damage the blades.
What if I don’t have lemons? Can I use other citrus fruits?
Absolutely! You can use any type of citrus fruit, such as limes, oranges, or grapefruits. They all contain citric acid, which is a natural deodorizer and disinfectant. Simply cut the citrus fruit into wedges or peels and add them to the ice cubes or directly into the disposal.
My garbage disposal is really smelly. Will this DIY method be strong enough to eliminate the odor?
In most cases, yes, this DIY method will be effective in eliminating unpleasant odors. However, if your disposal is extremely smelly, you may need to repeat the process a few times. You can also try adding a half cup of baking soda to the disposal before adding the ice and salt. Let it sit for 30 minutes, then flush with cold water.
What if I don’t have ice cube trays? Can I still use this method?
Yes, you can still use this method even if you don’t have ice cube trays. Simply combine the salt and citrus wedges (or peels) directly into the garbage disposal. Then, run cold water while turning on the disposal for about a minute. The cold water will help to flush away any debris.
Can I use hot water instead of cold water?
No, it is important to use cold water when cleaning your garbage disposal. Hot water can melt grease and cause it to solidify further down the drain, leading to clogs. Cold water helps to keep the grease solid so that it can be ground up and flushed away.
My garbage disposal is making a strange noise. Will this DIY cleaning method help?
This DIY cleaning method may help to eliminate strange noises if they are caused by food particles or debris stuck in the grinding chamber. However, if the noise persists after cleaning, it could be a sign of a more serious problem, such as a damaged blade or motor. In this case, it is best to consult a qualified appliance repair technician.
Is there anything I should avoid putting down my garbage disposal?
Yes, there are several things you should avoid putting down your garbage disposal, including:
* Grease and oil
* Bones
* Coffee grounds
* Eggshells
* Pasta and rice
* Fibrous vegetables (such as celery and asparagus)
* Fruit pits
* Non-food items
These items can clog your disposal and damage the motor.
How do I prevent future garbage disposal problems?
To prevent future garbage disposal problems, follow these tips:
* Run cold water while operating the disposal.
* Cut food scraps into small pieces before putting them down the disposal.
* Avoid putting grease, bones, and other problematic items down the disposal.
* Clean your disposal regularly using this DIY method.
* Flush the disposal with plenty of cold water after each use.
By following these simple tips, you can keep your garbage disposal running smoothly for years to come.

Leave a Comment