

Clean Silver Baking Soda Foil: Sounds like a science experiment, right? Well, it kind of is, but it’s also your secret weapon to banishing tarnish and restoring the sparkle to your beloved silverware! Are you tired of looking at your once-gleaming silver heirlooms now dulled and darkened by time? I know I was! I used to dread the thought of polishing my grandmother’s silver tea set, envisioning hours of tedious rubbing and harsh chemicals.
Silver has held a place of honor in homes and cultures for centuries, representing elegance and prosperity. From ancient Roman coins to Victorian-era tea services, silver objects have been cherished and passed down through generations. But with time, silver tarnishes, a natural process that can make it look old and neglected.
That’s where this simple, yet incredibly effective, DIY trick comes in. You don’t need expensive silver polishes or professional cleaning services. All you need is baking soda, aluminum foil, and a little hot water to clean silver and bring back its original luster. This method is not only cost-effective but also gentle on your precious silver items, avoiding the harsh abrasives found in many commercial cleaners. So, ditch the elbow grease and get ready to witness the magic of chemistry as we transform your tarnished silver into sparkling treasures!
DIY Silver Cleaning Hack: Baking Soda, Foil, and Sparkling Silver!
Hey everyone! Are you tired of looking at your tarnished silver jewelry, silverware, or decorative pieces? I know I was! Polishing silver the traditional way can be a real pain – all that rubbing and special cleaner… ugh! But guess what? I’ve got a super easy and effective DIY hack that uses just baking soda, aluminum foil, and hot water. Seriously, that’s it! It’s like magic, and I’m so excited to share it with you.
This method works because of a chemical reaction called ion exchange. The tarnish on silver is silver sulfide, and when it comes into contact with aluminum in a baking soda solution, the sulfur atoms transfer from the silver to the aluminum. Pretty cool, right?
What You’ll Need
Before we get started, let’s gather our supplies. This is a pretty low-key project, so you probably already have everything you need!
* Baking Soda: The star of the show! You’ll need enough to create a good concentration in the water.
* Aluminum Foil: This acts as the sacrificial metal, attracting the tarnish. Make sure it’s clean!
* Hot Water: The hotter, the better! It helps speed up the chemical reaction.
* A Glass or Plastic Container: Avoid using metal containers, as they can interfere with the process. A baking dish, bowl, or even a plastic tub will work.
* Tongs or a Fork: To safely remove the silver from the hot water.
* Soft Cloth: For drying and buffing your newly cleaned silver.
* Optional: Dish soap for pre-cleaning heavily soiled items.
Step-by-Step Instructions: The Magic Begins!
Okay, let’s get down to business! Follow these steps carefully, and you’ll be amazed at the results.
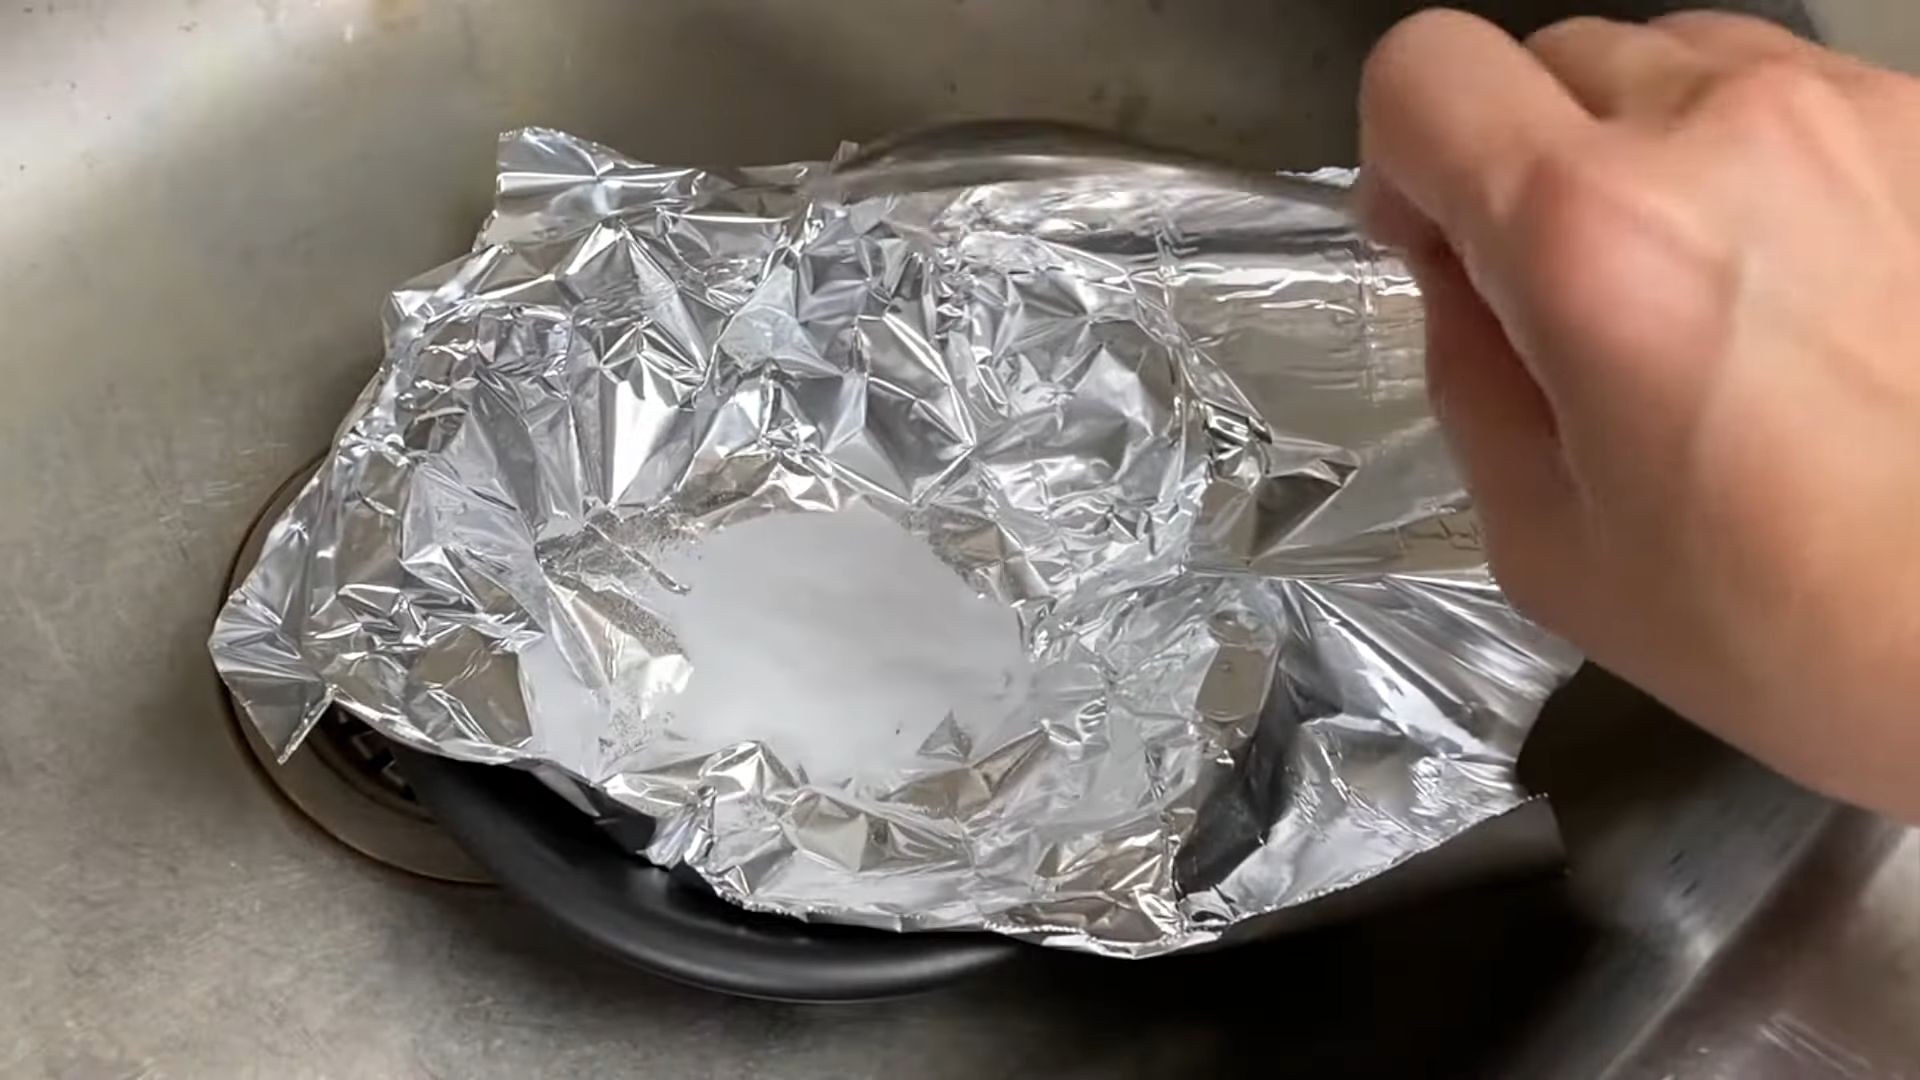
1. Prepare Your Container: Line your glass or plastic container with aluminum foil. Make sure the shiny side of the foil is facing up, as this is the side that will be in contact with the silver and the baking soda solution. Try to minimize wrinkles and tears in the foil for better contact.
2. Add Baking Soda: Pour about 1-2 tablespoons of baking soda per cup of hot water into the container. The amount of baking soda you need will depend on the size of your container and the amount of silver you’re cleaning. I usually err on the side of more baking soda, just to be safe.
3. Pour in the Hot Water: Carefully pour the hot water into the container. Be careful not to splash yourself! The water should be hot, but not boiling. Tap water heated in a kettle or microwave works perfectly.
4. Stir the Solution: Stir the baking soda and hot water until the baking soda is completely dissolved. You want a clear solution, not a cloudy one.
5. Submerge the Silver: Now, gently place your tarnished silver items into the solution. Make sure each piece is touching the aluminum foil. This is crucial for the ion exchange to occur. If you have a lot of items, you might need to do this in batches to ensure good contact.
6. Wait and Watch: This is where the magic happens! Let the silver sit in the solution for 5-10 minutes, or even longer for heavily tarnished items. You should start to see the tarnish disappearing and transferring to the aluminum foil. The solution might turn a yellowish or brownish color – that’s the tarnish coming off!
7. Check the Progress: After a few minutes, use tongs or a fork to carefully lift a piece of silver out of the solution and check its progress. If it’s still tarnished, put it back in for a few more minutes.
8. Remove and Rinse: Once the silver is clean to your liking, carefully remove it from the solution using tongs or a fork. Rinse it thoroughly with clean, warm water to remove any remaining baking soda residue.
9. Dry and Buff: Use a soft cloth to dry the silver completely. As you dry it, you can also buff it to bring out its shine. You’ll be amazed at how much brighter and cleaner it looks!
10. Admire Your Sparkling Silver: That’s it! You’ve successfully cleaned your silver using baking soda and aluminum foil. Now, stand back and admire your sparkling silver!
Troubleshooting and Tips
Sometimes, things don’t go exactly as planned. Here are a few troubleshooting tips to help you get the best results:
* Heavily Tarnished Items: If your silver is heavily tarnished, you might need to repeat the process or let it soak for a longer period of time. You can also try using a stronger baking soda solution.
* Stubborn Tarnish: For stubborn tarnish, you can try gently rubbing the silver with a soft cloth dipped in baking soda paste before submerging it in the solution.
* Uneven Cleaning: If some areas of the silver are cleaning better than others, make sure those areas are in direct contact with the aluminum foil. You might need to rearrange the items in the container.
* Black Residue: Sometimes, a black residue can form on the silver. This is just silver sulfide that has been loosened but not completely removed. You can easily wipe it off with a soft cloth.
* Not Working?: If you’re not seeing any results, make sure your water is hot enough, your baking soda concentration is high enough, and your silver is in direct contact with the aluminum foil. Also, ensure the foil is clean and shiny-side up.
* Pre-Cleaning: For items that are heavily soiled with grease or food residue, it’s a good idea to pre-clean them with dish soap and water before using the baking soda and foil method. This will help the baking soda solution work more effectively on the tarnish.
Important Considerations
While this method is generally safe for most silver items, there are a few things to keep in mind:
* Not for All Silver: This method is best suited for sterling silver and silver-plated items. It’s not recommended for antique silver pieces or items with delicate embellishments, as it could potentially damage them. Always test a small, inconspicuous area first before cleaning the entire piece.
* Gemstones and Pearls: Avoid using this method on silver items that contain gemstones or pearls, as the hot water and baking soda could damage them.
* Oxidized Silver: If you have silver pieces that are intentionally oxidized (darkened) to create a specific design or effect, this method will remove the oxidation.
* Safety First: Always be careful when working with hot water. Use tongs or a fork to handle the silver and avoid splashing yourself.
Why I Love This Hack
I absolutely love this DIY silver cleaning hack because it’s:
* Easy: It requires minimal effort and no special skills.
* Affordable: You probably already have the necessary ingredients in your pantry.
* Effective: It removes tarnish quickly and efficiently.
* Environmentally Friendly: It uses natural ingredients and avoids harsh chemicals.
Maintaining Your Sparkling Silver
Now that you’ve cleaned your silver, you’ll want to keep it looking its best. Here are a few tips for preventing tarnish:
* Store Silver Properly: Store your silver in airtight containers or bags to prevent it from being exposed to air and moisture, which can cause tarnish. You can also add anti-tarnish strips to the containers.
* Avoid Contact with Certain Substances: Avoid exposing your silver to substances that can accelerate tarnish, such as sulfur, chlorine, and certain foods.
* Regular Cleaning: Clean your silver regularly to prevent tarnish from building up. A quick wipe with a soft cloth after each use can help keep it looking shiny.
* Wear Silver Often: Believe it or not, wearing your silver jewelry can actually help prevent tarnish! The friction from your skin can help keep the surface clean.
Conclusion
So there you have it! My super simple and effective DIY silver cleaning hack using baking soda, aluminum foil, and hot water. I hope you found this tutorial helpful and that you’re now enjoying your sparkling silver. Give it a try, and let me know how it works for you! Happy cleaning!

Conclusion
So, there you have it! This simple, yet incredibly effective, DIY trick for cleaning silver using baking soda and foil is a game-changer. Forget expensive silver polishes filled with harsh chemicals and endless scrubbing. This method is not only cost-effective and environmentally friendly, but it also delivers stunning results with minimal effort. The magic lies in the electrochemical reaction between the baking soda, aluminum foil, and the tarnish on your silver. It’s a fascinating process to witness, and the satisfaction of seeing your dull, tarnished silver transform into gleaming treasures is truly rewarding.
Why is this a must-try? Because it’s easy, safe, and effective. It requires ingredients you likely already have in your pantry, eliminating the need for a special trip to the store. It’s gentle on your silver, avoiding the abrasive scratching that can occur with traditional polishing methods. And most importantly, it works! You’ll be amazed at how quickly and effortlessly your silver regains its luster.
Looking for variations? Absolutely! For heavily tarnished items, you can increase the amount of baking soda or extend the soaking time. You can also add a small amount of salt to the solution to further enhance the cleaning power. For delicate silver pieces with intricate designs, consider using a soft-bristled brush to gently loosen any stubborn tarnish before soaking. Remember to always test a small, inconspicuous area first to ensure compatibility, especially with antique or particularly valuable silver items. Another variation involves using a glass or plastic container instead of a metal one, although the reaction might be slightly less efficient. The key is to ensure the aluminum foil is in direct contact with the silver.
We wholeheartedly encourage you to give this DIY silver cleaning method a try. It’s a simple, rewarding project that will leave your silver sparkling and your wallet happy. Don’t be intimidated by the science behind it; the process is incredibly straightforward. Gather your supplies, follow the steps outlined, and prepare to be amazed.
But the real fun begins when you share your experience! We’d love to hear about your results, any variations you tried, and any tips or tricks you discovered along the way. Share your before-and-after photos on social media using #BakingSodaSilverClean or tag us in your posts. Let’s build a community of silver-cleaning enthusiasts and spread the word about this fantastic DIY solution. Your feedback will not only inspire others to try this method but also help us refine and improve our instructions. So, go ahead, unleash the power of baking soda and foil, and rediscover the beauty of your silver! This is the best way to clean silver at home.
Frequently Asked Questions (FAQ)
Q: What kind of aluminum foil should I use?
A: Regular household aluminum foil works perfectly fine. There’s no need to use heavy-duty foil or any special type. The key is to ensure that the foil is clean and free of any coatings that might interfere with the electrochemical reaction. Shiny side up or down doesn’t matter; the important thing is that the foil is in direct contact with the silver and the baking soda solution.
Q: Can I use this method on all types of silver?
A: This method is generally safe for most sterling silver, silver-plated items, and even some silver alloys. However, it’s always a good idea to test a small, inconspicuous area first, especially if you’re dealing with antique or particularly valuable silver. Avoid using this method on items that contain other metals or gemstones that might be sensitive to the baking soda solution. Also, be cautious with items that have been intentionally oxidized or antiqued, as this method may remove the desired patina.
Q: How long should I soak the silver?
A: The soaking time will depend on the severity of the tarnish. For lightly tarnished items, a few minutes may be sufficient. For heavily tarnished items, you may need to soak them for up to 30 minutes or even longer. Check the progress periodically and remove the silver when the tarnish has disappeared. If the tarnish is particularly stubborn, you can try gently rubbing the silver with a soft cloth while it’s still submerged in the solution.
Q: The water turned yellow/black. Is that normal?
A: Yes, that’s perfectly normal! The yellow or black discoloration of the water is a sign that the tarnish is being removed from the silver and transferred to the aluminum foil. The tarnish is silver sulfide, and the electrochemical reaction converts it back into metallic silver, while the sulfur reacts with the aluminum.
Q: Do I need to polish the silver after soaking?
A: In most cases, no polishing is necessary. The baking soda and foil method should leave your silver clean and shiny. However, if you desire an extra level of shine, you can gently buff the silver with a soft, clean cloth after rinsing and drying it.
Q: Can I reuse the baking soda solution?
A: It’s best to use a fresh batch of baking soda solution for each cleaning session. The solution becomes less effective as it becomes saturated with tarnish. Using a fresh solution ensures optimal cleaning results.
Q: Is this method safe for the environment?
A: Yes, this method is considered environmentally friendly because it uses natural ingredients and avoids the harsh chemicals found in many commercial silver polishes. Baking soda is a non-toxic and biodegradable substance.
Q: What if the tarnish is in hard-to-reach places?
A: For intricate designs or hard-to-reach areas, you can use a soft-bristled brush (like an old toothbrush) to gently scrub the silver while it’s submerged in the baking soda solution. This will help loosen any stubborn tarnish and ensure a thorough cleaning.
Q: How can I prevent my silver from tarnishing in the future?
A: To prevent future tarnishing, store your silver in airtight containers or bags. You can also place anti-tarnish strips or cloths in the storage containers to absorb sulfur compounds in the air. Avoid exposing your silver to humidity, direct sunlight, and harsh chemicals. Regularly wiping your silver with a soft cloth can also help prevent tarnish buildup.
Q: Can I use this method on jewelry with gemstones?
A: Exercise caution when using this method on jewelry with gemstones. Some gemstones may be sensitive to the baking soda solution. It’s best to avoid soaking jewelry with porous gemstones like pearls, opals, or turquoise. If you’re unsure, consult a professional jeweler before attempting to clean your jewelry using this method. You can try to clean only the silver parts with a cotton swab dipped in the baking soda solution, avoiding contact with the gemstones.


Leave a Comment